User Manual (ENGLISH)
Page 3
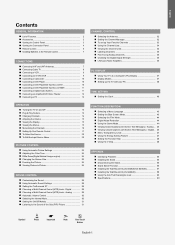
...48 APPENDIX Identifying Problems 55 Installing the Stand 56 Disconnecting the Stand 56 Stand Swivel Function 56 Installing the Wall Mount Kit (LN-S3292D/LN-S4092D 57 Installing the Wall Mount Kit (LN-S4692D 58 Using the Anti-Theft Kensington Lock 60 Specifications 60 Symbol Press Important Note One-...Digital-Signal Strength 36 LNA (Low Noise Amplifier 36 PC DISPLAY Using Your TV as a Computer (PC) Display 37 Display Modes 37 Setting up the TV with your PC 38 TIME SETTING Setting the Clock 40 FUNCTION DESCRIPTION Selecting a Menu Language 43 Setting the Blue Screen Mode 43...
...48 APPENDIX Identifying Problems 55 Installing the Stand 56 Disconnecting the Stand 56 Stand Swivel Function 56 Installing the Wall Mount Kit (LN-S3292D/LN-S4092D 57 Installing the Wall Mount Kit (LN-S4692D 58 Using the Anti-Theft Kensington Lock 60 Specifications 60 Symbol Press Important Note One-...Digital-Signal Strength 36 LNA (Low Noise Amplifier 36 PC DISPLAY Using Your TV as a Computer (PC) Display 37 Display Modes 37 Setting up the TV with your PC 38 TIME SETTING Setting the Clock 40 FUNCTION DESCRIPTION Selecting a Menu Language 43 Setting the Blue Screen Mode 43...
User Manual (ENGLISH)
Page 59
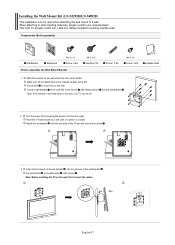
... M4 X L8 Screw: 3 EA 1 Mark the location on the wall where the hole will be used when attaching the wall mount to a wall. Installation Guide 2 Turn the power off . Installing the Wall Mount Kit (LN-S3292D/LN-S4092D) This installation is not firmly fixed to the wall, LCD TV can fall off and unplug the power cord from the...
... M4 X L8 Screw: 3 EA 1 Mark the location on the wall where the hole will be used when attaching the wall mount to a wall. Installation Guide 2 Turn the power off . Installing the Wall Mount Kit (LN-S3292D/LN-S4092D) This installation is not firmly fixed to the wall, LCD TV can fall off and unplug the power cord from the...
User Manual (ENGLISH)
Page 60
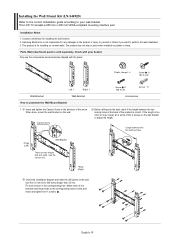
... Left: 1 Right: 1 Wall-Bracket Wall-Bracket How to the corresponding anchor holes and insert and tighten the 11 screws . Installing the Wall Mount Kit (LN-S4692D) Refer to the correct installation guide according to perform the wall installation. 3. This LCD TV accepts a 600 mm x 400 mm VESA-compliant mounting interface pad. Installation Notes 1. When done, mount the wall bracket on...
... Left: 1 Right: 1 Wall-Bracket Wall-Bracket How to the corresponding anchor holes and insert and tighten the 11 screws . Installing the Wall Mount Kit (LN-S4692D) Refer to the correct installation guide according to perform the wall installation. 3. This LCD TV accepts a 600 mm x 400 mm VESA-compliant mounting interface pad. Installation Notes 1. When done, mount the wall bracket on...

User Manual (ENGLISH)
Page 61
LCD TV How to Adjust Mounting Angle Adjust the bracket angle to -2° before installing it is securely fixed to the wall, or the product may vary depending on the model. (The assemblies of the product to adjust the angle. You can be caught in the holes. • Make sure the wall ... right side of the plastic hanger and the screw are the same) 2 Remove the 4 screws on the wall. Installing the Wall Mount Kit (LN-S4692D) Fixing the TV panel to the wall attachment panel bracket The shape of the product may not stay in place after installation. Make sure to reinsert ...
LCD TV How to Adjust Mounting Angle Adjust the bracket angle to -2° before installing it is securely fixed to the wall, or the product may vary depending on the model. (The assemblies of the product to adjust the angle. You can be caught in the holes. • Make sure the wall ... right side of the plastic hanger and the screw are the same) 2 Remove the 4 screws on the wall. Installing the Wall Mount Kit (LN-S4692D) Fixing the TV panel to the wall attachment panel bracket The shape of the product may not stay in place after installation. Make sure to reinsert ...


