

User Manual
Page 2
... to view wide screen format fullmotion video. Displaying stationary graphics and images on screen, such as a full screen picture. Constant displaying of still pictures can cause uneven aging of LCD Displays that offer picture sizing features, use these controls to view different formats as the dark sidebars on -site services, minimum or maximum repair times, exchanges or replacements, accessories, options, upgrades, or consumables. walls) to the Original Purchaser only. Figures and illustrations in this User Manual...
... to view wide screen format fullmotion video. Displaying stationary graphics and images on screen, such as a full screen picture. Constant displaying of still pictures can cause uneven aging of LCD Displays that offer picture sizing features, use these controls to view different formats as the dark sidebars on -site services, minimum or maximum repair times, exchanges or replacements, accessories, options, upgrades, or consumables. walls) to the Original Purchaser only. Figures and illustrations in this User Manual...
User Manual
Page 3
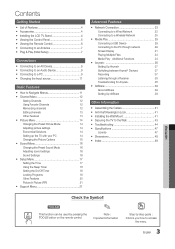
... Changing the Preset Sound Mode 16 Adjusting sound settings 16 Sound Settings 16 yy Setup Menu 17 Setting the Time 17 Using the Sleep Timer 18 Setting the On/Off Timer 18 Locking Programs 18 Other Features 20 Picture In Picture (PIP) 21 yy Support Menu 21 POWER P INFO CHLIST Check the Symbol! Contents Getting Started Advanced Features yy List of Features 4 yy Network Connection 23 yy Accessories 4 Connecting to a Wired Network 23 yy Installing the LCD TV Stand 4 Connecting to a Wireless Network 25 yy Viewing the Control Panel...
... Changing the Preset Sound Mode 16 Adjusting sound settings 16 Sound Settings 16 yy Setup Menu 17 Setting the Time 17 Using the Sleep Timer 18 Setting the On/Off Timer 18 Locking Programs 18 Other Features 20 Picture In Picture (PIP) 21 yy Support Menu 21 POWER P INFO CHLIST Check the Symbol! Contents Getting Started Advanced Features yy List of Features 4 yy Network Connection 23 yy Accessories 4 Connecting to a Wired Network 23 yy Installing the LCD TV Stand 4 Connecting to a Wireless Network 25 yy Viewing the Control Panel...
User Manual
Page 5
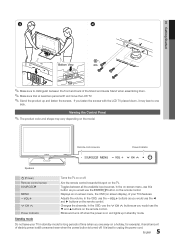
... all the available input sources. Viewing the Control Panel ✎✎The product color and shape may lean to unplug the power cord. 5 English In the on-screen menu, use this spot on and lights up and fasten the screws. Adjusts the volume. Blinks and turns off when the power is on the TV. Aim the remote control towards this button as you would use the ENTERE button on the model. Toggles between the...
... all the available input sources. Viewing the Control Panel ✎✎The product color and shape may lean to unplug the power cord. 5 English In the on-screen menu, use this spot on and lights up and fasten the screws. Adjusts the volume. Blinks and turns off when the power is on the TV. Aim the remote control towards this button as you would use the ENTERE button on the model. Toggles between the...
User Manual
Page 6
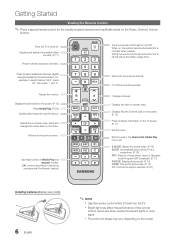
... the TV screen. (P. 17) Exit the menu. Changes channels. Displays the main on the screen. (P. 12) Views Media Play. (P. 29) Quickly select frequently used in Media Play and Anynet+ modes. (�: controls recording on the screen. (P. 12) Press to choose stereo, mono or Separate Audio Program (SAP broadcast). (P. 17) P.MODE: Selects picture mode. (P. 14) P.SIZE: Choose the picture size. (P. 15) CC: Controls the caption decoder. (P. 20) Installing batteries (Battery size: AAA) 6 English ✎✎NOTE xx Use the remote control within...
... the TV screen. (P. 17) Exit the menu. Changes channels. Displays the main on the screen. (P. 12) Views Media Play. (P. 29) Quickly select frequently used in Media Play and Anynet+ modes. (�: controls recording on the screen. (P. 12) Press to choose stereo, mono or Separate Audio Program (SAP broadcast). (P. 17) P.MODE: Selects picture mode. (P. 14) P.SIZE: Choose the picture size. (P. 15) CC: Controls the caption decoder. (P. 20) Installing batteries (Battery size: AAA) 6 English ✎✎NOTE xx Use the remote control within...

User Manual
Page 11
... INFO EXIT 4 ABC D S.MODE SRS MTS 1 MENU button: Displays the main on the selected menu. 02 Connections SLEEP P.MODE P.SIZE Changing the Input source Source List OO MENUm → Input → Source List → ENTERE FAV.CH Use to navigate the menu and select and adjust different functions. Select an icon with the ◄ or ► button. Press ENTERE to the previous menu. 4 EXIT button: Exits the on the screen: Picture, Sound, Channel, Setup, Input, Application, Support. How to DVI...
... INFO EXIT 4 ABC D S.MODE SRS MTS 1 MENU button: Displays the main on the selected menu. 02 Connections SLEEP P.MODE P.SIZE Changing the Input source Source List OO MENUm → Input → Source List → ENTERE FAV.CH Use to navigate the menu and select and adjust different functions. Select an icon with the ◄ or ► button. Press ENTERE to the previous menu. 4 EXIT button: Exits the on the screen: Picture, Sound, Channel, Setup, Input, Application, Support. How to DVI...

User Manual
Page 14
... make changes to turn on the Windows start menu. 2. Auto Adjustment t OO MENUm → Picture → Auto Adjustment → ENTERE Adjust frequency values/positions and fine tune the settings automatically. ✎✎Not available when connecting through HDMI/DVI cable. Click on "Control Panel" on the screen again. Basic FePOaWtEuR res PPicture Menu INFO ¦¦ Changing the Preset Picture Mode OO MENUm → Picture → Mode → ENTERE Mode Select your power savings; P.MODE...
... make changes to turn on the Windows start menu. 2. Auto Adjustment t OO MENUm → Picture → Auto Adjustment → ENTERE Adjust frequency values/positions and fine tune the settings automatically. ✎✎Not available when connecting through HDMI/DVI cable. Click on "Control Panel" on the screen again. Basic FePOaWtEuR res PPicture Menu INFO ¦¦ Changing the Preset Picture Mode OO MENUm → Picture → Mode → ENTERE Mode Select your power savings; P.MODE...
User Manual
Page 15
...; Size: Your cable box/satellite receiver SLEEP may cause image retention (screen ■■ Gamma: Adjust the primary color intensity. Zoom1: Use for a long time. Screen Fit: Displays the full image without any cut-off when HDMI (720p / 1080i / 1080p) or Component (1080i / 1080p) signals are not covered by the warranty. ■■ RGB Only Mode (Off / Red / Green / Blue): Displays the Red, Green and Blue color for each Shadow Detail : 0 external device connected to...
...; Size: Your cable box/satellite receiver SLEEP may cause image retention (screen ■■ Gamma: Adjust the primary color intensity. Zoom1: Use for a long time. Screen Fit: Displays the full image without any cut-off when HDMI (720p / 1080i / 1080p) or Component (1080i / 1080p) signals are not covered by the warranty. ■■ RGB Only Mode (Off / Red / Green / Blue): Displays the Red, Green and Blue color for each Shadow Detail : 0 external device connected to...

User Manual
Page 16
...) PC Picture Size 16:9, Zoom1, Zoom2, 4:3 16:9, 4:3, Wide Fit, Screen Fit 16:9, 4:3 ■■ Digital Noise Filter (Off / Low / Medium / High / Auto / Auto Visualization): If the broadcast signal received by the user, the screen saver is activated to prevent the formation of speakers or headphones using HRTF (Head Related Transfer Function) technology. ✎✎If Speaker Select is set to External Speaker, Virtual Surround is disabled. 16 English SLEEP Picture Reset...
...) PC Picture Size 16:9, Zoom1, Zoom2, 4:3 16:9, 4:3, Wide Fit, Screen Fit 16:9, 4:3 ■■ Digital Noise Filter (Off / Low / Medium / High / Auto / Auto Visualization): If the broadcast signal received by the user, the screen saver is activated to prevent the formation of speakers or headphones using HRTF (Head Related Transfer Function) technology. ✎✎If Speaker Select is set to External Speaker, Virtual Surround is disabled. 16 English SLEEP Picture Reset...
User Manual
Page 17
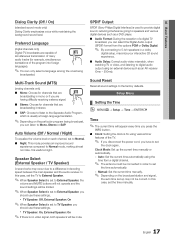
... disconnect the power cord, you should use these settings. SPDIF OCPH.uSLtIISZpTEut SPDIF (Sony Philips Digital Interface) is set to Normal. ■■ Night: This mode provides an improved sound experience compared to Normal mode, making almost no video signal, both speakers will be connected in order to digital audio output using an external device such as a DVD player. ■■ Audio Format: During the reception of many audio tracks (for channels that are...
... disconnect the power cord, you should use these settings. SPDIF OCPH.uSLtIISZpTEut SPDIF (Sony Philips Digital Interface) is set to Normal. ■■ Night: This mode provides an improved sound experience compared to Normal mode, making almost no video signal, both speakers will be connected in order to digital audio output using an external device such as a DVD player. ■■ Audio Format: During the reception of many audio tracks (for channels that are...
User Manual
Page 18
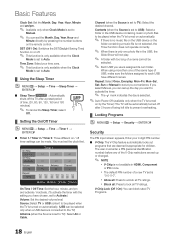
... directly by the Timer): The TV will not play. ✎✎ AsefloelcdteerdIw.NiFthOtoo long of USB, make sure the folders assigned to Auto. When using more than one photo file in HDMI, Component or PC mode. If you select Manual, you want to Activate.) Volume: Set the desired volume level. Source: Select TV or USB content to TV): Select Air or Cable. V-Chip Lock (Off / On...
... directly by the Timer): The TV will not play. ✎✎ AsefloelcdteerdIw.NiFthOtoo long of USB, make sure the folders assigned to Auto. When using more than one photo file in HDMI, Component or PC mode. If you select Manual, you want to Activate.) Volume: Set the desired volume level. Source: Select TV or USB content to TV): Select Air or Cable. V-Chip Lock (Off / On...

User Manual
Page 20
... connecting the game console, set to Movie. -- Equalizer is Style 0. xx You cannot set to TV or PC. button. ✎✎ Choose between English, Español and Français. BackgCrHoLuInSdT Color: Options include Default, White, Black, Red, Green, Blue, Yellow, Magenta and Cyan. Options include Default, Transparent, Translucent, Solid and Flashing. Default / CC1~CC4 / Text1~Text4: (analog channels only) The Analog Caption function operates in either analog TV channel mode...
... connecting the game console, set to Movie. -- Equalizer is Style 0. xx You cannot set to TV or PC. button. ✎✎ Choose between English, Español and Français. BackgCrHoLuInSdT Color: Options include Default, White, Black, Red, Green, Blue, Yellow, Magenta and Cyan. Options include Default, Transparent, Translucent, Solid and Flashing. Default / CC1~CC4 / Text1~Text4: (analog channels only) The Analog Caption function operates in either analog TV channel mode...
User Manual
Page 21
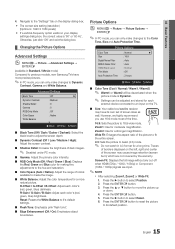
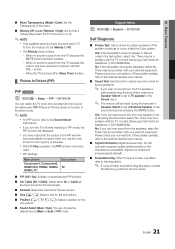
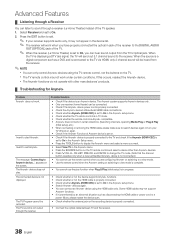
.... 03 Basic Features ■■ Menu Transparency (Bright / Dark): Set the Transparency of these troubleshooting tips apply, contact the Samsung customer service center. 21 English When no sound is muted by Sleep Timer function. ¦¦ Picture In Picture (PIP) PIP t OO MENUm → Setup → PIP → ENTERE You can hear sound from one external video source simultaneously. There may be a problem with the TV. There may be...
.... 03 Basic Features ■■ Menu Transparency (Bright / Dark): Set the Transparency of these troubleshooting tips apply, contact the Samsung customer service center. 21 English When no sound is muted by Sleep Timer function. ¦¦ Picture In Picture (PIP) PIP t OO MENUm → Setup → PIP → ENTERE You can hear sound from one external video source simultaneously. There may be a problem with the TV. There may be...
User Manual
Page 26
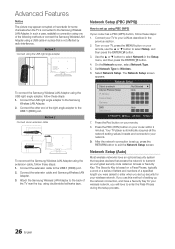
... angle adapter To connect the Samsung Wireless LAN Adapter using the USB right angle adapter, follow these steps: 1. Connect the extension cable to the Samsung Wireless LAN Adapter. 2. Use the ▲ or ▼ button to Wireless. 6. Your TV player automatically acquires all the network setting values it needs and connects to exit the Network Setup screen. Press the PBC (WPS) button on your TV, press the Menu button on a Pass Phrase, typically a word or a series of letters and numbers...
... angle adapter To connect the Samsung Wireless LAN Adapter using the USB right angle adapter, follow these steps: 1. Connect the extension cable to the Samsung Wireless LAN Adapter. 2. Use the ▲ or ▼ button to Wireless. 6. Your TV player automatically acquires all the network setting values it needs and connects to exit the Network Setup screen. Press the PBC (WPS) button on your TV, press the Menu button on a Pass Phrase, typically a word or a series of letters and numbers...

User Manual
Page 37
... when you set to 2 minutes. Anynet+ Menu View TV Device List (device_name) MENU (device_name) INFO Recording: (*recorder) Stop Recording: (*recorder) Receiver Description Changes Anynet+ mode to the recording device's users manual. 37 English E.g. If you want, press the red button to the recording device. Starts recording immediately using a Samsung recorder. 1. 04 Advanced Features Anynet+ Menu The Anynet+ menu changes depending on the device. ¦¦ Switching between Anynet...
... when you set to 2 minutes. Anynet+ Menu View TV Device List (device_name) MENU (device_name) INFO Recording: (*recorder) Stop Recording: (*recorder) Receiver Description Changes Anynet+ mode to the recording device's users manual. 37 English E.g. If you want, press the red button to the recording device. Starts recording immediately using a Samsung recorder. 1. 04 Advanced Features Anynet+ Menu The Anynet+ menu changes depending on the device. ¦¦ Switching between Anynet...
User Manual
Page 38
... a Receiver You can be connected. • Check if the Anynet+ device power cord is properly connected. • Check the Anynet+ device's Video/Audio/HDMI cable connections. • Check whether Anynet+ (HDMI-CEC) is set to On in the Anynet+ setup menu. • Check whether the TV remote control is in TV mode. • Check whether the remote control is Anynet+ compatible. • Anynet+ does not work in certain situations. (Searching channels, operating Media Play or Plug & Play...
... a Receiver You can be connected. • Check if the Anynet+ device power cord is properly connected. • Check the Anynet+ device's Video/Audio/HDMI cable connections. • Check whether Anynet+ (HDMI-CEC) is set to On in the Anynet+ setup menu. • Check whether the TV remote control is in TV mode. • Check whether the remote control is Anynet+ compatible. • Anynet+ does not work in certain situations. (Searching channels, operating Media Play or Plug & Play...

User Manual
Page 40
Using the Media Function An alarm window appears informing the user that the media file be displayed on the mobile phone the value will be allowed to play. If you keep pressing down on a control button (channel or volume) on your TV. "Unknown Device 0" is connected to unsecured or unfamiliar network, unwanted or inappropriate contents might be played at "AllShare Setup". xx The ENTERE and...
Using the Media Function An alarm window appears informing the user that the media file be displayed on the mobile phone the value will be allowed to play. If you keep pressing down on a control button (channel or volume) on your TV. "Unknown Device 0" is connected to unsecured or unfamiliar network, unwanted or inappropriate contents might be played at "AllShare Setup". xx The ENTERE and...

User Manual
Page 44
... black and white. Low signal level may cause picture distortion, especially in the Sound menu. (P. 17) • If you have an analog cable/satellite box, upgrade to a digital set to Screen Fit, change your cable box's audio option to HDMI when you have a problem, first try to reset it did in picture on analog and digital TV. • If you are using an AV composite input, connect the video cable (yellow) to the Green jack of component input 1 on Support, or call Samsung...
... black and white. Low signal level may cause picture distortion, especially in the Sound menu. (P. 17) • If you have an analog cable/satellite box, upgrade to a digital set to Screen Fit, change your cable box's audio option to HDMI when you have a problem, first try to reset it did in picture on analog and digital TV. • If you are using an AV composite input, connect the video cable (yellow) to the Green jack of component input 1 on Support, or call Samsung...

User Manual
Page 45
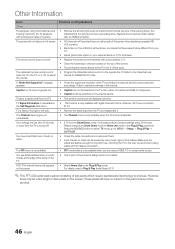
... digital channels. • Check Caption Setup menu. PC Connection A "Mode Not Supported" message appears. • Set your PC power settings. • Make sure the AC power cord is plugged in Setup menu. (P. 26) • If you are powered on. • Be sure to an HDMI input on the TV. • Make sure your connected devices are using a HDMI connection, check the audio output setting on the source list, regardless of video contents may not have latest SW version, SW upgrade...
... digital channels. • Check Caption Setup menu. PC Connection A "Mode Not Supported" message appears. • Set your PC power settings. • Make sure the AC power cord is plugged in Setup menu. (P. 26) • If you are powered on. • Be sure to an HDMI input on the TV. • Make sure your connected devices are using a HDMI connection, check the audio output setting on the source list, regardless of video contents may not have latest SW version, SW upgrade...
User Manual
Page 46
... menu when connected via HDMI or Component. • Caption must be caused by using cables with 90 degree connectors. The Channel menu is grey out (unavailable). • The Channel menu is only available when the TV source is normal and will reset audio and picture settings every 30 minutes. mounting the TV to the Cable/Sat user manual for long term use. For details, refer to Plug & Play (Initial Setup) (P. 7) ✎✎This TFT LCD panel uses a panel...
... menu when connected via HDMI or Component. • Caption must be caused by using cables with 90 degree connectors. The Channel menu is grey out (unavailable). • The Channel menu is only available when the TV source is normal and will reset audio and picture settings every 30 minutes. mounting the TV to the Cable/Sat user manual for long term use. For details, refer to Plug & Play (Initial Setup) (P. 7) ✎✎This TFT LCD panel uses a panel...
User Manual
Page 49
... Antenna Anynet+ Audio out Auto Adjustment Auto Program B Blanking Bracket Balance C Cables Cable Tie Caption Clear Scrambled Channel Clear Voice Component Composite D Device List Digital Audio out DST (Daylight Saving Time) D-sub Dynamic Contrast E Energy Saving Equalizer External Speaker F FAV.CH button Favorite Channel H HD HDMI Home theater Index I 39 Internet Protocol Setup 7 36 L 9 14 License 12 M Media Play 41 Melody 16 Menu Language MP3 Play MTS 10 N 41 20 Network Connection 13 Network Setup 16 8O 10 ON/OFF button Optimal resolution...
... Antenna Anynet+ Audio out Auto Adjustment Auto Program B Blanking Bracket Balance C Cables Cable Tie Caption Clear Scrambled Channel Clear Voice Component Composite D Device List Digital Audio out DST (Daylight Saving Time) D-sub Dynamic Contrast E Energy Saving Equalizer External Speaker F FAV.CH button Favorite Channel H HD HDMI Home theater Index I 39 Internet Protocol Setup 7 36 L 9 14 License 12 M Media Play 41 Melody 16 Menu Language MP3 Play MTS 10 N 41 20 Network Connection 13 Network Setup 16 8O 10 ON/OFF button Optimal resolution...


