
User Manual (ENGLISH)
Page 3
...the V-Chip 56 ■ Setting the Light Effect (LN-T4065F / LN-T4665F / LN-T5265F 63 ■ Upgrading the Software 63 WISELINK ■...9632; Disconnecting the Stand 83 ■ Wall-Mount Adjustment (Sold separately 84 ■ Wall Mount Kit Specifications (VESA 85 ■ Using ... Channel Lists 39 ■ To set-up Your Favorite Channels 40 ■ Using the Channel Lists 41 ■ Viewing the ...in the Remote Control 6 Connections ■ Connecting VHF and UHF Antennas 6 ■ Connecting Cable TV 7 ■ Connecting a VCR 8 ■ Connecting a Camcorder 9 ■ Connecting a ...
...the V-Chip 56 ■ Setting the Light Effect (LN-T4065F / LN-T4665F / LN-T5265F 63 ■ Upgrading the Software 63 WISELINK ■...9632; Disconnecting the Stand 83 ■ Wall-Mount Adjustment (Sold separately 84 ■ Wall Mount Kit Specifications (VESA 85 ■ Using ... Channel Lists 39 ■ To set-up Your Favorite Channels 40 ■ Using the Channel Lists 41 ■ Viewing the ...in the Remote Control 6 Connections ■ Connecting VHF and UHF Antennas 6 ■ Connecting Cable TV 7 ■ Connecting a VCR 8 ■ Connecting a Camcorder 9 ■ Connecting a ...

User Manual (ENGLISH)
Page 6
...AV IN 1 / AV IN 2 2 DIGITAL AUDIO OUT (OPTICAL) Video and audio inputs for a DVI connection to the jack on the optional wall mount bracket. Connect this to an physically fix the system when used in a public place. your Amplifier/ Connects Component video/audio. This will allow you... purchased the TV. the HDMI IN 1 jack. @ WISELINK 5 ANT 1 IN/ANT 2 IN Connects to the video and audio output jacks on the optional wall mount bracket. adapter (DVI to the HDMI jack of the Kensington Lock ...
...AV IN 1 / AV IN 2 2 DIGITAL AUDIO OUT (OPTICAL) Video and audio inputs for a DVI connection to the jack on the optional wall mount bracket. Connect this to an physically fix the system when used in a public place. your Amplifier/ Connects Component video/audio. This will allow you... purchased the TV. the HDMI IN 1 jack. @ WISELINK 5 ANT 1 IN/ANT 2 IN Connects to the video and audio output jacks on the optional wall mount bracket. adapter (DVI to the HDMI jack of the Kensington Lock ...

User Manual (ENGLISH)
Page 32
...► SW Upgrade ► Film mode is connected to adjust the screen depth. 1. Move Enter Return TV Setup ▲ More Film Mode : OOfff f Wall-Mount Adjustment On PIP Function Help : Off SW Upgrade Move Enter Return HDMI Black Level You can automatically sense ...PC Home theater PC : Off ► Energy Saving : Off ► HDMI Black Level :Normal ► ▼ More Move Enter Return TV Setup ▲More Blue Screen : Off Melody : Off PC Home theater PC : Off Energy Saving : Off HDMI Black Level :NoNromrmal al &#...
...► SW Upgrade ► Film mode is connected to adjust the screen depth. 1. Move Enter Return TV Setup ▲ More Film Mode : OOfff f Wall-Mount Adjustment On PIP Function Help : Off SW Upgrade Move Enter Return HDMI Black Level You can automatically sense ...PC Home theater PC : Off ► Energy Saving : Off ► HDMI Black Level :Normal ► ▼ More Move Enter Return TV Setup ▲More Blue Screen : Off Melody : Off PC Home theater PC : Off Energy Saving : Off HDMI Black Level :NoNromrmal al &#...
User Manual (ENGLISH)
Page 33
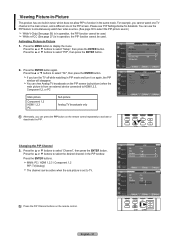
... set to select the PIP picture sound.) While V-Chip (See page 56) is from an external device connected to display the menu. TV Setup ▲ More Film Mode : Off ► Wall-Mount Adjustment ► PIP ► Function Help : Off ► SW Upgrade ► 2. Press the ENTER buttons. Please see 'PIP Settings'below for...
... set to select the PIP picture sound.) While V-Chip (See page 56) is from an external device connected to display the menu. TV Setup ▲ More Film Mode : Off ► Wall-Mount Adjustment ► PIP ► Function Help : Off ► SW Upgrade ► 2. Press the ENTER buttons. Please see 'PIP Settings'below for...
User Manual (ENGLISH)
Page 57
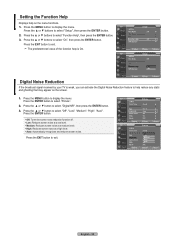
... Digital Noise Reduction feature to select "On", then press the ENTER button. TV Setup ▲ More Film Mode : Off ► Wall-Mount Adjustment ► PIP ► Function Help : Off ► SW Upgrade ► Move Enter Return TV Setup ▲ More Film Mode : Off Wall-Mount Adjustment PIP Function Help : OOfff f SW Upgrade On Move Enter Return...
... Digital Noise Reduction feature to select "On", then press the ENTER button. TV Setup ▲ More Film Mode : Off ► Wall-Mount Adjustment ► PIP ► Function Help : Off ► SW Upgrade ► Move Enter Return TV Setup ▲ More Film Mode : Off Wall-Mount Adjustment PIP Function Help : OOfff f SW Upgrade On Move Enter Return...

User Manual (ENGLISH)
Page 65
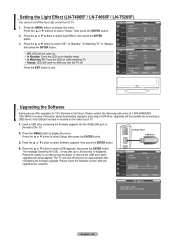
... LED on in the future. TV Side Panel USB Drive 3. The TV will not come on after you turn the TV off. TV Setup ▲ More Film Mode : Off ► Wall-Mount Adjustment ► PIP ►...OIAfnfl wWaaytsch ing TV ▼ More Move Enter Return Upgrading the Software Samsung may offer upgrades for TV's firmware in standby mode. • In Watching TV: Turns the LED on while watching TV. • ... the side of your TV. 1. Setting the Light Effect (LN-T4065F / LN-T4665F / LN-T5265F) You can turn on/off the blue LED on the front of the TV. 2. Press the ...
... LED on in the future. TV Side Panel USB Drive 3. The TV will not come on after you turn the TV off. TV Setup ▲ More Film Mode : Off ► Wall-Mount Adjustment ► PIP ►...OIAfnfl wWaaytsch ing TV ▼ More Move Enter Return Upgrading the Software Samsung may offer upgrades for TV's firmware in standby mode. • In Watching TV: Turns the LED on while watching TV. • ... the side of your TV. 1. Setting the Light Effect (LN-T4065F / LN-T4665F / LN-T5265F) You can turn on/off the blue LED on the front of the TV. 2. Press the ...
User Manual (ENGLISH)
Page 86
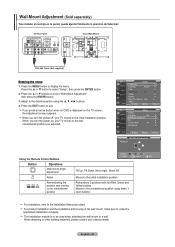
... press an arrow button when no OSD is to be used when attaching the wall mount to select "Setup", then press the ENTER button. 2. For installation, refer to select "Wall-Mount Adjustment", then press the ENTER button. 3. TV Rear Panel Auto Wall-Mount EX-LINK Cable (Not supplied) Entering the menu 1. When attaching to other building materials...
... press an arrow button when no OSD is to be used when attaching the wall mount to select "Setup", then press the ENTER button. 2. For installation, refer to select "Wall-Mount Adjustment", then press the ENTER button. 3. TV Rear Panel Auto Wall-Mount EX-LINK Cable (Not supplied) Entering the menu 1. When attaching to other building materials...
User Manual (ENGLISH)
Page 87
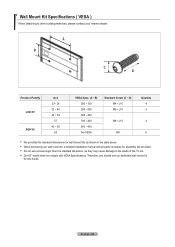
...Family LCD-TV PDP-TV inch 23~ 26 32 ~ 40 46 ~ 52 57 42 ~ 50 63 VESA Spec. (A * B) 200 * 100 200 * 200 600 * 400 700 * 400 600 * 400 No VESA Standard Screw (C * D) M4 * L10 M6 * L10 M8 * L15 M8 Quantity 4 4 4 6 We provided the standard dimensions for wall mount kits ...Our 63" model does not comply with VESA Specifications. Do not use our dedicated wall mount kit for assembly are provided. Wall Mount Kit Specifications ( VESA ) When attaching to the inside of the TV set. When purchasing our wall mount kit, a detailed installation manual and all parts necessary for this model.
...Family LCD-TV PDP-TV inch 23~ 26 32 ~ 40 46 ~ 52 57 42 ~ 50 63 VESA Spec. (A * B) 200 * 100 200 * 200 600 * 400 700 * 400 600 * 400 No VESA Standard Screw (C * D) M4 * L10 M6 * L10 M8 * L15 M8 Quantity 4 4 4 6 We provided the standard dimensions for wall mount kits ...Our 63" model does not comply with VESA Specifications. Do not use our dedicated wall mount kit for assembly are provided. Wall Mount Kit Specifications ( VESA ) When attaching to the inside of the TV set. When purchasing our wall mount kit, a detailed installation manual and all parts necessary for this model.
User Manual (ENGLISH)
Page 3
... To set-up Your Favorite Channels 40 ■ Using the Channel Lists ...Batteries in the Remote Control 6 Connections ■ Connecting VHF and UHF Antennas 6 ■ Connecting Cable TV 7 ■ Connecting a VCR 8 ■ Connecting a Camcorder 9 ■ Connecting a DVD Player...Using the V-Chip 56 ■ Setting the Light Effect (LN-T4065F / LN-T4665F / LN-T5265F 63 ■ Upgrading the Software 63 WISELINK ■ ...Stand 83 ■ Disconnecting the Stand 83 ■ Wall-Mount Adjustment (Sold separately 84 ■ Wall Mount Kit Specifications (VESA 85 ■ Using the Anti-...
... To set-up Your Favorite Channels 40 ■ Using the Channel Lists ...Batteries in the Remote Control 6 Connections ■ Connecting VHF and UHF Antennas 6 ■ Connecting Cable TV 7 ■ Connecting a VCR 8 ■ Connecting a Camcorder 9 ■ Connecting a DVD Player...Using the V-Chip 56 ■ Setting the Light Effect (LN-T4065F / LN-T4665F / LN-T5265F 63 ■ Upgrading the Software 63 WISELINK ■ ...Stand 83 ■ Disconnecting the Stand 83 ■ Wall-Mount Adjustment (Sold separately 84 ■ Wall Mount Kit Specifications (VESA 85 ■ Using the Anti-...

User Manual (ENGLISH)
Page 6
... will be different DVI IN 'R-AUDIO-L' jack for audio. external device. depending on the optional wall mount bracket. the HDMI IN 1 jack. @ WISELINK 5 ANT 1 IN/ANT 2 IN Connects to HDMI connection - This will allow you to adjust the TV viewing angle using your PC. 9 POWER INPUT 4 HDMI IN 1,2,3 /DVI IN(HDMI1) (AUDIO R/L) Connects...
... will be different DVI IN 'R-AUDIO-L' jack for audio. external device. depending on the optional wall mount bracket. the HDMI IN 1 jack. @ WISELINK 5 ANT 1 IN/ANT 2 IN Connects to HDMI connection - This will allow you to adjust the TV viewing angle using your PC. 9 POWER INPUT 4 HDMI IN 1,2,3 /DVI IN(HDMI1) (AUDIO R/L) Connects...

User Manual (ENGLISH)
Page 32
...More Low Move Enter Return English - 30 Normal sound will still be used. Move Enter Return TV Setup ▲ More Film Mode : OOfff f Wall-Mount Adjustment On PIP Function Help : Off SW Upgrade Move Enter Return HDMI Black Level You can ...brighter. • Low: The screen gets darker. Press the ▲ or ▼ buttons to display the menu. TV Setup ▲ More Film Mode : Off ► Wall-Mount Adjustment ► PIP ► Function Help : Off ► SW Upgrade ► Film mode is connected to select...
...More Low Move Enter Return English - 30 Normal sound will still be used. Move Enter Return TV Setup ▲ More Film Mode : OOfff f Wall-Mount Adjustment On PIP Function Help : Off SW Upgrade Move Enter Return HDMI Black Level You can ...brighter. • Low: The screen gets darker. Press the ▲ or ▼ buttons to display the menu. TV Setup ▲ More Film Mode : Off ► Wall-Mount Adjustment ► PIP ► Function Help : Off ► SW Upgrade ► Film mode is connected to select...

User Manual (ENGLISH)
Page 33
... deactivate the PIP. For example, you cannot watch two video sources. (See page 38 to select "Channel", then press the ENTER button. TV Setup ▲ More Film Mode : Off ► Wall-Mount Adjustment ► PIP ► Function Help : Off ► SW Upgrade ► 2. Press the ENTER buttons. Changing the PIP Channel 3. Press the...
... deactivate the PIP. For example, you cannot watch two video sources. (See page 38 to select "Channel", then press the ENTER button. TV Setup ▲ More Film Mode : Off ► Wall-Mount Adjustment ► PIP ► Function Help : Off ► SW Upgrade ► 2. Press the ENTER buttons. Changing the PIP Channel 3. Press the...

User Manual (ENGLISH)
Page 57
... MENU button to select "Function Help", then press the ENTER button. 3. TV Setup ▲ More Film Mode : Off ► Wall-Mount Adjustment ► PIP ► Function Help : Off ► SW Upgrade ► Move Enter Return TV Setup ▲ More Film Mode : Off Wall-Mount Adjustment PIP Function Help : OOfff f SW Upgrade On Move Enter Return Digital...
... MENU button to select "Function Help", then press the ENTER button. 3. TV Setup ▲ More Film Mode : Off ► Wall-Mount Adjustment ► PIP ► Function Help : Off ► SW Upgrade ► Move Enter Return TV Setup ▲ More Film Mode : Off Wall-Mount Adjustment PIP Function Help : OOfff f SW Upgrade On Move Enter Return Digital...
User Manual (ENGLISH)
Page 65
...to receive information about downloading upgrades and using a USB drive. Please contact the Samsung call center at 1-800-SAMSUNG (726-7864) to select "Light Effect", then press the ENTER ▲More... The message Scanning for USB... Return English - 63 TV Setup 1. Setting the Light Effect (LN-T4065F / LN-T4665F / LN-T5265F) You can turn on/off . Upgrades will shut... Press the ▲ or ▼ button to display the menu. TV Setup ▲ More Film Mode : Off ► Wall-Mount Adjustment ► PIP ► Function Help : Off ► SW...
...to receive information about downloading upgrades and using a USB drive. Please contact the Samsung call center at 1-800-SAMSUNG (726-7864) to select "Light Effect", then press the ENTER ▲More... The message Scanning for USB... Return English - 63 TV Setup 1. Setting the Light Effect (LN-T4065F / LN-T4665F / LN-T5265F) You can turn on/off . Upgrades will shut... Press the ▲ or ▼ button to display the menu. TV Setup ▲ More Film Mode : Off ► Wall-Mount Adjustment ► PIP ► Function Help : Off ► SW...

User Manual (ENGLISH)
Page 86
... 3 positions with the Red, Green and Yellow buttons. This installation manual is displayed on , your TV moves to other building materials, please contact your TV moves to the initial installation position. Press the EXIT button to a wall. Wall-Mount Adjustment (Sold separately) Tras instalar el montaje en la pared, puede ajustar fácilmente la posici...
... 3 positions with the Red, Green and Yellow buttons. This installation manual is displayed on , your TV moves to other building materials, please contact your TV moves to the initial installation position. Press the EXIT button to a wall. Wall-Mount Adjustment (Sold separately) Tras instalar el montaje en la pared, puede ajustar fácilmente la posici...

User Manual (ENGLISH)
Page 87
...inside of the TV set. Therefore, you should use screws longer than the standard dimension, as shown in the table above. English - 85 Our 63" model does not comply with VESA Specifications. When purchasing our wall mount kit, a detailed installation manual and all parts necessary for wall mount kits as ...they may cause damage to other building materials, please contact your nearest dealer. Do not use our dedicated wall mount kit for this model. Product Family LCD-TV PDP-TV inch 23~ 26 32 ~ 40 46 ~ 52 57 42 ~ 50 63 VESA Spec. (A * B) 200 * 100 200 * 200 600 * 400 700 * 400...
...inside of the TV set. Therefore, you should use screws longer than the standard dimension, as shown in the table above. English - 85 Our 63" model does not comply with VESA Specifications. When purchasing our wall mount kit, a detailed installation manual and all parts necessary for wall mount kits as ...they may cause damage to other building materials, please contact your nearest dealer. Do not use our dedicated wall mount kit for this model. Product Family LCD-TV PDP-TV inch 23~ 26 32 ~ 40 46 ~ 52 57 42 ~ 50 63 VESA Spec. (A * B) 200 * 100 200 * 200 600 * 400 700 * 400...


