User Manual (ENGLISH)
Page 2
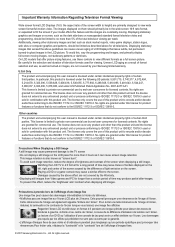
... la "luminosité" et le "contraste" lors de l'affichage d'images fixes. © 2007 Samsung Electronics Co., Ltd. Displaying stationary graphics and images on screen, such as described above effect are ... of brightness and contrast of the screen when displaying a still image. • Watching the LCD TV in 4:3 format for product features or functions that leave subtle, but permanent burned-in ghost images...non-commercial use . To prevent this user manual is also known as a full screen picture. No rights are granted under this product is limited to the ISO/IEC 11172-3 or...
... la "luminosité" et le "contraste" lors de l'affichage d'images fixes. © 2007 Samsung Electronics Co., Ltd. Displaying stationary graphics and images on screen, such as described above effect are ... of brightness and contrast of the screen when displaying a still image. • Watching the LCD TV in 4:3 format for product features or functions that leave subtle, but permanent burned-in ghost images...non-commercial use . To prevent this user manual is also known as a full screen picture. No rights are granted under this product is limited to the ISO/IEC 11172-3 or...
User Manual (ENGLISH)
Page 3
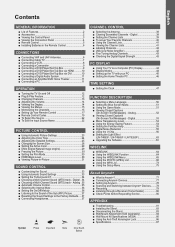
... Channel Lists 39 ■ To set-up Your Favorite Channels 40 ■ Using the Channel Lists 41 ■ Viewing the ... - English Contents General Information ■ List of the Sub (PIP) Picture 37 ■ Resetting the Sound Settings to the Sound of Features 2 ... the Remote Control 6 Connections ■ Connecting VHF and UHF Antennas 6 ■ Connecting Cable TV 7 ■ Connecting a VCR 8 ■ Connecting a Camcorder 9 ■ Connecting a ...the V-Chip 56 ■ Setting the Light Effect (LN-T4065F / LN-T4665F / LN-T5265F 63 ■ Upgrading the Software 63 WISELINK ...
... Channel Lists 39 ■ To set-up Your Favorite Channels 40 ■ Using the Channel Lists 41 ■ Viewing the ... - English Contents General Information ■ List of the Sub (PIP) Picture 37 ■ Resetting the Sound Settings to the Sound of Features 2 ... the Remote Control 6 Connections ■ Connecting VHF and UHF Antennas 6 ■ Connecting Cable TV 7 ■ Connecting a VCR 8 ■ Connecting a Camcorder 9 ■ Connecting a ...the V-Chip 56 ■ Setting the Light Effect (LN-T4065F / LN-T4665F / LN-T5265F 63 ■ Upgrading the Software 63 WISELINK ...

User Manual (ENGLISH)
Page 4
... Picture Quality - DNIe technology provides life-like clear images. SRS TruSurround XT - SRS TruSurround XT provides a virtual Dolby surround system. Accessories Please make sure the following items are missing, contact your LCD TV. Remote Control & Batteries (AAA x 2) (BN59-00599A) Power Cord (3903-000144) Cleaning Cloth (BN63-01798A) Cover-Bottom LN-T4061F : BN63-03031A LN-T4065F...
... Picture Quality - DNIe technology provides life-like clear images. SRS TruSurround XT - SRS TruSurround XT provides a virtual Dolby surround system. Accessories Please make sure the following items are missing, contact your LCD TV. Remote Control & Batteries (AAA x 2) (BN59-00599A) Power Cord (3903-000144) Cleaning Cloth (BN63-01798A) Cover-Bottom LN-T4061F : BN63-03031A LN-T4065F...
User Manual (ENGLISH)
Page 7
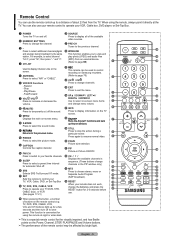
...RETURN Returns to the previous menu. @ P.MODE Press to select the picture mode. # CAPTION Controls the caption decoder. $ FAV.CH Press to switch to your TV,DVD, STB, CABLE (box), or VCR (See pages 17-21) g INFO Press to display information on Samsung recorders. (Refer to page 79) d CH / CH Press to... change channels in Picture ON/OFF. h Anynet+ Runs the Anynet+ functions and sets ...
...RETURN Returns to the previous menu. @ P.MODE Press to select the picture mode. # CAPTION Controls the caption decoder. $ FAV.CH Press to switch to your TV,DVD, STB, CABLE (box), or VCR (See pages 17-21) g INFO Press to display information on Samsung recorders. (Refer to page 79) d CH / CH Press to... change channels in Picture ON/OFF. h Anynet+ Runs the Anynet+ functions and sets ...
User Manual (ENGLISH)
Page 10
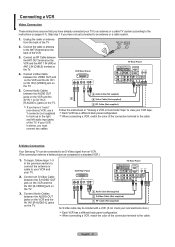
... terminal on the VCR and the ANT 1 IN (AIR) or ANT 2 IN (CABLE) terminal on the TV. Unplug the cable or antenna from an VCR. (This connection delivers a better picture as compared to a standard VCR.) 1. Connect an RF Cable between the S-VIDEO OUT jack on the VCR ... to the cable. Skip step 1 if you have already connected your TV to an antenna or a cable TV system (according to your VCR and your local electronics store.) Each VCR has a different back panel configuration. S-Video Connection Your Samsung TV can be included with a VCR. (If not, check your...
... terminal on the VCR and the ANT 1 IN (AIR) or ANT 2 IN (CABLE) terminal on the TV. Unplug the cable or antenna from an VCR. (This connection delivers a better picture as compared to a standard VCR.) 1. Connect an RF Cable between the S-VIDEO OUT jack on the VCR ... to the cable. Skip step 1 if you have already connected your TV to an antenna or a cable TV system (according to your VCR and your local electronics store.) Each VCR has a different back panel configuration. S-Video Connection Your Samsung TV can be included with a VCR. (If not, check your...

User Manual (ENGLISH)
Page 14
... Channels and Time will be set. The message "Select Home Mode when installing this TV at home." The message "Select the antennas to daylight savings time." We recommend setting the TV to Home mode for the best picture in your particular area. 5. If both ANT 1 (AIR) and ANT 2 (CABLE... OK Enter Skip Clock Set Plug & Play Select the clock mode. Press the ▲ or ▼ buttons to memorize. After all of the TV. 4. Menu language, Shop Mode, Channels and Time will begin memorizing all the available channels are connected, select the "Air + Cable". Shop Home...
... Channels and Time will be set. The message "Select Home Mode when installing this TV at home." The message "Select the antennas to daylight savings time." We recommend setting the TV to Home mode for the best picture in your particular area. 5. If both ANT 1 (AIR) and ANT 2 (CABLE... OK Enter Skip Clock Set Plug & Play Select the clock mode. Press the ▲ or ▼ buttons to memorize. After all of the TV. 4. Menu language, Shop Mode, Channels and Time will begin memorizing all the available channels are connected, select the "Air + Cable". Shop Home...
User Manual (ENGLISH)
Page 16
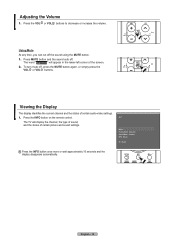
... INFO button on the remote control. Press the VOL or VOL buttons to decrease or increase the volume. To turn mute off . Air 7 Mono Picture Mode : Dynamic Sound Mode : Custom MTS : Stereo 05 : 54 pm Press the INFO button once more or wait approximately 10 seconds and the...sound cuts off , press the MUTE button again, or simply press the VOL or VOL buttons. English - 14 The TV will appear in the lower-left corner of certain picture and sound settings. Viewing the Display The display identifies the current channel and the status of certain audio-video settings. 1....
... INFO button on the remote control. Press the VOL or VOL buttons to decrease or increase the volume. To turn mute off . Air 7 Mono Picture Mode : Dynamic Sound Mode : Custom MTS : Stereo 05 : 54 pm Press the INFO button once more or wait approximately 10 seconds and the...sound cuts off , press the MUTE button again, or simply press the VOL or VOL buttons. English - 14 The TV will appear in the lower-left corner of certain picture and sound settings. Viewing the Display The display identifies the current channel and the status of certain audio-video settings. 1....

User Manual (ENGLISH)
Page 17
...menu' s left side has five icons: Picture, Sound, Channel, Setup, Input. 2. Use the ▲ or ▼ buttons to the TV (i.e. After the available channels are three steps for both "off-air" (Air) and "Cable" channels. TV 1. TV 2. Channel Antenna : Air Auto Program Clear ...press the MENU button. Press the MENU button to exit. TV Input Source List : TV ► Edit Name ► WiSELINK ► Anynet+ (HDMI-CEC) Move Enter Exit Memorizing the Channels Your TV can begin memorizing the available channels, you must specify the ...
...menu' s left side has five icons: Picture, Sound, Channel, Setup, Input. 2. Use the ▲ or ▼ buttons to the TV (i.e. After the available channels are three steps for both "off-air" (Air) and "Cable" channels. TV 1. TV 2. Channel Antenna : Air Auto Program Clear ...press the MENU button. Press the MENU button to exit. TV Input Source List : TV ► Edit Name ► WiSELINK ► Anynet+ (HDMI-CEC) Move Enter Exit Memorizing the Channels Your TV can begin memorizing the available channels, you must specify the ...
User Manual (ENGLISH)
Page 25
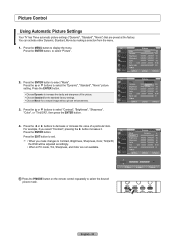
...increase the clarity and sharpness of a particular item. Press the ▲ or ▼ buttons to select "Picture". Picture Control Using Automatic Picture Settings Your TV has Three automatic picture settings ("Dynamic", "Standard", "Movie") that are not available. Press the ENTER button. Choose Dynamic...the OSD will be adjusted accordingly. • When in PC mode, Tint, Sharpness, and Color are preset at the factory. TV Picture Mode : Dynamic ► Contrast 100 Brightness 50 Sharpness 85 Color 55 Tint G 50 R 50 Balck light 100 ▼More ...
...increase the clarity and sharpness of a particular item. Press the ▲ or ▼ buttons to select "Picture". Picture Control Using Automatic Picture Settings Your TV has Three automatic picture settings ("Dynamic", "Standard", "Movie") that are not available. Press the ENTER button. Choose Dynamic...the OSD will be adjusted accordingly. • When in PC mode, Tint, Sharpness, and Color are preset at the factory. TV Picture Mode : Dynamic ► Contrast 100 Brightness 50 Sharpness 85 Color 55 Tint G 50 R 50 Balck light 100 ▼More ...

User Manual (ENGLISH)
Page 26
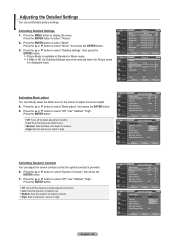
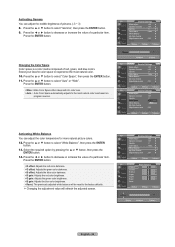
... Cool1 Size Digital NR : : 1L6oNWWw:oaa9rrrmmma12l Active Color : On DNle : On Reset : OK Move Enter Return TV Picture Resetting the Picture Settings to select "Picture". 2. Press the MENU button to select "Color Tone", then press the ENTER button. 3. Press the ▲ ... backlight brightness. Press the ▲ or ▼ button to exit. Activating Backlight You can adjust the screen brightness by adjusting the LCD backlight brightness. (0~10) 1. Press the EXIT button to select "Cool2", "Cool1", "Normal", "Warm1", or "Warm2". Press the...
... Cool1 Size Digital NR : : 1L6oNWWw:oaa9rrrmmma12l Active Color : On DNle : On Reset : OK Move Enter Return TV Picture Resetting the Picture Settings to select "Picture". 2. Press the MENU button to select "Color Tone", then press the ENTER button. 3. Press the ▲ ... backlight brightness. Press the ▲ or ▼ button to exit. Activating Backlight You can adjust the screen brightness by adjusting the LCD backlight brightness. (0~10) 1. Press the EXIT button to select "Cool2", "Cool1", "Normal", "Warm1", or "Warm2". Press the...
User Manual (ENGLISH)
Page 27
...Activating Dynamic Contrast You can adjust the screen contrast so that the optimal contrast is available in Standard mode. TV Picture Mode : Movie ► Contrast 100 Brightness 50 Sharpness 85 Color 55 Tint G 50 R 50 Balcklight 10 ▼More ...Move Enter Return TV Picture ▲More Color Tone : Cool2 ► Detailed settings ► Size : 16 : 9 ► Digital NR : Low ► Active Color : ...
...Activating Dynamic Contrast You can adjust the screen contrast so that the optimal contrast is available in Standard mode. TV Picture Mode : Movie ► Contrast 100 Brightness 50 Sharpness 85 Color 55 Tint G 50 R 50 Balcklight 10 ▼More ...Move Enter Return TV Picture ▲More Color Tone : Cool2 ► Detailed settings ► Size : 16 : 9 ► Digital NR : Low ► Active Color : ...
User Manual (ENGLISH)
Page 28
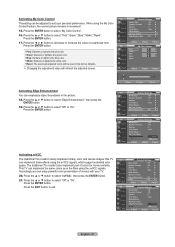
...the color temperature for more natural picture colors. 12. Press the ENTER button. Wide : Wide Color Space offers deep and rich color tone. Auto : Auto Color Space automatically adjusts to the most natural color. 10. TV Detailed Settings Black Adjust Dynamic Contrast ... Enter Return ▲ R-Offset ▼ Move Adjust 15 Return English - 26 Changing the Color Space Color space is a color matrix composed of pictures. (-3 ~ 3) 8. Press the ▲ or ▼ button to the factory defaults. Changing the adjustment value will be reset to select "White...
...the color temperature for more natural picture colors. 12. Press the ENTER button. Wide : Wide Color Space offers deep and rich color tone. Auto : Auto Color Space automatically adjusts to the most natural color. 10. TV Detailed Settings Black Adjust Dynamic Contrast ... Enter Return ▲ R-Offset ▼ Move Adjust 15 Return English - 26 Changing the Color Space Color space is a color matrix composed of pictures. (-3 ~ 3) 8. Press the ▲ or ▼ button to the factory defaults. Changing the adjustment value will be reset to select "White...
User Manual (ENGLISH)
Page 29
...9660; button to decrease or increase the value of colors for movie contents. When using the My Color Control Feature, the current picture remains in the picture. 18. Press the ◄ or ► button to select "Edge Enhancement", then press the ENTER button. 19. The traditional... TVs couldn't also implement part of a particular item. Gamma Color Space White Balance : 0 ► : Auto ► ► 20. Activating My Color ...
...9660; button to decrease or increase the value of colors for movie contents. When using the My Color Control Feature, the current picture remains in the picture. 18. Press the ◄ or ► button to select "Edge Enhancement", then press the ENTER button. 19. The traditional... TVs couldn't also implement part of a particular item. Gamma Color Space White Balance : 0 ► : Auto ► ► 20. Activating My Color ...
User Manual (ENGLISH)
Page 30
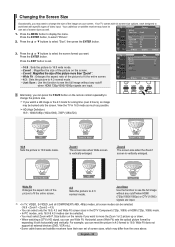
... Changing the Screen Size Occasionally, you may want to change the size of the image on the remote control repeatedly to change the picture size. TV Size 16 : 9 Zoom1 ► Zoom2 ► Wide Fit ► 4 : 3 Just Scan Move Enter Return Alternately, ...you can use Wide Fit. Zoom1 The screen size when Wide screen is vertically enlarged. TV Picture ▲More Color Tone : Cool2 ► Detailed settings ► Size : 16 : 9 ► Digital NR : Low ► Active Color : On ...
... Changing the Screen Size Occasionally, you may want to change the size of the image on the remote control repeatedly to change the picture size. TV Size 16 : 9 Zoom1 ► Zoom2 ► Wide Fit ► 4 : 3 Just Scan Move Enter Return Alternately, ...you can use Wide Fit. Zoom1 The screen size when Wide screen is vertically enlarged. TV Picture ▲More Color Tone : Cool2 ► Detailed settings ► Size : 16 : 9 ► Digital NR : Low ► Active Color : On ...
User Manual (ENGLISH)
Page 31
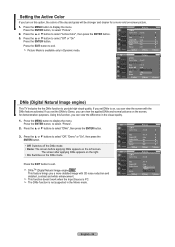
... to select "Off" or "On" Press the ENTER button. The DNle function is PC. Press the ▲ or ▼ buttons to exit. TV Picture ▲More Color Tone : Cool2 ► Detailed settings ► Size : 16 : 9 ► Digital NR : Low ► Active Color :... On ► DNle : On ► Reset : OK ► Move Enter Return TV Picture ▲More Color Tone : Cool2 Detailed settings Size : 16 : 9 Digital NR : Low Active Color DNle Reset : OOff ff : ODffemo : OOKn Move Enter...
... to select "Off" or "On" Press the ENTER button. The DNle function is PC. Press the ▲ or ▼ buttons to exit. TV Picture ▲More Color Tone : Cool2 ► Detailed settings ► Size : 16 : 9 ► Digital NR : Low ► Active Color :... On ► DNle : On ► Reset : OK ► Move Enter Return TV Picture ▲More Color Tone : Cool2 Detailed settings Size : 16 : 9 Digital NR : Low Active Color DNle Reset : OOff ff : ODffemo : OOKn Move Enter...

User Manual (ENGLISH)
Page 32
...then press the ENTER button. 2. Normal sound will still be used. Press the ▲ or ▼ buttons to freeze a moving picture. Freezing the Picture 1. This function is active only when an external device (DVD player, STB etc.) is supported in operation, the Still function cannot be ...heard. Press the ▲ or ▼ buttons to the TV via HDMI(RGB Signal). Setting the Film Mode You can ...
...then press the ENTER button. 2. Normal sound will still be used. Press the ▲ or ▼ buttons to freeze a moving picture. Freezing the Picture 1. This function is active only when an external device (DVD player, STB etc.) is supported in operation, the Still function cannot be ...heard. Press the ▲ or ▼ buttons to the TV via HDMI(RGB Signal). Setting the Film Mode You can ...
User Manual (ENGLISH)
Page 33
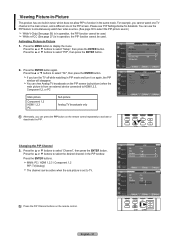
... in operation, the PIP function cannot be active when the sub picture is from an external device connected to HDMI1,2,3, Component1,2, or PC Main picture Component 1,2 HDMI 1,2,3 PC Sub picture Analog TV broadcasts only Move Enter Return TV PIP PIP Size Position Channel : Off : On : : Cable... button on the PIP screen (sub-picture) when the main picture is set to activate or deactivate the PIP. Activating Picture-in PIP mode and turn the TV off while watching in -Picture 1. Press the ▲ or ▼ buttons to display the menu. TV PIP PIP : On ► Size...
... in operation, the PIP function cannot be active when the sub picture is from an external device connected to HDMI1,2,3, Component1,2, or PC Main picture Component 1,2 HDMI 1,2,3 PC Sub picture Analog TV broadcasts only Move Enter Return TV PIP PIP Size Position Channel : Off : On : : Cable... button on the PIP screen (sub-picture) when the main picture is set to activate or deactivate the PIP. Activating Picture-in PIP mode and turn the TV off while watching in -Picture 1. Press the ▲ or ▼ buttons to display the menu. TV PIP PIP : On ► Size...
User Manual (ENGLISH)
Page 34
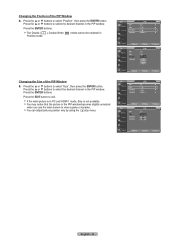
... buttons to select "Size", then press the ENTER button. If the main picture is in Position mode. Press the ENTER buttons. Press the ENTER buttons. You may notice that the picture in the PIP window. Move Enter Return TV PIP PIP : On ► Size : ► Position : ►... Channel : Cable 3 ► Move Enter Return TV PIP PIP Size Position Channel : On : : : Cable 3 Move Enter...
... buttons to select "Size", then press the ENTER button. If the main picture is in Position mode. Press the ENTER buttons. Press the ENTER buttons. You may notice that the picture in the PIP window. Move Enter Return TV PIP PIP : On ► Size : ► Position : ►... Channel : Cable 3 ► Move Enter Return TV PIP PIP Size Position Channel : On : : : Cable 3 Move Enter...

User Manual (ENGLISH)
Page 39
... Enter Return Resetting the Sound Settings to display the menu. TV Sound Mode : Custom ► Equalizer ► 2. When you insert the head set jack into the corresponding port, you can listen to the sound of the sub (PIP) picture. 1. English - 37 Press the ▲ or ▼... : Off ► Internal Mute : Off ► Sound Select : Main ► Reset Move Enter Return TV Sound Mode : Custom 3. Listening to the Sound of the Sub (PIP) Picture When the PIP feature is activated, you can operate only "Multi track option" in the room. Equalizer SRS ...
... Enter Return Resetting the Sound Settings to display the menu. TV Sound Mode : Custom ► Equalizer ► 2. When you insert the head set jack into the corresponding port, you can listen to the sound of the sub (PIP) picture. 1. English - 37 Press the ▲ or ▼... : Off ► Internal Mute : Off ► Sound Select : Main ► Reset Move Enter Return TV Sound Mode : Custom 3. Listening to the Sound of the Sub (PIP) Picture When the PIP feature is activated, you can operate only "Multi track option" in the room. Equalizer SRS ...

User Manual (ENGLISH)
Page 47
...Adjustment", then press the ENTER button. Change to have the TV set automatically adjust the video signals the monitor receives. After the noise has been reduced, re-adjust the picture so that it is aligned on the center of the picture quality adjustment is not removed by fine tuning alone, then... do the frequency adjustments to display the menu. The function also automatically fine-tunes the settings and adjusts the frequency values and positions. Setting up the TV with your PC How to ...
...Adjustment", then press the ENTER button. Change to have the TV set automatically adjust the video signals the monitor receives. After the noise has been reduced, re-adjust the picture so that it is aligned on the center of the picture quality adjustment is not removed by fine tuning alone, then... do the frequency adjustments to display the menu. The function also automatically fine-tunes the settings and adjusts the frequency values and positions. Setting up the TV with your PC How to ...


