User Manual (ENGLISH)
Page 4
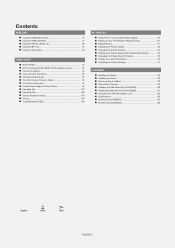
... 111 Adjusting the Picture Quality 112 Changing the Picture Position 113 Adjusting the Picture Quality and Position Automatically 114 Changing the Picture Size (PC Mode 115 Viewing the Current Resolution 116 Initializing the Picture Settings 117 APPENDIX Identifying Problems 118 Installing the Stand 119 Disconnecting the Stand 119 Stand Swivel Function 119 Installing the Wall Mount Kit (LN-S4096D...
... 111 Adjusting the Picture Quality 112 Changing the Picture Position 113 Adjusting the Picture Quality and Position Automatically 114 Changing the Picture Size (PC Mode 115 Viewing the Current Resolution 116 Initializing the Picture Settings 117 APPENDIX Identifying Problems 118 Installing the Stand 119 Disconnecting the Stand 119 Stand Swivel Function 119 Installing the Wall Mount Kit (LN-S4096D...
User Manual (ENGLISH)
Page 5
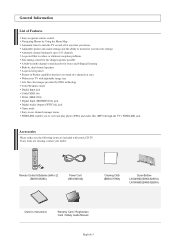
...you choose Adjustable picture and sound settings and the ability to memorize your dealer. Remote Control & Batteries (AAA x 2) (BN59-00529A) Power Cord (3903-000144) Cleaning Cloth (BN63-01798A) Cover-Bottom LN-S4096D (BN63-02491A) LN-S4696D (...BN63-02624A) Owner's Instructions Warranty Card / Registration Card / Safety Guide Manual English-3 WISELINK enables you watch two channels at any items are included with adjustable image size Life-like clear images provided by Using the Menu Map Automatic timer to turn the TV on and off at once Widescreen TV with your LCD TV...
...you choose Adjustable picture and sound settings and the ability to memorize your dealer. Remote Control & Batteries (AAA x 2) (BN59-00529A) Power Cord (3903-000144) Cleaning Cloth (BN63-01798A) Cover-Bottom LN-S4096D (BN63-02491A) LN-S4696D (...BN63-02624A) Owner's Instructions Warranty Card / Registration Card / Safety Guide Manual English-3 WISELINK enables you watch two channels at any items are included with adjustable image size Life-like clear images provided by Using the Menu Map Automatic timer to turn the TV on and off at once Widescreen TV with your LCD TV...
User Manual (ENGLISH)
Page 9
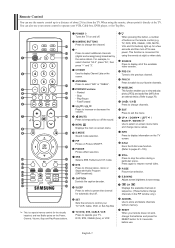
... time interval for the visually impaired, and has Braille points on the Power, Channel, Volume, Stop and Play/Pause buttons. SOURCE Press to your TV, DVD, STB, CABLE (box), or VCR When pressing this button, a number of buttons on -screen menu items and change the channel. -.... For example, to select additional channels (digital and analog) being broadcast by the same station. VCR/DVD Functions - P.MODE Picture effect selection. E.SAVING Adjusts screen brightness to change the batteries and press the RESET button for using the remote, always point it directly at night or when...
... time interval for the visually impaired, and has Braille points on the Power, Channel, Volume, Stop and Play/Pause buttons. SOURCE Press to your TV, DVD, STB, CABLE (box), or VCR When pressing this button, a number of buttons on -screen menu items and change the channel. -.... For example, to select additional channels (digital and analog) being broadcast by the same station. VCR/DVD Functions - P.MODE Picture effect selection. E.SAVING Adjusts screen brightness to change the batteries and press the RESET button for using the remote, always point it directly at night or when...
User Manual (ENGLISH)
Page 19
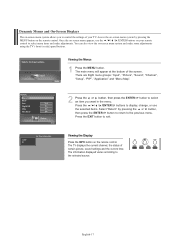
...to select Press the / / / /ENTER buttons to display, change, or use the / / / /ENTER buttons on your TV. Viewing the Display Press the INFO button on -screen menu system and make adjustments. Viewing the Menus 1 Press the MENU button. Once the on-screen menu appears, use the selected items. Select "Return... the or button, then press the ENTER an item you to the previous menu. The main menu will appear at the bottom of certain picture, sound settings and the current time. Dynamic Menus and On-Screen Displays The on-screen menu system allows you want in the menu. Press...
...to select Press the / / / /ENTER buttons to display, change, or use the / / / /ENTER buttons on your TV. Viewing the Display Press the INFO button on -screen menu system and make adjustments. Viewing the Menus 1 Press the MENU button. Once the on-screen menu appears, use the selected items. Select "Return... the or button, then press the ENTER an item you to the previous menu. The main menu will appear at the bottom of certain picture, sound settings and the current time. Dynamic Menus and On-Screen Displays The on-screen menu system allows you want in the menu. Press...

User Manual (ENGLISH)
Page 41
... digital channels. 1 Press the MENU button. LNA (Low Noise Amplifier) If the TV is noisy with the strongest signal. English-39 You can improve the reception (a low...Unlike analog channels, which can vary in a weak-signal area, sometimes the LNA function can , however, adjust your antenna to On, select Off. So, unlike analog channels, you will not receive them at all.... button. Select "Return" by pressing the ENTER button, to return to the previous menu. If the picture is operating in reception quality from "snowy" to clear, digital (HDTV) channels have either perfect reception...
... digital channels. 1 Press the MENU button. LNA (Low Noise Amplifier) If the TV is noisy with the strongest signal. English-39 You can improve the reception (a low...Unlike analog channels, which can vary in a weak-signal area, sometimes the LNA function can , however, adjust your antenna to On, select Off. So, unlike analog channels, you will not receive them at all.... button. Select "Return" by pressing the ENTER button, to return to the previous menu. If the picture is operating in reception quality from "snowy" to clear, digital (HDTV) channels have either perfect reception...

User Manual (ENGLISH)
Page 42
.... English-40 Picture Control Picture Control You can select the type of picture which best corresponds to exit. Changing the Picture Standard 1 Press the MENU button. or button to select "Picture", 2...P.MODE button on the remote control repeatedly to select the desired picture mode. • Choose "Dynamic" for viewing the TV during the day or when there is a bright light in ...the room. • Choose "Standard" for the standard factory settings. • Choose "Movie" when viewing the movie. • Choose "Custom" if you want to adjust...
.... English-40 Picture Control Picture Control You can select the type of picture which best corresponds to exit. Changing the Picture Standard 1 Press the MENU button. or button to select "Picture", 2...P.MODE button on the remote control repeatedly to select the desired picture mode. • Choose "Dynamic" for viewing the TV during the day or when there is a bright light in ...the room. • Choose "Standard" for the standard factory settings. • Choose "Movie" when viewing the movie. • Choose "Custom" if you want to adjust...

User Manual (ENGLISH)
Page 43
... ENTER button. Press the or button again to select "Mode", then press the ENTER button. 3 Press the or button to select the desired picture mode (Dynamic, Standard, Movie, Custom), then press the ENTER button. 4 Press the or button to select "Mode", then press the ENTER ..."Contrast", "Brightness", "Sharpness", "Color", "Tint", and "Color Tone" according to decrease or increase the value of a particular item. • While adjusting a picture option, you can also select another option (Contrast, Brightness, Sharpness, Color, or Tint) by pressing the or button. Press the or button to personal ...
... ENTER button. Press the or button again to select "Mode", then press the ENTER button. 3 Press the or button to select the desired picture mode (Dynamic, Standard, Movie, Custom), then press the ENTER button. 4 Press the or button to select "Mode", then press the ENTER ..."Contrast", "Brightness", "Sharpness", "Color", "Tint", and "Color Tone" according to decrease or increase the value of a particular item. • While adjusting a picture option, you can also select another option (Contrast, Brightness, Sharpness, Color, or Tint) by pressing the or button. Press the or button to personal ...

User Manual (ENGLISH)
Page 44
... ENTER button. or button. The reset function must be reset to the previous menu. Select "Return" by pressing the Press the ENTER button. Resetting the Picture Settings to the Factory Defaults 7 To return the factory defaults, select "Reset" by pressing the or button, then press the ENTER button to return to.... English-42 Press the EXIT button to exit. • If you set "Reset" to "Mode". 5 Press the ENTER button to return to "OK", the previously adjusted settings will be set separately for each mode (Dynamic, Standard, Movie, or Custom).
... ENTER button. or button. The reset function must be reset to the previous menu. Select "Return" by pressing the Press the ENTER button. Resetting the Picture Settings to the Factory Defaults 7 To return the factory defaults, select "Reset" by pressing the or button, then press the ENTER button to return to.... English-42 Press the EXIT button to exit. • If you set "Reset" to "Mode". 5 Press the ENTER button to return to "OK", the previously adjusted settings will be set separately for each mode (Dynamic, Standard, Movie, or Custom).

User Manual (ENGLISH)
Page 49
... return to exit. Press the EXIT button to the previous menu. The Film Mode can automatically sense and process film signals from all sources and adjust the picture for optimum quality. 1 Press the MENU button. Press the then press the ENTER button. or button to select...
... return to exit. Press the EXIT button to the previous menu. The Film Mode can automatically sense and process film signals from all sources and adjust the picture for optimum quality. 1 Press the MENU button. Press the then press the ENTER button. or button to select...

User Manual (ENGLISH)
Page 114
...it is not removed by pressing the or button, then press the ENTER button to return to remove or reduce picture noise. This feature may change the width of picture quality adjustment is to the previous menu. If the noise is aligned on the center of the screen. 1 Press the SOURCE... button to the utmost and fine tune again. If necessary, adjust the position to select "Setup", 3 Press the button. English-112 Adjusting the Picture Quality The purpose of the image. or button to center. Press the then press the ENTER button. or ...
...it is not removed by pressing the or button, then press the ENTER button to return to remove or reduce picture noise. This feature may change the width of picture quality adjustment is to the previous menu. If the noise is aligned on the center of the screen. 1 Press the SOURCE... button to the utmost and fine tune again. If necessary, adjust the position to select "Setup", 3 Press the button. English-112 Adjusting the Picture Quality The purpose of the image. or button to center. Press the then press the ENTER button. or ...

User Manual (ENGLISH)
Page 115
...the previous menu. English-113 or button to select "Setup", 3 Press the or button to select "Position", then press the ENTER 5 Adjust the position of the picture if it is not well-aligned. 1 Press the SOURCE button to select "PC". 2 Press the MENU button. or button to select "...PC", then press the ENTER button. 4 Press the button. Changing the Picture Position After connecting the TV to your PC, adjust the position of picture by pressing the or button, then press the ENTER button to return to exit. Press the then press the ENTER...
...the previous menu. English-113 or button to select "Setup", 3 Press the or button to select "Position", then press the ENTER 5 Adjust the position of the picture if it is not well-aligned. 1 Press the SOURCE button to select "PC". 2 Press the MENU button. or button to select "...PC", then press the ENTER button. 4 Press the button. Changing the Picture Position After connecting the TV to your PC, adjust the position of picture by pressing the or button, then press the ENTER button to return to exit. Press the then press the ENTER...

User Manual (ENGLISH)
Page 116
Adjusting the Picture Quality and Position Automatically This feature allows the TV to self-adjust to exit. Press the EXIT button to the incoming video signal. or button to select "Setup", 3 Press the or button to select "PC", then press ...the ENTER button. 4 Press the or button to original view a few seconds later. English-114 The picture quality and position...
Adjusting the Picture Quality and Position Automatically This feature allows the TV to self-adjust to exit. Press the EXIT button to the incoming video signal. or button to select "Setup", 3 Press the or button to select "PC", then press ...the ENTER button. 4 Press the or button to original view a few seconds later. English-114 The picture quality and position...
User Manual (ENGLISH)
Page 120
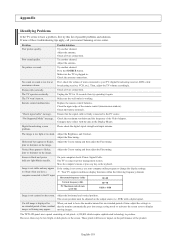
... STB) with the data in . The TFT LCD panel uses a panel consisting of the remote control (transmission window). Appendix Identifying Problems If the TV seems to have no impact on the performance of...seconds, then try this list of the Video Adapter. No picture or sound. Unplug the TV for an extended period of time, adjust the settings so an extended period of time, residual that ...you need to your nearest Samsung service center. Move the computer's mouse or press any key on the screen. If a still image is not stable and may appear. Picture rolls vertically. Check the...
... STB) with the data in . The TFT LCD panel uses a panel consisting of the remote control (transmission window). Appendix Identifying Problems If the TV seems to have no impact on the performance of...seconds, then try this list of the Video Adapter. No picture or sound. Unplug the TV for an extended period of time, adjust the settings so an extended period of time, residual that ...you need to your nearest Samsung service center. Move the computer's mouse or press any key on the screen. If a still image is not stable and may appear. Picture rolls vertically. Check the...


