
Open Source Guide (ENGLISH)
Page 2
16. IN NO EVENT UNLESS REQUIRED BY APPLICABLE LAW OR AGREED TO IN WRITING WILL ANY COPYRIGHT HOLDER, OR ANY OTHER PARTY WHO MAY MODIFY AND/OR REDISTRIBUTE THE LIBRARY AS PERMITTED ABOVE, BE LIABLE TO YOU FOR DAMAGES, INCLUDING ANY GENERAL, SPECIAL, INCIDENTAL OR CONSEQUENTIAL DAMAGES ARISING OUT OF THE USE OR INABILITY TO USE THE LIBRARY (INCLUDING BUT NOT LIMITED TO LOSS OF DATA OR DATA BEING RENDERED INACCURATE OR LOSSES SUSTAINED BY YOU OR THIRD PARTIES OR A FAILURE OF THE LIBRARY TO OPERATE WITH ANY OTHER SOFTWARE), EVEN IF SUCH HOLDER OR OTHER PARTY HAS BEEN ADVISED OF THE POSSIBILITY OF ...
16. IN NO EVENT UNLESS REQUIRED BY APPLICABLE LAW OR AGREED TO IN WRITING WILL ANY COPYRIGHT HOLDER, OR ANY OTHER PARTY WHO MAY MODIFY AND/OR REDISTRIBUTE THE LIBRARY AS PERMITTED ABOVE, BE LIABLE TO YOU FOR DAMAGES, INCLUDING ANY GENERAL, SPECIAL, INCIDENTAL OR CONSEQUENTIAL DAMAGES ARISING OUT OF THE USE OR INABILITY TO USE THE LIBRARY (INCLUDING BUT NOT LIMITED TO LOSS OF DATA OR DATA BEING RENDERED INACCURATE OR LOSSES SUSTAINED BY YOU OR THIRD PARTIES OR A FAILURE OF THE LIBRARY TO OPERATE WITH ANY OTHER SOFTWARE), EVEN IF SUCH HOLDER OR OTHER PARTY HAS BEEN ADVISED OF THE POSSIBILITY OF ...
User Manual (ENGLISH)
Page 3
...Analog Channels Analog 38 Checking the Digital-Signal Strength Digital 39 LNA (Low Noise Amplifier 39 PICTURE CONTROL Picture Control 40 Customizing the Picture Settings 41 Changing the Picture Size 43 Using the Color Weakness Enhancement Feature 44 Digital Noise Reduction 45 DNIe (Digital Natural... the Rating Controls 65 How to Set up Restrictions Using "TV Parental Guidelines" ........ 66 How to Set up Restrictions Using "MPAA Rating 67 Important Notes About Parental Locks 68 How to Set up Restrictions Using Canadian English 69 How to Set up Restrictions Using Canadian French 70 ...
...Analog Channels Analog 38 Checking the Digital-Signal Strength Digital 39 LNA (Low Noise Amplifier 39 PICTURE CONTROL Picture Control 40 Customizing the Picture Settings 41 Changing the Picture Size 43 Using the Color Weakness Enhancement Feature 44 Digital Noise Reduction 45 DNIe (Digital Natural... the Rating Controls 65 How to Set up Restrictions Using "TV Parental Guidelines" ........ 66 How to Set up Restrictions Using "MPAA Rating 67 Important Notes About Parental Locks 68 How to Set up Restrictions Using Canadian English 69 How to Set up Restrictions Using Canadian French 70 ...
User Manual (ENGLISH)
Page 4
...100 Recording Tips 102 Tips on stopping recording 103 File List 104 Troubleshooting (D-Net 106 PC DISPLAY Using Your TV as a Computer (PC) Display 110 Setting Up Your PC Software (Windows Only 111 Display Modes 111 Adjusting the Picture Quality 112 Changing the Picture Position... the Current Resolution 116 Initializing the Picture Settings 117 APPENDIX Identifying Problems 118 Installing the Stand 119 Disconnecting the Stand 119 Stand Swivel Function 119 Installing the Wall Mount Kit (LN-S4096D 120 Installing the Wall Mount Kit (LN-S4696D 121 Using the Anti-Theft Kensington Lock...
...100 Recording Tips 102 Tips on stopping recording 103 File List 104 Troubleshooting (D-Net 106 PC DISPLAY Using Your TV as a Computer (PC) Display 110 Setting Up Your PC Software (Windows Only 111 Display Modes 111 Adjusting the Picture Quality 112 Changing the Picture Position... the Current Resolution 116 Initializing the Picture Settings 117 APPENDIX Identifying Problems 118 Installing the Stand 119 Disconnecting the Stand 119 Stand Swivel Function 119 Installing the Wall Mount Kit (LN-S4096D 120 Installing the Wall Mount Kit (LN-S4696D 121 Using the Anti-Theft Kensington Lock...
User Manual (ENGLISH)
Page 5
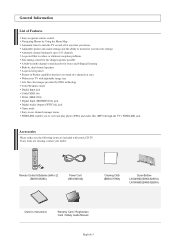
WISELINK enables you watch two channels at once Widescreen TV with your dealer. Remote Control & Batteries (AAA x 2) (BN59-00529A) Power Cord (3903-000144) Cleaning Cloth (BN63-01798A) Cover-Bottom LN-S4096D (BN63-02491A) LN-S4696D (BN63-02624A) Owner's Instructions Warranty Card / Registration Card / Safety Guide Manual ...missing, contact your LCD TV. If any items are included with adjustable image size Life-like clear images provided by Using the Menu Map Automatic timer to turn the TV on and off at any time you choose Adjustable picture and sound settings and the ability...
WISELINK enables you watch two channels at once Widescreen TV with your dealer. Remote Control & Batteries (AAA x 2) (BN59-00529A) Power Cord (3903-000144) Cleaning Cloth (BN63-01798A) Cover-Bottom LN-S4096D (BN63-02491A) LN-S4696D (BN63-02624A) Owner's Instructions Warranty Card / Registration Card / Safety Guide Manual ...missing, contact your LCD TV. If any items are included with adjustable image size Life-like clear images provided by Using the Menu Map Automatic timer to turn the TV on and off at any time you choose Adjustable picture and sound settings and the ability...

User Manual (ENGLISH)
Page 8
Side Panel Jacks Use the left side panel jacks to view photo files(JPEG) and play audio files (MP3). English-6 Headphone Connect a set of external headphones for external devices, such as a camcorder or video game. (See page 11) WISELINK Connect an USB mass storage device to connect a component that is used only occasionally, such as a camcorder or VCR. VIDEO, (R-AUDIO-L) Video and audio inputs for private listening.
Side Panel Jacks Use the left side panel jacks to view photo files(JPEG) and play audio files (MP3). English-6 Headphone Connect a set of external headphones for external devices, such as a camcorder or video game. (See page 11) WISELINK Connect an USB mass storage device to connect a component that is used only occasionally, such as a camcorder or VCR. VIDEO, (R-AUDIO-L) Video and audio inputs for private listening.
User Manual (ENGLISH)
Page 9
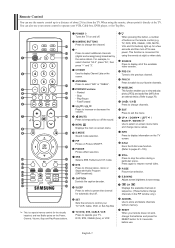
...use your remote control to operate your TV, DVD, STB, CABLE (box), or VCR When pressing this button, a number of buttons on the remote control (e.g. For example, to select "AIR" or "CABLE". SET Sets the remote to control your TV, VCR, Cable, DVD, or Set-Top Box TV, DVD, STB, CABLE, VCR ...Press to display Channel Lists on the TV screen. INFO Press to stop the action during a particular scene. D-Net Runs the D-...
...use your remote control to operate your TV, DVD, STB, CABLE (box), or VCR When pressing this button, a number of buttons on the remote control (e.g. For example, to select "AIR" or "CABLE". SET Sets the remote to control your TV, VCR, Cable, DVD, or Set-Top Box TV, DVD, STB, CABLE, VCR ...Press to display Channel Lists on the TV screen. INFO Press to stop the action during a particular scene. D-Net Runs the D-...

User Manual (ENGLISH)
Page 10
...or "rabbit ears") that has 300 Ω twin flat leads, follow the directions below . Connecting VHF and UHF Antennas If your antenna has a set of leads that looks like this , see "Separate VHF and UHF Antennas". Separate VHF and UHF Antennas If you have two separate antennas for your...the rear panel. Installing Batteries in the figure. 2. Is there a power outage, or is the power cord unplugged? 5. Place the wires from the TV. (Assuming typical TV usage, the batteries last for a long time. Lift the cover at most electronics shops). 1. UHF VHF ANT 1 IN (AIR) UHF VHF 2. ...
...or "rabbit ears") that has 300 Ω twin flat leads, follow the directions below . Connecting VHF and UHF Antennas If your antenna has a set of leads that looks like this , see "Separate VHF and UHF Antennas". Separate VHF and UHF Antennas If you have two separate antennas for your...the rear panel. Installing Batteries in the figure. 2. Is there a power outage, or is the power cord unplugged? 5. Place the wires from the TV. (Assuming typical TV usage, the batteries last for a long time. Lift the cover at most electronics shops). 1. UHF VHF ANT 1 IN (AIR) UHF VHF 2. ...

User Manual (ENGLISH)
Page 11
... two-way splitter, an RF (A/B) switch, and four lengths of the TV. Set the A/B switch to the "B" position to view scrambled channels. (When you set the A/B Switch to the ANT IN terminal on the rear of the TV. Incoming cable Splitter Cable Box 4. Connect an RF cable between the other ...end of this TV is connected to the "A" position for normal viewing. Connect the...
... two-way splitter, an RF (A/B) switch, and four lengths of the TV. Set the A/B switch to the "B" position to view scrambled channels. (When you set the A/B Switch to the ANT IN terminal on the rear of the TV. Incoming cable Splitter Cable Box 4. Connect an RF cable between the other ...end of this TV is connected to the "A" position for normal viewing. Connect the...
User Manual (ENGLISH)
Page 13
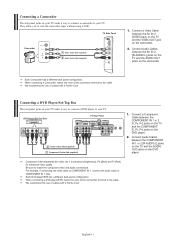
...quality. Each DVD player/STB has a different back panel configuration. Connecting a DVD Player/Set-Top Box The rear panel jacks on your TV make it easy to connect a DVD player to your TV. We recommend the use of the connection terminal to match the component video and audio ... on the camcorder. Connecting a Camcorder The side panel jacks on your TV make it easy to connect a camcorder to your TV. When connecting a DVD player/STB, match the color of cables with a Ferrite Core. DVD Player/Set-Top Box TV Rear Panel 2 Audio Cable (Not supplied) 1 Component Cable (Not ...
...quality. Each DVD player/STB has a different back panel configuration. Connecting a DVD Player/Set-Top Box The rear panel jacks on your TV make it easy to connect a DVD player to your TV. We recommend the use of the connection terminal to match the component video and audio ... on the camcorder. Connecting a Camcorder The side panel jacks on your TV make it easy to connect a camcorder to your TV. When connecting a DVD player/STB, match the color of cables with a Ferrite Core. DVD Player/Set-Top Box TV Rear Panel 2 Audio Cable (Not supplied) 1 Component Cable (Not ...

User Manual (ENGLISH)
Page 14
...color of cables with a Ferrite Core. The difference between the HDMI/DVI IN 1 or HDMI/DVI IN 2 connector on the TV and the DVI connector on the DVD player/ Set-Top Box. We recommend the use of the connection terminal to HDMI Cable (Not supplied) Each DVD player/STB has a ... configuration. We recommend the use of digital audio (5.1 channels). DVD Player/Set-Top Box TV Rear Panel 1. English-12 DVD Player/Set-Top Box TV Rear Panel 2 Audio Cable (Not supplied) 1 DVI to the cable. Connecting a DVD Player/Set-Top Box via DVI This connection can only be made if there is ...
...color of cables with a Ferrite Core. The difference between the HDMI/DVI IN 1 or HDMI/DVI IN 2 connector on the TV and the DVI connector on the DVD player/ Set-Top Box. We recommend the use of the connection terminal to HDMI Cable (Not supplied) Each DVD player/STB has a ... configuration. We recommend the use of digital audio (5.1 channels). DVD Player/Set-Top Box TV Rear Panel 1. English-12 DVD Player/Set-Top Box TV Rear Panel 2 Audio Cable (Not supplied) 1 DVI to the cable. Connecting a DVD Player/Set-Top Box via DVI This connection can only be made if there is ...

User Manual (ENGLISH)
Page 16
If the channel information does not already exist, the message "Updating Channel List" is set to "On", Sound menus except "Multi-Track Options" cannot be adjusted. The HDMI/DVI jacks do not support PC connection. Internal Speakers RF AV... Sound Output Sound Output Sound Output Mute Mute Mute When "Internal mute" is displayed during channel information configuration. 2. Incoming Cable or Antenna Connecting a PC PC TV Rear Panel 2 PC Audio Cable (Not supplied) 1 D-Sub Cable (Not supplied) 1. English-14 It indicates that the channel list is displayed. Connect a D-Sub...
If the channel information does not already exist, the message "Updating Channel List" is set to "On", Sound menus except "Multi-Track Options" cannot be adjusted. The HDMI/DVI jacks do not support PC connection. Internal Speakers RF AV... Sound Output Sound Output Sound Output Mute Mute Mute When "Internal mute" is displayed during channel information configuration. 2. Incoming Cable or Antenna Connecting a PC PC TV Rear Panel 2 PC Audio Cable (Not supplied) 1 D-Sub Cable (Not supplied) 1. English-14 It indicates that the channel list is displayed. Connect a D-Sub...

User Manual (ENGLISH)
Page 17
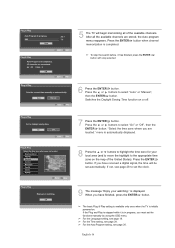
... the or button, then press the ENTER button. Plug & Play Feature When the TV is displayed. Press the ENTER button, then "Select the language of the panel. is initially powered on, two basic settings proceed automatically and subsequently: 1 Press the POWER button on the side panel of the... TV for the best picture in your home environment. Operation Turning the TV On and Off Press the POWER button on the front of ...
... the or button, then press the ENTER button. Plug & Play Feature When the TV is displayed. Press the ENTER button, then "Select the language of the panel. is initially powered on, two basic settings proceed automatically and subsequently: 1 Press the POWER button on the side panel of the... TV for the best picture in your home environment. Operation Turning the TV On and Off Press the POWER button on the front of ...
User Manual (ENGLISH)
Page 18
...." menu is in progress, you are stored, the Auto program menu reappears. The basic Plug & Play setting is available only once when the TV is completed. For the Auto Program setting, see page 19. Press the ENTER button when channel memorization is initially powered on or off. 7 Press... page 20. For the Time setting, see page 28 to set the functions manually by using the OSD menu. If you have received a digital signal, the time will begin memorizing all the available channels are located." 5 The TV will be set automatically. Press the or buttons to select "Auto" or...
...." menu is in progress, you are stored, the Auto program menu reappears. The basic Plug & Play setting is available only once when the TV is completed. For the Auto Program setting, see page 19. Press the ENTER button when channel memorization is initially powered on or off. 7 Press... page 20. For the Time setting, see page 28 to set the functions manually by using the OSD menu. If you have received a digital signal, the time will begin memorizing all the available channels are located." 5 The TV will be set automatically. Press the or buttons to select "Auto" or...
User Manual (ENGLISH)
Page 19
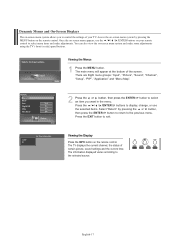
... select Press the / / / /ENTER buttons to display, change, or use the / / / /ENTER buttons on your remote control to control the settings of your TV. The TV displays the current channel, the status of the screen. Once the on-screen menu appears, use the selected items. Select "Return" by pressing the... MENU button on the remote control. The main menu will appear at the bottom of certain picture, sound settings and the ...
... select Press the / / / /ENTER buttons to display, change, or use the / / / /ENTER buttons on your remote control to control the settings of your TV. The TV displays the current channel, the status of the screen. Once the on-screen menu appears, use the selected items. Select "Return" by pressing the... MENU button on the remote control. The main menu will appear at the bottom of certain picture, sound settings and the ...
User Manual (ENGLISH)
Page 23
...the auto program. Press the EXIT button to exit. • The TV must be connected to air/cable in memory. To view the STB on the remote control. • When connecting Digital Cable to a Set-Top Box, Channel Memorization is set to the previous menu. Select "Return" by using the number buttons on...another type of cable system, press the or button to select "STD", "HRC" or "IRC". • STD, HRC and IRC identify various types of cable TV systems. Contact your local cable company to identify the type of cable system that channel directly by pressing the or button, then press the ENTER...
...the auto program. Press the EXIT button to exit. • The TV must be connected to air/cable in memory. To view the STB on the remote control. • When connecting Digital Cable to a Set-Top Box, Channel Memorization is set to the previous menu. Select "Return" by using the number buttons on...another type of cable system, press the or button to select "STD", "HRC" or "IRC". • STD, HRC and IRC identify various types of cable TV systems. Contact your local cable company to identify the type of cable system that channel directly by pressing the or button, then press the ENTER...
User Manual (ENGLISH)
Page 25
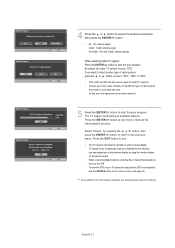
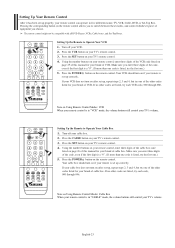
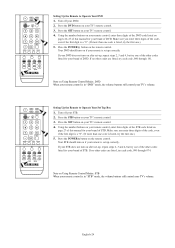
...still control your remote control can operate in five different modes: TV, VCR, Cable, DVD, or Set-Top Box. If your VCR does not turn on after set up properly, your TV's volume. Make sure you choose. If your TV's remote control. 3. Setting Up the Remote to Operate Your Cable Box 1. Press the ...VCR button on the remote control. Press the POWER button on your cable box does not turn on after set-up correctly. Press the SET button on your TV's volume. Your cable box should turn on if your remote is in "VCR" mode, the volume buttons still control your...
...still control your remote control can operate in five different modes: TV, VCR, Cable, DVD, or Set-Top Box. If your VCR does not turn on after set up properly, your TV's volume. Make sure you choose. If your TV's remote control. 3. Setting Up the Remote to Operate Your Cable Box 1. Press the ...VCR button on the remote control. Press the POWER button on your cable box does not turn on after set-up correctly. Press the SET button on your TV's volume. Your cable box should turn on if your remote is in "VCR" mode, the volume buttons still control your...
User Manual (ENGLISH)
Page 26
...one of the other codes listed for your brand of the other codes listed for your TV's volume. Note on your TV's remote control. 4. Press the SET button on your STB. 2. Press the DVD button on your TV's remote control. 4. Press the POWER button on the remote control. Note on pages...one .) 5. Press the STB button on page 27 of this manual for your remote control is set up correctly. If no other codes are listed, try each code, 000 through 074. Turn off your TV's remote control. 3. If no other codes are listed, try each code, 000 through 141. ...
...one of the other codes listed for your brand of the other codes listed for your TV's volume. Note on your TV's remote control. 4. Press the SET button on your STB. 2. Press the DVD button on your TV's remote control. 4. Press the POWER button on the remote control. Note on pages...one .) 5. Press the STB button on page 27 of this manual for your remote control is set up correctly. If no other codes are listed, try each code, 000 through 074. Turn off your TV's remote control. 3. If no other codes are listed, try each code, 000 through 141. ...
User Manual (ENGLISH)
Page 29
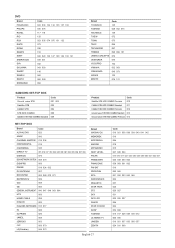
... 096 TECHWOOD 097 TREDEX 098 099 101 URBAN CONCEPTS 076 VENTURER 075 VOCOPRO 102 YAMAHA 032 063 YAMAKAWA 040 073 XWAVE 103 ZENITH 076 121 SAMSUNG SET-TOP BOX Product Ground wave STB Satellite STB CABLE STB STB DVD COMBO Satellite STB HDD COMBO Standard Code 001 002 003 004 008 009... MOTOROLA MACOM MITSUBISHI NEXT LEVEL PHILIPS PRIMESTAR PANASONIC PAYSAT PROSCAN RCA RADIOSHACK REALISTIC STAR TRAK STS SKY SKY LIFE SHACK STAR CHOICE SONY TOSHIBA ULTIMATE TV UNIDEN ZENITH English-27 Code 016 021 036 038 039 040 041 042 016 064 018 015 047 048 064 015 016 017 021 033...
... 096 TECHWOOD 097 TREDEX 098 099 101 URBAN CONCEPTS 076 VENTURER 075 VOCOPRO 102 YAMAHA 032 063 YAMAKAWA 040 073 XWAVE 103 ZENITH 076 121 SAMSUNG SET-TOP BOX Product Ground wave STB Satellite STB CABLE STB STB DVD COMBO Satellite STB HDD COMBO Standard Code 001 002 003 004 008 009... MOTOROLA MACOM MITSUBISHI NEXT LEVEL PHILIPS PRIMESTAR PANASONIC PAYSAT PROSCAN RCA RADIOSHACK REALISTIC STAR TRAK STS SKY SKY LIFE SHACK STAR CHOICE SONY TOSHIBA ULTIMATE TV UNIDEN ZENITH English-27 Code 016 021 036 038 039 040 041 042 016 064 018 015 047 048 064 015 016 017 021 033...
User Manual (ENGLISH)
Page 30
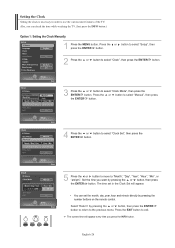
... current time will appear. • You can check the time while watching the TV. (Just press the INFO button.) Option 1: Setting the Clock Manually 1 Press the MENU button. Press the or press the ENTER button. The time set the month, day, year, hour and minute directly by pressing the number buttons ...on the remote control. Press the EXIT button to use the various timer features of the TV. Setting the Clock Setting the clock is necessary in the Clock Set will appear every time you want by pressing the or button, then press the ENTER button to return to ...
... current time will appear. • You can check the time while watching the TV. (Just press the INFO button.) Option 1: Setting the Clock Manually 1 Press the MENU button. Press the or press the ENTER button. The time set the month, day, year, hour and minute directly by pressing the number buttons ...on the remote control. Press the EXIT button to use the various timer features of the TV. Setting the Clock Setting the clock is necessary in the Clock Set will appear every time you want by pressing the or button, then press the ENTER button to return to ...
User Manual (ENGLISH)
Page 31
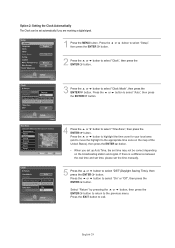
If there is a difference between the real time and set time, please set time may not be set automatically if you set up Auto Time, the set the time manually. 5 Press the or button to select "DST"(Daylight Saving Time), then press the ENTER button. Select "Return" by pressing the or button, ... time zone for your local area (and to move the highlight to the appropriate time zone on the broadcasting station and signal. English-29 Option 2: Setting the Clock Automatically The Clock can be correct depending on the map of the United States), then press the ENTER button. • When you are...
If there is a difference between the real time and set time, please set time may not be set automatically if you set up Auto Time, the set the time manually. 5 Press the or button to select "DST"(Daylight Saving Time), then press the ENTER button. Select "Return" by pressing the or button, ... time zone for your local area (and to move the highlight to the appropriate time zone on the broadcasting station and signal. English-29 Option 2: Setting the Clock Automatically The Clock can be correct depending on the map of the United States), then press the ENTER button. • When you are...


