
User Manual (ENGLISH)
Page 3
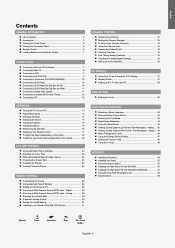
... Connecting a VCR 9 Connecting an S-VHS VCR 9 Connecting a Camcorder (LN-S3241D/LN-S4041D 10 Connecting a DVD Player 10 Connecting a DVD Player/Set-Top Box via DVI 10 Connecting a DVD Player/Set-Top Box via HDMI 11 Connecting a Digital Audio System 11 Connecting an Amplifier/DVD Home Theater 12...APPENDIX Identifying Problems 54 Installing the Stand 55 Disconnecting the Stand 55 Installing the Wall Mount Kit (LN-S2641D 56 Installing the Wall Mount Kit (LN-S3241D/LN-S4041D 57 Using the Anti-Theft Kensington Lock 58 Specifications 58 Symbol Press Important Note One-Touch Button...
... Connecting a VCR 9 Connecting an S-VHS VCR 9 Connecting a Camcorder (LN-S3241D/LN-S4041D 10 Connecting a DVD Player 10 Connecting a DVD Player/Set-Top Box via DVI 10 Connecting a DVD Player/Set-Top Box via HDMI 11 Connecting a Digital Audio System 11 Connecting an Amplifier/DVD Home Theater 12...APPENDIX Identifying Problems 54 Installing the Stand 55 Disconnecting the Stand 55 Installing the Wall Mount Kit (LN-S2641D 56 Installing the Wall Mount Kit (LN-S3241D/LN-S4041D 57 Using the Anti-Theft Kensington Lock 58 Specifications 58 Symbol Press Important Note One-Touch Button...
User Manual (ENGLISH)
Page 6
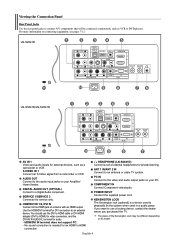
... connection, and the DVI-IN 'R-AUDIO-L' terminal for DVI connection to HDMI connection. You should use a locking device, contact the dealer where you want to the video and audio output jacks on its model. LN-S2641D LN-S3241D/LN-S4041D AV IN 1 Video and audio inputs for service only. PC IN... Connect to use the DVI to HDMI cable or DVI-HDMI adapter (DVI to an antenna or cable TV system. POWER INPUT Connect...
... connection, and the DVI-IN 'R-AUDIO-L' terminal for DVI connection to HDMI connection. You should use a locking device, contact the dealer where you want to the video and audio output jacks on its model. LN-S2641D LN-S3241D/LN-S4041D AV IN 1 Video and audio inputs for service only. PC IN... Connect to use the DVI to HDMI cable or DVI-HDMI adapter (DVI to an antenna or cable TV system. POWER INPUT Connect...
User Manual (ENGLISH)
Page 12
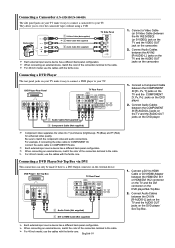
...COMPONENT IN, connect the audio cable to HDMI Cable or DVI-HDMI Adapter between the AV IN2 [VIDEO] (or S-VIDEO) jack on the TV and the VIDEO OUT jack on the DVD player. 2. Connect a DVI to COMPONENT IN also. Connecting a Camcorder (LN-S3241D/LN-S4041D) The side panel jacks on your ...and the AUDIO OUT jacks on the DVD player/ Set-Top Box. When connecting an external device, match the color of the connection terminal to HDMI Cable (Not supplied) 1. Each external input source device has a different back panel configuration. Connecting a DVD Player/Set-Top Box via DVI ...
...COMPONENT IN, connect the audio cable to HDMI Cable or DVI-HDMI Adapter between the AV IN2 [VIDEO] (or S-VIDEO) jack on the TV and the VIDEO OUT jack on the DVD player. 2. Connect a DVI to COMPONENT IN also. Connecting a Camcorder (LN-S3241D/LN-S4041D) The side panel jacks on your ...and the AUDIO OUT jacks on the DVD player/ Set-Top Box. When connecting an external device, match the color of the connection terminal to HDMI Cable (Not supplied) 1. Each external input source device has a different back panel configuration. Connecting a DVD Player/Set-Top Box via DVI ...

User Manual (ENGLISH)
Page 13
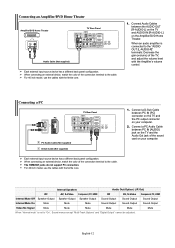
...smaller in size, has the HDCP (High Bandwidth Digital Copy Protection) coding feature installed, and supports multi-channel digital audio. The difference between HDMI and DVI is that enables the transmission of digital audio and video signals using a single cable without compression. • "Multimedia interface" ... configuration. For 40 inch model, use the cables with the ferrite core. Connect an Optical Cable between the HDMI/DVI 1 or HDMI/DVI 2 connector on the TV and the HDMI connector on your TV. When a Digital Audio System is a more accurate name for it especially because it ...
...smaller in size, has the HDCP (High Bandwidth Digital Copy Protection) coding feature installed, and supports multi-channel digital audio. The difference between HDMI and DVI is that enables the transmission of digital audio and video signals using a single cable without compression. • "Multimedia interface" ... configuration. For 40 inch model, use the cables with the ferrite core. Connect an Optical Cable between the HDMI/DVI 1 or HDMI/DVI 2 connector on the TV and the HDMI connector on your TV. When a Digital Audio System is a more accurate name for it especially because it ...
User Manual (ENGLISH)
Page 14
...level with the Amplifier's volume control. Internal Speakers Audio Out (Optical, L/R Out) RF AV, S-Video Component, PC, HDMI RF AV, S-Video Component, PC, HDMI Internal Mute Off Speaker Output Speaker Output Speaker Output Sound Output Sound Output Sound Output Internal Mute On Mute Mute Mute Sound... menus except "Multi-Track Options" and "Digital Output" cannot be adjusted. When an audio amplifier is set to the cable. The HDMI/DVI jacks do not support PC connection. Connecting an Amplifier/DVD Home Theater Amplifier/DVD Home Theater TV Rear Panel Audio Cable (Not ...
...level with the Amplifier's volume control. Internal Speakers Audio Out (Optical, L/R Out) RF AV, S-Video Component, PC, HDMI RF AV, S-Video Component, PC, HDMI Internal Mute Off Speaker Output Speaker Output Speaker Output Sound Output Sound Output Sound Output Internal Mute On Mute Mute Mute Sound... menus except "Multi-Track Options" and "Digital Output" cannot be adjusted. When an audio amplifier is set to the cable. The HDMI/DVI jacks do not support PC connection. Connecting an Amplifier/DVD Home Theater Amplifier/DVD Home Theater TV Rear Panel Audio Cable (Not ...
User Manual (ENGLISH)
Page 24
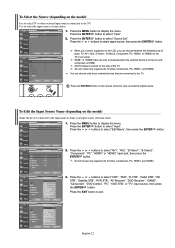
... "Input". Press the ENTER button to display the menu. Press the ENTER button to display the menu. AV2/S-Video2 is turned on and connected via HDMI. To Edit the Input Source Name (depending on the TV's rear panel. Press the MENU button to select "Input". 2. HDMI1 or HDMI2 input can choose...
... "Input". Press the ENTER button to display the menu. Press the ENTER button to display the menu. AV2/S-Video2 is turned on and connected via HDMI. To Edit the Input Source Name (depending on the TV's rear panel. Press the MENU button to select "Input". 2. HDMI1 or HDMI2 input can choose...

User Manual (ENGLISH)
Page 25
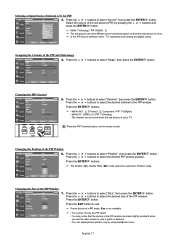
... button. 4. Press the or buttons to select the "Dynamic", "Standard", "Movie", or "Custom" picture setting. Press the or buttons to display the menu. When in HDMI, PC or any Component mode. • The Tint cannot be adjusted while watching Digital TV. • Each adjusted setting will also be adjusted accordingly. For...
... button. 4. Press the or buttons to select the "Dynamic", "Standard", "Movie", or "Custom" picture setting. Press the or buttons to display the menu. When in HDMI, PC or any Component mode. • The Tint cannot be adjusted while watching Digital TV. • Each adjusted setting will also be adjusted accordingly. For...
User Manual (ENGLISH)
Page 27
..., S-VIDEO,and all COMPONENT (480i, 480p) modes, all screen modes can be selected. (16:9 • Zoom1 • Zoom2 • 4:3). • In TV(DTV), DVI, PC, HDMI, COMPONENT (720p, 1080i) modes, only 16:9 & 4:3 modes can not change the picture size. • If you watch a still image or the 4:3 mode for a long time...
..., S-VIDEO,and all COMPONENT (480i, 480p) modes, all screen modes can be selected. (16:9 • Zoom1 • Zoom2 • 4:3). • In TV(DTV), DVI, PC, HDMI, COMPONENT (720p, 1080i) modes, only 16:9 & 4:3 modes can not change the picture size. • If you watch a still image or the 4:3 mode for a long time...
User Manual (ENGLISH)
Page 28
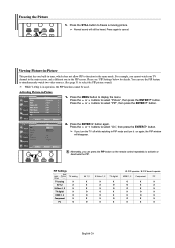
..., the PIP function cannot be heard. PIP Settings Sub Main Picture Picture TV analog TV analog X AV 1,2 X S-Video 1, 2 X TV digital X HDMI 1, 2 O Component X PC O AV 1,2 X X X O O X O S-Video 1, 2 X X X O O X X TV digital X O O X X O X O: PIP operates / X: PIP doesn't operate HDMI 1, 2 Component PC O X X O X X O X X X O X X O X O X X X X X English-26 Activating Picture-in the PIP screen. Press the ENTER button again. For example, you turn...
..., the PIP function cannot be heard. PIP Settings Sub Main Picture Picture TV analog TV analog X AV 1,2 X S-Video 1, 2 X TV digital X HDMI 1, 2 O Component X PC O AV 1,2 X X X O O X O S-Video 1, 2 X X X O O X X TV digital X O O X X O X O: PIP operates / X: PIP doesn't operate HDMI 1, 2 Component PC O X X O X X O X X X O X X O X O X X X X X English-26 Activating Picture-in the PIP screen. Press the ENTER button again. For example, you turn...
User Manual (ENGLISH)
Page 29
.... Press the or buttons to TV. Press the ENTER buttons. • MAIN: AV(1, 2), S-Video(1, 2), Component / PIP: TV(Digital) • MAIN: PC, HDMI(1,2) / PIP: TV(Analog) • The channel can be selected in Position mode. Press the ENTER buttons. If main picture is in PC mode, Size is.... Press the or buttons to select the desired PIP window position. Selecting a Signal Source (External A/V) for PIP. 3. MAIN: TV(Analog) / PIP: HDMI(1, 2) The sub picture can adjust picture position only by pressing the or buttons and press the ENTER button. Changing the Size of the sub picture...
.... Press the or buttons to TV. Press the ENTER buttons. • MAIN: AV(1, 2), S-Video(1, 2), Component / PIP: TV(Digital) • MAIN: PC, HDMI(1,2) / PIP: TV(Analog) • The channel can be selected in Position mode. Press the ENTER buttons. If main picture is in PC mode, Size is.... Press the or buttons to select the desired PIP window position. Selecting a Signal Source (External A/V) for PIP. 3. MAIN: TV(Analog) / PIP: HDMI(1, 2) The sub picture can adjust picture position only by pressing the or buttons and press the ENTER button. Changing the Size of the sub picture...
User Manual (ENGLISH)
Page 47
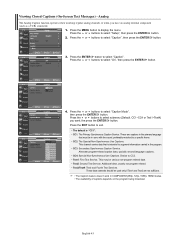
... an analog external component (such as a VCR) connected. 1. English-45 These are not sufficient. • The Caption feature doesn't work in COMPONENT(480p, 720p, 1080i), HDMI modes. • The availability of captions depends on the program being broadcast. Press the or buttons to CC2. • Text1: First Text Service. These data...
... an analog external component (such as a VCR) connected. 1. English-45 These are not sufficient. • The Caption feature doesn't work in COMPONENT(480p, 720p, 1080i), HDMI modes. • The availability of captions depends on the program being broadcast. Press the or buttons to CC2. • Text1: First Text Service. These data...


