

Quick Guide (easy Manual) (ver.1.0) (English)
Page 9
...channels in sequence. (These buttons change the batteries and press the Reset button for the TV to your remote does not work, change channels in -Picture ON/OFF. ANTENNA Press to display he on the current broadcast. For example, to bring up the Anynet menu. Anynet Press the Anynet button to... select channel "54-3", press "54", then press "-" and "3". FAV.CH Press to switch to turn off the sound. TV, VCR, CABLE, DVD or Samsung Set-top box. VOL + and VOL Press to stop the action during a particular scene. MENU Displays the main on and off. STILL Press to increase...
...channels in sequence. (These buttons change the batteries and press the Reset button for the TV to your remote does not work, change channels in -Picture ON/OFF. ANTENNA Press to display he on the current broadcast. For example, to bring up the Anynet menu. Anynet Press the Anynet button to... select channel "54-3", press "54", then press "-" and "3". FAV.CH Press to switch to turn off the sound. TV, VCR, CABLE, DVD or Samsung Set-top box. VOL + and VOL Press to stop the action during a particular scene. MENU Displays the main on and off. STILL Press to increase...
Quick Guide (easy Manual) (ver.1.0) (English)
Page 10
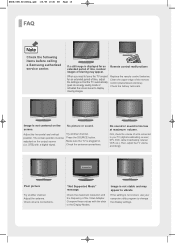
BN68-00515U-X0Eng.qxd 1/5/05 10:01 PM Page 10 FAQ Check the following items before calling a Samsung authorized service center. Remote control malfunctions When you need to display moving images. Replace the remote control batteries. STB) with the data in . ... screen saver to leave the TV unused for an extended period of units connected to your computer utility program to vibrate. No picture or sound. Check the antenna connections. Poor picture Try another channel. "Not Supported Mode" message. If a still image is plugged in the Display Modes. The screen position ...
BN68-00515U-X0Eng.qxd 1/5/05 10:01 PM Page 10 FAQ Check the following items before calling a Samsung authorized service center. Remote control malfunctions When you need to display moving images. Replace the remote control batteries. STB) with the data in . ... screen saver to leave the TV unused for an extended period of units connected to your computer utility program to vibrate. No picture or sound. Check the antenna connections. Poor picture Try another channel. "Not Supported Mode" message. If a still image is plugged in the Display Modes. The screen position ...
Quick Guide (easy Manual) (ver.1.0) (English)
Page 5
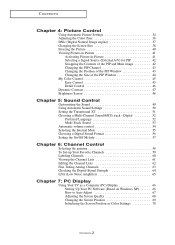
... 34 Adjusting the Color Tone 36 DNle (Digital Natural Image engine 37 Changing the Screen Size 38 Freezing the Picture 40 Viewing Picture-in-Picture 41 Activating Picture-in-Picture 41 Selecting a Signal Source (External A/V) for PIP 42 Swapping the Contents of the PIP and Main image 42 Changing the PIP Channel 43 Changing the...
... 34 Adjusting the Color Tone 36 DNle (Digital Natural Image engine 37 Changing the Screen Size 38 Freezing the Picture 40 Viewing Picture-in-Picture 41 Activating Picture-in-Picture 41 Selecting a Signal Source (External A/V) for PIP 42 Swapping the Contents of the PIP and Main image 42 Changing the PIP Channel 43 Changing the...
Quick Guide (easy Manual) (ver.1.0) (English)
Page 7
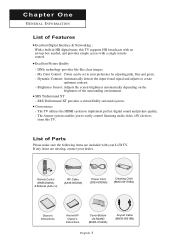
...Power Cord (3903-000085) Cleaning Cloth (BN63-001798A) Owner's Instructions Anynet AV Owner's Instructions Cover-Bottom LN-R408D (BN63-01640A) Anynet Cable (BN39-00518B) English-1 Excellent Picture Quality - My Color Control: Colors can be set -top box needed, and provides simple access with no... Dynamic Contrast: Automatically detects the input visual signal and adjusts to implement perfect digital sound and picture quality. - The Anynet system enables you to easily control Samsung audio-video (AV) devices from this TV supports HD broadcasts with a single remote control. List...
...Power Cord (3903-000085) Cleaning Cloth (BN63-001798A) Owner's Instructions Anynet AV Owner's Instructions Cover-Bottom LN-R408D (BN63-01640A) Anynet Cable (BN39-00518B) English-1 Excellent Picture Quality - My Color Control: Colors can be set -top box needed, and provides simple access with no... Dynamic Contrast: Automatically detects the input visual signal and adjusts to implement perfect digital sound and picture quality. - The Anynet system enables you to easily control Samsung audio-video (AV) devices from this TV supports HD broadcasts with a single remote control. List...
Quick Guide (easy Manual) (ver.1.0) (English)
Page 10
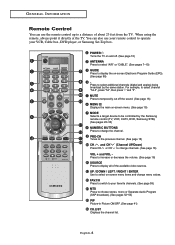
...-screen menu items and change menu values. UP / DOWN / LEFT / RIGHT / ENTER Use to select additional channels (digital and analog) being broadcast by the Samsung remote control (TV, VCR, CATV, DVD, Samsung STB). (See pages 28~30) NUMERIC BUTTONS Press to operate your VCR, Cable box, DVD player, or... Samsung Set-Top box. For example, to choose stereo, mono or Separate Audio Program (SAP broadcast). (See pages 52~53) PIP Picture-in Picture ON/OFF. (See page 41) CH.LIST Displays the channel list. FAV.CH Press...
...-screen menu items and change menu values. UP / DOWN / LEFT / RIGHT / ENTER Use to select additional channels (digital and analog) being broadcast by the Samsung remote control (TV, VCR, CATV, DVD, Samsung STB). (See pages 28~30) NUMERIC BUTTONS Press to operate your VCR, Cable box, DVD player, or... Samsung Set-Top box. For example, to choose stereo, mono or Separate Audio Program (SAP broadcast). (See pages 52~53) PIP Picture-in Picture ON/OFF. (See page 41) CH.LIST Displays the channel list. FAV.CH Press...

Quick Guide (easy Manual) (ver.1.0) (English)
Page 19
English-13 CONNECTIONS Connecting an S-VHS VCR Your Samsung TV can be connected to an S-Video signal from an S-VHS VCR. (This connection delivers a better picture as compared to a standard VHS VCR.) 1 To begin, follow steps 1-3 in the previous section to connect the antenna or cable to your VCR and your ...
English-13 CONNECTIONS Connecting an S-VHS VCR Your Samsung TV can be connected to an S-Video signal from an S-VHS VCR. (This connection delivers a better picture as compared to a standard VHS VCR.) 1 To begin, follow steps 1-3 in the previous section to connect the antenna or cable to your VCR and your ...
Quick Guide (easy Manual) (ver.1.0) (English)
Page 25
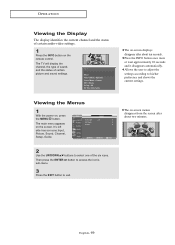
...10 seconds and it disappears automatically. English-19 O P E R AT I O N Viewing the Display The display identifies the current channel and the status of certain picture and sound settings. The TV will display the channel, the type of sound, and the status of certain audio-video settings. 1 Press the INFO button...button to access the icon's sub-menu. 3 Press the EXIT button to select one of the six icons. It's left side has six icons:Input, Picture, Sound, Channel, Setup, Guide. 2 Use the UP/DOWN buttons to exit. Viewing the Menus 1 With the power on the screen. The main ...
...10 seconds and it disappears automatically. English-19 O P E R AT I O N Viewing the Display The display identifies the current channel and the status of certain picture and sound settings. The TV will display the channel, the type of sound, and the status of certain audio-video settings. 1 Press the INFO button...button to access the icon's sub-menu. 3 Press the EXIT button to select one of the six icons. It's left side has six icons:Input, Picture, Sound, Channel, Setup, Guide. 2 Use the UP/DOWN buttons to exit. Viewing the Menus 1 With the power on the screen. The main ...
Quick Guide (easy Manual) (ver.1.0) (English)
Page 40
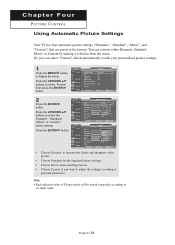
...DOWN buttons to personal preference. Press the UP/DOWN buttons to its input mode. English-34 Chapter Four PICTURE CONTROL Using Automatic Picture Settings Your TV has four automatic picture settings ("Dynamic", "Standard", "Movie", and "Custom") that are preset at the factory. You can ...select "Custom" which automatically recalls your personalized picture settings. 1 Press the MENU button to display the menu. Note • Each adjusted value of the picture. • Choose Standard for the standard factory settings. • Choose Movie when ...
...DOWN buttons to personal preference. Press the UP/DOWN buttons to its input mode. English-34 Chapter Four PICTURE CONTROL Using Automatic Picture Settings Your TV has four automatic picture settings ("Dynamic", "Standard", "Movie", and "Custom") that are preset at the factory. You can ...select "Custom" which automatically recalls your personalized picture settings. 1 Press the MENU button to display the menu. Note • Each adjusted value of the picture. • Choose Standard for the standard factory settings. • Choose Movie when ...

Quick Guide (easy Manual) (ver.1.0) (English)
Page 41
... color will also be adjusted accordingly. Press the EXIT button to decrease or increase the value of a particular item. Press the ENTER button. English-35 PICTURE CONTROL 3 Press the UP/DOWN buttons to select "Contrast", "Brightness", "Sharpness", "Color", or "Tint", then press the ENTER button. 4 Press the LEFT/RIGHT buttons to...
... color will also be adjusted accordingly. Press the EXIT button to decrease or increase the value of a particular item. Press the ENTER button. English-35 PICTURE CONTROL 3 Press the UP/DOWN buttons to select "Contrast", "Brightness", "Sharpness", "Color", or "Tint", then press the ENTER button. 4 Press the LEFT/RIGHT buttons to...

Quick Guide (easy Manual) (ver.1.0) (English)
Page 42
... the following Color Tone settings: "Cool 2", "Cool 1", "Normal", "Warm 1", "Warm 2" according to select "Mode". Press the UP/DOWN buttons to select "Picture", then press the ENTER button. 2 Press the ENTER button. 3 Press the UP/DOWN buttons to select "Color Tone", then press the ENTER button. 4 Press the... UP/DOWN buttons to display the menu. English-36 PICTURE CONTROL Adjusting the Color Tone You can change the color of the entire screen according to your preference. 1 Press the MENU button to select "...
... the following Color Tone settings: "Cool 2", "Cool 1", "Normal", "Warm 1", "Warm 2" according to select "Mode". Press the UP/DOWN buttons to select "Picture", then press the ENTER button. 2 Press the ENTER button. 3 Press the UP/DOWN buttons to select "Color Tone", then press the ENTER button. 4 Press the... UP/DOWN buttons to display the menu. English-36 PICTURE CONTROL Adjusting the Color Tone You can change the color of the entire screen according to your preference. 1 Press the MENU button to select "...
Quick Guide (easy Manual) (ver.1.0) (English)
Page 43
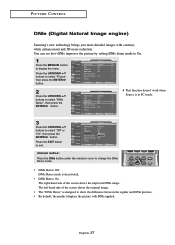
...then press the ENTER button. Press the UP/DOWN buttons to select "Picture", then press the ENTER button. 2 Press the UP/DOWN buttons to display the menu. PICTURE CONTROL DNIe (Digital Natural Image engine) Samsung's new technology brings you more detailed images with DNIe applied. This function ...is designed to exit. English-37 Press the EXIT button to show the difference between the regular and DNIe pictures. • By default, the product displays the picture with contrast, white enhancement and 3D noise reduction. The left-hand side of the screen shows the improved DNIe...
...then press the ENTER button. Press the UP/DOWN buttons to select "Picture", then press the ENTER button. 2 Press the UP/DOWN buttons to display the menu. PICTURE CONTROL DNIe (Digital Natural Image engine) Samsung's new technology brings you more detailed images with DNIe applied. This function ...is designed to exit. English-37 Press the EXIT button to show the difference between the regular and DNIe pictures. • By default, the product displays the picture with contrast, white enhancement and 3D noise reduction. The left-hand side of the screen shows the improved DNIe...

Quick Guide (easy Manual) (ver.1.0) (English)
Page 44
.... Press the EXIT button to exit. • 16:9 : Sets the picture to 16:9 wide mode. • Panorama : Use this mode for the wide aspect ratio of a panoramic picture. • Zoom1 : Magnifies the size of the picture on the type of video input. 1 Press the MENU button to display ... Changing the Screen Size Screen size selection depends on the screen. • Zoom2 : Expands the Zoom1 format picture. • 4:3 : Sets the picture to 4:3 normal mode. Press the UP/DOWN buttons to select "Picture", then press the ENTER button. 2 Press the UP/DOWN buttons to select "Size", then press the ENTER...
.... Press the EXIT button to exit. • 16:9 : Sets the picture to 16:9 wide mode. • Panorama : Use this mode for the wide aspect ratio of a panoramic picture. • Zoom1 : Magnifies the size of the picture on the type of video input. 1 Press the MENU button to display ... Changing the Screen Size Screen size selection depends on the screen. • Zoom2 : Expands the Zoom1 format picture. • 4:3 : Sets the picture to 4:3 normal mode. Press the UP/DOWN buttons to select "Picture", then press the ENTER button. 2 Press the UP/DOWN buttons to select "Size", then press the ENTER...
Quick Guide (easy Manual) (ver.1.0) (English)
Page 45
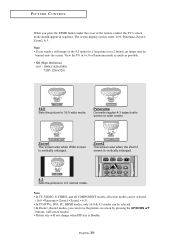
Zoom1 The screen size when Wide screen is vertically enlarged. 4:3 Sets the picture to 4:3 normal mode. View the TV in sequence. Note • In TV, VIDEO, S-VIDEO,...39 Note • If you can move the picture on screen by pressing the UP/DOWN buttons. (All screen modes) • Picture size will not change when PIP size is Double. PICTURE CONTROL When you press the P.SIZE button under the.... • HD (High Definition) 16:9 - 1080i (1920x1080) 720P (1280x720) 16:9 Sets the picture to 16:9 wide mode. The screen displays in this order: 16:9, Panorama, Zoom1, Zoom2, 4:3.
Zoom1 The screen size when Wide screen is vertically enlarged. 4:3 Sets the picture to 4:3 normal mode. View the TV in sequence. Note • In TV, VIDEO, S-VIDEO,...39 Note • If you can move the picture on screen by pressing the UP/DOWN buttons. (All screen modes) • Picture size will not change when PIP size is Double. PICTURE CONTROL When you press the P.SIZE button under the.... • HD (High Definition) 16:9 - 1080i (1920x1080) 720P (1280x720) 16:9 Sets the picture to 16:9 wide mode. The screen displays in this order: 16:9, Panorama, Zoom1, Zoom2, 4:3.
Quick Guide (easy Manual) (ver.1.0) (English)
Page 46
PICTURE CONTROL Freezing the Picture 1 Press the STILL button to cancel. English-40 Press again to freeze a moving picture. • Normal sound will still be heard.
PICTURE CONTROL Freezing the Picture 1 Press the STILL button to cancel. English-40 Press again to freeze a moving picture. • Normal sound will still be heard.

Quick Guide (easy Manual) (ver.1.0) (English)
Page 47
Press the UP/DOWN buttons to select "On", then press the ENTER button. Press the UP/DOWN buttons to select "Picture", then press the ENTER button. Activating Picture-in-Picture 1 Press the MENU button to simultaneously watch one TV channel in the main screen, and a different one built-in tuner...can use the PIP feature to display the menu. Alternate method : Press the PIP button on again, the PIP window will disappear. PICTURE CONTROL Viewing Picture-in-Picture This product has one in the PIP screen. Press the UP/DOWN buttons to select "PIP", then press the ENTER button. 2 ...
Press the UP/DOWN buttons to select "On", then press the ENTER button. Press the UP/DOWN buttons to select "Picture", then press the ENTER button. Activating Picture-in-Picture 1 Press the MENU button to simultaneously watch one TV channel in the main screen, and a different one built-in tuner...can use the PIP feature to display the menu. Alternate method : Press the PIP button on again, the PIP window will disappear. PICTURE CONTROL Viewing Picture-in-Picture This product has one in the PIP screen. Press the UP/DOWN buttons to select "PIP", then press the ENTER button. 2 ...

Quick Guide (easy Manual) (ver.1.0) (English)
Page 48
... buttons and press the ENTER button. • MAIN : TV(ATV) PIP : HDMI • The sub picture can serve different source selections based on what the main picture is set to select "Swap", then press the ENTER button. Select the source of the PIP and Main image... 4 Press the UP/DOWN buttons to . English-42 PICTURE CONTROL PIP Settings Main Picture Sub Picture DTV DTV X ATV X ATV X X AV O X S-Video O X COM1 O X COM2 O X PC X X HDMI X O Note • ATV : Analog TV • DTV :...
... buttons and press the ENTER button. • MAIN : TV(ATV) PIP : HDMI • The sub picture can serve different source selections based on what the main picture is set to select "Swap", then press the ENTER button. Select the source of the PIP and Main image... 4 Press the UP/DOWN buttons to . English-42 PICTURE CONTROL PIP Settings Main Picture Sub Picture DTV DTV X ATV X ATV X X AV O X S-Video O X COM1 O X COM2 O X PC X X HDMI X O Note • ATV : Analog TV • DTV :...

Quick Guide (easy Manual) (ver.1.0) (English)
Page 49
Alternate method : Press the PIP Channel buttons under the remote's cover. Press the ENTER buttons. • The Double ( ) mode cannot be active when the sub picture is set to select the desired PIP window position. Press the ENTER buttons. • MAIN : AV, S-Video, COM1, COM2 PIP : TV(DTV) • ..., HDMI PIP : TV(ATV) • The channel can be selected in the PIP window. Press the UP/DOWN buttons to TV. English-43 PICTURE CONTROL Changing the PIP Channel 5 Press the UP/DOWN buttons to select the desired channel in position. Press the UP/DOWN buttons to select "PIP...
Alternate method : Press the PIP Channel buttons under the remote's cover. Press the ENTER buttons. • The Double ( ) mode cannot be active when the sub picture is set to select the desired PIP window position. Press the ENTER buttons. • MAIN : AV, S-Video, COM1, COM2 PIP : TV(DTV) • ..., HDMI PIP : TV(ATV) • The channel can be selected in the PIP window. Press the UP/DOWN buttons to TV. English-43 PICTURE CONTROL Changing the PIP Channel 5 Press the UP/DOWN buttons to select the desired channel in position. Press the UP/DOWN buttons to select "PIP...

Quick Guide (easy Manual) (ver.1.0) (English)
Page 50
Press the UP/DOWN buttons to select the desired size of the PIP Window 7 Press the UP/DOWN buttons to view a game or karaoke. • You can adjust picture position only by using the size menu. English-44 Press the EXIT button to exit. • When the PC is in energy saving mode, you cannot choose the PIP option. • You may notice that the picture in the PIP window becomes slightly unnatural when you use the main screen to select "Size", then press the ENTER button. PICTURE CONTROL Changing the Size of the PIP window. Press the ENTER button.
Press the UP/DOWN buttons to select the desired size of the PIP Window 7 Press the UP/DOWN buttons to view a game or karaoke. • You can adjust picture position only by using the size menu. English-44 Press the EXIT button to exit. • When the PC is in energy saving mode, you cannot choose the PIP option. • You may notice that the picture in the PIP window becomes slightly unnatural when you use the main screen to select "Size", then press the ENTER button. PICTURE CONTROL Changing the Size of the PIP window. Press the ENTER button.
Quick Guide (easy Manual) (ver.1.0) (English)
Page 51
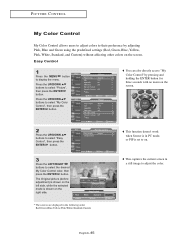
... press the ENTER button. This captures the current screen in PC mode, or PIP is set to adjust the color. The Original picture (before adjustment) is shown on the left side, while the selected mode is in a still image to on. You can also directly access "My Color ... are displayed in the following order: Red-Green-Blue-Yellow-Pink-White-Standard-Custom This function doesn't work when Source is shown on the screen. PICTURE CONTROL My Color Control My Color Control allows users to adjust colors to select the desired My Color Control color, then press the ENTER button...
... press the ENTER button. This captures the current screen in PC mode, or PIP is set to adjust the color. The Original picture (before adjustment) is shown on the left side, while the selected mode is in a still image to on. You can also directly access "My Color ... are displayed in the following order: Red-Green-Blue-Yellow-Pink-White-Standard-Custom This function doesn't work when Source is shown on the screen. PICTURE CONTROL My Color Control My Color Control allows users to adjust colors to select the desired My Color Control color, then press the ENTER button...
Quick Guide (easy Manual) (ver.1.0) (English)
Page 52
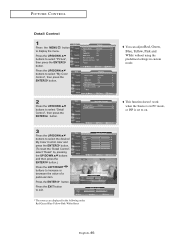
... custom mode. This function doesn't work when the Source is set to increase or decrease the value of a particular item. PICTURE CONTROL Detail Control 1 Press the MENU button to select "Picture", then press the ENTER button. Press the UP/DOWN buttons to display the menu. Press the UP/DOWN buttons to select...
... custom mode. This function doesn't work when the Source is set to increase or decrease the value of a particular item. PICTURE CONTROL Detail Control 1 Press the MENU button to select "Picture", then press the ENTER button. Press the UP/DOWN buttons to display the menu. Press the UP/DOWN buttons to select...

