

Quick Guide (easy Manual) (ver.1.0) (English)
Page 4
... the copy protection system regulated by your digital cable service provider. These PCMCIA card modules or CableCARDs will take few minutes depending on your particular connections. • Some channels may appear. When the CableCARD is called CableCARDs). This new standard is inserted into the CableCARD slot of a new digital cable standard...
... the copy protection system regulated by your digital cable service provider. These PCMCIA card modules or CableCARDs will take few minutes depending on your particular connections. • Some channels may appear. When the CableCARD is called CableCARDs). This new standard is inserted into the CableCARD slot of a new digital cable standard...

Quick Guide (easy Manual) (ver.1.0) (English)
Page 5
It is currently incompatible with many existing TV antennas. Can I connect my DTV set -top receiver to put up outside antennas for broadcast. If your present antenna may work fine. there is it was originally encoded ... as long as analog TV and works well with broadcast DTV set-top receivers. All you won't have to the transmission tower. Is the antenna I connect an antenna in height. However, DTV broadcast channel assignments are not covered by browsing selected Internet web sites such as analog TV receivers to use...
It is currently incompatible with many existing TV antennas. Can I connect my DTV set -top receiver to put up outside antennas for broadcast. If your present antenna may work fine. there is it was originally encoded ... as long as analog TV and works well with broadcast DTV set-top receivers. All you won't have to the transmission tower. Is the antenna I connect an antenna in height. However, DTV broadcast channel assignments are not covered by browsing selected Internet web sites such as analog TV receivers to use...
Quick Guide (easy Manual) (ver.1.0) (English)
Page 6
... How to assemble the Stand-Base 19 Connections Connecting VHF and UHF Antennas 22 Connecting Cable TV 23 Connecting CableCARD 25 Connecting a VCR 26 Connecting a Camcorder 27 Connecting a DVD Player 28 Connecting a DTV Receiver 29 Connecting to HDMI (High Definition Multimedia Interface 30 Connecting a Digital TV Set-Top Box 31 Connecting a Digital Audio System 32 Connecting to an Analog Amplifier 33 Operation...
... How to assemble the Stand-Base 19 Connections Connecting VHF and UHF Antennas 22 Connecting Cable TV 23 Connecting CableCARD 25 Connecting a VCR 26 Connecting a Camcorder 27 Connecting a DVD Player 28 Connecting a DTV Receiver 29 Connecting to HDMI (High Definition Multimedia Interface 30 Connecting a Digital TV Set-Top Box 31 Connecting a Digital Audio System 32 Connecting to an Analog Amplifier 33 Operation...
Quick Guide (easy Manual) (ver.1.0) (English)
Page 7
...129 Using the CableCARD 131 Using the CableCARD Setup Function ..........132 Appendix Troubleshooting 136 Care and Maintenance 137 Specifications 138 Dimensions (HP-R4252 139 Dimensions (HP-R5052 141 Note • The information contained in this User's Manual is subject to change without prior notice for improvement, and...Enhancement Option 110 Viewing Closed Captions (On-Screen Text Messages) - Analog 111 Viewing Closed Captions (On-Screen Text Messages) - Connecting a PC and Operation Connecting a PC 90 Changing the Position of the TV's software and the regional conditions. 7
...129 Using the CableCARD 131 Using the CableCARD Setup Function ..........132 Appendix Troubleshooting 136 Care and Maintenance 137 Specifications 138 Dimensions (HP-R4252 139 Dimensions (HP-R5052 141 Note • The information contained in this User's Manual is subject to change without prior notice for improvement, and...Enhancement Option 110 Viewing Closed Captions (On-Screen Text Messages) - Analog 111 Viewing Closed Captions (On-Screen Text Messages) - Connecting a PC and Operation Connecting a PC 90 Changing the Position of the TV's software and the regional conditions. 7

Quick Guide (easy Manual) (ver.1.0) (English)
Page 12
... the audio output jack on your DVI device. (Not compatible with HDMI output. This jack is for connecting to other Samsung Anynet-enabled devices. ˝ COMPONENT IN 1, 2 Video (Y/PB/PR) and audio (L-AUDIO-R) component inputs. Ô CableCARDTM Insert the CableCARD into the slot. ANT (... Video input for external devices, such as a camcorder or VCR. Æ S-VIDEO Video input for external devices with an S-Video output, such as a DVI connection with separate analog audio inputs. When using the optional HDMI/DVI adapter, the DVI analog audio inputs on your TV allow you to receive left...
... the audio output jack on your DVI device. (Not compatible with HDMI output. This jack is for connecting to other Samsung Anynet-enabled devices. ˝ COMPONENT IN 1, 2 Video (Y/PB/PR) and audio (L-AUDIO-R) component inputs. Ô CableCARDTM Insert the CableCARD into the slot. ANT (... Video input for external devices, such as a camcorder or VCR. Æ S-VIDEO Video input for external devices with an S-Video output, such as a DVI connection with separate analog audio inputs. When using the optional HDMI/DVI adapter, the DVI analog audio inputs on your TV allow you to receive left...

Quick Guide (easy Manual) (ver.1.0) (English)
Page 22
Use an antenna cable. (Sold Separately) 22 Connecting VHF and UHF Antennas Antennas with 75-ohm Round Leads If your antenna looks like this: it has 75-ohm round leads. 1 Plug the antenna lead into the ANT 2 IN (AIR IN) on the TV.
Use an antenna cable. (Sold Separately) 22 Connecting VHF and UHF Antennas Antennas with 75-ohm Round Leads If your antenna looks like this: it has 75-ohm round leads. 1 Plug the antenna lead into the ANT 2 IN (AIR IN) on the TV.

Quick Guide (easy Manual) (ver.1.0) (English)
Page 23
... descrambles some or all channels. This terminal might be labeled "ANT OUT", "VHF OUT" or simply "OUT". 2 Connect the cable to the ANT 1 IN (CABLE IN) on your Cable box. Connecting Cable TV You can connect different cable systems to your TV, including cable without a Cable Box 1 Plug the incoming cable into the... ANT 1 IN (CABLE IN) on the TV. Use an antenna cable. (Sold Separately) Cable with a Cable box that Descrambles All Channels 1 Find the cable connected to the ANTENNA OUT terminal on the TV. Use an antenna cable. (Sold Separately) 23
... descrambles some or all channels. This terminal might be labeled "ANT OUT", "VHF OUT" or simply "OUT". 2 Connect the cable to the ANT 1 IN (CABLE IN) on your Cable box. Connecting Cable TV You can connect different cable systems to your TV, including cable without a Cable Box 1 Plug the incoming cable into the... ANT 1 IN (CABLE IN) on the TV. Use an antenna cable. (Sold Separately) Cable with a Cable box that Descrambles All Channels 1 Find the cable connected to the ANTENNA OUT terminal on the TV. Use an antenna cable. (Sold Separately) 23
Quick Guide (easy Manual) (ver.1.0) (English)
Page 24
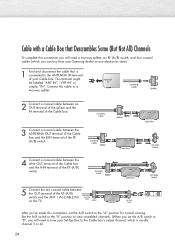
...or simply, "IN". Cable with a Cable Box that is usually channel 3 or 4.) 24 After you've made this connection, set the A/B switch to "B", you can buy from your Samsung dealer or any electronics store). 1 Find and disconnect the cable that Descrambles Some (But Not All) Channels To complete this ...cable to a two-way splitter. 2 Connect a coaxial cable between an OUT terminal of the splitter and the IN ...
...or simply, "IN". Cable with a Cable Box that is usually channel 3 or 4.) 24 After you've made this connection, set the A/B switch to "B", you can buy from your Samsung dealer or any electronics store). 1 Find and disconnect the cable that Descrambles Some (But Not All) Channels To complete this ...cable to a two-way splitter. 2 Connect a coaxial cable between an OUT terminal of the splitter and the IN ...
Quick Guide (easy Manual) (ver.1.0) (English)
Page 25
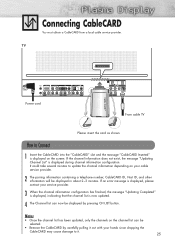
How to Connect 1 Insert the CableCARD into the "CableCARD" slot and the message "CableCARD Inserted" is displayed during channel information configuration. If the channel information does not exist, ... hands since dropping the CableCARD may cause damage to update the channel information depending on the channel list can now be displayed in about 2~3 minutes. Connecting CableCARD You must obtain a CableCARD from a local cable service provider. It could take several minutes to it out with your service provider. 3 When the channel...
How to Connect 1 Insert the CableCARD into the "CableCARD" slot and the message "CableCARD Inserted" is displayed during channel information configuration. If the channel information does not exist, ... hands since dropping the CableCARD may cause damage to update the channel information depending on the channel list can now be displayed in about 2~3 minutes. Connecting CableCARD You must obtain a CableCARD from a local cable service provider. It could take several minutes to it out with your service provider. 3 When the channel...

Quick Guide (easy Manual) (ver.1.0) (English)
Page 26
Press the SOURCE button to select "AV" or "S-Video". 3. Videotape Playback: 1. Turn on your VCR, insert a videotape and press the Play button. 26 Turn on the VCR. (Note: For better video, use an S-Video cable.) Note • Please be sure to match the color coded input terminals and cable jacks. Connecting a VCR Connecting a VCR to the Video or S-Video/Audio jack TV Power cord VCR Audio cable Video cable S-Video cable How to Connect Connect the Video/Audio cables between the VIDEO or S-VIDEO/AUDIO input jacks on the TV and VIDEO or S-VIDEO/AUDIO output jacks on your TV. 2.
Press the SOURCE button to select "AV" or "S-Video". 3. Videotape Playback: 1. Turn on your VCR, insert a videotape and press the Play button. 26 Turn on the VCR. (Note: For better video, use an S-Video cable.) Note • Please be sure to match the color coded input terminals and cable jacks. Connecting a VCR Connecting a VCR to the Video or S-Video/Audio jack TV Power cord VCR Audio cable Video cable S-Video cable How to Connect Connect the Video/Audio cables between the VIDEO or S-VIDEO/AUDIO input jacks on the TV and VIDEO or S-VIDEO/AUDIO output jacks on your TV. 2.

Quick Guide (easy Manual) (ver.1.0) (English)
Page 27
Turn on your camcorder and set it to video mode. (For details, refer to your TV. 2. Connecting a Camcorder Viewing camcorder tapes TV Power cord Camcorder Audio cable Video cable S-Video cable How to Connect Connect a Video/Audio cable between the VIDEO or S-VIDEO/AUDIO input jacks on the TV and the VIDEO or S-VIDEO...
Turn on your camcorder and set it to video mode. (For details, refer to your TV. 2. Connecting a Camcorder Viewing camcorder tapes TV Power cord Camcorder Audio cable Video cable S-Video cable How to Connect Connect a Video/Audio cable between the VIDEO or S-VIDEO/AUDIO input jacks on the TV and the VIDEO or S-VIDEO...

Quick Guide (easy Manual) (ver.1.0) (English)
Page 28
...For an explanation of component video, see your TV. 2. Turn on the DVD player using a audio cable. Connecting a DVD Player (480i, 480p) Playing DVD TV Power cord DVD Player Component cable Audio cable How to Connect 1 Connect the Y, PB, PR (COMPONENT1, 2) input jacks on the TV to the Y, PB, PR output jacks on... the DVD player using a component cable. 2 Connect the AUDIO L/R (COMPONENT1, 2) input jacks on the TV to the AUDIO output jacks on your DVD player's owner's instructions. 28 Note • Please be sure...
...For an explanation of component video, see your TV. 2. Turn on the DVD player using a audio cable. Connecting a DVD Player (480i, 480p) Playing DVD TV Power cord DVD Player Component cable Audio cable How to Connect 1 Connect the Y, PB, PR (COMPONENT1, 2) input jacks on the TV to the Y, PB, PR output jacks on... the DVD player using a component cable. 2 Connect the AUDIO L/R (COMPONENT1, 2) input jacks on the TV to the AUDIO output jacks on your DVD player's owner's instructions. 28 Note • Please be sure...

Quick Guide (easy Manual) (ver.1.0) (English)
Page 29
... receiver. • For an explanation of component video, see your TV. 2. Press the SOURCE button to match the color coded input terminals and cable jacks. Connecting a DTV Receiver (480p, 720p, 1080i) This TV displays the optimum picture in 720p mode. To Watch DTV: 1. Watching DTV TV Power cord DTV Receiver ... 2) or HDMI input jack on the TV to the Y, PB, PR or DVI output jacks on the DTV receiver using a component or HDMI/DVI cable. 3 Connect the AUDIO L/R (COMPONENT1, 2 or DVI AUDIO IN) input jacks on the TV with the AUDIO output jacks on the DTV receiver using an audio cable.
... receiver. • For an explanation of component video, see your TV. 2. Press the SOURCE button to match the color coded input terminals and cable jacks. Connecting a DTV Receiver (480p, 720p, 1080i) This TV displays the optimum picture in 720p mode. To Watch DTV: 1. Watching DTV TV Power cord DTV Receiver ... 2) or HDMI input jack on the TV to the Y, PB, PR or DVI output jacks on the DTV receiver using a component or HDMI/DVI cable. 3 Connect the AUDIO L/R (COMPONENT1, 2 or DVI AUDIO IN) input jacks on the TV with the AUDIO output jacks on the DTV receiver using an audio cable.

Quick Guide (easy Manual) (ver.1.0) (English)
Page 30
... before selecting HDMI from the "Source List" on your DTV receiver owner's instructions. 3. Press the SOURCE button to the antenna input jack on the DTV. 2 Connect the HDMI input jack on the TV with the HDMI output jack on your DTV receiver. • For an explanation of HDMI video, see your... TV. 2. Turn on the TV. Connecting to HDMI (High Definition Multimedia Interface) (480p, 720p, 1080i) Watching DTV TV Power cord HDMI cable DTV Set-Top Box How to...
... before selecting HDMI from the "Source List" on your DTV receiver owner's instructions. 3. Press the SOURCE button to the antenna input jack on the DTV. 2 Connect the HDMI input jack on the TV with the HDMI output jack on your DTV receiver. • For an explanation of HDMI video, see your... TV. 2. Turn on the TV. Connecting to HDMI (High Definition Multimedia Interface) (480p, 720p, 1080i) Watching DTV TV Power cord HDMI cable DTV Set-Top Box How to...
Quick Guide (easy Manual) (ver.1.0) (English)
Page 31
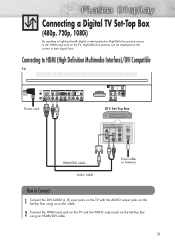
... DVI AUDIO (L, R) input jacks on the TV with the AUDIO output jacks on the Set-Top Box using an HDMI/DVI cable. 31 Connecting to HDMI (High Definition Multimedia Interface)/DVI Compatible TV Power cord DTV Set-Top Box HDMI/DVI cable Audio cable From cable or Antenna How ...to the HDMI input jack on the TV, High-Definition pictures can be displayed on the Set-Top Box using an audio cable. 2 Connect the HDMI input jack on the TV and the VIDEO output jack on the screen in their digital form.
... DVI AUDIO (L, R) input jacks on the TV with the AUDIO output jacks on the Set-Top Box using an HDMI/DVI cable. 31 Connecting to HDMI (High Definition Multimedia Interface)/DVI Compatible TV Power cord DTV Set-Top Box HDMI/DVI cable Audio cable From cable or Antenna How ...to the HDMI input jack on the TV, High-Definition pictures can be displayed on the Set-Top Box using an audio cable. 2 Connect the HDMI input jack on the TV and the VIDEO output jack on the screen in their digital form.

Quick Guide (easy Manual) (ver.1.0) (English)
Page 32
... system is received through a coaxial copper cable. 32 A simplified illustration of digital audio systems on the TV. Do not connect both coaxial and optical digital audio inputs, SAMSUNG recommends you use the optical digital output on the TV. 2 If your audio system has a optical digital audio input..., connect to remove the black cover from the optical output before inserting the cable. 3 If your system has both optical and...
... system is received through a coaxial copper cable. 32 A simplified illustration of digital audio systems on the TV. Do not connect both coaxial and optical digital audio inputs, SAMSUNG recommends you use the optical digital output on the TV. 2 If your audio system has a optical digital audio input..., connect to remove the black cover from the optical output before inserting the cable. 3 If your system has both optical and...

Quick Guide (easy Manual) (ver.1.0) (English)
Page 33
When an audio amplifier is connected to an amplifier. You must hook them up to the "AUDIO OUT (AUDIO L/R)" terminals: Decrease the gain (volume) of the audio amplifier, turn the TV's internal mute on and adjust the volume level with the volume control of the amplifier. 33 Connecting to an Analog Amplifier TV Power cord Audio cable Analog Amplifier How to Connect 1 The "AUDIO OUT (AUDIO L/R)" terminals cannot be used for external speakers.
When an audio amplifier is connected to an amplifier. You must hook them up to the "AUDIO OUT (AUDIO L/R)" terminals: Decrease the gain (volume) of the audio amplifier, turn the TV's internal mute on and adjust the volume level with the volume control of the amplifier. 33 Connecting to an Analog Amplifier TV Power cord Audio cable Analog Amplifier How to Connect 1 The "AUDIO OUT (AUDIO L/R)" terminals cannot be used for external speakers.
Quick Guide (easy Manual) (ver.1.0) (English)
Page 37
... area. Digital Channel : STD √ Analog Channel : STD √ Start Press the ▲ or ▼ button to identify the type of the selected connection. Move Enter Skip Plug & Play Select the cable system. Digital Channel : SSTTDD √ Analog Channel : SHTRDC √ Start IRC Press the ▲ or... Press the ▲ or ▼ button to select "STD", "HRC", or "IRC", press the ENTER button. Notes • If the antenna is connected to ANT 1 IN (CABLE IN), select "Cable" and if it is inserted into the "CableCARD" slot on page 43. Proceed to ANT 2 IN (...
... area. Digital Channel : STD √ Analog Channel : STD √ Start Press the ▲ or ▼ button to identify the type of the selected connection. Move Enter Skip Plug & Play Select the cable system. Digital Channel : SSTTDD √ Analog Channel : SHTRDC √ Start IRC Press the ▲ or... Press the ▲ or ▼ button to select "STD", "HRC", or "IRC", press the ENTER button. Notes • If the antenna is connected to ANT 1 IN (CABLE IN), select "Cable" and if it is inserted into the "CableCARD" slot on page 43. Proceed to ANT 2 IN (...

Quick Guide (easy Manual) (ver.1.0) (English)
Page 41
... "Cable" antenna signal. • Air + Cable : "Air" and "Cable" antenna signals. This eliminates the need to select the antenna connection, then press the ENTER button. Air Start Cable Start Air + Cable Start Move Enter Return 41 After the available channels are not available. Press ... press the ENTER button. 3 Press the ▲ or ▼ button to change channels by entering the channel digits. If the CableCARD is connected to scan through the channels. TV Channel Antenna : Air √ Auto Program √ Add / Delete √ Favorite Channels √ Name...
... "Cable" antenna signal. • Air + Cable : "Air" and "Cable" antenna signals. This eliminates the need to select the antenna connection, then press the ENTER button. Air Start Cable Start Air + Cable Start Move Enter Return 41 After the available channels are not available. Press ... press the ENTER button. 3 Press the ▲ or ▼ button to change channels by entering the channel digits. If the CableCARD is connected to scan through the channels. TV Channel Antenna : Air √ Auto Program √ Add / Delete √ Favorite Channels √ Name...

Quick Guide (easy Manual) (ver.1.0) (English)
Page 43
Press the ENTER button at any time to select the cable system. Note • The TV must be connected to an antenna in Memory 4 Press the ▲ or ▼ button to select the antennas to memorize. Move Enter Return TV Auto Program Select the ...
Press the ENTER button at any time to select the cable system. Note • The TV must be connected to an antenna in Memory 4 Press the ▲ or ▼ button to select the antennas to memorize. Move Enter Return TV Auto Program Select the ...


