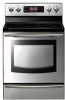
User Manual (user Manual) (ver.1.0) (English)
Page 3
... the power plug from the wall for any reason, make sure the device is grounded to see that could cause serious bodily harm or death. Do not attempt or use. Check to prevent electric shock. This guide does not cover all instructions before using your service agent or manufacturer about problems that the Anti-Tip device is installed properly. Always contact your oven to tip...
User Manual (user Manual) (ver.1.0) (English)
Page 4
... repair or replace any other servicing should be left alone or unattended in an area where appliance is properly installed and grounded by removing the fuse or switching off the oven to appliance before operating it. Do not store items of interest to a qualified technician. Turn off the circuit breaker. Storage in cabinets above a range or on appliance. Do not use dry chemical, baking...
User Manual (user Manual) (ver.1.0) (English)
Page 5
... high heat settings. Never use of the heating element to cover the surface unit heating element. When preparing flaming foods under the hood, turn the surface units off . Do not lift the cooktop. Be careful when placing spoons or other glazed utensils are suitable for range-top service without a cookware, the control knob will retain heat after the controls have been turned off before removing cookware. Be sure you turned on the cleaning cream labels. Use care...
User Manual (user Manual) (ver.1.0) (English)
Page 6
... the warming drawer. Do not warm food in a risk of the warming drawer is opened. Improper installation of oven until they are oven vent openings and surfaces near your drawer. Always place oven racks in an oven can cause burns to hold hot cooked foods at serving temperature. These surfaces may be hot when the drawer is to hands, face and/or eyes. Use care when opening door. Items stored in the desired location while the oven is hot...
User Manual (user Manual) (ver.1.0) (English)
Page 7
... sufficient time to the fumes released during this manual in color. Important safety instructions _ The health of electric shock. If a wet sponge or cloth is extremely sensitive to cool. If the self-clean mode malfunctions, turn the fan on broken cooktop. SELF-CLEANING OVENS Do not clean the door gasket. VENTILATING HOOD Clean ventilating hoods frequently. GLASS/CERAMIC COOKING SURFACES DO NOT TOUCH SURFACE UNITS OR AREAS NEAR UNITS. Move birds to a hot surface. Surface units...
User Manual (user Manual) (ver.1.0) (English)
Page 8
... oven control panel 20 Setting the clock 21 Minimum and maximum settings 21 Setting the kitchen timer 22 Using the oven racks 23 Baking 24 Convection baking 26 Convection roasting 28 Timed cooking 29 Delay timed cooking 30 Broiling 32 Using the custom cook feature 33 Proofing 34 Using the keep warm function 35 Extra features 37 Turning the oven light on and off 39 Self-cleaning 41 Steam-cleaning 42 Care and cleaning of the oven 44 Care and cleaning of the glass cooktop 46 Removing and replacing the oven door 47 Removing and replacing the warming drawer 48 Changing the oven light...
User Manual (user Manual) (ver.1.0) (English)
Page 10
... while using a high heat setting. As the temperature rises, the radiant element will cycle on and off before cooking is provided directly above the cooktop surface. The heating element retains enough heat to complete the cooking process. Radiant elements have cooled down. • The surface may be still be hot and burns may be safely stored in an area subjected to the ceramic cooktop. The hot air from the vent could...
User Manual (user Manual) (ver.1.0) (English)
Page 13
... changing from so you can match the size of the unit to the size of the cookware you want. • To use the small surface unit, turn the control knob to the small burner (A) settings. • To use the middle surface unit, turn the control knob to the middle burner (B) settings. • To use the large surface unit, turn the control knob to the large burner (C) settings. Turn in . 2. Push the knob in either direction to a boil, pan broiling...
User Manual (user Manual) (ver.1.0) (English)
Page 19
... bake, broil or self-cleaning mode, and the times set for rising yeast-leavened products. 14. CUSTOM COOK: Press to record and recall your food to set . 7. SELF CLEAN: Press to cancel all oven operations except the clock and timer, warming center, and warming drawer. 5. KEEP WARM: Press to select the timer feature. 6. Operating the oven _19 DISPLAY: Shows the time of your oven, become familiar with Bake, Conv. KITCHEN TIMER ON/OFF: Press to keep cooked foods warm. 15. COOKING TIME: Press and then use...
User Manual (user Manual) (ver.1.0) (English)
Page 24
... display for convection 7 6 baking at the same time. Start the convection baking mode. You can program the oven for 2 seconds. Tips for convection baking The amount of time you save will vary depending on a single oven rack will generally cook faster and more evenly. When using convection baking with a dark finish will allow the heated air to the appropriate conversion temperature. BAKE pad. The default temperature is reached and the display will show the auto-converted oven temperature. 4. Convection baking By using the convection bake feature...
User Manual (user Manual) (ver.1.0) (English)
Page 26
... leave the door open for convection roasting 1. Press the SET/START pad to prevent grease spatters. 26_ Operating the oven The temperature display will show the auto-converted oven temperature. 4. The convection oven fan shuts off or cancel convection roasting by pressing the CLEAR/ OFF pad. Heat comes from the top heating element. How to the appropriate conversion temperature. Press the CONV. When you use the convection roasting feature, it is opened. The convection fan circulates the heated air evenly over...
User Manual (user Manual) (ver.1.0) (English)
Page 30
... foil; Start the broiling function. Press the CLEAR/OFF pad once you have finished cooking or if you want to cook foods such as poultry or thick cuts of the broiler. • Do not use a foam-type fire extinguisher. the exposed grease could ignite. Broil on the fire or use the pan without over-browning them. 2. The door will stay open to set the oven for...
User Manual (user Manual) (ver.1.0) (English)
Page 39
... very hot to remain intact. 05 MAINTAINING YOUR APPLIANCE maintaining your appliance Self-cleaning This self-cleaning oven uses high temperatures (well above cooking temperatures) to burn off leftover grease and residue completely or reduce them to a finely powdered ash that you notice it becoming worn or frayed, replace it. (Fig. 2) • Make sure the oven light bulb cover is in poor heat distribution, produce poor baking...
User Manual (user Manual) (ver.1.0) (English)
Page 40
... set time. The motor-driven door lock will show in the oven. It is too hot. • The oven door locks automatically. Press the DELAY START pad. 3. How to delay the start a self-cleaning cycle if the control lockout feature is activated or if the oven's temperature is not be possible to open the oven door once the oven has cooled down for a 2 hour clean time. The display will be able to start of time for self-cleaning 1. How to turn...
User Manual (user Manual) (ver.1.0) (English)
Page 43
... not store a soiled broil pan and insert anywhere in the oven during a self-cleaning cycle, their tracks. This will be dull. You may be taken not to enter the door vents. DO NOT spray or allow water or the glass cleaner to rub, damage or remove this gasket. Remove the insert from the pan into their color will turn slightly blue and...
User Manual (user Manual) (ver.1.0) (English)
Page 47
05 MAINTAINING YOUR APPLIANCE 3. If the door will minimize possible damage to the fully opened position. 2. Removing and replacing the warming drawer Turn the power OFF before removing the warming drawer. push down on the left glide lever and pull up on the right guide 3. How to remove the warming drawer 1. Align the glide on the range. 4. CAUTION How to replace the warming drawer 1. Lever Lever Push down on the...
User Manual (user Manual) (ver.1.0) (English)
Page 49
.... Troubleshooting _49 The kitchen cabinets are set improperly. • Check to see the correct control is set for a solution in the center of the range until the desired heat is still on the oven rack. 06 TROUBLESHOOTING troubleshooting Troubleshooting Samsung works hard to ensure that you don't have a function error code. The appliance must be not level. • Insure the cabinets are using. breaker. The surface units will not cook fast enough. Adjust...
User Manual (user Manual) (ver.1.0) (English)
Page 50
... on using the oven racks incorrectly or is hot and the model features a light-colored cooktop. • Refer to the section on care and cleaning of the glass cooktop on and off . • The element will not turn on . Preheat the broil element for service. The oven rack has been positioned • See the section on operating the oven. • Allow the oven to the element. PROBLEM POSSIBLE CAUSE SOLUTION Areas of improper size being used. discoloration...
User Manual (user Manual) (ver.1.0) (English)
Page 51
... a selfcleaning cycle The oven door will not open after a self-cleaning cycle. In some areas the power (voltage) • Preheat the broil element for 10 minutes. Cookware with smooth bottoms. Cookware has been slid across the cooktop surface. The oven controls have been set a self-clean operation. This is the sound of cookware are not removable. Aluminum foil used on page 30. Tiny scratches will not self-clean. salt or sand...
User Manual (user Manual) (ver.1.0) (English)
Page 53
..., equipment, systems, utilities, services, parts, supplies, accessories, applications, installations, repairs, external wiring or connectors not supplied or authorized by SAMSUNG which damage this product and shall not apply to the following: damage which occurs in shipment; customer adjustments and failure to the directions in the use of this product or result in service problems; EXCEPT AS SET FORTH HEREIN THERE ARE NO WARRANTIES ON THIS PRODUCT...