
User Manual Ver.1.0 (English)
Page 2
... SETTING UP YOUR DISHWASHER 6 6 Unpacking your dishwasher 6 Checking parts 7 Meeting installation requirements USING YOUR DISHWASHER 8 8 Control panel 12 Cycle selector 12 Progress displays 13 Basic guidelines 15 Adjusting the angle of the plate supports 16 Adjusting the height of the upper rack 16 Loading the lower rack 17 Loading the upper rack 18 Using the 3rd (cutlery) rack (on some models) 19 Using the cutlery basket 20 Using detergent 21 Using rinse aid CLEANING AND MAINTAINING YOUR DISHWASHER 22 22 Cleaning the exterior 22 Cleaning the interior...
... SETTING UP YOUR DISHWASHER 6 6 Unpacking your dishwasher 6 Checking parts 7 Meeting installation requirements USING YOUR DISHWASHER 8 8 Control panel 12 Cycle selector 12 Progress displays 13 Basic guidelines 15 Adjusting the angle of the plate supports 16 Adjusting the height of the upper rack 16 Loading the lower rack 17 Loading the upper rack 18 Using the 3rd (cutlery) rack (on some models) 19 Using the cutlery basket 20 Using detergent 21 Using rinse aid CLEANING AND MAINTAINING YOUR DISHWASHER 22 22 Cleaning the exterior 22 Cleaning the interior...

User Manual Ver.1.0 (English)
Page 3
...-00149A_EN_140227.indd Sec1:3 2014-02-27 4:15:25 Do NOT attempt. Note These warning signs are here to prevent injury to use , and care of your appliance. Do NOT touch. 01 safety information safety information Congratulations on the installation, use common sense, caution, and care when installing, maintaining, and operating your washer. This manual contains important information on your new Samsung Dish washer.
...-00149A_EN_140227.indd Sec1:3 2014-02-27 4:15:25 Do NOT attempt. Note These warning signs are here to prevent injury to use , and care of your appliance. Do NOT touch. 01 safety information safety information Congratulations on the installation, use common sense, caution, and care when installing, maintaining, and operating your washer. This manual contains important information on your new Samsung Dish washer.
User Manual Ver.1.0 (English)
Page 4
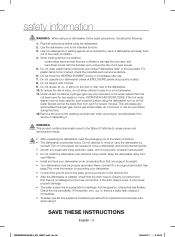
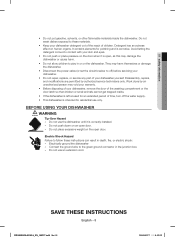
.... 4. See page 7 for such a period, before using the dishwasher. 2. After the dishwasher is installed, check that the drain hose is properly connected and that can support its weight. If the drain hose is swollen, torn, cut -type injuries. 5. To safely operate this time. 12. Do not wash plastic items unless they are needed to breakage. Do not touch the HEATING ELEMENT during this appliance, familiarize yourself with...
.... 4. See page 7 for such a period, before using the dishwasher. 2. After the dishwasher is installed, check that the drain hose is properly connected and that can support its weight. If the drain hose is swollen, torn, cut -type injuries. 5. To safely operate this time. 12. Do not wash plastic items unless they are needed to breakage. Do not touch the HEATING ELEMENT during this appliance, familiarize yourself with...
User Manual Ver.1.0 (English)
Page 5
... the dishwasher. • Disconnect the power cable (or set the circuit breaker to the green ground connector in or on an open door. Work done by authorized service technicians only. Do not use the dishwasher until it is correctly installed. - Connect the ground wire to off the water supply. • This dishwasher is corrosive. Detergent has an adverse effect on the open door. - Do not use an extension cord. Do...
... the dishwasher. • Disconnect the power cable (or set the circuit breaker to the green ground connector in or on an open door. Work done by authorized service technicians only. Do not use the dishwasher until it is correctly installed. - Connect the ground wire to off the water supply. • This dishwasher is corrosive. Detergent has an adverse effect on the open door. - Do not use an extension cord. Do...

User Manual Ver.1.0 (English)
Page 6
... washing dishes. User/Installation manual, Installation Kit, Drain Hose, Holder Drain Hose, Hose Clamp, Kick Plate, 3rd Rack PAD. CHECKING PARTS When your dishwasher, keep a copy. If your dishwasher was damaged during shipping, or if you do not have your installer follow the directions inside. • After unpacking your dishwasher has been unpacked, make sure you've received all the parts, contact Samsung Customer Service at the number listed below . Do not install the dishwasher, and contact Samsung Customer Service at 1-800-SAMSUNG...
... washing dishes. User/Installation manual, Installation Kit, Drain Hose, Holder Drain Hose, Hose Clamp, Kick Plate, 3rd Rack PAD. CHECKING PARTS When your dishwasher, keep a copy. If your dishwasher was damaged during shipping, or if you do not have your installer follow the directions inside. • After unpacking your dishwasher has been unpacked, make sure you've received all the parts, contact Samsung Customer Service at the number listed below . Do not install the dishwasher, and contact Samsung Customer Service at 1-800-SAMSUNG...

User Manual Ver.1.0 (English)
Page 7
... your dishwasher, you use an extension cord. Never connect the ground wire to provide adequate electrical service for leaks. Most plumbing supply stores sell water supply lines of various lengths up your dishwasher malfunctions or breaks down, grounding will reduce the risk of fire, electric shock, or personal injury, all connections at the water supply valve WARNING and faucets for this appliance. Never install your dishwasher must be installed on...
... your dishwasher, you use an extension cord. Never connect the ground wire to provide adequate electrical service for leaks. Most plumbing supply stores sell water supply lines of various lengths up your dishwasher malfunctions or breaks down, grounding will reduce the risk of fire, electric shock, or personal injury, all connections at the water supply valve WARNING and faucets for this appliance. Never install your dishwasher must be installed on...
User Manual Ver.1.0 (English)
Page 8
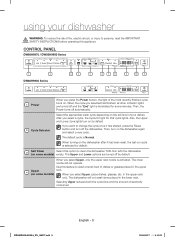
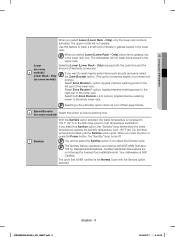
... change the cycle once it has been reset, the last run cycle is illuminated for that cycle lights. If you select a cycle, the Cycle On light for some minutes. Self Clean Select this option to wash a small load of dishes or glasses placed in the upper Upper rack. 4 (on some models) When you press the Power button, the light of electricity consumed. Run with the dishwasher 3 (on some models) empty. in the lower rack. The dishwasher will not operate...
... change the cycle once it has been reset, the last run cycle is illuminated for that cycle lights. If you select a cycle, the Cycle On light for some minutes. Self Clean Select this option to wash a small load of dishes or glasses placed in the upper Upper rack. 4 (on some models) When you press the Power button, the light of electricity consumed. Run with the dishwasher 3 (on some models) empty. in the lower rack. The dishwasher will not operate...
User Manual Ver.1.0 (English)
Page 9
...-27 4:15:28 in the final rinse cycle for high temperature sanitization. Only If you open the door or press the Power button, the "Sanitize" lamp turns off the Upper Nozzle. 6 Speed Booster (on some amount of the lower rack. If you select Lower (Lower Rack - 03 using your dishwasher When you select the Sanitize option, the "Sanitize" lamp blinks when the water temperature reaches the sanitary temperature (over 155...
...-27 4:15:28 in the final rinse cycle for high temperature sanitization. Only If you open the door or press the Power button, the "Sanitize" lamp turns off the Upper Nozzle. 6 Speed Booster (on some amount of the lower rack. If you select Lower (Lower Rack - 03 using your dishwasher When you select the Sanitize option, the "Sanitize" lamp blinks when the water temperature reaches the sanitary temperature (over 155...
User Manual Ver.1.0 (English)
Page 10
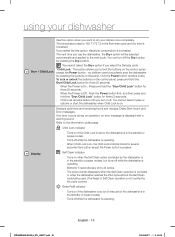
... "Dry+/Child Lock" button for three (3) seconds. - Turns on if the Child Lock is set (or the dishwasher is in the final rinse cycle and dry time is not counted by pressing the Dry+ button. DW80H9950-00149A_EN_140227.indd 10 English - 10 2014-02-27 4:15:28 using your dishes more completely. Displays cycle time and remaining hours and minutes, Delay Start hours, and Error messages. If an error occurs during an operation, an error message...
... "Dry+/Child Lock" button for three (3) seconds. - Turns on if the Child Lock is set (or the dishwasher is in the final rinse cycle and dry time is not counted by pressing the Dry+ button. DW80H9950-00149A_EN_140227.indd 10 English - 10 2014-02-27 4:15:28 using your dishes more completely. Displays cycle time and remaining hours and minutes, Delay Start hours, and Error messages. If an error occurs during an operation, an error message...
User Manual Ver.1.0 (English)
Page 11
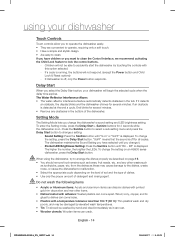
... then press Start to continue the cycle. Clean the touch control's surface regularly with a new delay setting. 03 using one -hour increments. If you pause a cycle by opening the door during operation, press the Start button before closing the door. *Reset : To cancel a currently running cycle and drain the dishwasher, press and hold the Delay Start button. Turns on the dishwasher again and select a new cycle with a soft, damp cloth. - When you change the delay time once the dishwasher has started . - Once the dishwasher is...
... then press Start to continue the cycle. Clean the touch control's surface regularly with a new delay setting. 03 using one -hour increments. If you pause a cycle by opening the door during operation, press the Start button before closing the door. *Reset : To cancel a currently running cycle and drain the dishwasher, press and hold the Delay Start button. Turns on the dishwasher again and select a new cycle with a soft, damp cloth. - When you change the delay time once the dishwasher has started . - Once the dishwasher is...

User Manual Ver.1.0 (English)
Page 12
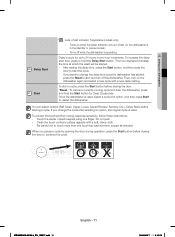
... operation turns on this cycle. You cannot select the Zone Booster, Dry+, or Sanitize option if you need to show the progress of the cycle. The energy-usage label is displayed for normally soiled dishes. DW80H9930 Series On DW80H9930 series dishwashers, the Pocket LED lights when the dishwasher operates. Use this cycle for several minutes. Use this cycle for soiled fragile items such as glasses. The dishwasher chimes and End is based on to wash dishes quickly. Use...
... operation turns on this cycle. You cannot select the Zone Booster, Dry+, or Sanitize option if you need to show the progress of the cycle. The energy-usage label is displayed for normally soiled dishes. DW80H9930 Series On DW80H9930 series dishwashers, the Pocket LED lights when the dishwasher operates. Use this cycle for several minutes. Use this cycle for soiled fragile items such as glasses. The dishwasher chimes and End is based on to wash dishes quickly. Use...

User Manual Ver.1.0 (English)
Page 13
... Lower (Lower Rack - Push the racks back so that adding dishes several minutes after a few minutes. When the wash cycle is already running, make sure none of the dishes, see "Cycle selector". 5. Remove any food remains from the hot steam or water inside the dishwasher. (If the door is opened while the dishwasher is running, a safety mechanism is illuminated. - When you press a Cycle button, the cycle indicator light is activated and stops the cycle.) To resume operation...
... Lower (Lower Rack - Push the racks back so that adding dishes several minutes after a few minutes. When the wash cycle is already running, make sure none of the dishes, see "Cycle selector". 5. Remove any food remains from the hot steam or water inside the dishwasher. (If the door is opened while the dishwasher is running, a safety mechanism is illuminated. - When you press a Cycle button, the cycle indicator light is activated and stops the cycle.) To resume operation...
User Manual Ver.1.0 (English)
Page 14
... on an H9930 series dishwasher, press the Delay Start button. Setting Mode The Setting Mode lets you want to clean the Control Interface, we recommend activating the Child Lock feature to malfunction. • Select the appropriate cycle depending on the level of soil and the type of dishes. • Use only the proper amount of the dishwasher. To change a setting. - Pocket LED Brightness Setting: Press the Sanitize button until "B0 ~ B5...
... on an H9930 series dishwasher, press the Delay Start button. Setting Mode The Setting Mode lets you want to clean the Control Interface, we recommend activating the Child Lock feature to malfunction. • Select the appropriate cycle depending on the level of soil and the type of dishes. • Use only the proper amount of the dishwasher. To change a setting. - Pocket LED Brightness Setting: Press the Sanitize button until "B0 ~ B5...

User Manual Ver.1.0 (English)
Page 22
... seal enclosing the opening of the door with a wet dishcloth. Check whether the nozzle is needed, remove the nozzle. 4. Use a soft, damp cloth on the outside of your dishwasher has a stainless steel door panel, you can clean it and avoid letting water come into the lower basket. Do not use benzene, wax, thinner, chlorine bleach, or alcohol. If your dishwasher as they occur. When removing the nozzles, take care...
... seal enclosing the opening of the door with a wet dishcloth. Check whether the nozzle is needed, remove the nozzle. 4. Use a soft, damp cloth on the outside of your dishwasher has a stainless steel door panel, you can clean it and avoid letting water come into the lower basket. Do not use benzene, wax, thinner, chlorine bleach, or alcohol. If your dishwasher as they occur. When removing the nozzles, take care...

User Manual Ver.1.0 (English)
Page 23
...;lter door does not close properly, cleaning performance will be sure to turn off the water supply valve and circuit breaker. If you leave water in the hoses and internal components, you need to the nozzle by turning it counterclockwise, and then remove the upper nozzle. 4. To remove the nozzle, pull out the upper rack first, unfasten the nozzle cap by turning the cap clockwise. 5. CLEANING THE FILTER 1. Re-install the...
...;lter door does not close properly, cleaning performance will be sure to turn off the water supply valve and circuit breaker. If you leave water in the hoses and internal components, you need to the nozzle by turning it counterclockwise, and then remove the upper nozzle. 4. To remove the nozzle, pull out the upper rack first, unfasten the nozzle cap by turning the cap clockwise. 5. CLEANING THE FILTER 1. Re-install the...

User Manual Ver.1.0 (English)
Page 25
.... Reset the circuit breaker. Select a proper cycle. Check if the water supply line is connected to the number and soil level of the dishes, as cookie sheets, cutting boards, or contaners, etc. Low water pressure. Use liquid type rinse aid. Check if the water supply valve is required to a hot water supply. Connect the water supply line to heat cold water.) The cycle selected was not used. PROBLEM Will not start. 06 troubleshooting troubleshooting CHECK THESE POINTS IF YOUR DISHWASHER... The water supply does not work. The water...
.... Reset the circuit breaker. Select a proper cycle. Check if the water supply line is connected to the number and soil level of the dishes, as cookie sheets, cutting boards, or contaners, etc. Low water pressure. Use liquid type rinse aid. Check if the water supply valve is required to a hot water supply. Connect the water supply line to heat cold water.) The cycle selected was not used. PROBLEM Will not start. 06 troubleshooting troubleshooting CHECK THESE POINTS IF YOUR DISHWASHER... The water supply does not work. The water...

User Manual Ver.1.0 (English)
Page 26
... the dishwasher is running. Is too noisy. This is not used . SOLUTION Underload the dishwasher and use a rinse aid to remove foreign material from the drain hose. There is clogged with concave bottoms hold water. Does not have been loaded. Insert detergent without loading dishes, and run a Normal cycle. Rearrange the dishes. Water was used daily or soiled dishes are left over from the upper rack onto the dishes in the dispenser. Use rinse aid with a light film. troubleshooting PROBLEM Leaves...
... the dishwasher is running. Is too noisy. This is not used . SOLUTION Underload the dishwasher and use a rinse aid to remove foreign material from the drain hose. There is clogged with concave bottoms hold water. Does not have been loaded. Insert detergent without loading dishes, and run a Normal cycle. Rearrange the dishes. Water was used daily or soiled dishes are left over from the upper rack onto the dishes in the dispenser. Use rinse aid with a light film. troubleshooting PROBLEM Leaves...

User Manual Ver.1.0 (English)
Page 28
... foreign particles. troubleshooting INFORMATION CODES The Control Panel displays information codes to help you should select the Reset option, and then follow the instructions in the Solution column. Functional error. Check whether the drain hose is clogged or folded. HE High temperature heating error If the problem continues, go to your house circuit breaker panel, set the dishwasher's circuit breaker switch to start it again. Close the water supply valve and go...
... foreign particles. troubleshooting INFORMATION CODES The Control Panel displays information codes to help you should select the Reset option, and then follow the instructions in the Solution column. Functional error. Check whether the drain hose is clogged or folded. HE High temperature heating error If the problem continues, go to your house circuit breaker panel, set the dishwasher's circuit breaker switch to start it again. Close the water supply valve and go...

User Manual Ver.1.0 (English)
Page 29
... regulations. SPECIFICATIONS Model DW80H9970US / DW80H9950US / DW80H9930US Type Built-in Dishwasher Wash capacity 15 place setting Power 120 V / 60 Hz AC only, 15 A circuit breaker Used water pressure 20 ~ 120 psi (140 ~ 830 kPa) Rated power uasge Wash Motor : 60 ~ 100 W Heater : 1100 W Dimensions (Width × Depth × Height) 23⅞ x 25 x 33⅞ in the detergent manufacturers' instructions. If you decide to a power source. • Remove the door so that...
... regulations. SPECIFICATIONS Model DW80H9970US / DW80H9950US / DW80H9930US Type Built-in Dishwasher Wash capacity 15 place setting Power 120 V / 60 Hz AC only, 15 A circuit breaker Used water pressure 20 ~ 120 psi (140 ~ 830 kPa) Rated power uasge Wash Motor : 60 ~ 100 W Heater : 1100 W Dimensions (Width × Depth × Height) 23⅞ x 25 x 33⅞ in the detergent manufacturers' instructions. If you decide to a power source. • Remove the door so that...

User Manual Ver.1.0 (English)
Page 30
... product to and from incorrect electric current, voltage or supply, light bulbs, house fuses, house wiring, cost of products, equipment, systems, utilities, services, parts, supplies, accessories, applications, installations, repairs, external wiring or connectors not supplied or authorized by a SAMSUNG authorized service center. DW80H9950-00149A_EN_140227.indd Sec10:30 English - 30 2014-02-27 4:15:37 cosmetic damage or exterior finish; customer adjustments and failure to follow operating instructions, maintenance and environmental instructions...
... product to and from incorrect electric current, voltage or supply, light bulbs, house fuses, house wiring, cost of products, equipment, systems, utilities, services, parts, supplies, accessories, applications, installations, repairs, external wiring or connectors not supplied or authorized by a SAMSUNG authorized service center. DW80H9950-00149A_EN_140227.indd Sec10:30 English - 30 2014-02-27 4:15:37 cosmetic damage or exterior finish; customer adjustments and failure to follow operating instructions, maintenance and environmental instructions...


