Samsung DW80R5061 Support and Manuals
Get Help and Manuals for this Samsung item

View All Support Options Below
Free Samsung DW80R5061 manuals!
Problems with Samsung DW80R5061?
Ask a Question
Free Samsung DW80R5061 manuals!
Problems with Samsung DW80R5061?
Ask a Question
Popular Samsung DW80R5061 Manual Pages
User Manual - Page 1
...-02034B-020_EN.indd 1
2/51/0/82/0210717 101:05:5:55:454AAMM
DW80K7050 Series DW80K5050 Series DW80R5060 Series DW80R5061 Series
Dishwasher
installation guide
STOP
These installation instructions are having problems installing this dishwasher Please call : 1-800-SAMSUNG (726-7864) for assistance : www.samsung.com
imagine the possibilities
Thank you are intended for purchasing this...
User Manual - Page 2

safety instructions
Throughout this manual, you and others.
Call the service center for damages resulting from improper use common sense, caution, and care when installing, maintaining, and operating the dishwasher. These warning signs are here to prevent injury to you 'll see Warning and Caution notes.
Install and store the dishwasher inside, away from CAUTION open...
User Manual - Page 3
...extension cord. The dishwasher must be replaced by the manufacturer, a service agent or CAUTION similarly qualified person in order to avoid a hazard.
BEFORE INSTALLING THE DISHWASHER
WARNING
WARNING
Tip-Over ...these instructions can damage the hoses, valves, pump, or other components. Temperature should not exceed 149 ˚F (65 ˚C) to prevent damage to the User Manual. The...
User Manual - Page 5
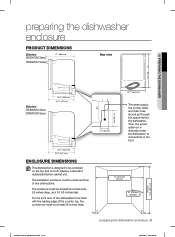
... deep, and 34 1/8 inches high. preparing the dishwasher enclosure
PRODUCT DIMENSIONS
Side view DW80K7050 Series
DW80R5061 Series
27" (686 mm)
Rear view
01 PREPARING THE DISHWASHER
33 9/10" (860 mm)... line, power cable and drain hose should go through this space behind the dishwasher.
The installation enclosure must be clean and free of the counter top, the counter top must be enclosed...
User Manual - Page 8
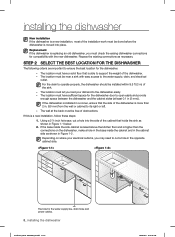
... saw, cut a hole in . (50 mm) from the wall or cabinet to support the weight of the dishwasher. -
STEP 2 SELECT THE BEST LOCATION FOR THE DISHWASHER...the water supply, drain, and electrical
outlet. Replacement If the dishwasher is replacing an old dishwasher, you may need to ensure ...and power cables.
8_ installing the dishwasher
Installation_DD81-02034B-020_EN.indd Sec3:8
2/51/0/82/0210617...
User Manual - Page 11

...place it on the bottom of the dishwasher to ensure they are intact
and secure. 4. 02 INSTALLING THE DISHWASHER
STEP 5 UNPACKING AND INSPECTING THE DISHWASHER
Unbox the dishwasher in an open area free... the door latch, the operation of the hinges, and confirm the door is fully installed and operational to ensure you may want to ensure that it for any circumstances, remove the sound...
User Manual - Page 12
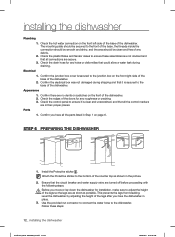
...control markers are turned off before proceeding with the following steps. Before you have all the parts listed in place.
3. Confirm there are as short as shown in their proper ...junction box cover is secured to the base of the doors for installation, make sure to ensure these steps:
12_ installing the dishwasher
Installation_DD81-02034B-020_EN.indd Sec3:12
2/51/0/82/0210617 ...
User Manual - Page 13
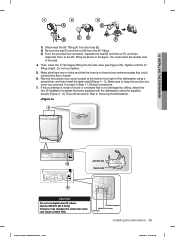
... Step 9, Securing the Dishwasher. A).
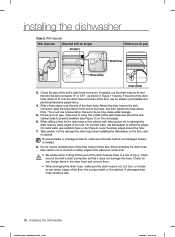
Hot Water Supply Line
Elbow( 3/4" (9.5 mm)) Inlet valve
installing the dishwasher _13
Installation_DD81-02034B-02_EN.indd Sec3:13
2/51/0/82/0210617 101:05:65:60:303AAMM... there are no kinks and that were supplied with the dishwasher using a screwdriver, and then Install the strain relief (Figure 4 - They will be used in (31.6 N·m)) Doing so...
User Manual - Page 14

...N·m)) Doing so may damage the water inlet valve and cause a water leak.
14_ installing the dishwasher
Installation_DD81-02034B-02_EN.indd Sec3:14
2/51/0/82/0210617 101:05:65:60:303AAMM
...excess lengths of kinks. 5. CAUTION Also, make sure they are not folded or twisted. installing the dishwasher
STEP 7 PLACING THE DISHWASHER AND CONNECTING THE HOT WATER SUPPLY LINE
1. Pull ...
User Manual - Page 15
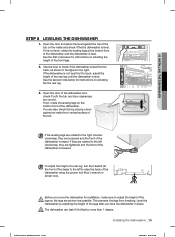
... also check this by adjusting the height of the legs after you move the dishwasher for instructions on the bottom front of the base) to the right (counter clockwise), they are as... short as shown in place.
This prevents the legs from breaking. 02 INSTALLING THE DISHWASHER
STEP 8 LEVELING THE DISHWASHER
1. If the leveling legs are rotated to the left (...
User Manual - Page 16
... the cabinet. Insert the provided screws into the dishwasher. Replace the tub spacer caps.
• The screws or tub...other material that can be damaged by drilling, follow the instructions in 2-2 below . Remove the tub spacer caps with ...little. Contact a qualified service technician for additional stability and safety.
1. installing the dishwasher
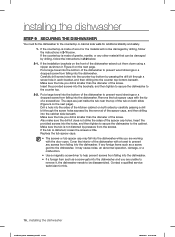
STEP 9 SECURING THE DISHWASHER...
User Manual - Page 18
... When drilling a hole for
any foreign items in Figure 11 below). To prevent leaks or drainage problems, make sure the drain hose is no air gap, make sure to do so may cause water...not to soften the edges. Failure to hang.
A damaged drain hose causes a leak.
18_ installing the dishwasher
Installation_DD81-02034B-020_EN.indd Sec3:18
2/51/0/82/0210717 101:05:65:60:505AAMM ...
User Manual - Page 19
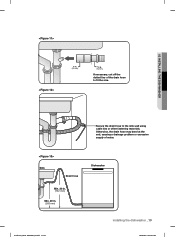
...dotted line of water. Otherwise, the drain hose may bend at the end, causing a drainage problem or excessive supply of the drain hose to the sink wall using cable ties or other fastening...to fit the size. 02 INSTALLING THE DISHWASHER
1 in. (25 mm)
5/8 in . (508 mm)
Dishwasher
Installation_DD81-02034B-020_EN.indd Sec3:19
installing the dishwasher _19
2/51/0/82/0210617 ...
User Manual - Page 21
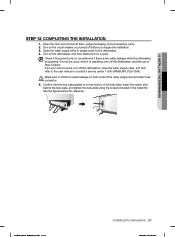
... ends of the kick plate. If an error has occurred, turn off the dishwasher, and then go to the user manual or contact a service center 1-800-SAMSUNG (726-7864). Insert the rubber skirt behind the kick plate, and tighten the kick plate using the screws included in the Install Kit. Open the water supply valve...
User Manual - Page 22

...×Depth×Height)
23⅞ x 24 3⁄4 (Excluding Handle) x 33⅞in. [ 605 x 627 ( Excluding Handle) x 860mm] (DW80K7050 Series,DW80R5061 Series )
23⅞ x 243⁄4 x 337⁄8 in this manual.
22_ specifications
Installation_DD81-02034B-02_EN.indd Sec4:22
2/51/0/82/0210717101:506:5:066:0A6 MAM The actual appearance of...
Samsung DW80R5061 Reviews
We have not received any reviews for Samsung yet.