
Quick Guide (easy Manual) (ver.1.0) (English)
Page 6
...Cautions 3 Maintenance of Cabinet 3 Disc Handling 3 Disc Storage 4 Disc Specifications 4 General Features 8 Before Reading the Instruction Manual 9 How to use the DVD Recorder 9 Description 11 Front Panel 11 Front Panel Display 11 Rear Panel 12 Unpacking 12 Accessories 12 Tour of the Remote Control 13 Connecting & Setting... to a TV 24 Connecting to a TV with HDMI Jack 24 Connecting to a TV with DVI Jack 25 Step 5 : Connecting External Devices 26 Connecting a VCR, Set-Top Box(STB) or DVD Player to the AV 1 IN or S-VIDEO IN jacks . . . .26 Connecting a Camcorder to the AV 2 IN ...
...Cautions 3 Maintenance of Cabinet 3 Disc Handling 3 Disc Storage 4 Disc Specifications 4 General Features 8 Before Reading the Instruction Manual 9 How to use the DVD Recorder 9 Description 11 Front Panel 11 Front Panel Display 11 Rear Panel 12 Unpacking 12 Accessories 12 Tour of the Remote Control 13 Connecting & Setting... to a TV 24 Connecting to a TV with HDMI Jack 24 Connecting to a TV with DVI Jack 25 Step 5 : Connecting External Devices 26 Connecting a VCR, Set-Top Box(STB) or DVD Player to the AV 1 IN or S-VIDEO IN jacks . . . .26 Connecting a Camcorder to the AV 2 IN ...
Quick Guide (easy Manual) (ver.1.0) (English)
Page 8
... high quality digital video on DVD-RW/DVD-R discs. HDMI (High Definition Multimedia Interface) HDMI reduces picture noise by allowing a pure digital video/audio signal path from a digital camcorder using a DV input jack Record digital camcorder video onto DVD-RW, DVD-R discs using a DVD-RW/DVD-R disc With the DVD-R135, you can set your own DVD video title on the...
... high quality digital video on DVD-RW/DVD-R discs. HDMI (High Definition Multimedia Interface) HDMI reduces picture noise by allowing a pure digital video/audio signal path from a digital camcorder using a DV input jack Record digital camcorder video onto DVD-RW, DVD-R discs using a DVD-RW/DVD-R disc With the DVD-R135, you can set your own DVD video title on the...
Quick Guide (easy Manual) (ver.1.0) (English)
Page 12
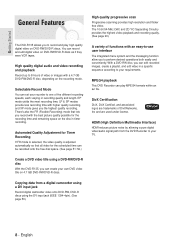
... video input jacks. 8. AV 1 S-VIDEO IN Connects the output of external equipment using an S-Video cable. 11. To watch a DVD on your TV, you must connect audio/video cables. AV 1 VIDEO IN Connects the output of external equipment using audio cables 9. ANT...Panel Getting Started 1. Unpacking Accessories Check for Remote Control (AAA Size) (AC43-12002H) Instruction Manual (AK68-01049B) Quick Guide (AK68-01051B) HDMI OUT s The Antenna connection does not pass NOTE audio/video signals. AV 1 AUDIO IN Connect the output of external equipment using a video cable...
... video input jacks. 8. AV 1 S-VIDEO IN Connects the output of external equipment using an S-Video cable. 11. To watch a DVD on your TV, you must connect audio/video cables. AV 1 VIDEO IN Connects the output of external equipment using audio cables 9. ANT...Panel Getting Started 1. Unpacking Accessories Check for Remote Control (AAA Size) (AC43-12002H) Instruction Manual (AK68-01049B) Quick Guide (AK68-01051B) HDMI OUT s The Antenna connection does not pass NOTE audio/video signals. AV 1 AUDIO IN Connect the output of external equipment using a video cable...

Quick Guide (easy Manual) (ver.1.0) (English)
Page 14
... † Step 2 : Connecting the Video Cable † Step 3 : Connecting the Audio Cable † Step 4 : Connecting HDMI/ DVI to a TV † Step 5 : Connecting External Devices † Step 6 : Connecting the Power Cord † Step...the Antenna Cable 15 Step 2 : Connecting the Video Cable 18 Step 3 : Connecting the Audio Cable 21 Step 4 : Connecting HDMI/ DVI to a TV 24 Step 5 : Connecting External Devices 26 Step 6 : Connecting the Power Cord 29 Step 7 : Preparing... as close to the point of connecting the DVD Recorder to other external components and setting required initial modes.
... † Step 2 : Connecting the Video Cable † Step 3 : Connecting the Audio Cable † Step 4 : Connecting HDMI/ DVI to a TV † Step 5 : Connecting External Devices † Step 6 : Connecting the Power Cord † Step...the Antenna Cable 15 Step 2 : Connecting the Video Cable 18 Step 3 : Connecting the Audio Cable 21 Step 4 : Connecting HDMI/ DVI to a TV 24 Step 5 : Connecting External Devices 26 Step 6 : Connecting the Power Cord 29 Step 7 : Preparing... as close to the point of connecting the DVD Recorder to other external components and setting required initial modes.
Quick Guide (easy Manual) (ver.1.0) (English)
Page 20
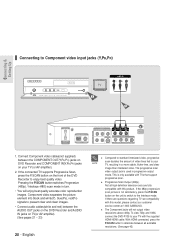
... image than interlaced video. To view 720p and 1080i, connect the DVD-R135 to your TV with this product. With HDMI connected, press the P.SCAN button to alternate between the COMPONENT OUT(Y,PB,PR) jacks on DVD Recorder and COMPONENT IN(Y,PB,PR) jacks on the front of video...in progressive output mode. If the 480p progressive scan picture is only available with this model, please contact our customer service center at 1-800-SAMSUNG. s Progressive Scan Output (480p). If there are fully compatible with TVs that support progressive scan. This is not satisfactory, press the ...
... image than interlaced video. To view 720p and 1080i, connect the DVD-R135 to your TV with this product. With HDMI connected, press the P.SCAN button to alternate between the COMPONENT OUT(Y,PB,PR) jacks on DVD Recorder and COMPONENT IN(Y,PB,PR) jacks on the front of video...in progressive output mode. If the 480p progressive scan picture is only available with this model, please contact our customer service center at 1-800-SAMSUNG. s Progressive Scan Output (480p). If there are fully compatible with TVs that support progressive scan. This is not satisfactory, press the ...

Quick Guide (easy Manual) (ver.1.0) (English)
Page 24
...not available when you use, audio may not be supported. Press the input selector on your TV remote control until the HDMI signal from the DVD Recorder appears on the HDMI device(TV/HDMI Receiver) you set the digital audio ouput to PCM.(See page 34~35) Caution s Depending on your TV. English ...In this case, set Digital output as Bitstream or select DTS On in Audio setup menu. HDMI OUT s To watch through the HDMI output, ...
...not available when you use, audio may not be supported. Press the input selector on your TV remote control until the HDMI signal from the DVD Recorder appears on the HDMI device(TV/HDMI Receiver) you set the digital audio ouput to PCM.(See page 34~35) Caution s Depending on your TV. English ...In this case, set Digital output as Bitstream or select DTS On in Audio setup menu. HDMI OUT s To watch through the HDMI output, ...
Quick Guide (easy Manual) (ver.1.0) (English)
Page 25
...to enable the digital transmission of your TV. It provides a secure digital link between HDMI and DVI is required. HDMI OUT Connecting & Setting Up NOTE s To change HDMI output resolution, see page 42. Using HDMI, the DVD recorder transmits a digital video and audio signal and displays a vivid picture on the ...audio data (LPCM or Bit Stream data). - s Why does Samsung use HDMI? Press the input selector on your TV. Using the audio cables, connect the AUDIO (red and white) OUT terminals on the rear of the DVD Recorder to your TV remote control until the DVI signal from ...
...to enable the digital transmission of your TV. It provides a secure digital link between HDMI and DVI is required. HDMI OUT Connecting & Setting Up NOTE s To change HDMI output resolution, see page 42. Using HDMI, the DVD recorder transmits a digital video and audio signal and displays a vivid picture on the ...audio data (LPCM or Bit Stream data). - s Why does Samsung use HDMI? Press the input selector on your TV. Using the audio cables, connect the AUDIO (red and white) OUT terminals on the rear of the DVD Recorder to your TV remote control until the DVI signal from ...

Quick Guide (easy Manual) (ver.1.0) (English)
Page 36
DVD-Recorder No Disc Timer Rec. TV Aspect Setup Input Level Black Level 3D Noise Reduction HDMI/DVI Resolution DivX(R) Registration Video : 16:9 Wide √ : Darker √ : 7.5 IRE √ : Off √ : 480P √ √ MOVE ENTER RETURN EXIT ..., 4:3 PanScan or 16:9 Wide) using the ...† buttons, then press the ENTER or √ button. TV Aspect Setup Input Level Black Level 3D Noise Reduction HDMI/DVI Resolution DivX(R) Registration Video : 164:93 WLeidtter Box √ : D4a:r3kPearn-Scan √ : 71.56:I9RWEide √ : Off √ : 480P...
DVD-Recorder No Disc Timer Rec. TV Aspect Setup Input Level Black Level 3D Noise Reduction HDMI/DVI Resolution DivX(R) Registration Video : 16:9 Wide √ : Darker √ : 7.5 IRE √ : Off √ : 480P √ √ MOVE ENTER RETURN EXIT ..., 4:3 PanScan or 16:9 Wide) using the ...† buttons, then press the ENTER or √ button. TV Aspect Setup Input Level Black Level 3D Noise Reduction HDMI/DVI Resolution DivX(R) Registration Video : 164:93 WLeidtter Box √ : D4a:r3kPearn-Scan √ : 71.56:I9RWEide √ : Off √ : 480P...
Quick Guide (easy Manual) (ver.1.0) (English)
Page 41
...Black level function is too dark and you want to make the screen lighter. DVD-Recorder Timer Record No Disc Timer Rec. Video option menu will be displayed. TV Aspect Setup Input Level Black Level 3D Noise Reduction HDMI/DVI Resolution DivX(R) Registration Video : 16:9 Wide √ : Darker √...Video Parental Control Setup MOVE ENTER RETURN EXIT DVD-Recorder No Disc Timer Rec. TV Aspect Setup Input Level Black Level : 16:9 Wide √ Da: rDkearrker √ Li:gh7t.e5r IRE √ 3D Noise Reduction : Off √ HDMI/DVI Resolution : 480P √ DivX(R) ...
...Black level function is too dark and you want to make the screen lighter. DVD-Recorder Timer Record No Disc Timer Rec. Video option menu will be displayed. TV Aspect Setup Input Level Black Level 3D Noise Reduction HDMI/DVI Resolution DivX(R) Registration Video : 16:9 Wide √ : Darker √...Video Parental Control Setup MOVE ENTER RETURN EXIT DVD-Recorder No Disc Timer Rec. TV Aspect Setup Input Level Black Level : 16:9 Wide √ Da: rDkearrker √ Li:gh7t.e5r IRE √ 3D Noise Reduction : Off √ HDMI/DVI Resolution : 480P √ DivX(R) ...
Quick Guide (easy Manual) (ver.1.0) (English)
Page 42
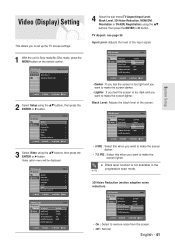
... Level : Darker √ : 7.5 IRE √ 3D Noise Reduction : Off √ HDMI/DVI Resolution 4:8408P0P √ DivX(R) Registration 720P √ 1080i MOVE ENTER RETURN EXIT • 480p : 720 x 480 • 720p : 1280 x 720 • 1080i : 1920 x 1080 Output selection Connect the DVD-R135 to select the output resolution. - To learn more, visit www.divx...
... Level : Darker √ : 7.5 IRE √ 3D Noise Reduction : Off √ HDMI/DVI Resolution 4:8408P0P √ DivX(R) Registration 720P √ 1080i MOVE ENTER RETURN EXIT • 480p : 720 x 480 • 720p : 1280 x 720 • 1080i : 1920 x 1080 Output selection Connect the DVD-R135 to select the output resolution. - To learn more, visit www.divx...

Quick Guide (easy Manual) (ver.1.0) (English)
Page 93
... Re-check the recording time and the end time settings again. See if your disc. Video The disc revolves, but this 480p/720p/1080i DVD Recorder. Checkpoint 1 Checkpoint 2 Checkpoint 3 Check whether there is disconnected due to bright suddenly, the screen may not play properly. Checkpoint 1 Checkpoint... 2 Checkpoint 3 Checkpoint 4 Are you are displayed. Recording will be heard. Check the connection between the TV and the HDMI jack of recording. Checkpoint 1 If snow noise appears on your TV supports this is inserted correctly with the label facing up. If ...
... Re-check the recording time and the end time settings again. See if your disc. Video The disc revolves, but this 480p/720p/1080i DVD Recorder. Checkpoint 1 Checkpoint 2 Checkpoint 3 Check whether there is disconnected due to bright suddenly, the screen may not play properly. Checkpoint 1 Checkpoint... 2 Checkpoint 3 Checkpoint 4 Are you are displayed. Recording will be heard. Check the connection between the TV and the HDMI jack of recording. Checkpoint 1 If snow noise appears on your TV supports this is inserted correctly with the label facing up. If ...

Quick Guide (easy Manual) (ver.1.0) (English)
Page 94
... - Please refer to change a subtitle and an audio signal on your DVD recorder. Allow for 720p/1080i HDMI (High Definition Multimedia Interface) Output. If the problem still persists, contact a nearby Samsung service center. Checkpoint 1 Checkpoint 2 Point the remote control at the remote... control sensor on your DVD recorder simultaneously when the power is converted ...
... - Please refer to change a subtitle and an audio signal on your DVD recorder. Allow for 720p/1080i HDMI (High Definition Multimedia Interface) Output. If the problem still persists, contact a nearby Samsung service center. Checkpoint 1 Checkpoint 2 Point the remote control at the remote... control sensor on your DVD recorder simultaneously when the power is converted ...

Quick Guide (easy Manual) (ver.1.0) (English)
Page 97
... S-Video output 1 (Y:1.0Vp-p, C:0.286Vp-p at 75Ω load) Component output 1 (Y: 1.0Vp-p, Pb: 0.70Vp-p, Pr: 0.70Vp-p at 75Ω load) HDMI/DVI output 1 (480p, 720p, 1080i) Picture Compression format MPEG-II Audio Compression format Dolby Digital 2ch/256kbps Recording Quality XP (about 8 Mbps), SP (about 4 ...Mbps), LP (about 2 Mbps), EP (about 1.2 Mbps or about 0.8 Mbps) Audio Frequency Response 20 Hz ~ 20 kHz For DVD discs, audio signals recorded at 96kHz sampling Audio Output frequency are converted and output at 48kHz. Disc Type Analog Audio Output Digital Audio Output...
... S-Video output 1 (Y:1.0Vp-p, C:0.286Vp-p at 75Ω load) Component output 1 (Y: 1.0Vp-p, Pb: 0.70Vp-p, Pr: 0.70Vp-p at 75Ω load) HDMI/DVI output 1 (480p, 720p, 1080i) Picture Compression format MPEG-II Audio Compression format Dolby Digital 2ch/256kbps Recording Quality XP (about 8 Mbps), SP (about 4 ...Mbps), LP (about 2 Mbps), EP (about 1.2 Mbps or about 0.8 Mbps) Audio Frequency Response 20 Hz ~ 20 kHz For DVD discs, audio signals recorded at 96kHz sampling Audio Output frequency are converted and output at 48kHz. Disc Type Analog Audio Output Digital Audio Output...
User Manual (user Manual) (ver.1.0) (English)
Page 6
...Cautions 3 Maintenance of Cabinet 3 Disc Handling 3 Disc Storage 4 Disc Specifications 4 General Features 8 Before Reading the Instruction Manual 9 How to use the DVD Recorder 9 Description 11 Front Panel 11 Front Panel Display 11 Rear Panel 12 Unpacking 12 Accessories 12 Tour of the Remote Control 13 Connecting & Setting... to a TV 24 Connecting to a TV with HDMI Jack 24 Connecting to a TV with DVI Jack 25 Step 5 : Connecting External Devices 26 Connecting a VCR, Set-Top Box(STB) or DVD Player to the AV 1 IN or S-VIDEO IN jacks . . . .26 Connecting a Camcorder to the AV 2 IN ...
...Cautions 3 Maintenance of Cabinet 3 Disc Handling 3 Disc Storage 4 Disc Specifications 4 General Features 8 Before Reading the Instruction Manual 9 How to use the DVD Recorder 9 Description 11 Front Panel 11 Front Panel Display 11 Rear Panel 12 Unpacking 12 Accessories 12 Tour of the Remote Control 13 Connecting & Setting... to a TV 24 Connecting to a TV with HDMI Jack 24 Connecting to a TV with DVI Jack 25 Step 5 : Connecting External Devices 26 Connecting a VCR, Set-Top Box(STB) or DVD Player to the AV 1 IN or S-VIDEO IN jacks . . . .26 Connecting a Camcorder to the AV 2 IN ...

User Manual (user Manual) (ver.1.0) (English)
Page 8
..., and edit video in recording quality and length. HDMI (High Definition Multimedia Interface) HDMI reduces picture noise by allowing a pure digital video/audio signal path from a digital camcorder using a DV input jack Record digital camcorder video onto DVD-RW, DVD-R discs using a DVD-RW/DVD-R disc With the DVD-R135, you can play high quality digital video on...
..., and edit video in recording quality and length. HDMI (High Definition Multimedia Interface) HDMI reduces picture noise by allowing a pure digital video/audio signal path from a digital camcorder using a DV input jack Record digital camcorder video onto DVD-RW, DVD-R discs using a DVD-RW/DVD-R disc With the DVD-R135, you can play high quality digital video on...

User Manual (user Manual) (ver.1.0) (English)
Page 12
...VIDEO OUT(better video quality) Connects the input of external equipment using an S-Video cable. 7. Video/Audio Cable (AC39-00073A) 12 - HDMI OUT I The Antenna connection does not pass NOTE audio/video signals. Rear Panel Getting Started 1. COMPONENT VIDEO OUT(best video quality) Connect to... coaxial audio input jack. 4. DIGITAL AUDIO OUT(COAXIAL) Connects to the audio input of external equipment using audio cables. 5. To watch a DVD on your TV, you must connect audio/video cables. ANT IN/ANT OUT (TO TV) Connect antenna cables. 2. Unpacking Accessories Check for Remote...
...VIDEO OUT(better video quality) Connects the input of external equipment using an S-Video cable. 7. Video/Audio Cable (AC39-00073A) 12 - HDMI OUT I The Antenna connection does not pass NOTE audio/video signals. Rear Panel Getting Started 1. COMPONENT VIDEO OUT(best video quality) Connect to... coaxial audio input jack. 4. DIGITAL AUDIO OUT(COAXIAL) Connects to the audio input of external equipment using audio cables. 5. To watch a DVD on your TV, you must connect audio/video cables. ANT IN/ANT OUT (TO TV) Connect antenna cables. 2. Unpacking Accessories Check for Remote...

User Manual (user Manual) (ver.1.0) (English)
Page 14
Connecting & Setting Up Connecting & Setting Up This section involves various methods of connecting the DVD Recorder to the point of the building as practical. English • Note to CATV system installer: : This reminder is provided ... required initial modes. Step 1 : Connecting the Antenna Cable † Step 2 : Connecting the Video Cable † Step 3 : Connecting the Audio Cable † Step 4 : Connecting HDMI/ DVI to a TV † Step 5 : Connecting External Devices † Step 6 : Connecting the Power Cord † Step 7 : Preparing the Remote Control Quick Overview 14 Step...
Connecting & Setting Up Connecting & Setting Up This section involves various methods of connecting the DVD Recorder to the point of the building as practical. English • Note to CATV system installer: : This reminder is provided ... required initial modes. Step 1 : Connecting the Antenna Cable † Step 2 : Connecting the Video Cable † Step 3 : Connecting the Audio Cable † Step 4 : Connecting HDMI/ DVI to a TV † Step 5 : Connecting External Devices † Step 6 : Connecting the Power Cord † Step 7 : Preparing the Remote Control Quick Overview 14 Step...

User Manual (user Manual) (ver.1.0) (English)
Page 20
... resolutions above 480p. To view 720p and 1080i, connect the DVD-R135 to the Interlace mode. If the 480p progressive scan picture is only available with this model, please contact our customer service center at 1-800-SAMSUNG. With HDMI connected, press the P.SCAN button to present clear and clean... images. • Connect audio cables(white and red) between the COMPONENT OUT(Y,PB,PR) jacks on DVD Recorder and COMPONENT IN(Y,PB,PR) jacks on the...
... resolutions above 480p. To view 720p and 1080i, connect the DVD-R135 to the Interlace mode. If the 480p progressive scan picture is only available with this model, please contact our customer service center at 1-800-SAMSUNG. With HDMI connected, press the P.SCAN button to present clear and clean... images. • Connect audio cables(white and red) between the COMPONENT OUT(Y,PB,PR) jacks on DVD Recorder and COMPONENT IN(Y,PB,PR) jacks on the...

User Manual (user Manual) (ver.1.0) (English)
Page 24
...your TV remote control until the HDMI signal from the DVD Recorder appears on your TV. If TV does not support Dolby digital/DTS, Audio output is not available when you use, audio may not be supported. HDMI cable connect the HDMI OUT jack on the HDMI device(TV/HDMI Receiver) you set Digital output ... & Setting Up Step 4 : Connecting HDMI/DVI to a TV If your TV has a HDMI/DVI input, connect HDMI/DVI cable to a TV with HDMI Jack Using the HDMI- In this case, set the digital audio output to PCM.(See page 34~35) Caution I Depending on the rear of the DVD Recorder to PCM or DTS Off...
...your TV remote control until the HDMI signal from the DVD Recorder appears on your TV. If TV does not support Dolby digital/DTS, Audio output is not available when you use, audio may not be supported. HDMI cable connect the HDMI OUT jack on the HDMI device(TV/HDMI Receiver) you set Digital output ... & Setting Up Step 4 : Connecting HDMI/DVI to a TV If your TV has a HDMI/DVI input, connect HDMI/DVI cable to a TV with HDMI Jack Using the HDMI- In this case, set the digital audio output to PCM.(See page 34~35) Caution I Depending on the rear of the DVD Recorder to PCM or DTS Off...

User Manual (user Manual) (ver.1.0) (English)
Page 25
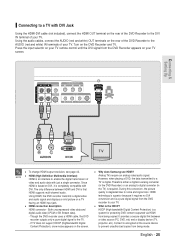
...does Samsung use HDMI? However, when playing a DVD, the data transmitted to your TV. It provides a secure digital link between HDMI and DVI is completely compatible with just a single connector. If TV does not support HDCP (Highbandwidth Digital Content Protection), snow noise appears on a TV having an HDMI input...in the TV) is an interface to enable the digital transmission of video and audio data with DVI. Though the DVD recorder uses a HDMI cable, the DVD recorder outputs only a pure digital signal to the DVI IN terminal of your TV screen. Connecting to a TV...
...does Samsung use HDMI? However, when playing a DVD, the data transmitted to your TV. It provides a secure digital link between HDMI and DVI is completely compatible with just a single connector. If TV does not support HDCP (Highbandwidth Digital Content Protection), snow noise appears on a TV having an HDMI input...in the TV) is an interface to enable the digital transmission of video and audio data with DVI. Though the DVD recorder uses a HDMI cable, the DVD recorder outputs only a pure digital signal to the DVI IN terminal of your TV screen. Connecting to a TV...
