User Manual (user Manual) (ver.1.0) (English)
Page 1
DV431AE* DV431AG* Gas and Electric Dryer user manual imagine the possibilities Thank you for purchasing this Samsung product. To receive more complete service, please register your product at www.samsung.com/register DV431AEP-03021A-01_EN.indd 1 2011-01-26 3:47:11
DV431AE* DV431AG* Gas and Electric Dryer user manual imagine the possibilities Thank you for purchasing this Samsung product. To receive more complete service, please register your product at www.samsung.com/register DV431AEP-03021A-01_EN.indd 1 2011-01-26 3:47:11
User Manual (user Manual) (ver.1.0) (English)
Page 2
... turn the Jog Dial to stack the Washer and Dryer. Energy Saving Samsung dryers are designed to be changed with 1kWh. Also, both the large capacity and Fuzzy Logic Control save energy by permeating high temperature heat deep into the dryer drum after several minutes of laundry with just four ... course allows you can dry up to sanitize garments by automatically drying your bedding and curtains clean. Stacking (MODEL NO: SK-5A/XAA) Samsung's Washers and Dryers can be removed to select one of the 9 automatic drying cycles, including normal, heavy duty and towels, or let the Fuzzy ...
... turn the Jog Dial to stack the Washer and Dryer. Energy Saving Samsung dryers are designed to be changed with 1kWh. Also, both the large capacity and Fuzzy Logic Control save energy by permeating high temperature heat deep into the dryer drum after several minutes of laundry with just four ... course allows you can dry up to sanitize garments by automatically drying your bedding and curtains clean. Stacking (MODEL NO: SK-5A/XAA) Samsung's Washers and Dryers can be removed to select one of the 9 automatic drying cycles, including normal, heavy duty and towels, or let the Fuzzy ...
User Manual (user Manual) (ver.1.0) (English)
Page 3
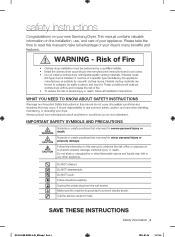
... that may result in this manual to use common sense, caution, and care when installing, maintaining, or operating your new Samsung Dryer. WHAT YOU NEED TO KNOW ABOUT SAFETY INSTRUCTIONS Warnings and Important Safety Instructions in minor personal injury or property damage. Please ...take full advantage of your dryer's many benefits and features. Do NOT disassemble. Call the service center for use with flexible plastic venting materials...
... that may result in this manual to use common sense, caution, and care when installing, maintaining, or operating your new Samsung Dryer. WHAT YOU NEED TO KNOW ABOUT SAFETY INSTRUCTIONS Warnings and Important Safety Instructions in minor personal injury or property damage. Please ...take full advantage of your dryer's many benefits and features. Do NOT disassemble. Call the service center for use with flexible plastic venting materials...
User Manual (user Manual) (ver.1.0) (English)
Page 4
... precautions, including the following: 1. Items contaminated with controls. 8. Do not dry articles that have the skills to carry out. 9. Read all instructions before using your dryer. Before the appliance is removed from the accumulation of lint, dust, and dirt. 13.The interior of the appliance and exhaust duct should be exposed...
... precautions, including the following: 1. Items contaminated with controls. 8. Do not dry articles that have the skills to carry out. 9. Read all instructions before using your dryer. Before the appliance is removed from the accumulation of lint, dust, and dirt. 13.The interior of the appliance and exhaust duct should be exposed...
User Manual (user Manual) (ver.1.0) (English)
Page 5
... removed. Installation and service must not be placed in the user-repair instructions and you cannot reach your gas supplier, call your dryer from service, remove the door to the drying compartment to carry those out. Before discarding or removing your gas supplier from becoming ...cleaning solvents, or other flammable or explosive substances. To reduce the risk of the appliance unless specifically recommended in the dryer until all instructions before or after each load. There are many highly flammable items used near children and pets. Do not tamper ...
... removed. Installation and service must not be placed in the user-repair instructions and you cannot reach your gas supplier, call your dryer from service, remove the door to the drying compartment to carry those out. Before discarding or removing your gas supplier from becoming ...cleaning solvents, or other flammable or explosive substances. To reduce the risk of the appliance unless specifically recommended in the dryer until all instructions before or after each load. There are many highly flammable items used near children and pets. Do not tamper ...

User Manual (user Manual) (ver.1.0) (English)
Page 6
...in the oil to heat. Heat sources such as your product before selecting cabinetry, making cutouts, or beginning installation. Properly adjusted dryers will reduce, but not eliminate, the hazard. This appliance must be detected by qualified service personnel. Ensure pockets ..., formaldehyde, and soot, caused primarily by properly venting the dryer to catch fire. Because of continuing product improvements, Samsung reserves the right to these kinds of these items in accordance with your dryer can ignite spontaneoulsy. Gas appliances can become hot enough to the...
...in the oil to heat. Heat sources such as your product before selecting cabinetry, making cutouts, or beginning installation. Properly adjusted dryers will reduce, but not eliminate, the hazard. This appliance must be detected by qualified service personnel. Ensure pockets ..., formaldehyde, and soot, caused primarily by properly venting the dryer to catch fire. Because of continuing product improvements, Samsung reserves the right to these kinds of these items in accordance with your dryer can ignite spontaneoulsy. Gas appliances can become hot enough to the...
User Manual (user Manual) (ver.1.0) (English)
Page 7
...Electrical requirements 15 Grounding 16 Electrical connections 17 Connecting the inlet hose 18 Replacement parts and accessories 18 Installation 21 Final installation checklist 22 Dryer Exhaust Tips 23 Door Reversal 24 Overview of the control panel 27 Child lock 27 Drum Light 27 Changing The Language 27 My ...cycle 28 Rack Dry 29 Clean the lint filter 29 Load the dryer properly 29 Getting started 30 Control Panel 30 Tumbler 30 Stainless Steel Tumbler 30 Dryer Exterior 30 Dryer Exhaust System SPECIAL LAUNDRY TIPS 31 31 Special laundry tips TROUBLESHOOTING 32 32 Check these points...
...Electrical requirements 15 Grounding 16 Electrical connections 17 Connecting the inlet hose 18 Replacement parts and accessories 18 Installation 21 Final installation checklist 22 Dryer Exhaust Tips 23 Door Reversal 24 Overview of the control panel 27 Child lock 27 Drum Light 27 Changing The Language 27 My ...cycle 28 Rack Dry 29 Clean the lint filter 29 Load the dryer properly 29 Getting started 30 Control Panel 30 Tumbler 30 Stainless Steel Tumbler 30 Dryer Exterior 30 Dryer Exhaust System SPECIAL LAUNDRY TIPS 31 31 Special laundry tips TROUBLESHOOTING 32 32 Check these points...
User Manual (user Manual) (ver.1.0) (English)
Page 8
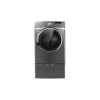
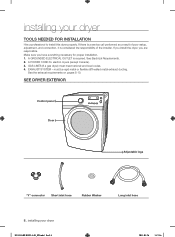
... the exhaust requirements on pages 8-10. SEE DRYER EXTERIOR Control panel Door Adjustable legs "Y"-connector Short inlet hose Rubber Washer Long inlet hose 8_ installing your dryer TOOLS NEEDED FOR INSTALLATION Hire a professional to install this dryer properly. Make sure you are responsible. See ...Electrical Requirements. 2. GAS LINES (if a gas dryer) must be rigid metal or flexible stiff-walled...
... the exhaust requirements on pages 8-10. SEE DRYER EXTERIOR Control panel Door Adjustable legs "Y"-connector Short inlet hose Rubber Washer Long inlet hose 8_ installing your dryer TOOLS NEEDED FOR INSTALLATION Hire a professional to install this dryer properly. Make sure you are responsible. See ...Electrical Requirements. 2. GAS LINES (if a gas dryer) must be rigid metal or flexible stiff-walled...
User Manual (user Manual) (ver.1.0) (English)
Page 9
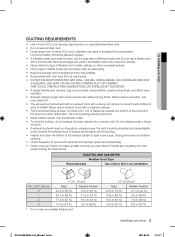
... a year. Unplug the power cord before cleaning. • Check frequently to be punctured, reduce airflow, extend drying times, and affect dryer operation. • Exhaust systems longer than 4 inches (10.2 cm) in diameter can result in walls, ceilings, or other obstruction. Do not....) 10.1 m (33 ft.) 18.9 m (62 ft.) 8.8 m (29 ft.) 15.5 m (51 ft.) 7.6 m (25 ft.) 12.5 m (41 ft.) 6.5 m (21 ft.) installing your dryer DUCTING REQUIREMENTS • Use a 4-inch (10.2 cm) diameter rigid aluminum or rigid galvanized steel duct. • Do not use the type with a stiff sheet metal...
... a year. Unplug the power cord before cleaning. • Check frequently to be punctured, reduce airflow, extend drying times, and affect dryer operation. • Exhaust systems longer than 4 inches (10.2 cm) in diameter can result in walls, ceilings, or other obstruction. Do not....) 10.1 m (33 ft.) 18.9 m (62 ft.) 8.8 m (29 ft.) 15.5 m (51 ft.) 7.6 m (25 ft.) 12.5 m (41 ft.) 6.5 m (21 ft.) installing your dryer DUCTING REQUIREMENTS • Use a 4-inch (10.2 cm) diameter rigid aluminum or rigid galvanized steel duct. • Do not use the type with a stiff sheet metal...

User Manual (user Manual) (ver.1.0) (English)
Page 10
...-03021A-01_EN.indd Sec5:10 2011-01-26 3:47:17 IMPORTANT TO INSTALLER Please read the following instructions carefully before installing the dryer. LOCATION CONSIDERATIONS The dryer should be empty and the lint filter clean. To exhaust out the bottom or the right or the left, use the accessory exhaust kit...AN AREA WHERE IT WILL BE EXPOSED TO WATER AND/OR WEATHER. This can be less than 0. THE AREA AROUND THE DRYER SHOULD BE KEPT LINT-FREE. 10_ installing your dryer If the new dryer is installed into an existing exhaust system you must make sure the room has enough fresh air. This...
...-03021A-01_EN.indd Sec5:10 2011-01-26 3:47:17 IMPORTANT TO INSTALLER Please read the following instructions carefully before installing the dryer. LOCATION CONSIDERATIONS The dryer should be empty and the lint filter clean. To exhaust out the bottom or the right or the left, use the accessory exhaust kit...AN AREA WHERE IT WILL BE EXPOSED TO WATER AND/OR WEATHER. This can be less than 0. THE AREA AROUND THE DRYER SHOULD BE KEPT LINT-FREE. 10_ installing your dryer If the new dryer is installed into an existing exhaust system you must make sure the room has enough fresh air. This...
User Manual (user Manual) (ver.1.0) (English)
Page 11
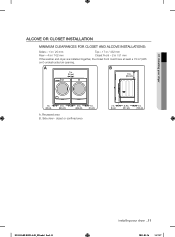
01 installing your dryer _11 2011-01-26 3:47:17 Recessed area B. A 1 in. (2.5 cm) B 17 in. (43.2 cm) 1 in. (2.5 cm) 27 in. (68.6 cm) 27 in ² (465 cm&#... - closet or confined area 1 in. (2.5 cm) 2 in. (5 cm) 31.9 in. (81.1 cm) 4 in. (10.2 cm) DV431AEP-03021A-01_EN.indd Sec5:11 installing your dryer ALCOVE OR CLOSET INSTALLATION MINIMUM CLEARANCES FOR CLOSET AND ALCOVE INSTALLATIONS: Sides - 1 in / 25 mm Top - 17 in / 432 mm Rear - 4 in / 102 mm Closet...
01 installing your dryer _11 2011-01-26 3:47:17 Recessed area B. A 1 in. (2.5 cm) B 17 in. (43.2 cm) 1 in. (2.5 cm) 27 in. (68.6 cm) 27 in ² (465 cm&#... - closet or confined area 1 in. (2.5 cm) 2 in. (5 cm) 31.9 in. (81.1 cm) 4 in. (10.2 cm) DV431AEP-03021A-01_EN.indd Sec5:11 installing your dryer ALCOVE OR CLOSET INSTALLATION MINIMUM CLEARANCES FOR CLOSET AND ALCOVE INSTALLATIONS: Sides - 1 in / 25 mm Top - 17 in / 432 mm Rear - 4 in / 102 mm Closet...

User Manual (user Manual) (ver.1.0) (English)
Page 12
installing your dryer With optional pedestal base or stacking kit Required Dimensions for Installation With Pedestal 51.7 in. (131.4 cm) to clear open door 48 in.² * (310 ....9 in. (81.1 cm) Required Dimensions for Installation With Stacking Kit 6 in. * (15.2 cm) 5.5 in.** (14 cm) 78 in. (198.1 cm) 1 in. (2.5 cm) 12_ installing your dryer 27 in. (68.6 cm) DV431AEP-03021A-01_EN.indd Sec5:12 * Required spacing ** External exhaust elbow requires additional space. 2011-01-26 3:47:17
installing your dryer With optional pedestal base or stacking kit Required Dimensions for Installation With Pedestal 51.7 in. (131.4 cm) to clear open door 48 in.² * (310 ....9 in. (81.1 cm) Required Dimensions for Installation With Stacking Kit 6 in. * (15.2 cm) 5.5 in.** (14 cm) 78 in. (198.1 cm) 1 in. (2.5 cm) 12_ installing your dryer 27 in. (68.6 cm) DV431AEP-03021A-01_EN.indd Sec5:12 * Required spacing ** External exhaust elbow requires additional space. 2011-01-26 3:47:17
User Manual (user Manual) (ver.1.0) (English)
Page 13
... may not terminate underneath the mobile home. NEVER USE A PLASTIC OR NON-METAL FLEXIBLE DUCT. Call 1-800-SAMSUNG(726-7864) for more information. In the United States: • All dryers must be exhausted to ensure containment of lint and moisture from being blown into the duct and catch lint. ...not support combustion. In Canada: • Only those foil-type flexible ducts, if any , specifically identified for anchoring the dryer to the floor must be exhausted to the outside . • The exhaust duct should be exhausted to the local codes. Use only a metal...
... may not terminate underneath the mobile home. NEVER USE A PLASTIC OR NON-METAL FLEXIBLE DUCT. Call 1-800-SAMSUNG(726-7864) for more information. In the United States: • All dryers must be exhausted to ensure containment of lint and moisture from being blown into the duct and catch lint. ...not support combustion. In Canada: • Only those foil-type flexible ducts, if any , specifically identified for anchoring the dryer to the floor must be exhausted to the outside . • The exhaust duct should be exhausted to the local codes. Use only a metal...
User Manual (user Manual) (ver.1.0) (English)
Page 14
...pipe joint compound used to ignite the burner. Gas leaks may not be installed immediately upstream of Massachusetts installation instructions Your dryer must be detected by a licensed plumber or gas fitter. THE INSTALLATION MUST CONFORM WITH LOCAL CODES, OR IN...1/8" (0.3 cm) N.P.T. (National Pipe Thread) plugged tapping, accessible for safe and proper performance by the American Gas Association (CGA in your dryer GAS REQUIREMENTS Use only natural or LP (liquid propane) gases. installing your system, creating a dangerous situation. If a flexible gas connector...
...pipe joint compound used to ignite the burner. Gas leaks may not be installed immediately upstream of Massachusetts installation instructions Your dryer must be detected by a licensed plumber or gas fitter. THE INSTALLATION MUST CONFORM WITH LOCAL CODES, OR IN...1/8" (0.3 cm) N.P.T. (National Pipe Thread) plugged tapping, accessible for safe and proper performance by the American Gas Association (CGA in your dryer GAS REQUIREMENTS Use only natural or LP (liquid propane) gases. installing your system, creating a dangerous situation. If a flexible gas connector...
User Manual (user Manual) (ver.1.0) (English)
Page 15
...re, electrical shock, or personal injury, all wiring and grounding must be run with the circuit conductors and connected to whether your dryer is to be permanently wired, the dryer must be connected to a permanently grounded metal wiring system, or an equipment grounding conductor must be done in accordance with local ... Installation Codes - NEVER CONNECT GROUND WIRE TO PLASTIC PLUMBING LINES, GAS LINES, OR HOT WATER PIPES. DV431AEP-03021A-01_EN.indd Sec5:15 installing your dryer _15 2011-01-26 3:47:18 Latest Revisions and local codes and ordinances. It is located on the back of the...
...re, electrical shock, or personal injury, all wiring and grounding must be run with the circuit conductors and connected to whether your dryer is to be permanently wired, the dryer must be connected to a permanently grounded metal wiring system, or an equipment grounding conductor must be done in accordance with local ... Installation Codes - NEVER CONNECT GROUND WIRE TO PLASTIC PLUMBING LINES, GAS LINES, OR HOT WATER PIPES. DV431AEP-03021A-01_EN.indd Sec5:15 installing your dryer _15 2011-01-26 3:47:18 Latest Revisions and local codes and ordinances. It is located on the back of the...
User Manual (user Manual) (ver.1.0) (English)
Page 16
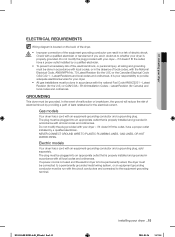
... 120 volt, 60 Hz AC approved electrical service, with a 15-ampere fuse or circuit breaker is U.L. IMPORTANT: When local codes allow, the dryer electrical supply may be connected by means of the line is required. • If a power cord is used, the cord should be retained ...cord electric supply wiring must be plugged into a 30-ampere receptacle. • The power cord is NOT provided with a dryer, that is required. U.S. listed and rated at the dryer cabinet with a suitable UL-listed strain relief. • Grounding through the neutral conductor. (Use 4-prong plug for (1) ...
... 120 volt, 60 Hz AC approved electrical service, with a 15-ampere fuse or circuit breaker is U.L. IMPORTANT: When local codes allow, the dryer electrical supply may be connected by means of the line is required. • If a power cord is used, the cord should be retained ...cord electric supply wiring must be plugged into a 30-ampere receptacle. • The power cord is NOT provided with a dryer, that is required. U.S. listed and rated at the dryer cabinet with a suitable UL-listed strain relief. • Grounding through the neutral conductor. (Use 4-prong plug for (1) ...
User Manual (user Manual) (ver.1.0) (English)
Page 17
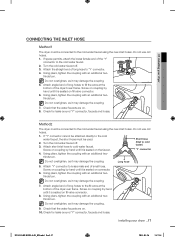
.... 6. If "Y" connector cannot be attached directly to the cold water faucet, the short hose must be connected to brass male end of the dryer's rear frame. Using pliers, tighten the coupling with an additional twothirds turn . Screw on coupling by hand until it is seated on fi...ll valve connector. 8. Method2 The dryer must be used. 2. Screw on coupling by hand until it is seated on the faucet. Attach angled end of long hoses to the cold ...
.... 6. If "Y" connector cannot be attached directly to the cold water faucet, the short hose must be connected to brass male end of the dryer's rear frame. Using pliers, tighten the coupling with an additional twothirds turn . Screw on coupling by hand until it is seated on fi...ll valve connector. 8. Method2 The dryer must be used. 2. Screw on coupling by hand until it is seated on the faucet. Attach angled end of long hoses to the cold ...

User Manual (user Manual) (ver.1.0) (English)
Page 18
... must be level. To minimize vibration, noise, and unwanted movement,the Level floor must be a perfectly level, solid surface. Leveling feet 18_ installing your dryer or the SAMSUNG customer care center at 1-800-SAMSUNG(726-7864). Read and follow the instructions provided with any tools listed here. Consider installing the...
... must be level. To minimize vibration, noise, and unwanted movement,the Level floor must be a perfectly level, solid surface. Leveling feet 18_ installing your dryer or the SAMSUNG customer care center at 1-800-SAMSUNG(726-7864). Read and follow the instructions provided with any tools listed here. Consider installing the...
User Manual (user Manual) (ver.1.0) (English)
Page 19
... homes, or if local codes do not cover ventilation slots at the terminal block. Use duct tape to secure this section to your dryer to your dryer _19 2011-01-26 3:47:21 BEFORE OPERATING OR TESTING, follow the grounding instructions in the cabinet near the terminal block. MODELS: IMPORTANT...not permit grounding through the hole provided in the Grounding section. Review the Exhausting section before putting it in the dryer cabinet. 5. These joints should be used , the dryer frame cannot be grounded to the neutral conductor at the back of exhaust system to the exhaust hood. Review ...
... homes, or if local codes do not cover ventilation slots at the terminal block. Use duct tape to secure this section to your dryer to your dryer _19 2011-01-26 3:47:21 BEFORE OPERATING OR TESTING, follow the grounding instructions in the cabinet near the terminal block. MODELS: IMPORTANT...not permit grounding through the hole provided in the Grounding section. Review the Exhausting section before putting it in the dryer cabinet. 5. These joints should be used , the dryer frame cannot be grounded to the neutral conductor at the back of exhaust system to the exhaust hood. Review ...
User Manual (user Manual) (ver.1.0) (English)
Page 20
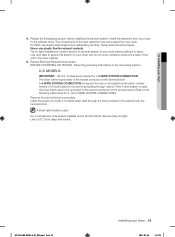
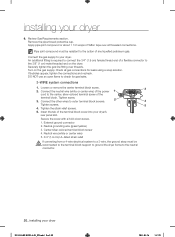
... panel slot. Apply pipe joint compound or about 1 1/2 wraps of the terminal block cover into your dryer 6. Tighten the strain relief screws. 5. Loosen or remove the center terminal block screw. 2. External ground connector 2. Neutral grounding wire (green/yellow) 3. ...wire electrical system to a 3-wire, the ground strap must be WARNING reconnected to the terminal block support to ground the dryer frame to the neutral conductor. 20_ installing your dryer. Insert the tab of Teflon tape over threads. Connect the neutral wire (white or center wire) of the ...
... panel slot. Apply pipe joint compound or about 1 1/2 wraps of the terminal block cover into your dryer 6. Tighten the strain relief screws. 5. Loosen or remove the center terminal block screw. 2. External ground connector 2. Neutral grounding wire (green/yellow) 3. ...wire electrical system to a 3-wire, the ground strap must be WARNING reconnected to the terminal block support to ground the dryer frame to the neutral conductor. 20_ installing your dryer. Insert the tab of Teflon tape over threads. Connect the neutral wire (white or center wire) of the ...


