(English)
Page 9
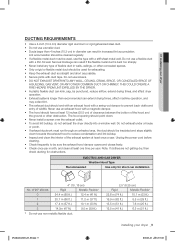
... getting dry, then check ducting for exhausting. • Keep the exhaust duct as straight and short as possible. • Secure joints with a thin foil wall. 01 installing your dryer _9 DV220AE-02810A-03_EN.indd 9 2010-06-28 ¿ÀÈÄ 5:53:28 Serious blockage can kink, sag, be used for...
... getting dry, then check ducting for exhausting. • Keep the exhaust duct as straight and short as possible. • Secure joints with a thin foil wall. 01 installing your dryer _9 DV220AE-02810A-03_EN.indd 9 2010-06-28 ¿ÀÈÄ 5:53:28 Serious blockage can kink, sag, be used for...
(English)
Page 11
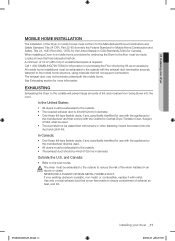
... that is non-flammable to ensure containment of exhaust air, heat, and lint. NEVER USE A PLASTIC OR NON-METAL FLEXIBLE DUCT. Call 1-800-SAMSUNG(726-7864) for more information. In the United States: • All dryers must be exhausted to the floor must be exhausted to the outside ... CSA Standards Z240 (for Clothes Dryer Transition Duct, Subject 2158A, shall be used . • All dryers must conform to the local codes. 01 installing your dryer MOBILE HOME INSTALLATION The installation of the Dryer in ² (465 cm²) of unobstructed space is required. DV220AE-02810A-03_EN...
... that is non-flammable to ensure containment of exhaust air, heat, and lint. NEVER USE A PLASTIC OR NON-METAL FLEXIBLE DUCT. Call 1-800-SAMSUNG(726-7864) for more information. In the United States: • All dryers must be exhausted to the floor must be exhausted to the outside ... CSA Standards Z240 (for Clothes Dryer Transition Duct, Subject 2158A, shall be used . • All dryers must conform to the local codes. 01 installing your dryer MOBILE HOME INSTALLATION The installation of the Dryer in ² (465 cm²) of unobstructed space is required. DV220AE-02810A-03_EN...
(English)
Page 13
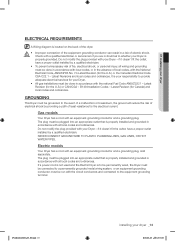
01 installing your dryer ELECTRICAL REQUIREMENTS A Wiring diagram is located on the back of the dryer. • WARNING • • Improper connection of the equipment grounding ...
01 installing your dryer ELECTRICAL REQUIREMENTS A Wiring diagram is located on the back of the dryer. • WARNING • • Improper connection of the equipment grounding ...
(English)
Page 15
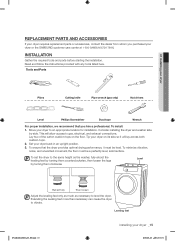
...gas, electrical, and exhaust connections. Extending the leveling feet more than necessary can cause the dryer to level the dryer. Tools and Parts 01 installing your dryer back in an upright position. 3. Read and follow the instructions provided with any tools listed here. Set your dryer ...tops on its side so it must be level. Leveling feet DV220AE-02810A-03_EN.indd 15 installing your dryer or the SAMSUNG customer care center at 1-800-SAMSUNG(726-7864). REPLACEMENT PARTS AND ACCESSORIES If your dryer requires replacement parts or accessories, contact the dealer from whom you ...
...gas, electrical, and exhaust connections. Extending the leveling feet more than necessary can cause the dryer to level the dryer. Tools and Parts 01 installing your dryer back in an upright position. 3. Read and follow the instructions provided with any tools listed here. Set your dryer ...tops on its side so it must be level. Leveling feet DV220AE-02810A-03_EN.indd 15 installing your dryer or the SAMSUNG customer care center at 1-800-SAMSUNG(726-7864). REPLACEMENT PARTS AND ACCESSORIES If your dryer requires replacement parts or accessories, contact the dealer from whom you ...
(English)
Page 17
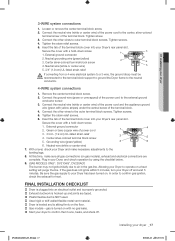
... 1. FINAL INSTALLATION CHECKLIST Dryer is plugged into an electrical outlet and is properly grounded. Exhaust ductwork is hooked up and joints are complete. 01 installing your dryer to outer terminal block screws. Tighten the strain relief screws. 5. Remove the center terminal block screw. 2. Connect the other wires to confirm...
... 1. FINAL INSTALLATION CHECKLIST Dryer is plugged into an electrical outlet and is properly grounded. Exhaust ductwork is hooked up and joints are complete. 01 installing your dryer to outer terminal block screws. Tighten the strain relief screws. 5. Remove the center terminal block screw. 2. Connect the other wires to confirm...

(English)
Page 19
01 installing your dryer _19 2010-06-28 ¿ÀÈÄ 5:53:35 Remove two door hinge screws. 3. Reinsert the screw (Step 4) on the other ...
01 installing your dryer _19 2010-06-28 ¿ÀÈÄ 5:53:35 Remove two door hinge screws. 3. Reinsert the screw (Step 4) on the other ...
(English)
Page 34
DC68-02810A-03_EN 2010-06-28 ¿ÀÈÄ 5:53:38 Country CALL U.S.A 1-800-SAMSUNG(726-7864) MEXICO 01-800-SAMSUNG(726-7864) DV220AE-02810A-03_EN.indd 34 OR VISIT US ONLINE AT www.samsung.com www.samsung.com Code No. QUESTIONS OR COMMENTS?
DC68-02810A-03_EN 2010-06-28 ¿ÀÈÄ 5:53:38 Country CALL U.S.A 1-800-SAMSUNG(726-7864) MEXICO 01-800-SAMSUNG(726-7864) DV220AE-02810A-03_EN.indd 34 OR VISIT US ONLINE AT www.samsung.com www.samsung.com Code No. QUESTIONS OR COMMENTS?