

Open Source Guide (ENGLISH)
Page 1
... received the program in object code or executable form with such an offer, in either source or binary form) with the major components (compiler, kernel, and so on) of the operating system on the Program is to work written entirely by software patents. Activities other work based on the Program) on a medium customarily used to induce you from the Program, and can redistribute and change...
... received the program in object code or executable form with such an offer, in either source or binary form) with the major components (compiler, kernel, and so on) of the operating system on the Program is to work written entirely by software patents. Activities other work based on the Program) on a medium customarily used to induce you from the Program, and can redistribute and change...

Open Source Guide (ENGLISH)
Page 2
...want it free software that everyone can do so by permitting redistribution under the terms of the ordinary General Public License). To apply these terms (or, alternatively, under these terms, attach the following notices to where the full notice is safest to attach them to the start of warranty; It... CONSEQUENTIAL DAMAGES ARISING OUT OF THE USE OR INABILITY TO USE THE LIBRARY (INCLUDING BUT NOT LIMITED TO LOSS OF DATA OR DATA BEING RENDERED INACCURATE OR LOSSES SUSTAINED BY YOU OR THIRD PARTIES OR A FAILURE OF THE LIBRARY TO OPERATE WITH ANY OTHER SOFTWARE), EVEN IF SUCH HOLDER OR OTHER...
...want it free software that everyone can do so by permitting redistribution under the terms of the ordinary General Public License). To apply these terms (or, alternatively, under these terms, attach the following notices to where the full notice is safest to attach them to the start of warranty; It... CONSEQUENTIAL DAMAGES ARISING OUT OF THE USE OR INABILITY TO USE THE LIBRARY (INCLUDING BUT NOT LIMITED TO LOSS OF DATA OR DATA BEING RENDERED INACCURATE OR LOSSES SUSTAINED BY YOU OR THIRD PARTIES OR A FAILURE OF THE LIBRARY TO OPERATE WITH ANY OTHER SOFTWARE), EVEN IF SUCH HOLDER OR OTHER...

User Manual (user Manual) (ver.1.0) (English)
Page 3
... TELEVISION ■ View of Your Television (depending on the model 5 ■ Infrared Remote Control 6 ■ Inserting the Batteries in the Remote Control 8 ■ Connecting to an Aerial or Cable Television Network 8 ■ Switching Your Television On and Off 9 ■ Placing Your Television in Standby Mode 9 ■ Becoming Familiar with the Remote Control 10 ■ Plug & Play Feature 11 ■ Viewing the Demonstration 12 ■ Choosing Your Language 12 ◆ SETTING THE CHANNELS ■ Storing Channels...
... TELEVISION ■ View of Your Television (depending on the model 5 ■ Infrared Remote Control 6 ■ Inserting the Batteries in the Remote Control 8 ■ Connecting to an Aerial or Cable Television Network 8 ■ Switching Your Television On and Off 9 ■ Placing Your Television in Standby Mode 9 ■ Becoming Familiar with the Remote Control 10 ■ Plug & Play Feature 11 ■ Viewing the Demonstration 12 ■ Choosing Your Language 12 ◆ SETTING THE CHANNELS ■ Storing Channels...

User Manual (user Manual) (ver.1.0) (English)
Page 4
Contents (continued) ◆ USING YOUR TELEVISION (continued) ■ Setting the Sleep Timer 32 ■ Switching the Television On and Off Automatically 33 ■ Setting the Preferred Volume Level/Channel 34 ■ Viewing an External Signal Source/Edit Name (depending on the model).... 35 ■ Viewing the Picture In Picture (PIP) (depending on the model 36 ◆ USING THE TELETEXT FEATURE ■ Teletext Feature 39 ■ Displaying the Teletext Information 39 ■ Selecting a Page...
Contents (continued) ◆ USING YOUR TELEVISION (continued) ■ Setting the Sleep Timer 32 ■ Switching the Television On and Off Automatically 33 ■ Setting the Preferred Volume Level/Channel 34 ■ Viewing an External Signal Source/Edit Name (depending on the model).... 35 ■ Viewing the Picture In Picture (PIP) (depending on the model 36 ◆ USING THE TELETEXT FEATURE ■ Teletext Feature 39 ■ Displaying the Teletext Information 39 ■ Selecting a Page...
User Manual (user Manual) (ver.1.0) (English)
Page 5
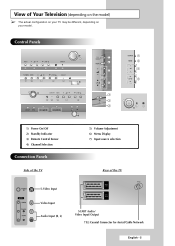
View of the TV S-Video Input Video Input Audio Input (R, L) SCART Audio/ Video Input/Output 75Ω Coaxial Connector for Aerial/Cable Network English - 5 Control Panels 1 6 5 4 3 2 7 6 5 4 2 3 1 1 7 6 32 6 5 4 5 4 3 2 1 7 6 5 4 1 2 3 1) Power On/Off 2) Standby Indicator 3) Remote Control Sensor 4) Channel Selection Connection Panels Side of the TV 5) Volume Adjustment 6) Menu Display 7) Input source selection Rear of Your Television (depending on the model) ➢ The actual configuration on your TV may be different, depending on your model.
View of the TV S-Video Input Video Input Audio Input (R, L) SCART Audio/ Video Input/Output 75Ω Coaxial Connector for Aerial/Cable Network English - 5 Control Panels 1 6 5 4 3 2 7 6 5 4 2 3 1 1 7 6 32 6 5 4 5 4 3 2 1 7 6 5 4 1 2 3 1) Power On/Off 2) Standby Indicator 3) Remote Control Sensor 4) Channel Selection Connection Panels Side of the TV 5) Volume Adjustment 6) Menu Display 7) Input source selection Rear of Your Television (depending on the model) ➢ The actual configuration on your TV may be different, depending on your model.
User Manual (user Manual) (ver.1.0) (English)
Page 6
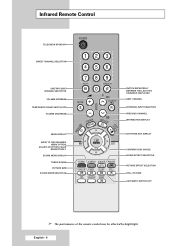
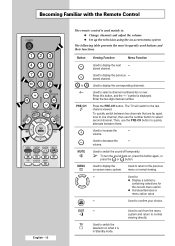
... Control TELEVISION STAND-BY DIRECT CHANNEL SELECTION ONE/TWO-DIGIT CHANNEL SELECTION VOLUME INCREASE TEMPORARY SOUND SWITCH-OFF VOLUME DECREASE MENU DISPLAY MOVE TO THE REQUIRED MENU OPTION/ ADJUST AN OPTION VALUE RESPECTIVELY SOUND MENU DISPLAY TURBO SOUND PICTURE SIZE SOUND MODE SELECTION SWITCH REPEATEDLY BETWEEN THE LAST TWO CHANNELS DISPLAYED NEXT CHANNEL EXTERNAL INPUT SELECTION PREVIOUS CHANNEL INFORMATION DISPLAY EXIT FROM ANY DISPLAY CONFIRM YOUR CHOICE SOUND EFFECT SELECTION PICTURE EFFECT SELECTION STILL PICTURE AUTOMATIC SWITCH-OFF ➢ The performance of the remote control...
... Control TELEVISION STAND-BY DIRECT CHANNEL SELECTION ONE/TWO-DIGIT CHANNEL SELECTION VOLUME INCREASE TEMPORARY SOUND SWITCH-OFF VOLUME DECREASE MENU DISPLAY MOVE TO THE REQUIRED MENU OPTION/ ADJUST AN OPTION VALUE RESPECTIVELY SOUND MENU DISPLAY TURBO SOUND PICTURE SIZE SOUND MODE SELECTION SWITCH REPEATEDLY BETWEEN THE LAST TWO CHANNELS DISPLAYED NEXT CHANNEL EXTERNAL INPUT SELECTION PREVIOUS CHANNEL INFORMATION DISPLAY EXIT FROM ANY DISPLAY CONFIRM YOUR CHOICE SOUND EFFECT SELECTION PICTURE EFFECT SELECTION STILL PICTURE AUTOMATIC SWITCH-OFF ➢ The performance of the remote control...
User Manual (user Manual) (ver.1.0) (English)
Page 8
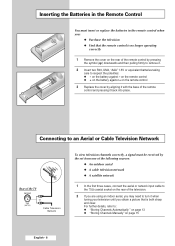
... the remote control when you obtain a picture that the remote control is both sharp and clear. on the remote control ◆ + on the battery against - Connecting to an Aerial or Cable Television Network Rear of the TV or Cable Television Network To view television channels correctly, a signal must insert or replace the batteries in the Remote Control You must be received by the set from one of the following sources: ◆ An outdoor aerial ◆ A cable television network...
... the remote control when you obtain a picture that the remote control is both sharp and clear. on the remote control ◆ + on the battery against - Connecting to an Aerial or Cable Television Network Rear of the TV or Cable Television Network To view television channels correctly, a signal must insert or replace the batteries in the Remote Control You must be received by the set from one of the following sources: ◆ An outdoor aerial ◆ A cable television network...
User Manual (user Manual) (ver.1.0) (English)
Page 9
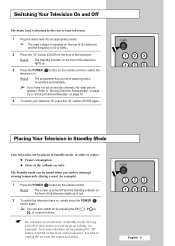
.... English - 9 Refer to "Storing Channels Automatically" on page 13 or "Storing Channels Manually" on page 15. 4 To switch your television off and the Standby indicator on the front of the television lights up . 3 Press the POWER ( ) button on the remote control to switch the television on. Placing Your Television in Standby Mode Your television can be placed in Standby mode, in Standby mode for long periods of time (when you were watching last...
.... English - 9 Refer to "Storing Channels Automatically" on page 13 or "Storing Channels Manually" on page 15. 4 To switch your television off and the Standby indicator on the front of the television lights up . 3 Press the POWER ( ) button on the remote control to switch the television on. Placing Your Television in Standby Mode Your television can be placed in Standby mode, in Standby mode for long periods of time (when you were watching last...
User Manual (user Manual) (ver.1.0) (English)
Page 10
... switch the sound off temporarily. ➢ To turn the sound back on -screen menu system. Used to display the next stored channel. Button to -/-PRE-CH MUTE MENU Viewing Function Menu Function Used to confirm your choice. To quickly switch between them. Then, use the PRE-CH button to quickly alternate between two channels that are far apart, tune to one channel, then use the number button to : ◆ Change channels and adjust the volume ◆ Set up the television using...
... switch the sound off temporarily. ➢ To turn the sound back on -screen menu system. Used to display the next stored channel. Button to -/-PRE-CH MUTE MENU Viewing Function Menu Function Used to confirm your choice. To quickly switch between them. Then, use the PRE-CH button to quickly alternate between two channels that are far apart, tune to one channel, then use the number button to : ◆ Change channels and adjust the volume ◆ Set up the television using...
User Manual (user Manual) (ver.1.0) (English)
Page 11
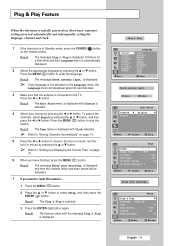
... Standby mode, press the POWER ( ) button on page 13. 5 Press the œ or √ button to move to "Storing Channels Automatically" on the remote control. Off Off Timer -- : -- Result: The message Plug & Play is selected. 4 Select your country by pressing the ▲ or ▼ button. ➢ Refer to "Setting and Displaying the Current Time" on page 31. 6 When you want to reset this feature... 1 Press the MENU ( ) button...
... Standby mode, press the POWER ( ) button on page 13. 5 Press the œ or √ button to move to "Storing Channels Automatically" on the remote control. Off Off Timer -- : -- Result: The message Plug & Play is selected. 4 Select your country by pressing the ▲ or ▼ button. ➢ Refer to "Setting and Displaying the Current Time" on page 31. 6 When you want to reset this feature... 1 Press the MENU ( ) button...
User Manual (user Manual) (ver.1.0) (English)
Page 15
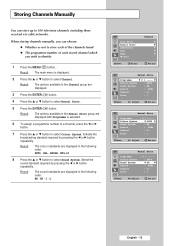
... channels manually, you wish to 100 television channels, including those received via cable networks. DK - SECAM - Select the sound standard required by pressing the œ or √ button repeatedly. Store : ? Storing Channels Manually You can choose: ◆ Whether or not to store each of the channels found ◆ The programme number of each stored channel which you can store up to identify 1 Press the MENU ( ) button...
... channels manually, you wish to 100 television channels, including those received via cable networks. DK - SECAM - Select the sound standard required by pressing the œ or √ button repeatedly. Store : ? Storing Channels Manually You can choose: ◆ Whether or not to store each of the channels found ◆ The programme number of each stored channel which you can store up to identify 1 Press the MENU ( ) button...
User Manual (user Manual) (ver.1.0) (English)
Page 19
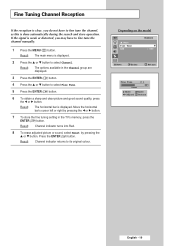
... channel manually. 1 Press the MENU ( ) button. More Fine Tune LNA Channel √ : Off Move Enter Return Fine Tune Reset P 1 1 Move Save œ √ Adjust Return English - 19 Result: Channel indicator turns into Red. 8 To erase adjusted picture or sound, select Reset by pressing the œ or √ button. 7 To store the fine tuning setting in the Channel group are displayed. 3 Press the ENTER ( ) button. 4 Press the ▲ or ▼ button...
... channel manually. 1 Press the MENU ( ) button. More Fine Tune LNA Channel √ : Off Move Enter Return Fine Tune Reset P 1 1 Move Save œ √ Adjust Return English - 19 Result: Channel indicator turns into Red. 8 To erase adjusted picture or sound, select Reset by pressing the œ or √ button. 7 To store the fine tuning setting in the Channel group are displayed. 3 Press the ENTER ( ) button. 4 Press the ▲ or ▼ button...
User Manual (user Manual) (ver.1.0) (English)
Page 22
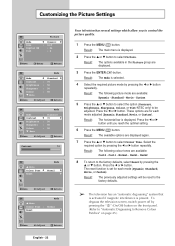
... the MENU ( ) button. Standard - Press the œ or √ button. Result: The following picture mode are displayed again. 7 Press the ▲ or ▼ button to Remove Colour Patches" on page 45.) Cool1 - Normal - Warm2 8 To return to the factory defaults, select Reset by pressing the " " (On/Off) button on the front panel. (Refer to "Automatic Degaussing to select Colour Tone. To degauss the television screen, switch power...
... the MENU ( ) button. Standard - Press the œ or √ button. Result: The following picture mode are displayed again. 7 Press the ▲ or ▼ button to Remove Colour Patches" on page 45.) Cool1 - Normal - Warm2 8 To return to the factory defaults, select Reset by pressing the " " (On/Off) button on the front panel. (Refer to "Automatic Degaussing to select Colour Tone. To degauss the television screen, switch power...

User Manual (user Manual) (ver.1.0) (English)
Page 29
...; When receiving a mono sound in the AV mode, connect to either "DUAL-I" or "STEREO", depending on the panel (front or side). Type of the audio signal. English - 29 Selecting the Sound Mode (depending on the model) The "DUAL I -II button. If the mono sound comes out only from left speaker, press the DUAL I -II" button displays/controls the processing and output of broadcast On-screen indication Regular broadcast (Standard audio...
...; When receiving a mono sound in the AV mode, connect to either "DUAL-I" or "STEREO", depending on the panel (front or side). Type of the audio signal. English - 29 Selecting the Sound Mode (depending on the model) The "DUAL I -II button. If the mono sound comes out only from left speaker, press the DUAL I -II" button displays/controls the processing and output of broadcast On-screen indication Regular broadcast (Standard audio...

User Manual (user Manual) (ver.1.0) (English)
Page 32
... main menu is selected. 6 Press the ▲ or ▼ button to Standby mode by pressing the SLEEP ( ) button. Result: The options available in the Setup group are displayed. 3 Press the ENTER ( ) button. 4 Press the ▲ or ▼ button to select Setup. English - 32 Off On Timer Volume : 10 On Timer Channel : 1 Move œ √ Adjust Return You can set your TV to automatically turn off after the television automatically switches...
... main menu is selected. 6 Press the ▲ or ▼ button to Standby mode by pressing the SLEEP ( ) button. Result: The options available in the Setup group are displayed. 3 Press the ENTER ( ) button. 4 Press the ▲ or ▼ button to select Setup. English - 32 Off On Timer Volume : 10 On Timer Channel : 1 Move œ √ Adjust Return You can set your TV to automatically turn off after the television automatically switches...

User Manual (user Manual) (ver.1.0) (English)
Page 34
... ▼ button to select Setup. English - 34 Result: The main menu is selected. 6 Press the ▲ or ▼ button to select On Timer Volume. 7 Press the œ or √ button to adjust volume level. 8 Press the ▲ or ▼ button to select On Timer Channel. 9 Press the œ or √ button to select the channel. Setting the Preferred Volume Level/Channel TV Setup Plug & Play Language : English Time Blue Screen Melody Demonstration...
... ▼ button to select Setup. English - 34 Result: The main menu is selected. 6 Press the ▲ or ▼ button to select On Timer Volume. 7 Press the œ or √ button to adjust volume level. 8 Press the ▲ or ▼ button to select On Timer Channel. 9 Press the œ or √ button to select the channel. Setting the Preferred Volume Level/Channel TV Setup Plug & Play Language : English Time Blue Screen Melody Demonstration...
User Manual (user Manual) (ver.1.0) (English)
Page 35
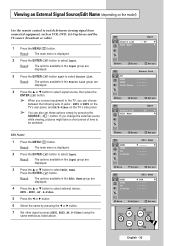
... displayed. 4 Press the ▲ or ▼ button to select signal source, then press the ENTER ( ) button. ➢ When you connect equipment to the TV, you change the external source while viewing, pictures might take a short period of jacks : EXT1 or EXT2 on the TV's rear panel, and AV/S-Video on the model) Use the remote control to switch between the following sets of time to select Input. EXT2 - Edit Name 1 Press the MENU ( ) button. S-Video...
... displayed. 4 Press the ▲ or ▼ button to select signal source, then press the ENTER ( ) button. ➢ When you connect equipment to the TV, you change the external source while viewing, pictures might take a short period of jacks : EXT1 or EXT2 on the TV's rear panel, and AV/S-Video on the model) Use the remote control to switch between the following sets of time to select Input. EXT2 - Edit Name 1 Press the MENU ( ) button. S-Video...
User Manual (user Manual) (ver.1.0) (English)
Page 38
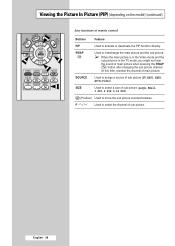
... the Video mode and the sub picture is in the TV mode, you might not hear the sound of main picture when pressing the SWAP ( ) button after changing the sub picture channel. SWAP Used to move the sub picture counterclockwise. Viewing the Picture In Picture (PIP) (depending on the model) (continued) Easy functions of remote control Buttons Feature PIP Used to select the channel of sub picture. P/ Used to activate or deactivate the PIP function directly. SOURCE Used...
... the Video mode and the sub picture is in the TV mode, you might not hear the sound of main picture when pressing the SWAP ( ) button after changing the sub picture channel. SWAP Used to move the sub picture counterclockwise. Viewing the Picture In Picture (PIP) (depending on the model) (continued) Easy functions of remote control Buttons Feature PIP Used to select the channel of sub picture. P/ Used to activate or deactivate the PIP function directly. SOURCE Used...

User Manual (user Manual) (ver.1.0) (English)
Page 39
... ( ) button to be displayed correctly, channel reception must be accessed by pressing the (index) button. 3 If you wish to display the actual broadcast at any time by : ◆ Entering the page number ◆ Selecting a title in a list ◆ Selecting a coloured heading (FASTEXT system) Displaying the Teletext Information You can be stable; F Status information. Teletext Feature Most television channels provide written information services via...
... ( ) button to be displayed correctly, channel reception must be accessed by pressing the (index) button. 3 If you wish to display the actual broadcast at any time by : ◆ Entering the page number ◆ Selecting a title in a list ◆ Selecting a coloured heading (FASTEXT system) Displaying the Teletext Information You can be stable; F Status information. Teletext Feature Most television channels provide written information services via...
User Manual (user Manual) (ver.1.0) (English)
Page 45
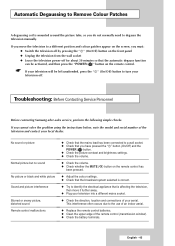
... sound or picture Normal picture but no sound No picture or black and white picture Sound and picture interference Blurred or snowy picture, distorted sound Remote control malfunctions ◆ Check that the mains lead has been connected to a wall socket. ◆ Check that you cannot solve the problem using the instructions below, note the model and serial number of the television and contact your local dealer. Troubleshooting: Before Contacting Service Personnel Before contacting Samsung after-sales service...
... sound or picture Normal picture but no sound No picture or black and white picture Sound and picture interference Blurred or snowy picture, distorted sound Remote control malfunctions ◆ Check that the mains lead has been connected to a wall socket. ◆ Check that you cannot solve the problem using the instructions below, note the model and serial number of the television and contact your local dealer. Troubleshooting: Before Contacting Service Personnel Before contacting Samsung after-sales service...


