

Open Source Guide (ENGLISH)
Page 1
... in new free programs; it in other work based on ) of Sections 1 and 2 above provided that work written entirely by the Free Software Foundation. If the distribution and/or use to the public, the best way to achieve this License to carry prominent notices stating that you wish to incorporate parts of free software (and charge for software interchange; If you changed the files...
... in new free programs; it in other work based on ) of Sections 1 and 2 above provided that work written entirely by the Free Software Foundation. If the distribution and/or use to the public, the best way to achieve this License to carry prominent notices stating that you wish to incorporate parts of free software (and charge for software interchange; If you changed the files...

Open Source Guide (ENGLISH)
Page 2
...CONSEQUENTIAL DAMAGES ARISING OUT OF THE USE OR INABILITY TO USE THE LIBRARY (INCLUDING BUT NOT LIMITED TO LOSS OF DATA OR DATA BEING RENDERED INACCURATE OR LOSSES SUSTAINED BY YOU OR THIRD PARTIES OR A FAILURE OF THE LIBRARY TO OPERATE WITH ANY OTHER SOFTWARE), EVEN IF SUCH HOLDER OR ...change. It is found. and each file should have at least the "copyright" line and a pointer to where the full notice is safest to attach them to the start of each source file to the public, we recommend making it free software that everyone can do so by permitting redistribution under the terms of warranty...
...CONSEQUENTIAL DAMAGES ARISING OUT OF THE USE OR INABILITY TO USE THE LIBRARY (INCLUDING BUT NOT LIMITED TO LOSS OF DATA OR DATA BEING RENDERED INACCURATE OR LOSSES SUSTAINED BY YOU OR THIRD PARTIES OR A FAILURE OF THE LIBRARY TO OPERATE WITH ANY OTHER SOFTWARE), EVEN IF SUCH HOLDER OR ...change. It is found. and each file should have at least the "copyright" line and a pointer to where the full notice is safest to attach them to the start of each source file to the public, we recommend making it free software that everyone can do so by permitting redistribution under the terms of warranty...

User Manual (user Manual) (ver.1.0) (English)
Page 3
... 17 Connecting a DVD Player 17 Connecting a Camcorder 18 Installing Batteries in the Remote Control 19 Chapter 3: Operation 20 Turning the TV On and Off 20 Plug & Play Feature 20 Viewing the Menus and On-Screen Displays 22 Viewing the Menus 22 Viewing the Display 22 Selecting a Menu Language 23 Memorizing the Channels 24 Selecting the Video Signal-source 24 Storing Channels in Memory (Automatic Method 25 Adding and Erasing Channels (Manual Method 26 Changing Channels 27 Using the Channel Buttons...
... 17 Connecting a DVD Player 17 Connecting a Camcorder 18 Installing Batteries in the Remote Control 19 Chapter 3: Operation 20 Turning the TV On and Off 20 Plug & Play Feature 20 Viewing the Menus and On-Screen Displays 22 Viewing the Menus 22 Viewing the Display 22 Selecting a Menu Language 23 Memorizing the Channels 24 Selecting the Video Signal-source 24 Storing Channels in Memory (Automatic Method 25 Adding and Erasing Channels (Manual Method 26 Changing Channels 27 Using the Channel Buttons...

User Manual (user Manual) (ver.1.0) (English)
Page 9
... of the preset factory settings (or select your personal, customized sound settings). ˇ P.MODE Adjust the TV picture by the Samsung remote control (i.e., TV, Set Top Box, VCR, Cable box, or DVD). PRE-CH Tunes to the previous channel. Ò TV/VIDEO Press to display all of the preset factory settings (or select your remote control to about 23 feet from the TV. " MENU Displays the main on-screen menu. ' P.SIZE Press to change ) a particular item. ¯...
... of the preset factory settings (or select your personal, customized sound settings). ˇ P.MODE Adjust the TV picture by the Samsung remote control (i.e., TV, Set Top Box, VCR, Cable box, or DVD). PRE-CH Tunes to the previous channel. Ò TV/VIDEO Press to display all of the preset factory settings (or select your remote control to about 23 feet from the TV. " MENU Displays the main on-screen menu. ' P.SIZE Press to change ) a particular item. ¯...
User Manual (user Manual) (ver.1.0) (English)
Page 14
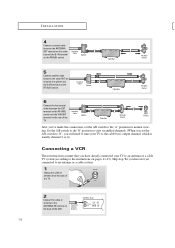
...). Incoming Cable Splitter Cable Box RF (A/B) Switch TV Rear After you've made this connection, set the A/B switch to "B", you will need to tune your TV to an antenna or a cable TV system (according to the instructions on the RF (A/B) switch. Set the A/B switch to the "B" position to view scrambled channels. (When you have already connected your TV to the cable box's output channel, which is usually channel 3 or 4.) Connecting a VCR These instructions assume that...
...). Incoming Cable Splitter Cable Box RF (A/B) Switch TV Rear After you've made this connection, set the A/B switch to "B", you will need to tune your TV to an antenna or a cable TV system (according to the instructions on the RF (A/B) switch. Set the A/B switch to the "B" position to view scrambled channels. (When you have already connected your TV to the cable box's output channel, which is usually channel 3 or 4.) Connecting a VCR These instructions assume that...

User Manual (user Manual) (ver.1.0) (English)
Page 17
... TV Your TV can send out signals of Component video, see your DVD player's owner's manual. DVD Player Rear Panel Video Cable TV Rear Panel Note: For an explanation of its picture and sound to your TV. 1 Connect a set of audio cables between the VIDEO OUT jack on the TV and the VIDEO IN jack on the VCR. DVD Player Rear Panel Audio Cable TV Rear Panel 2 Connect a video cable between the AUDIO OUT jacks on the TV and the AUDIO IN jacks on the VCR...
... TV Your TV can send out signals of Component video, see your DVD player's owner's manual. DVD Player Rear Panel Video Cable TV Rear Panel Note: For an explanation of its picture and sound to your TV. 1 Connect a set of audio cables between the VIDEO OUT jack on the TV and the VIDEO IN jack on the VCR. DVD Player Rear Panel Audio Cable TV Rear Panel 2 Connect a video cable between the AUDIO OUT jacks on the TV and the AUDIO IN jacks on the VCR...
User Manual (user Manual) (ver.1.0) (English)
Page 20
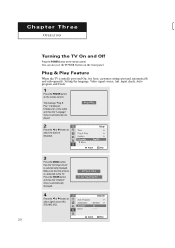
... the remote control. Plug & Play 2 Press the œ or √ button to select signal source (Air, STD, HRC, IRC). Time Plug & Play Caption Language M More Setup English Adjust Skip 3 Press the MENU button then the "Ant Input check" is initially powered On, five basic customer settings proceed automatically and subsequently: Setting the language, Video signal source, Ant. Plug & Play Feature When the TV is automatically displayed. input check, Auto program and Clock. 1 Press the POWER button on the front panel. C h a pOtPEeRArTIOTN h r e e OPERATION Turning...
... the remote control. Plug & Play 2 Press the œ or √ button to select signal source (Air, STD, HRC, IRC). Time Plug & Play Caption Language M More Setup English Adjust Skip 3 Press the MENU button then the "Ant Input check" is initially powered On, five basic customer settings proceed automatically and subsequently: Setting the language, Video signal source, Ant. Plug & Play Feature When the TV is automatically displayed. input check, Auto program and Clock. 1 Press the POWER button on the front panel. C h a pOtPEeRArTIOTN h r e e OPERATION Turning...

User Manual (user Manual) (ver.1.0) (English)
Page 59
... your remote control is a "0". (If more than Samsung). • The remote control might not be compatible with a universal remote control. Setting Up Your Remote Control to Operate Your VCR (Cable box or DVD player) 1 Turn off your VCR (Cable box or DVD player). 2 Press the MODE button and make sure that the VCR (CABLE or DVD) LED is illuminated. œ The remote control has five modes: TV, STB, VCR, CABLE and DVD. 3 On your Samsung remote control, press the SET button. 4 Enter 3 digits of the VCR (Cable box or DVD player) code listed on...
... your remote control is a "0". (If more than Samsung). • The remote control might not be compatible with a universal remote control. Setting Up Your Remote Control to Operate Your VCR (Cable box or DVD player) 1 Turn off your VCR (Cable box or DVD player). 2 Press the MODE button and make sure that the VCR (CABLE or DVD) LED is illuminated. œ The remote control has five modes: TV, STB, VCR, CABLE and DVD. 3 On your Samsung remote control, press the SET button. 4 Enter 3 digits of the VCR (Cable box or DVD player) code listed on...
User Manual (user Manual) (ver.1.0) (English)
Page 3
...-Screen Displays 20 Viewing the Menus 20 Viewing the Display 20 Selecting a Menu Language 21 Memorizing the Channels 22 Selecting the Video Signal Source 22 Storing Channels in Memory (Automatic Method 23 Adding and Erasing Channels 24 Changing Channels 25 Using the Channel Buttons 25 Using the Number Buttons 25 Using the PRE-CH Button to Select the Previous Channel 25 Labelling the Channels 26 Picture Control 27 Using Automatic Picture Settings 27 Customizing the Picture 28 Resetting the Picture Settings to the Factory Defaults...
...-Screen Displays 20 Viewing the Menus 20 Viewing the Display 20 Selecting a Menu Language 21 Memorizing the Channels 22 Selecting the Video Signal Source 22 Storing Channels in Memory (Automatic Method 23 Adding and Erasing Channels 24 Changing Channels 25 Using the Channel Buttons 25 Using the Number Buttons 25 Using the PRE-CH Button to Select the Previous Channel 25 Labelling the Channels 26 Picture Control 27 Using Automatic Picture Settings 27 Customizing the Picture 28 Resetting the Picture Settings to the Factory Defaults...

User Manual (user Manual) (ver.1.0) (English)
Page 14
... viewing. Incoming Cable Splitter Cable Box RF (A/B) Switch TV Rear After you will need to tune your cable box descrambles only some channels (such as premium channels), follow the instructions below. Set the A/B switch to the "B" position to view scrambled channels. (When you set the A/B switch to "B", you 've made this connection, set the A/B switch to the cable box's output channel, which is connected to the ANTENNA IN terminal on the rear panel. Incoming Cable Splitter Cable Box RF (A/B) Switch 4 Connect another cable between an OUTPUT...
... viewing. Incoming Cable Splitter Cable Box RF (A/B) Switch TV Rear After you will need to tune your cable box descrambles only some channels (such as premium channels), follow the instructions below. Set the A/B switch to the "B" position to view scrambled channels. (When you set the A/B switch to "B", you 've made this connection, set the A/B switch to the cable box's output channel, which is connected to the ANTENNA IN terminal on the rear panel. Incoming Cable Splitter Cable Box RF (A/B) Switch 4 Connect another cable between an OUTPUT...

User Manual (user Manual) (ver.1.0) (English)
Page 18
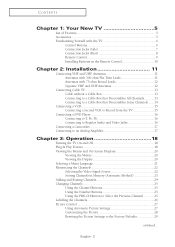
... button, then the "Auto Program" is displayed. You can also use the POWER button on the remote control. Press the ENTER button, then the "Language" is displayed. Plug & Play Start Plug & Play OK Enter Exit œ Plug & Play feature doesn't work in the TV for the first time. 1 Press the POWER button on the remote control. The"Check antenna input." is not pressed, the "Language" will be displayed automatically. 2 Press the ... Plug & Play Feature When the TV is connected...
... button, then the "Auto Program" is displayed. You can also use the POWER button on the remote control. Press the ENTER button, then the "Language" is displayed. Plug & Play Start Plug & Play OK Enter Exit œ Plug & Play feature doesn't work in the TV for the first time. 1 Press the POWER button on the remote control. The"Check antenna input." is not pressed, the "Language" will be displayed automatically. 2 Press the ... Plug & Play Feature When the TV is connected...

User Manual (user Manual) (ver.1.0) (English)
Page 3
... 16 Connecting a DVD Player 17 Connecting a Camcorder 18 Installing Batteries in the Remote Control 19 Chapter 3: Operation 20 Turning the TV On and Off 20 Plug & Play Feature 20 Viewing the Menus and On-Screen Displays 22 Viewing the Menus 22 Viewing the Display 22 Selecting a Menu Language 23 Memorizing the Channels 24 Selecting the Video Signal-source 24 Storing Channels in Memory (Automatic Method 25 Adding and Erasing Channels (Manual Method 26 Changing Channels 27 Using the Channel Buttons...
... 16 Connecting a DVD Player 17 Connecting a Camcorder 18 Installing Batteries in the Remote Control 19 Chapter 3: Operation 20 Turning the TV On and Off 20 Plug & Play Feature 20 Viewing the Menus and On-Screen Displays 22 Viewing the Menus 22 Viewing the Display 22 Selecting a Menu Language 23 Memorizing the Channels 24 Selecting the Video Signal-source 24 Storing Channels in Memory (Automatic Method 25 Adding and Erasing Channels (Manual Method 26 Changing Channels 27 Using the Channel Buttons...

User Manual (user Manual) (ver.1.0) (English)
Page 17
English - 17 INSTALLATION Connecting a DVD Player The rear panel jacks on your TV make it easy to connect a DVD player to your DVD player's owner's manual. DVD Player Rear Panel Video Cable TV Rear Panel Note: For an explanation of Component video, see your TV. 1 Connect a set of audio cables between the COMPONENT INPUT (Y, Pb, Pr) jacks on the TV and the COMPONENT VIDEO OUT (Y, PB, PR) jacks on the DVD player. DVD Player Rear Panel Audio Cable TV Rear Panel 2 Connect a video cable between the AUDIO INPUT 2 jacks on the TV and the AUDIO OUT jacks on the DVD player.
English - 17 INSTALLATION Connecting a DVD Player The rear panel jacks on your TV make it easy to connect a DVD player to your DVD player's owner's manual. DVD Player Rear Panel Video Cable TV Rear Panel Note: For an explanation of Component video, see your TV. 1 Connect a set of audio cables between the COMPONENT INPUT (Y, Pb, Pr) jacks on the TV and the COMPONENT VIDEO OUT (Y, PB, PR) jacks on the DVD player. DVD Player Rear Panel Audio Cable TV Rear Panel 2 Connect a video cable between the AUDIO INPUT 2 jacks on the TV and the AUDIO OUT jacks on the DVD player.

User Manual (user Manual) (ver.1.0) (English)
Page 3
... 17 Connecting a DVD Player 17 Connecting a Camcorder 18 Installing Batteries in the Remote Control 19 Chapter 3: Operation 20 Turning the TV On and Off 20 Plug & Play Feature 20 Viewing the Menus and On-Screen Displays 22 Viewing the Menus 22 Viewing the Display 22 Selecting a Menu Language 23 Memorizing the Channels 24 Selecting the Video Signal-source 24 Storing Channels in Memory (Automatic Method 25 Adding and Erasing Channels (Manual Method 26 Changing Channels 27 Using the Channel Buttons...
... 17 Connecting a DVD Player 17 Connecting a Camcorder 18 Installing Batteries in the Remote Control 19 Chapter 3: Operation 20 Turning the TV On and Off 20 Plug & Play Feature 20 Viewing the Menus and On-Screen Displays 22 Viewing the Menus 22 Viewing the Display 22 Selecting a Menu Language 23 Memorizing the Channels 24 Selecting the Video Signal-source 24 Storing Channels in Memory (Automatic Method 25 Adding and Erasing Channels (Manual Method 26 Changing Channels 27 Using the Channel Buttons...

User Manual (user Manual) (ver.1.0) (English)
Page 8
... not using the DVD video input jacks. Because there are identical to A/V signals being displayed on the big screen. 8 (Typically used as a VCR or a DVD player. YOUR NEW TV Rear Panel Jacks Use the rear panel jacks to connect an A/V component that will be connected continuously, such as the input signals for Video 2 or S-VIDEO. Ø ANTENNA Connect to an antenna or to a cable TV system. ˇ AUDIO-VIDEO MONITOR OUTPUT jacks These audio-video signals are two sets of audio input source is connected to the side audio input...
... not using the DVD video input jacks. Because there are identical to A/V signals being displayed on the big screen. 8 (Typically used as a VCR or a DVD player. YOUR NEW TV Rear Panel Jacks Use the rear panel jacks to connect an A/V component that will be connected continuously, such as the input signals for Video 2 or S-VIDEO. Ø ANTENNA Connect to an antenna or to a cable TV system. ˇ AUDIO-VIDEO MONITOR OUTPUT jacks These audio-video signals are two sets of audio input source is connected to the side audio input...

User Manual (user Manual) (ver.1.0) (English)
Page 9
... or Separate Audio Program (SAP broadcast). 9 " MENU Displays the main on-screen menu. ' P.SIZE Press to change the screen size. ˝ R.SURF Press the R.SURF button to automatically return to a preferred channel after a user-preset time delay. Ô MODE Selects a target device to be controlled by selecting one of the preset factory settings (or select your personal, customized sound settings). ˇ P.MODE Adjust the TV picture by the Samsung remote control (i.e., TV, Set Top Box, VCR, Cable box, or DVD). ...
... or Separate Audio Program (SAP broadcast). 9 " MENU Displays the main on-screen menu. ' P.SIZE Press to change the screen size. ˝ R.SURF Press the R.SURF button to automatically return to a preferred channel after a user-preset time delay. Ô MODE Selects a target device to be controlled by selecting one of the preset factory settings (or select your personal, customized sound settings). ˇ P.MODE Adjust the TV picture by the Samsung remote control (i.e., TV, Set Top Box, VCR, Cable box, or DVD). ...

User Manual (user Manual) (ver.1.0) (English)
Page 17
DVD Player Rear Panel Audio Cable TV Rear Panel 2 Connect a video cable between the COMPONENT INPUT (Y, Pb, Pr) jacks on the TV and the COMPONENT VIDEO OUT (Y, Pb, Pr) jacks on back of Component video, see your DVD player's owner's manual. The actual configuration for more information about how to be recorded by a second VCR. INSTALLATION Connecting a Second VCR to Record from the TV Your TV can send out signals of audio cables between the AUDIO INPUT 2 jacks on...
DVD Player Rear Panel Audio Cable TV Rear Panel 2 Connect a video cable between the COMPONENT INPUT (Y, Pb, Pr) jacks on the TV and the COMPONENT VIDEO OUT (Y, Pb, Pr) jacks on back of Component video, see your DVD player's owner's manual. The actual configuration for more information about how to be recorded by a second VCR. INSTALLATION Connecting a Second VCR to Record from the TV Your TV can send out signals of audio cables between the AUDIO INPUT 2 jacks on...

User Manual (user Manual) (ver.1.0) (English)
Page 59
... VCRs, DVD players and Cable boxes. Setting Up Your Remote Control to Operate Your VCR (Cable box or DVD player) 1 Turn off your VCR (Cable box or DVD player). 2 Press the MODE button and make sure that the VCR (CABLE or DVD) LED is illuminated. œ The remote control has five modes: TV, STB, VCR, CABLE and DVD. 3 On your Samsung remote control, press the SET button. 4 Enter 3 digits of the VCR (Cable box or DVD player) code listed on next page for your brand of VCR (Cable box or DVD player). œ...
... VCRs, DVD players and Cable boxes. Setting Up Your Remote Control to Operate Your VCR (Cable box or DVD player) 1 Turn off your VCR (Cable box or DVD player). 2 Press the MODE button and make sure that the VCR (CABLE or DVD) LED is illuminated. œ The remote control has five modes: TV, STB, VCR, CABLE and DVD. 3 On your Samsung remote control, press the SET button. 4 Enter 3 digits of the VCR (Cable box or DVD player) code listed on next page for your brand of VCR (Cable box or DVD player). œ...

User Manual (user Manual) (ver.1.0) (English)
Page 3
...-Screen Displays 20 Viewing the Menus 20 Viewing the Display 20 Selecting a Menu Language 21 Memorizing the Channels 22 Selecting the Video Signal Source 22 Storing Channels in Memory (Automatic Method 23 Adding and Erasing Channels 24 Changing Channels 25 Using the Channel Buttons 25 Using the Number Buttons 25 Using the PRE-CH Button to Select the Previous Channel 25 Labelling the Channels 26 Picture Control 27 Using Automatic Picture Settings 27 Customizing the Picture 28 Resetting the Picture Settings to the Factory Defaults...
...-Screen Displays 20 Viewing the Menus 20 Viewing the Display 20 Selecting a Menu Language 21 Memorizing the Channels 22 Selecting the Video Signal Source 22 Storing Channels in Memory (Automatic Method 23 Adding and Erasing Channels 24 Changing Channels 25 Using the Channel Buttons 25 Using the Number Buttons 25 Using the PRE-CH Button to Select the Previous Channel 25 Labelling the Channels 26 Picture Control 27 Using Automatic Picture Settings 27 Customizing the Picture 28 Resetting the Picture Settings to the Factory Defaults...

User Manual (user Manual) (ver.1.0) (English)
Page 18
...: Setting the language, Antenna input check, Channel Memorize and Time Setting. • The Plug & Play function operates after plugging in the AV mode. ˇ Even if ENTER button is not pressed, the "Language" will be displayed automatically. 2 Press the or button to the TV. Press the ENTER button, then the "Auto Program" is displayed. The "Start Plug & Play" is displayed. OK Enter Skip English - 18 You can also use the POWER button on the remote control. Plug & Play...
...: Setting the language, Antenna input check, Channel Memorize and Time Setting. • The Plug & Play function operates after plugging in the AV mode. ˇ Even if ENTER button is not pressed, the "Language" will be displayed automatically. 2 Press the or button to the TV. Press the ENTER button, then the "Auto Program" is displayed. The "Start Plug & Play" is displayed. OK Enter Skip English - 18 You can also use the POWER button on the remote control. Plug & Play...


