

Open Source Guide (ENGLISH)
Page 1
... or distributing the Program (or any work which the executable runs, unless that component itself is interactive but may not copy, modify, sublicense, or distribute the Program except as distribution of the source code, even though third parties are different, write to the author to share and change free software--to control the distribution of derivative or collective works based on you...
... or distributing the Program (or any work which the executable runs, unless that component itself is interactive but may not copy, modify, sublicense, or distribute the Program except as distribution of the source code, even though third parties are different, write to the author to share and change free software--to control the distribution of derivative or collective works based on you...

Open Source Guide (ENGLISH)
Page 2
... use to where the full notice is found. It is safest to attach them to the start of each file should have at least the "copyright" line and a pointer to the public, we recommend making it free software that everyone can do so by permitting redistribution under the terms of warranty;...SUSTAINED BY YOU OR THIRD PARTIES OR A FAILURE OF THE LIBRARY TO OPERATE WITH ANY OTHER SOFTWARE), EVEN IF SUCH HOLDER OR OTHER PARTY HAS BEEN ADVISED OF THE POSSIBILITY OF SUCH DAMAGES. You can redistribute and change. and each source file to the library. To apply these terms (or, alternatively, under...
... use to where the full notice is found. It is safest to attach them to the start of each file should have at least the "copyright" line and a pointer to the public, we recommend making it free software that everyone can do so by permitting redistribution under the terms of warranty;...SUSTAINED BY YOU OR THIRD PARTIES OR A FAILURE OF THE LIBRARY TO OPERATE WITH ANY OTHER SOFTWARE), EVEN IF SUCH HOLDER OR OTHER PARTY HAS BEEN ADVISED OF THE POSSIBILITY OF SUCH DAMAGES. You can redistribute and change. and each source file to the library. To apply these terms (or, alternatively, under...

User Manual (user Manual) (ver.1.0) (English)
Page 2
... Connecting a DVD Player 14 Connecting a Camcorder 15 Installing Batteries in the Remote Control 16 Chapter 3: Operation 17 Turning the TV On and Off 17 Viewing the Menus and On-Screen Displays 17 Viewing the Menus 17 Viewing the Display 17 Selecting a Menu Language 18 Memorizing the Channels 19 Selecting the Video Signal-source 19 Storing Channels in Memory (Automatic Method 20 Adding and Erasing Channels (Manual Method 21 Changing Channels 22 Using the Channel Buttons 22 Directly Accessing Channels 22 Using...
... Connecting a DVD Player 14 Connecting a Camcorder 15 Installing Batteries in the Remote Control 16 Chapter 3: Operation 17 Turning the TV On and Off 17 Viewing the Menus and On-Screen Displays 17 Viewing the Menus 17 Viewing the Display 17 Selecting a Menu Language 18 Memorizing the Channels 19 Selecting the Video Signal-source 19 Storing Channels in Memory (Automatic Method 20 Adding and Erasing Channels (Manual Method 21 Changing Channels 22 Using the Channel Buttons 22 Directly Accessing Channels 22 Using...
User Manual (user Manual) (ver.1.0) (English)
Page 3
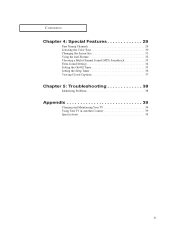
CONTENTS Chapter 4: Special Features 29 Fine Tuning Channels 29 Selecting the Color Tone 30 Changing the Screen Size 31 Using the Surf Feature 32 Choosing a Multi-Channel Sound (MTS) Soundtrack 33 Extra Sound Settings 34 Setting the On/Off Timer 35 Setting the Sleep Timer 36 Viewing Closed Captions 37 Chapter 5: Troubleshooting 38 Identifying Problems 38 Appendix 39 Cleaning and Maintaining Your TV 39 Using Your TV in Another Country 39 Specifications 39 3
CONTENTS Chapter 4: Special Features 29 Fine Tuning Channels 29 Selecting the Color Tone 30 Changing the Screen Size 31 Using the Surf Feature 32 Choosing a Multi-Channel Sound (MTS) Soundtrack 33 Extra Sound Settings 34 Setting the On/Off Timer 35 Setting the Sleep Timer 36 Viewing Closed Captions 37 Chapter 5: Troubleshooting 38 Identifying Problems 38 Appendix 39 Cleaning and Maintaining Your TV 39 Using Your TV in Another Country 39 Specifications 39 3
User Manual (user Manual) (ver.1.0) (English)
Page 4
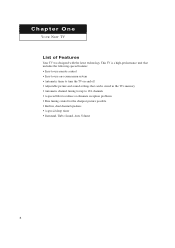
...-screen menu system • Automatic timer to turn the TV on and off • Adjustable picture and sound settings that can be stored in the TV's memory • Automatic channel tuning for up to 181 channels • A special filter to reduce or eliminate reception problems • Fine tuning control for the sharpest picture possible • Built-in, dual channel speakers • A special sleep timer • Surround, Turbo Sound, Auto Volume...
...-screen menu system • Automatic timer to turn the TV on and off • Adjustable picture and sound settings that can be stored in the TV's memory • Automatic channel tuning for up to 181 channels • A special filter to reduce or eliminate reception problems • Fine tuning control for the sharpest picture possible • Built-in, dual channel speakers • A special sleep timer • Surround, Turbo Sound, Auto Volume...
User Manual (user Manual) (ver.1.0) (English)
Page 6
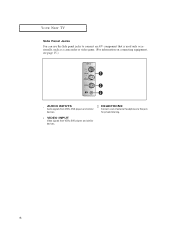
YOUR NEW TV Side Panel Jacks You can use the Side panel jacks to this jack for private listening. 6 HEADPHONE Connect a set of external headphones to connect an A/V component that is used only occasionally, such as a camcorder or video game. (For information on connecting equipment, see page 15.) ˛ AUDIO INPUTS Audio signals from VCRs, DVD players and similar devices. « VIDEO INPUT Video signals from VCRs, DVD players and similar devices.
YOUR NEW TV Side Panel Jacks You can use the Side panel jacks to this jack for private listening. 6 HEADPHONE Connect a set of external headphones to connect an A/V component that is used only occasionally, such as a camcorder or video game. (For information on connecting equipment, see page 15.) ˛ AUDIO INPUTS Audio signals from VCRs, DVD players and similar devices. « VIDEO INPUT Video signals from VCRs, DVD players and similar devices.
User Manual (user Manual) (ver.1.0) (English)
Page 7
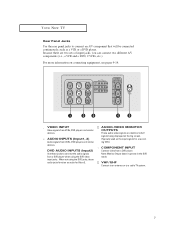
... Connect to an antenna or to connect an A/V component that will be connected continuously, such as a VCR or a DVD player. Note: Monitor Output doesn't operate in the DVD mode. When not using the DVD video input jacks. YOUR NEW TV Rear Panel Jacks Use the rear panel jacks to a cable TV system. 7 AUDIO-VIDEO MONITOR OUTPUTS These audio-video signals are two sets of input jacks, you can connect two different A/V components (i.e., a VCR and a DVD, 2 VCRs, etc.) For more information on the big screen. (Typically used...
... Connect to an antenna or to connect an A/V component that will be connected continuously, such as a VCR or a DVD player. Note: Monitor Output doesn't operate in the DVD mode. When not using the DVD video input jacks. YOUR NEW TV Rear Panel Jacks Use the rear panel jacks to a cable TV system. 7 AUDIO-VIDEO MONITOR OUTPUTS These audio-video signals are two sets of input jacks, you can connect two different A/V components (i.e., a VCR and a DVD, 2 VCRs, etc.) For more information on the big screen. (Typically used...
User Manual (user Manual) (ver.1.0) (English)
Page 8
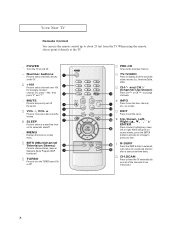
... the ENTER button to activate (or change channels. æ INFO Press to display all of the available video sources (i.e., Antenna/Cable, VCR). TV/VIDEO Press to see the time, channel, etc., on the TV. +100 Press to have the TV automatically scan all of the channels it directly at the TV. ˛ POWER Turns the TV on -screen menu. YOUR NEW TV Remote Control You can use the remote control up , down...
... the ENTER button to activate (or change channels. æ INFO Press to display all of the available video sources (i.e., Antenna/Cable, VCR). TV/VIDEO Press to see the time, channel, etc., on the TV. +100 Press to have the TV automatically scan all of the channels it directly at the TV. ˛ POWER Turns the TV on -screen menu. YOUR NEW TV Remote Control You can use the remote control up , down...

User Manual (user Manual) (ver.1.0) (English)
Page 9
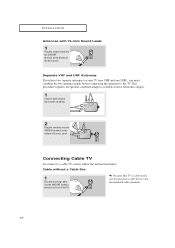
... 300-ohm twin flat leads, follow the directions below . If your antenna has a set of the back panel. 9 C h a p t e r Tw o INSTALLATION Connecting VHF and UHF Antennas If your antenna has one lead that look like this , see "Antennas with 300-ohm Flat Twin Leads" below . 1 Place the wires from the twin leads under the screws on the 300-75 ohm adaptor (not supplied).
... 300-ohm twin flat leads, follow the directions below . If your antenna has a set of the back panel. 9 C h a p t e r Tw o INSTALLATION Connecting VHF and UHF Antennas If your antenna has one lead that look like this , see "Antennas with 300-ohm Flat Twin Leads" below . 1 Place the wires from the twin leads under the screws on the 300-75 ohm adaptor (not supplied).
User Manual (user Manual) (ver.1.0) (English)
Page 10
... and one UHF), you do not need a cable box to view unscrambled cable channels. 10 This procedure requires an optional combiner-adaptor (available at most electronics shops). 1 Connect both antenna leads to the combiner. 2 Plug the combiner into the VHF/UHF antenna terminal on back of the back panel. INSTALLATION Antennas with 75-ohm Round Leads 1 Plug the antenna lead into the VHF/UHF terminal...
... and one UHF), you do not need a cable box to view unscrambled cable channels. 10 This procedure requires an optional combiner-adaptor (available at most electronics shops). 1 Connect both antenna leads to the combiner. 2 Plug the combiner into the VHF/UHF antenna terminal on back of the back panel. INSTALLATION Antennas with 75-ohm Round Leads 1 Plug the antenna lead into the VHF/UHF terminal...
User Manual (user Manual) (ver.1.0) (English)
Page 11
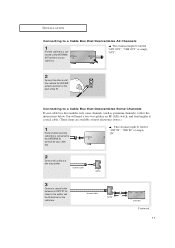
... cable to the VHF/UHF antenna terminal on your cable box. ▼ This terminal might be labeled "ANT OUT", "VHF OUT" or simply, "OUT". 2 Connect the other end of the TV. Incoming Cable Splitter Cable Box Continued... 11 Connecting to a Cable Box that Descrambles Some Channels If your cable box descrambles only some channels (such as premium channels), follow the instructions below. Incoming Cable Splitter 3 Connect a coaxial cable between an OUTPUT...
... cable to the VHF/UHF antenna terminal on your cable box. ▼ This terminal might be labeled "ANT OUT", "VHF OUT" or simply, "OUT". 2 Connect the other end of the TV. Incoming Cable Splitter Cable Box Continued... 11 Connecting to a Cable Box that Descrambles Some Channels If your cable box descrambles only some channels (such as premium channels), follow the instructions below. Incoming Cable Splitter 3 Connect a coaxial cable between an OUTPUT...
User Manual (user Manual) (ver.1.0) (English)
Page 12
Set the A/B switch to the "B" position to view scrambled channels. (When you set the A/B switch to "B", you 've made this connection, set the A/B switch to the cable box's output channel, which is usually channel 3 or 4.) 12 INSTALLATION 4 Connect a coaxial cable between the ANTENNA OUT terminal on the cable box and the B-IN terminal on the rear of the TV. Incoming Cable Splitter Cable Box RF (A/B) Switch 6 Connect the last coaxial cable between the other OUT terminal on the...
Set the A/B switch to the "B" position to view scrambled channels. (When you set the A/B switch to "B", you 've made this connection, set the A/B switch to the cable box's output channel, which is usually channel 3 or 4.) 12 INSTALLATION 4 Connect a coaxial cable between the ANTENNA OUT terminal on the cable box and the B-IN terminal on the rear of the TV. Incoming Cable Splitter Cable Box RF (A/B) Switch 6 Connect the last coaxial cable between the other OUT terminal on the...
User Manual (user Manual) (ver.1.0) (English)
Page 13
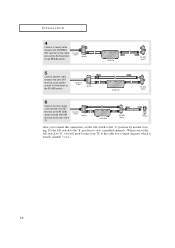
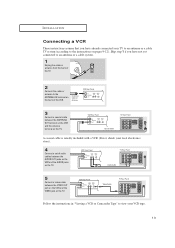
INSTALLATION Connecting a VCR These instructions assume that you have already connected your VCR tape. 13 VCR Rear Panel TV Rear Panel Audio Cable 5 Connect a video cable between the AUDIO OUT jacks on the VCR and the AUDIO jacks on the TV. VCR Rear Panel Video Cable TV Rear Panel Follow the instructions in "Viewing a VCR or Camcorder Tape" to view your TV to an antenna or a cable TV system (according to the ANTENNA IN terminal on the TV...
INSTALLATION Connecting a VCR These instructions assume that you have already connected your VCR tape. 13 VCR Rear Panel TV Rear Panel Audio Cable 5 Connect a video cable between the AUDIO OUT jacks on the VCR and the AUDIO jacks on the TV. VCR Rear Panel Video Cable TV Rear Panel Follow the instructions in "Viewing a VCR or Camcorder Tape" to view your TV to an antenna or a cable TV system (according to the ANTENNA IN terminal on the TV...
User Manual (user Manual) (ver.1.0) (English)
Page 14
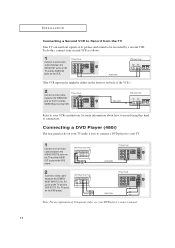
... Input Panel Refer to your VCR's instructions for more information about how to your DVD player's owner's manual. 14 DVD Player Rear Panel TV Rear Panel Audio Cable TV Rear Panel Video Cable Note: For an explanation of Component video, see your TV. 1 Connect a set of audio cables between the AUDIO INPUT 2 jacks on the TV and the AUDIO OUT jacks on the DVD player. INSTALLATION Connecting a Second VCR to Record from the TV Your TV can send out signals of its picture and sound...
... Input Panel Refer to your VCR's instructions for more information about how to your DVD player's owner's manual. 14 DVD Player Rear Panel TV Rear Panel Audio Cable TV Rear Panel Video Cable Note: For an explanation of Component video, see your TV. 1 Connect a set of audio cables between the AUDIO INPUT 2 jacks on the TV and the AUDIO OUT jacks on the DVD player. INSTALLATION Connecting a Second VCR to Record from the TV Your TV can send out signals of its picture and sound...

User Manual (user Manual) (ver.1.0) (English)
Page 15
... "Viewing a VCR or Camcorder Tape" on page 28.) 1 Locate the A/V output jacks on the side or back of the TV. Camcorder Output Jacks Audio Cable Y-Connector TV Side Panel 3 Connect a video cable between the AUDIO OUTPUT jack on the camcorder and the AUDIO terminals on the side of two cables. 15 They allow you need to your TV make it easy to connect a camcorder to connect a set of...
... "Viewing a VCR or Camcorder Tape" on page 28.) 1 Locate the A/V output jacks on the side or back of the TV. Camcorder Output Jacks Audio Cable Y-Connector TV Side Panel 3 Connect a video cable between the AUDIO OUTPUT jack on the camcorder and the AUDIO terminals on the side of two cables. 15 They allow you need to your TV make it easy to connect a camcorder to connect a set of...
User Manual (user Manual) (ver.1.0) (English)
Page 17
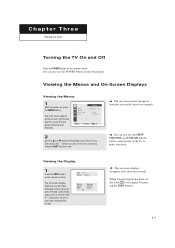
... main menu appears on the remote control. am : Dynamic : Custom : Stereo ▼ The on the control panel of the TV to highlight one of the following: Active channel, picture mode, audio mode, audio source and the time. ("*" indicates a channel has been manually fine tuned.) ANT 11* Signal : Mono Picture Sound MTS - - : - - Viewing the Display 1 Press the INFO button. When Closed Caption has been set, the icon( ) will appear by pressing the INFO button. 17 Mode Adjust Color Tone Size Picture...
... main menu appears on the remote control. am : Dynamic : Custom : Stereo ▼ The on the control panel of the TV to highlight one of the following: Active channel, picture mode, audio mode, audio source and the time. ("*" indicates a channel has been manually fine tuned.) ANT 11* Signal : Mono Picture Sound MTS - - : - - Viewing the Display 1 Press the INFO button. When Closed Caption has been set, the icon( ) will appear by pressing the INFO button. 17 Mode Adjust Color Tone Size Picture...
User Manual (user Manual) (ver.1.0) (English)
Page 22
... change to single-digit channels (0-9) faster, press "0" before the single digit. (For channel "4", press "0", then "4".) Using the PRE-CH Button to any channel. Directly Accessing Channels Use the number buttons to quickly tune to select the Previous Channel Press the PRE-CH button. The TV will change channels. The TV will switch to the last channel viewed. ▼ To quickly switch between them. OPERATION Changing Channels Using the Channel Buttons Press the CH or CH button to quickly alternate between two channels...
... change to single-digit channels (0-9) faster, press "0" before the single digit. (For channel "4", press "0", then "4".) Using the PRE-CH Button to any channel. Directly Accessing Channels Use the number buttons to quickly tune to select the Previous Channel Press the PRE-CH button. The TV will change channels. The TV will switch to the last channel viewed. ▼ To quickly switch between them. OPERATION Changing Channels Using the Channel Buttons Press the CH or CH button to quickly alternate between two channels...
User Manual (user Manual) (ver.1.0) (English)
Page 24
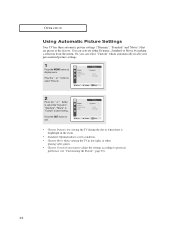
.... • Standard: Optimal indoor screen condition. • Choose Movie when viewing the TV in low light, or when playing video games. • Choose Custom if you can activate either Dynamic, Standard or Movie by making a selection from the menu. You can select "Custom" which automatically recalls your personalized picture settings. 1 Press the MENU button to select "Picture". Press the ˇ or ˆ button to display menu.
.... • Standard: Optimal indoor screen condition. • Choose Movie when viewing the TV in low light, or when playing video games. • Choose Custom if you can activate either Dynamic, Standard or Movie by making a selection from the menu. You can select "Custom" which automatically recalls your personalized picture settings. 1 Press the MENU button to select "Picture". Press the ˇ or ˆ button to display menu.

User Manual (user Manual) (ver.1.0) (English)
Page 37
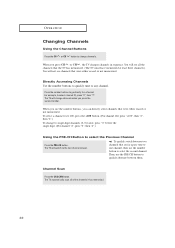
... as news or weather, is displayed. These are broadcast with certain TV shows. All VCRs record the closed caption signal from television programs, so home-recorded video tapes also provide closed captions as in your television schedule and on the tape's packaging: . 1 Press the MENU button to select "Mode". Most pre-recorded commercial video tapes provide closed captions. Caption Mode Channels Field Function : On : Caption : 1 : 1 Move Select Exit ▼ Misspellings...
... as news or weather, is displayed. These are broadcast with certain TV shows. All VCRs record the closed caption signal from television programs, so home-recorded video tapes also provide closed captions as in your television schedule and on the tape's packaging: . 1 Press the MENU button to select "Mode". Most pre-recorded commercial video tapes provide closed captions. Caption Mode Channels Field Function : On : Caption : 1 : 1 Move Select Exit ▼ Misspellings...
User Manual (user Manual) (ver.1.0) (English)
Page 38
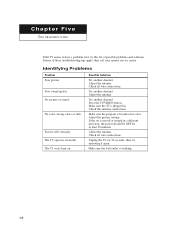
... channel. Check the antenna connections. If the set is broadcast in color. Chapter Five TROUBLESHOOTING If the TV seems to have a problem, first try operating it again. Identifying Problems Problem Poor picture Poor sound quality. Adjust the picture settings. Picture rolls vertically. Press the TV/VIDEO button. Check all wire connections. Make sure the wall outlet is plugged in a different direction, the power should be OFF for 30 seconds, then try this list...
... channel. Check the antenna connections. If the set is broadcast in color. Chapter Five TROUBLESHOOTING If the TV seems to have a problem, first try operating it again. Identifying Problems Problem Poor picture Poor sound quality. Adjust the picture settings. Picture rolls vertically. Press the TV/VIDEO button. Check all wire connections. Make sure the wall outlet is plugged in a different direction, the power should be OFF for 30 seconds, then try this list...


