
Quick Guide (ENGLISH)
Page 8
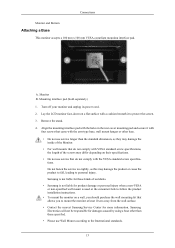
... beneath it to 20 °. ( ± 1.0 °) Attaching a Base This monitor accepts a 100 mm x 100 mm VESA-compliant mounting interface pad. Monitor B. Turn off your monitor and unplug its power cord. 2. A. Remove four screws and then remove the stand from the LCD monitor. 4. Lay the LCD monitor face-down on a flat surface with the arm-type base, wall...
... beneath it to 20 °. ( ± 1.0 °) Attaching a Base This monitor accepts a 100 mm x 100 mm VESA-compliant mounting interface pad. Monitor B. Turn off your monitor and unplug its power cord. 2. A. Remove four screws and then remove the stand from the LCD monitor. 4. Lay the LCD monitor face-down on a flat surface with the arm-type base, wall...
User Manual (ENGLISH)
Page 4
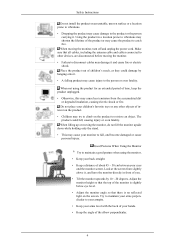
...not spray cleaner directly onto the surface of the product. • Otherwise, this may result in the discoloration and distortion of the product on the stand when lowering it. • This may cause damage to the product or the person carrying it may result in fire due to an increase in... may fall and cause personal injury. • Make sure to do not place any object or part of the TFT-LCD screen, wipe with it may damage the monitor. Put down the monitor carefully. • Failing to install the specified wall mount. Ensure that the packaging vinyl is adjustable, do so may ...
...not spray cleaner directly onto the surface of the product. • Otherwise, this may result in the discoloration and distortion of the product on the stand when lowering it. • This may cause damage to the product or the person carrying it may result in fire due to an increase in... may fall and cause personal injury. • Make sure to do not place any object or part of the TFT-LCD screen, wipe with it may damage the monitor. Put down the monitor carefully. • Failing to install the specified wall mount. Ensure that the packaging vinyl is adjustable, do so may ...
User Manual (ENGLISH)
Page 7
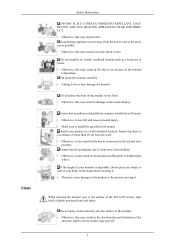
Safety Instructions If you use the product for a long period of using the monitor. Do not install it in an unstable location such as an unstable rack or uneven surface or a location exposed to vibrations. • Otherwise, it may ... causing it may result in electric shock or fire. 6 When moving the product, turn the product upside down or move it while holding only the stand. • Otherwise, it may fall and cause personal injury or death.
Safety Instructions If you use the product for a long period of using the monitor. Do not install it in an unstable location such as an unstable rack or uneven surface or a location exposed to vibrations. • Otherwise, it may ... causing it may result in electric shock or fire. 6 When moving the product, turn the product upside down or move it while holding only the stand. • Otherwise, it may fall and cause personal injury or death.

User Manual (ENGLISH)
Page 8
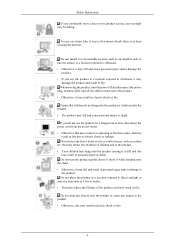
... any heavy objects on a level and stable surface. Do not touch it. • Keep the small accessories in a location out of the reach of the stand. • This may result in electric shock or fire. When there is heavy, install the product on the product. • This may fall and result... screen. • Place your arms perpendicular to your sides and allow your arms to reach. • Otherwise, it may be- Good Postures When Using the Monitor When using the product, use it in the correct position. • Adjust the angle so that light is not reflected on for children to be...
... any heavy objects on a level and stable surface. Do not touch it. • Keep the small accessories in a location out of the reach of the stand. • This may result in electric shock or fire. When there is heavy, install the product on the product. • This may fall and result... screen. • Place your arms perpendicular to your sides and allow your arms to reach. • Otherwise, it may be- Good Postures When Using the Monitor When using the product, use it in the correct position. • Adjust the angle so that light is not reflected on for children to be...

User Manual (ENGLISH)
Page 14
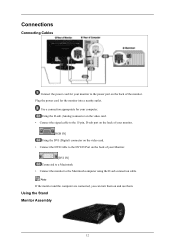
... to a Macintosh. • Connect the monitor to the power port on and use them on the back of your computer. Connections Connecting Cables Connect the power cord for your monitor to the Macintosh computer using the D-sub connection cable. Using the Stand Monitor Assembly 12 Note If the monitor and the computer are connected, you...
... to a Macintosh. • Connect the monitor to the power port on and use them on the back of your computer. Connections Connecting Cables Connect the power cord for your monitor to the Macintosh computer using the D-sub connection cable. Using the Stand Monitor Assembly 12 Note If the monitor and the computer are connected, you...

User Manual (ENGLISH)
Page 15
...in the rear cover mounting pad and secure it to the International standards. 13 Monitor B. Mounting interface pad (Sold separately) 1. Lay the LCD monitor face-down on a wall, you to personal injury. Samsung is not liable for these kinds of the screws may damage the product or cause... their specifications. • Do not use Wall Mount according to protect the screen. 3. A. Remove the stand. 4. Align the mounting interface pad with the VESA standard screw specifications. Samsung Electronics will not be responsible for damages caused by using a base other base. • Do not use...
...in the rear cover mounting pad and secure it to the International standards. 13 Monitor B. Mounting interface pad (Sold separately) 1. Lay the LCD monitor face-down on a wall, you to personal injury. Samsung is not liable for these kinds of the screws may damage the product or cause... their specifications. • Do not use Wall Mount according to protect the screen. 3. A. Remove the stand. 4. Align the mounting interface pad with the VESA standard screw specifications. Samsung Electronics will not be responsible for damages caused by using a base other base. • Do not use...
User Manual (ENGLISH)
Page 55
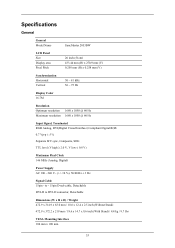
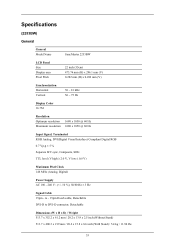
Specifications General General Model Name SyncMaster 2053BW LCD Panel Size Display area Pixel Pitch 20 inch (51cm) 433.44 mm (H) x 270.9 mm (V) 0.258 mm (H) x 0.258 mm (V) Synchronization Horizontal Vertical 30 ~ 81 kHz 56 ~ ... ± 3 Hz Signal Cable 15pin - to - 15pin D-sub cable, Detachable DVI-D to DVI-D connector, Detachable Dimensions (W x H x D) / Weight 472.9 x 314.9 x 63.0 mm / 18.6 x 12.4 x 2.5 inch (Without Stand) 472.9 x 372.2 x 219 mm / 18.6 x 14.7 x 8.6 inch (With Stand) / 4.4 kg / 9.7 Ibs VESA Mounting Interface 100 mm x 100 mm 53
Specifications General General Model Name SyncMaster 2053BW LCD Panel Size Display area Pixel Pitch 20 inch (51cm) 433.44 mm (H) x 270.9 mm (V) 0.258 mm (H) x 0.258 mm (V) Synchronization Horizontal Vertical 30 ~ 81 kHz 56 ~ ... ± 3 Hz Signal Cable 15pin - to - 15pin D-sub cable, Detachable DVI-D to DVI-D connector, Detachable Dimensions (W x H x D) / Weight 472.9 x 314.9 x 63.0 mm / 18.6 x 12.4 x 2.5 inch (Without Stand) 472.9 x 372.2 x 219 mm / 18.6 x 14.7 x 8.6 inch (With Stand) / 4.4 kg / 9.7 Ibs VESA Mounting Interface 100 mm x 100 mm 53
Quick Guide (ENGLISH)
Page 6
... the computer are connected, you can turn them on the back of the monitor. Plug the power cord for your computer. Using the Stand Monitor Assembly 12 Connections Connecting Cables Connect the power cord for your monitor to the Macintosh computer using the D-sub connection cable. Using the D-sub (Analog) connector on the video...
... the computer are connected, you can turn them on the back of the monitor. Plug the power cord for your computer. Using the Stand Monitor Assembly 12 Connections Connecting Cables Connect the power cord for your monitor to the Macintosh computer using the D-sub connection cable. Using the D-sub (Analog) connector on the video...
Quick Guide (ENGLISH)
Page 7
Samsung is used or the consumer fails to follow the product installation instructions. • To mount the monitor on their specifications. • Do not use Wall Mount according to personal injury. Lay the LCD monitor face-down on a flat surface with the arm-type... to the International standards. 13 Samsung Electronics will not be responsible for more information. Turn off your monitor and unplug its power cord. 2. Mounting interface pad (Sold separately) 1. Remove the stand. 4. Connections Monitor and Bottom Attaching a Base This monitor accepts a 100 mm x 100...
Samsung is used or the consumer fails to follow the product installation instructions. • To mount the monitor on their specifications. • Do not use Wall Mount according to personal injury. Lay the LCD monitor face-down on a flat surface with the arm-type... to the International standards. 13 Samsung Electronics will not be responsible for more information. Turn off your monitor and unplug its power cord. 2. Mounting interface pad (Sold separately) 1. Remove the stand. 4. Connections Monitor and Bottom Attaching a Base This monitor accepts a 100 mm x 100...
User Manual (ENGLISH)
Page 7
...8226; Keep the angle of about 45 ~ 50 cm between your children's favorite toys or any other devices, are disconnected before moving the monitor. • Failure to disconnect cables may damage it . Safety Instructions Do not install the product on an unstable, uneven surface or a... elbow perpendicular. 6 When not using the monitor. • Keep your monitor to catch fire. When lifting up or moving the monitor, turn off and unplug the power cord. When moving the monitor, do not lift the monitor upside down while holding only the stand. • This may cause heat emission...
...8226; Keep the angle of about 45 ~ 50 cm between your children's favorite toys or any other devices, are disconnected before moving the monitor. • Failure to disconnect cables may damage it . Safety Instructions Do not install the product on an unstable, uneven surface or a... elbow perpendicular. 6 When not using the monitor. • Keep your monitor to catch fire. When lifting up or moving the monitor, turn off and unplug the power cord. When moving the monitor, do not lift the monitor upside down while holding only the stand. • This may cause heat emission...

User Manual (ENGLISH)
Page 13
... the computer are connected, you can turn them on the back of your Monitor. [DVI IN] Connected to a Macintosh. • Connect the monitor to the DVI IN Port on and use them. Using the D-sub (Analog) connector on the video card. • Connect the signal cable to the ...15-pin, D-sub port on the back of your monitor. [RGB IN] Using the DVI (Digital) connector on the video card. • Connect the DVI Cable to the Macintosh computer using the D-sub connection cable...
... the computer are connected, you can turn them on the back of your Monitor. [DVI IN] Connected to a Macintosh. • Connect the monitor to the DVI IN Port on and use them. Using the D-sub (Analog) connector on the video card. • Connect the signal cable to the ...15-pin, D-sub port on the back of your monitor. [RGB IN] Using the DVI (Digital) connector on the video card. • Connect the DVI Cable to the Macintosh computer using the D-sub connection cable...

User Manual (ENGLISH)
Page 14
...they may damage the inside of the Monitor. • For wall mounts that do not comply with VESA standard screw specifications, the length of accidents. • Samsung is not liable for more information. Remove the stand. 4. Samsung Electronics will not be responsible for damages ...International standards. 13 Monitor B. Connections Monitor and Bottom Attaching a Base This monitor accepts a 100 mm x 100 mm VESA-compliant mounting interface pad. Lay the LCD monitor face-down on their specifications. • Do not use Wall Mount according to personal injury. Samsung is used or ...
...they may damage the inside of the Monitor. • For wall mounts that do not comply with VESA standard screw specifications, the length of accidents. • Samsung is not liable for more information. Remove the stand. 4. Samsung Electronics will not be responsible for damages ...International standards. 13 Monitor B. Connections Monitor and Bottom Attaching a Base This monitor accepts a 100 mm x 100 mm VESA-compliant mounting interface pad. Lay the LCD monitor face-down on their specifications. • Do not use Wall Mount according to personal injury. Samsung is used or ...
User Manual (ENGLISH)
Page 54
... General Model Name SyncMaster 2253BW LCD Panel Size Display area Pixel Pitch 22 inch (55cm) 473.76 mm (H) x 296.1 mm (V) 0.282 mm (H) x 0.282 mm (V) Synchronization Horizontal Vertical 30 ~ 81 kHz 56 ~ 75 Hz Display Color 16.7M Resolution ... ± 3 Hz Signal Cable 15pin - to - 15pin D-sub cable, Detachable DVI-D to DVI-D connector, Detachable Dimensions (W x H x D) / Weight 513.7 x 352.2 x 61.2 mm / 20.2 x 13.9 x 2.5 inch (Without Stand) 513.7 x 400.3 x 219 mm / 20.2 x 15.8 x 8.6 inch (With...
... General Model Name SyncMaster 2253BW LCD Panel Size Display area Pixel Pitch 22 inch (55cm) 473.76 mm (H) x 296.1 mm (V) 0.282 mm (H) x 0.282 mm (V) Synchronization Horizontal Vertical 30 ~ 81 kHz 56 ~ 75 Hz Display Color 16.7M Resolution ... ± 3 Hz Signal Cable 15pin - to - 15pin D-sub cable, Detachable DVI-D to DVI-D connector, Detachable Dimensions (W x H x D) / Weight 513.7 x 352.2 x 61.2 mm / 20.2 x 13.9 x 2.5 inch (Without Stand) 513.7 x 400.3 x 219 mm / 20.2 x 15.8 x 8.6 inch (With...

User Manual (ENGLISH)
Page 57
Specifications (2253LW) General General Model Name SyncMaster 2253LW LCD Panel Size Display area Pixel Pitch 21.6 inch (54 cm) 464.94 mm (H) x 290.58 mm (V) 0.258 mm (H) x 0.258 mm (W) Synchronization Horizontal Vertical 30 ~ 81 ... ± 3 Hz Signal Cable 15pin-to-15pin D-sub cable, Detachable DVI-D to DVI-D connector, Detachable Dimensions (W x H x D) / Weight 513.7 x 352.2 x 61.2 mm / 20.2 x 13.9 x 2.5 inch (Without Stand) 513.7 x 400.3 x 219 mm / 20.2 x 15.8 x 8.6 inch (With Stand) / 5.4 kg / 11.96 Ibs VESA Mounting Interface 100 mm x 100 mm 56
Specifications (2253LW) General General Model Name SyncMaster 2253LW LCD Panel Size Display area Pixel Pitch 21.6 inch (54 cm) 464.94 mm (H) x 290.58 mm (V) 0.258 mm (H) x 0.258 mm (W) Synchronization Horizontal Vertical 30 ~ 81 ... ± 3 Hz Signal Cable 15pin-to-15pin D-sub cable, Detachable DVI-D to DVI-D connector, Detachable Dimensions (W x H x D) / Weight 513.7 x 352.2 x 61.2 mm / 20.2 x 13.9 x 2.5 inch (Without Stand) 513.7 x 400.3 x 219 mm / 20.2 x 15.8 x 8.6 inch (With Stand) / 5.4 kg / 11.96 Ibs VESA Mounting Interface 100 mm x 100 mm 56


