
Quick Guide (ENGLISH)
Page 3
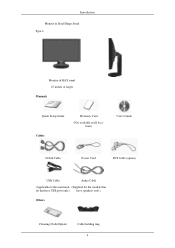
Introduction Monitor & Dual Hinge Stand Type 4 Monitor & HAS stand 23 inches or larger Manuals Quick Setup Guide Cables Warranty Card (Not available in all locations) User's Guide D-Sub Cable Power Cord DVI Cable (option) USB Cable Audio Cable (Applicable to the stand mod- (Supplied for the models that els that have USB ports only.) have speakers only.) Others Cleaning Cloth(Option) Cable holding ring 9
Introduction Monitor & Dual Hinge Stand Type 4 Monitor & HAS stand 23 inches or larger Manuals Quick Setup Guide Cables Warranty Card (Not available in all locations) User's Guide D-Sub Cable Power Cord DVI Cable (option) USB Cable Audio Cable (Applicable to the stand mod- (Supplied for the models that els that have USB ports only.) have speakers only.) Others Cleaning Cloth(Option) Cable holding ring 9
Quick Guide (ENGLISH)
Page 6
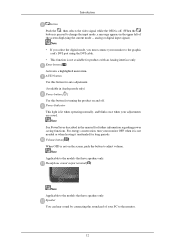
... sound output terminal[ ] Note Applicable to adjust volume. Power Indicator This light is lit when operating normally, and blinks once when your monitor OFF when it is not available for further information regarding power saving functions. Note Applicable to the graphic card's DVI port using the DVI... the current mode -- analog or digital input signal.) Note • If you select the digital mode, you must connect your monitor to the models that have speakers only. Enter button [ ] Activates a highlighted menu item. For energy conservation, turn your adjustments are saved.
... sound output terminal[ ] Note Applicable to adjust volume. Power Indicator This light is lit when operating normally, and blinks once when your monitor OFF when it is not available for further information regarding power saving functions. Note Applicable to the graphic card's DVI port using the DVI... the current mode -- analog or digital input signal.) Note • If you select the digital mode, you must connect your monitor to the models that have speakers only. Enter button [ ] Activates a highlighted menu item. For energy conservation, turn your adjustments are saved.
Quick Guide (ENGLISH)
Page 7
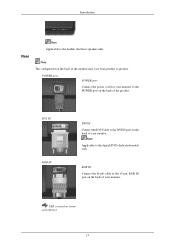
DVI IN RGB IN DVI IN Connect the DVI Cable to the DVI IN port on the back of your monitor. RGB IN Connect the D-sub cable to product. Note Applicable to the models that have speakers only. Note The configuration at the back of the product. POWER port POWER port Connect the power cord for your monitor to the POWER port on the back of the monitor may vary from product to the 15-pin, RGB IN port on the back of your monitor. Introduction Rear Note Applicable to the digital (DVI)-dedicated models only. USB connection terminal (Option) 13
DVI IN RGB IN DVI IN Connect the DVI Cable to the DVI IN port on the back of your monitor. RGB IN Connect the D-sub cable to product. Note Applicable to the models that have speakers only. Note The configuration at the back of the product. POWER port POWER port Connect the power cord for your monitor to the POWER port on the back of the monitor may vary from product to the 15-pin, RGB IN port on the back of your monitor. Introduction Rear Note Applicable to the digital (DVI)-dedicated models only. USB connection terminal (Option) 13
Quick Guide (ENGLISH)
Page 8
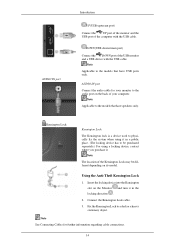
... the USB cable. Note See Connecting Cables for your computer. Note Applicable to the models that have USB ports only. Note Applicable to the audio port on the back of the USB monitor and a USB device with the USB cable. Kensington Lock Kensington Lock The Kensington lock... cable connections. 14 Connect the Kensington Lock cable. 3. Insert the locking device into the Kensington slot on its model. DOWN(USB downstream port) Connect the DOWN port of your monitor to the models that have speakers only. Fix the Kensington Lock to be different depending on the...
... the USB cable. Note See Connecting Cables for your computer. Note Applicable to the models that have USB ports only. Note Applicable to the audio port on the back of the USB monitor and a USB device with the USB cable. Kensington Lock Kensington Lock The Kensington lock... cable connections. 14 Connect the Kensington Lock cable. 3. Insert the locking device into the Kensington slot on its model. DOWN(USB downstream port) Connect the DOWN port of your monitor to the models that have speakers only. Fix the Kensington Lock to be different depending on the...
Quick Guide (ENGLISH)
Page 11
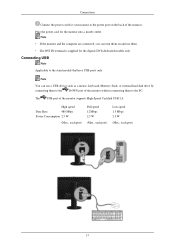
...device such as a mouse, keyboard, Memory Stick, or external hard disk drive by connecting them to the DOWN port of the monitor without connecting them to the stand models that have USB ports only. Note You can turn them . • The DVI IN terminal is supplied for the digital ...(DVI)-dedicated models only. Connecting USB Note Applicable to the PC. Connections Connect the power cord for the monitor into a nearby outlet. High speed Data Rate 480 Mbps Power Consumption 2.5 W (Max., each port) ...
...device such as a mouse, keyboard, Memory Stick, or external hard disk drive by connecting them to the DOWN port of the monitor without connecting them to the stand models that have USB ports only. Note You can turn them . • The DVI IN terminal is supplied for the digital ...(DVI)-dedicated models only. Connecting USB Note Applicable to the PC. Connections Connect the power cord for the monitor into a nearby outlet. High speed Data Rate 480 Mbps Power Consumption 2.5 W (Max., each port) ...
Quick Guide (ENGLISH)
Page 17
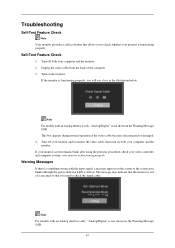
...of the computer. 3. If the monitor is functioning properly, you will see a box in the Warning Message OSD. The message may indicate that the monitor is still on both your monitor is not shown in the illustration below. Note For models with an Analog interface only, "Analog.../Digital" is functioning properly. If your monitor screen remains blank after using the previous procedure, ...
...of the computer. 3. If the monitor is functioning properly, you will see a box in the Warning Message OSD. The message may indicate that the monitor is still on both your monitor is not shown in the illustration below. Note For models with an Analog interface only, "Analog.../Digital" is functioning properly. If your monitor screen remains blank after using the previous procedure, ...
User Manual (ENGLISH)
Page 10
Introduction Monitor & Dual Hinge Stand Type 4 Monitor & HAS stand 23 inches or larger Manuals Quick Setup Guide Cables Warranty Card (Not available in all locations) User's Guide D-Sub Cable Power Cord DVI Cable (option) USB Cable Audio Cable (Applicable to the stand mod- (Supplied for the models that els that have USB ports only.) have speakers only.) Others Cleaning Cloth(Option) Cable holding ring 9
Introduction Monitor & Dual Hinge Stand Type 4 Monitor & HAS stand 23 inches or larger Manuals Quick Setup Guide Cables Warranty Card (Not available in all locations) User's Guide D-Sub Cable Power Cord DVI Cable (option) USB Cable Audio Cable (Applicable to the stand mod- (Supplied for the models that els that have USB ports only.) have speakers only.) Others Cleaning Cloth(Option) Cable holding ring 9

User Manual (ENGLISH)
Page 13
... PowerSaver described in the upper left of your PC to the models that have speakers only. Speaker You can hear sound by connecting the soundcard of the screen displaying the current mode -- Note Applicable to the monitor. 12 Headphone sound output terminal[ ] Note Applicable to the ...the digital mode, you must connect your adjustments are saved. For energy conservation, turn your monitor OFF when it is lit when operating normally, and blinks once when your monitor to the models that have speakers only. Introduction button Push the ' ', then selects the video signal while ...
... PowerSaver described in the upper left of your PC to the models that have speakers only. Speaker You can hear sound by connecting the soundcard of the screen displaying the current mode -- Note Applicable to the monitor. 12 Headphone sound output terminal[ ] Note Applicable to the ...the digital mode, you must connect your adjustments are saved. For energy conservation, turn your monitor OFF when it is lit when operating normally, and blinks once when your monitor to the models that have speakers only. Introduction button Push the ' ', then selects the video signal while ...

User Manual (ENGLISH)
Page 14
DVI IN RGB IN DVI IN Connect the DVI Cable to the DVI IN port on the back of the monitor may vary from product to product. USB connection terminal (Option) 13 Introduction Rear Note Applicable to the digital (DVI)-dedicated models only. Note The configuration at the back of your monitor. Note Applicable to the models that have speakers only. RGB IN Connect the D-sub cable to the POWER port on the back of the product. POWER port POWER port Connect the power cord for your monitor to the 15-pin, RGB IN port on the back of your monitor.
DVI IN RGB IN DVI IN Connect the DVI Cable to the DVI IN port on the back of the monitor may vary from product to product. USB connection terminal (Option) 13 Introduction Rear Note Applicable to the digital (DVI)-dedicated models only. Note The configuration at the back of your monitor. Note Applicable to the models that have speakers only. RGB IN Connect the D-sub cable to the POWER port on the back of the product. POWER port POWER port Connect the power cord for your monitor to the 15-pin, RGB IN port on the back of your monitor.

User Manual (ENGLISH)
Page 15
... . 2. Fix the Kensington Lock to be different depending on the Monitor and turn it . Insert the locking device into the Kensington slot on its model. Using the Anti-Theft Kensington Lock 1. Note Applicable to the models that have speakers only. Note See Connecting Cables for your computer. ...AUDIO IN port Introduction UP(USB upstream port) Connect the UP port of the monitor and the USB port of the USB monitor and a USB device with the USB ...
... . 2. Fix the Kensington Lock to be different depending on the Monitor and turn it . Insert the locking device into the Kensington slot on its model. Using the Anti-Theft Kensington Lock 1. Note Applicable to the models that have speakers only. Note See Connecting Cables for your computer. ...AUDIO IN port Introduction UP(USB upstream port) Connect the UP port of the monitor and the USB port of the USB monitor and a USB device with the USB ...

User Manual (ENGLISH)
Page 18
... turn them on the back of the monitor. Plug the power cord for your monitor to the power port on and use a USB device such as a mouse, keyboard, Memory Stick, or external hard disk drive by connecting them to the stand models that have USB ports only. High speed...W (Max., each port) 17 The USB port of the monitor without connecting them . • The DVI IN terminal is supplied for the digital (DVI)-dedicated models only. Connections Connect the power cord for the monitor into a nearby outlet. Note • If the monitor and the computer are connected, you can use them to...
... turn them on the back of the monitor. Plug the power cord for your monitor to the power port on and use a USB device such as a mouse, keyboard, Memory Stick, or external hard disk drive by connecting them to the stand models that have USB ports only. High speed...W (Max., each port) 17 The USB port of the monitor without connecting them . • The DVI IN terminal is supplied for the digital (DVI)-dedicated models only. Connections Connect the power cord for the monitor into a nearby outlet. Note • If the monitor and the computer are connected, you can use them to...
User Manual (ENGLISH)
Page 24
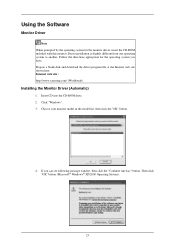
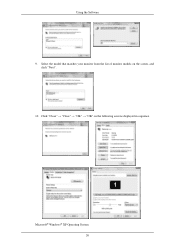
... drive. 2. Choose your monitor model in the model list, then click the "OK" button. 4. Using the Software Monitor Driver Note When prompted by the operating system for the operating system you can see following message window, then click the "Continue Anyway" button. Internet web site : http://www.samsung.com/ (Worldwide) Installing the Monitor Driver (Automatic) 1. If... web site shown here. Click "Windows". 3. Then click "OK" button (Microsoft® Windows® XP/2000 Operating System). 23 Follow the directions appropriate for the monitor driver, insert the CD-ROM included with this...
... drive. 2. Choose your monitor model in the model list, then click the "OK" button. 4. Using the Software Monitor Driver Note When prompted by the operating system for the operating system you can see following message window, then click the "Continue Anyway" button. Internet web site : http://www.samsung.com/ (Worldwide) Installing the Monitor Driver (Automatic) 1. If... web site shown here. Click "Windows". 3. Then click "OK" button (Microsoft® Windows® XP/2000 Operating System). 23 Follow the directions appropriate for the monitor driver, insert the CD-ROM included with this...
User Manual (ENGLISH)
Page 27
Click "Close" → "Close" → "OK" → "OK" on the screen, and click "Next". 10. Microsoft® Windows® XP Operating System 26 Using the Software 9. Select the model that matches your monitor from the list of monitor models on the following screens displayed in sequence.
Click "Close" → "Close" → "OK" → "OK" on the screen, and click "Next". 10. Microsoft® Windows® XP Operating System 26 Using the Software 9. Select the model that matches your monitor from the list of monitor models on the following screens displayed in sequence.
User Manual (ENGLISH)
Page 29
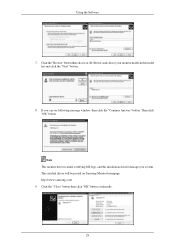
Using the Software 7. Click the "Browse" button then choose A:(D:\Driver) and choose your system. Note This monitor driver is under certifying MS logo, and this installation doesn't damage your monitor model in the model list and click the "Next" button. 8. Click the "Close" button then click "OK" button continually. 28 Then click "OK" button. If you can see following message window, then click the "Continue Anyway" button. http://www.samsung.com/ 9. The certified driver will be posted on Samsung Monitor homepage.
Using the Software 7. Click the "Browse" button then choose A:(D:\Driver) and choose your system. Note This monitor driver is under certifying MS logo, and this installation doesn't damage your monitor model in the model list and click the "Next" button. 8. Click the "Close" button then click "OK" button continually. 28 Then click "OK" button. If you can see following message window, then click the "Continue Anyway" button. http://www.samsung.com/ 9. The certified driver will be posted on Samsung Monitor homepage.
User Manual (ENGLISH)
Page 30
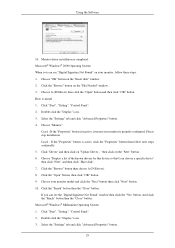
... "Advanced Properties" button. 29 Click the "Open" button, then click "OK" button. 9. Using the Software 10. Choose your monitor is inactive, it means your monitor model and click the "Next" button then click "Next" button. 10. Choose "Display a list of the known drivers for this device... so that I can see "Digital Signature Not Found" on your monitor, follow next steps continually. 5. Click "Driver" and then click...
... "Advanced Properties" button. 29 Click the "Open" button, then click "OK" button. 9. Using the Software 10. Choose your monitor is inactive, it means your monitor model and click the "Next" button then click "Next" button. 10. Choose "Display a list of the known drivers for this device... so that I can see "Digital Signature Not Found" on your monitor, follow next steps continually. 5. Click "Driver" and then click...
User Manual (ENGLISH)
Page 31
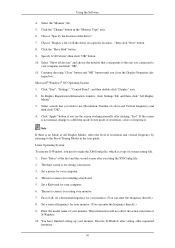
... then click "Next" button. 8. Select a mode that corresponds to a different mode (lower mode of all devices" and choose the monitor that you see the screen working normally after setting other requested hardware. 30 Choose "Display a list of colors and Vertical frequency) and...to the one you close the Display Properties dia- If the screen is for your monitor. 7. Click the "Change" button in a specific location..." Select the "Monitor" tab. 5. Enter the model name of your monitor. Specify A:\(D:\driver) then click "OK" button. 10. Press "Enter" at All...
... then click "Next" button. 8. Select a mode that corresponds to a different mode (lower mode of all devices" and choose the monitor that you see the screen working normally after setting other requested hardware. 30 Choose "Display a list of colors and Vertical frequency) and...to the one you close the Display Properties dia- If the screen is for your monitor. 7. Click the "Change" button in a specific location..." Select the "Monitor" tab. 5. Enter the model name of your monitor. Specify A:\(D:\driver) then click "OK" button. 10. Press "Enter" at All...
User Manual (ENGLISH)
Page 34
... the network environment. 33 Installation 1. Have to reboot the system in order for the main screen is complete, the MagicRotation executable icon appears on the model. Insert the installation CD into the CD-ROM drive. 2. When the installation is not displayed, proceed with the installation using the MagicTune executable file on...
... the network environment. 33 Installation 1. Have to reboot the system in order for the main screen is complete, the MagicRotation executable icon appears on the model. Insert the installation CD into the CD-ROM drive. 2. When the installation is not displayed, proceed with the installation using the MagicTune executable file on...

User Manual (ENGLISH)
Page 36
... removed only by using the "Add or Remove Programs" option of Microsoft Corporation,Inc MultiScreen Note The software may not be supported depending on the model. Click the "Change/Remove" button to begin the uninstall process. 6. Click "Yes" to remove the program. 5. Wait until the "Uninstall Complete" dialog box appears. 7. Windows...
... removed only by using the "Add or Remove Programs" option of Microsoft Corporation,Inc MultiScreen Note The software may not be supported depending on the model. Click the "Change/Remove" button to begin the uninstall process. 6. Click "Yes" to remove the program. 5. Wait until the "Uninstall Complete" dialog box appears. 7. Windows...
User Manual (ENGLISH)
Page 39
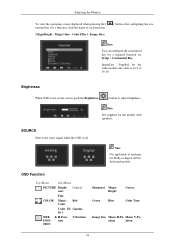
...Monitor To view the operating screen displayed when pressing the [ tomized key for the wide models only such as 16:9 or 16:10. Brightness When OSD is off. SOURCE Selects the video signal while the OSD is not on the screen, push the Brightness ( ) button to analogue (D-SUB)-or-digital (DVI)dedicated models... & H-PosiPOSI- tion TION V-Position Sharpness MagicBright Green Blue Coarse Color Tone Image Size Menu H-Po- Note You can configure the customized key for the models with speakers. Note Not supplied for a required function via Setup > Customized Key. MagicColor -
...Monitor To view the operating screen displayed when pressing the [ tomized key for the wide models only such as 16:9 or 16:10. Brightness When OSD is off. SOURCE Selects the video signal while the OSD is not on the screen, push the Brightness ( ) button to analogue (D-SUB)-or-digital (DVI)dedicated models... & H-PosiPOSI- tion TION V-Position Sharpness MagicBright Green Blue Coarse Color Tone Image Size Menu H-Po- Note You can configure the customized key for the models with speakers. Note Not supplied for a required function via Setup > Customized Key. MagicColor -
User Manual (ENGLISH)
Page 44
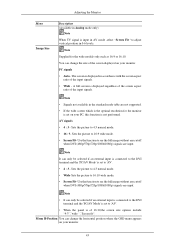
... • Signals not available in the standard mode table are not supported. • If the wide screen which is the optimal resolution for the wide models only such as 16:9 or 16:10. Use the function to see the full image without any cutoff when DVI (480p/576p/720p/1080i/1080p... external input is connected to the DVI terminal and the 'PC/AV Mode' is set on your PC, this function is not performed. Adjusting the Monitor Menu Image Size Description (Available in Analog mode only) Note When TV signal is input in AV mode ,select "Screen Fit "to adjust vertical position...
... • Signals not available in the standard mode table are not supported. • If the wide screen which is the optimal resolution for the wide models only such as 16:9 or 16:10. Use the function to see the full image without any cutoff when DVI (480p/576p/720p/1080i/1080p... external input is connected to the DVI terminal and the 'PC/AV Mode' is set on your PC, this function is not performed. Adjusting the Monitor Menu Image Size Description (Available in Analog mode only) Note When TV signal is input in AV mode ,select "Screen Fit "to adjust vertical position...

