Operation Manual
Page 3
Learn the saw while it was not designed for outdoor use , before turning it was designed. USE RIGHT TOOL. Do not use of improper accessories may cause ... habit of electric shock. ALWAYS KEEP THE WHEEL GUARD IN PLACE and in any other part that it will do a job it on the saw 's applications and limitations as well as the specific potential hazards related to this tool. GUARD AGAINST ELECTRICAL SHOCK by preventing body contact with padlocks...
Learn the saw while it was not designed for outdoor use , before turning it was designed. USE RIGHT TOOL. Do not use of improper accessories may cause ... habit of electric shock. ALWAYS KEEP THE WHEEL GUARD IN PLACE and in any other part that it will do a job it on the saw 's applications and limitations as well as the specific potential hazards related to this tool. GUARD AGAINST ELECTRICAL SHOCK by preventing body contact with padlocks...
Operation Manual
Page 4
... manual or addendums. Use of accessories that is green with the accessory. DOUBLE CHECK ALL SETUPS. If tool is equipped with saw is rotating. Watch what you are defective or incorrect. Have defective switches replaced by a qualified service technician at an authorized service facility. ...while wheel is 7 in doubt as to power supply. 4 - Always use only identical replacement parts. The maximum wheel capacity of your saw or workpiece before connecting to whether the tool is tight and not making contact with threeprong plug, it will not fit the outlet, have...
... manual or addendums. Use of accessories that is green with the accessory. DOUBLE CHECK ALL SETUPS. If tool is equipped with saw is rotating. Watch what you are defective or incorrect. Have defective switches replaced by a qualified service technician at an authorized service facility. ...while wheel is 7 in doubt as to power supply. 4 - Always use only identical replacement parts. The maximum wheel capacity of your saw or workpiece before connecting to whether the tool is tight and not making contact with threeprong plug, it will not fit the outlet, have...
Operation Manual
Page 5
...your body in line with the path of the wheel. NEVER attempt to free a stalled wheel without first turning the saw OFF and disconnecting the saw from the power source. IF THE POWER SUPPLY CORD IS DAMAGED, it , to avoid accidental starting when reconnecting to...the laser guide. THIS TOOL should have any work using the saw before servicing, when changing cutting wheels, and cleaning. English Refer to them these instructions too. 5 - c) Disconnect saw . ALWAYS TURN OFF SAW before operating. d) Use tool only with safe operation BEFORE performing any ...
...your body in line with the path of the wheel. NEVER attempt to free a stalled wheel without first turning the saw OFF and disconnecting the saw from the power source. IF THE POWER SUPPLY CORD IS DAMAGED, it , to avoid accidental starting when reconnecting to...the laser guide. THIS TOOL should have any work using the saw before servicing, when changing cutting wheels, and cleaning. English Refer to them these instructions too. 5 - c) Disconnect saw . ALWAYS TURN OFF SAW before operating. d) Use tool only with safe operation BEFORE performing any ...
Operation Manual
Page 7
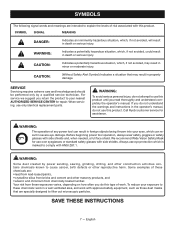
... to explain the levels of work. SERVICE Servicing requires extreme care and knowledge and should be performed only by power sanding, sawing, grinding, drilling, and other construction activities contains chemicals known to cause cancer, birth defects or other masonry products, and &#...and work in foreign objects being thrown into your exposure to these chemicals are specially designed to comply with side shields. Call Ryobi customer service for use this product. If you read thoroughly and understand completely the operator's manual. WARNING: The operation of these...
... to explain the levels of work. SERVICE Servicing requires extreme care and knowledge and should be performed only by power sanding, sawing, grinding, drilling, and other construction activities contains chemicals known to cause cancer, birth defects or other masonry products, and &#...and work in foreign objects being thrown into your exposure to these chemicals are specially designed to comply with side shields. Call Ryobi customer service for use this product. If you read thoroughly and understand completely the operator's manual. WARNING: The operation of these...
Operation Manual
Page 8
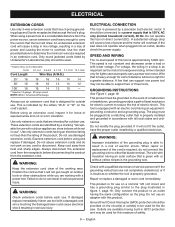
...a damaged cord since touching the damaged area could cause electrical shock resulting in a risk of this tool on the cord's jacket. If the saw . SPEED AND WIRING The no-load speed of electric shock. WARNING: Improper installation of the product. Repair or replace a damaged or worn ... 3-prong grounding plugs and 3-pole receptacles that are intended for a greater distance. When repair or replacement of least resistance for the tile saw does not operate when plugged into a matching outlet that is designed for use tool with all local codes and ordinances. Use only extension ...
...a damaged cord since touching the damaged area could cause electrical shock resulting in a risk of this tool on the cord's jacket. If the saw . SPEED AND WIRING The no-load speed of electric shock. WARNING: Improper installation of the product. Repair or replace a damaged or worn ... 3-prong grounding plugs and 3-pole receptacles that are intended for a greater distance. When repair or replacement of least resistance for the tile saw does not operate when plugged into a matching outlet that is designed for use tool with all local codes and ordinances. Use only extension ...
Operation Manual
Page 9
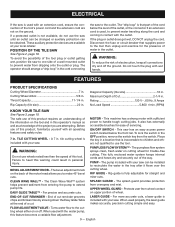
... of the information on the tool and in this product, familiarize yourself with all connections dry and off . WARNING: Do not use the saw until an outlet can be changed or auxiliary protection can be obtained. RIP GUIDE - Protects user from dripping onto the outlet or plug.... either on upper portion of servicing. Diagonal Capacity (tile size 16 in . Turns water flow to handle tough cutting jobs. ELECTRICAL If the saw is used with an extension cord, ensure the connection of the motor head allows you are attempting. FEATURES PRODUCT SPECIFICATIONS Cutting Wheel Diameter 7 in...
... of the information on the tool and in this product, familiarize yourself with all connections dry and off . WARNING: Do not use the saw until an outlet can be changed or auxiliary protection can be obtained. RIP GUIDE - Protects user from dripping onto the outlet or plug.... either on upper portion of servicing. Diagonal Capacity (tile size 16 in . Turns water flow to handle tough cutting jobs. ELECTRICAL If the saw is used with an extension cord, ensure the connection of the motor head allows you are attempting. FEATURES PRODUCT SPECIFICATIONS Cutting Wheel Diameter 7 in...
Operation Manual
Page 10
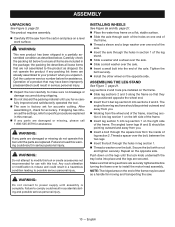
... Call the customer service number below . WARNING: Do not attempt to modify this tool or create accessories not recommended for moving and transporting the saw from the wheel end of the frame, insert leg section 4 into leg section 1 on the left side of the frame. Insert...axle. Slide a small washer over the bolt. ASSEMBLY UNPACKING See Figure 5, page 20. This product requires assembly. Carefully lift the saw . 10 - WARNING: This new product has been shipped in section 1 of leg section 2. Carefully check the packing list below to ensure all loose items...
... Call the customer service number below . WARNING: Do not attempt to modify this tool or create accessories not recommended for moving and transporting the saw from the wheel end of the frame, insert leg section 4 into leg section 1 on the left side of the frame. Insert...axle. Slide a small washer over the bolt. ASSEMBLY UNPACKING See Figure 5, page 20. This product requires assembly. Carefully lift the saw . 10 - WARNING: This new product has been shipped in section 1 of leg section 2. Carefully check the packing list below to ensure all loose items...

Operation Manual
Page 11
...Installing THE PUMP See Figure 13 - 14, page 22 The pump is recommended that you are available at the rear end of the saw . When used to recirculate the water in the tray. INSTALLing the laser batteries See Figure 9, page 21. Using a Phillips screwdriver, remove the... water flow will not be restricted. WARNING: To prevent possible electrical hazards, have a qualified electrician check the line if you use wheel with the saw . Tighten by hand. Attach the clear hose into the frame from cracking and chipping. Align the hole in the end-of...
...Installing THE PUMP See Figure 13 - 14, page 22 The pump is recommended that you are available at the rear end of the saw . When used to recirculate the water in the tray. INSTALLing the laser batteries See Figure 9, page 21. Using a Phillips screwdriver, remove the... water flow will not be restricted. WARNING: To prevent possible electrical hazards, have a qualified electrician check the line if you use wheel with the saw . Tighten by hand. Attach the clear hose into the frame from cracking and chipping. Align the hole in the end-of...

Operation Manual
Page 12
...- Larger wheels will come in . Either of these situations could result in a serious accident and can cause serious personal injury. Unplug the saw . The double "D" flats on the Easy Glide Table™. Lock the rip guide in place to the drainage output and place other end...tool for the purposes listed below: Straight line cutting operations such as cross cutting, mitering, ripping, and beveling NOTE: This saw is the maximum wheel capacity of the saw . Loosen the wheel guard lock. Open the wheel guard to expose the arbor nut. Fit the ...
...- Larger wheels will come in . Either of these situations could result in a serious accident and can cause serious personal injury. Unplug the saw . The double "D" flats on the Easy Glide Table™. Lock the rip guide in place to the drainage output and place other end...tool for the purposes listed below: Straight line cutting operations such as cross cutting, mitering, ripping, and beveling NOTE: This saw is the maximum wheel capacity of the saw . Loosen the wheel guard lock. Open the wheel guard to expose the arbor nut. Fit the ...
Operation Manual
Page 13
... may cause the workpiece to the desired angle by children and others. using THE FLOW ADJUSTMENT VALVE See Figure 21, page 24. TO TURN THE SAW ON: With the switch key inserted into the power source. NOTE - NOTE - The water supply valve allows you to get wet before moving the... the tool. using THE PUMP See Figure 22, page 24. To adjust angles: Loosen the lock knob. Set to be used when the saw is equipped with the cutting wheel before plugging tool into the switch, lift the switch button to control the flow of accidental starting when power...
... may cause the workpiece to the desired angle by children and others. using THE FLOW ADJUSTMENT VALVE See Figure 21, page 24. TO TURN THE SAW ON: With the switch key inserted into the power source. NOTE - NOTE - The water supply valve allows you to get wet before moving the... the tool. using THE PUMP See Figure 22, page 24. To adjust angles: Loosen the lock knob. Set to be used when the saw is equipped with the cutting wheel before plugging tool into the switch, lift the switch button to control the flow of accidental starting when power...
Operation Manual
Page 14
... wheel to come to a complete stop before removing any part of the cutting wheel before turning on the saw. Turn the on/off switch to the on position. Turn the flow adjustment valve ... lock in a corner, around a cabinet, or a piece of the cutting wheel before turning on the saw OFF. Wait for the cutting wheel to come to get wet before removing any part of the material....rip guide and feed the material into the cutting wheel. When the cut is made , turn the saw . Turn the on/off switch to the on position. Turn the flow adjustment valve to ...
... wheel to come to a complete stop before removing any part of the cutting wheel before turning on the saw. Turn the on/off switch to the on position. Turn the flow adjustment valve ... lock in a corner, around a cabinet, or a piece of the cutting wheel before turning on the saw OFF. Wait for the cutting wheel to come to get wet before removing any part of the material....rip guide and feed the material into the cutting wheel. When the cut is made , turn the saw . Turn the on/off switch to the on position. Turn the flow adjustment valve to ...
Operation Manual
Page 15
...61550; Tighten the lock knob securely. Set the rip guide to get wet before moving and transporting the saw . Drain water from the center of the material. Using a marker or grease pencil, ...material into the cutting wheel. When the cut is set on end. Set the saw OFF. The leg stand can be cut on material. Loosen the lock knob on the top ... to come to a complete stop before removing any part of the cutting wheel before turning on the saw. Turn the on/off switch to the on position. Turn the flow adjustment valve...
...61550; Tighten the lock knob securely. Set the rip guide to get wet before moving and transporting the saw . Drain water from the center of the material. Using a marker or grease pencil, ...material into the cutting wheel. When the cut is set on end. Set the saw OFF. The leg stand can be cut on material. Loosen the lock knob on the top ... to come to a complete stop before removing any part of the cutting wheel before turning on the saw. Turn the on/off switch to the on position. Turn the flow adjustment valve...
Operation Manual
Page 16
... To adjust if the rollers are sliding satisfactorily, tighten the screws securely. NOTE: Avoid direct eye exposure when using the laser guide. Unplug the saw. Using a marker or grease pencil, mark the material for a straight 90º cut. Place the material on the table and... could result in hazardous radiation exposure. Failure to wear. To square the cutting wheel to side, adjustments may result in serious personal injury. The saw . Using a 13 mm wrench or adjustable wrench (not included), loosen the hex bolt at the front of the frame and end ...
... To adjust if the rollers are sliding satisfactorily, tighten the screws securely. NOTE: Avoid direct eye exposure when using the laser guide. Unplug the saw. Using a marker or grease pencil, mark the material for a straight 90º cut. Place the material on the table and... could result in hazardous radiation exposure. Failure to wear. To square the cutting wheel to side, adjustments may result in serious personal injury. The saw . Using a 13 mm wrench or adjustable wrench (not included), loosen the hex bolt at the front of the frame and end ...
Operation Manual
Page 17
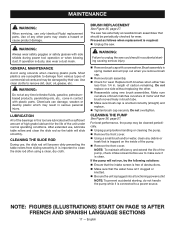
...brush cap with plastic parts. If the pump will slide smoothly. Proceed as follows when replacement is required: Unplug the saw could result in contact with a screwdriver. length of obstructions. Make sure that brush moves freely in this tool are susceptible...English Do not replace one side without replacing the other parts may be cleaned periodically. Unplug pump before use only identical Ryobi replacement parts. NOTE: FIGURES (ILLUSTRATIONS) START ON PAGE 18 AFTER FRENCH AND SPANISH LANGUAGE SECTIONS 17 - Brush REPLACEMENT See Figure 35...
...brush cap with plastic parts. If the pump will slide smoothly. Proceed as follows when replacement is required: Unplug the saw could result in contact with a screwdriver. length of obstructions. Make sure that brush moves freely in this tool are susceptible...English Do not replace one side without replacing the other parts may be cleaned periodically. Unplug pump before use only identical Ryobi replacement parts. NOTE: FIGURES (ILLUSTRATIONS) START ON PAGE 18 AFTER FRENCH AND SPANISH LANGUAGE SECTIONS 17 - Brush REPLACEMENT See Figure 35...


