
Operation Manual
Page 7
...extra caution when servicing them . • Keep children out of the mowing area and under the influence of inattention while operating the lawn mower may result in the rain. Keep children away - They are sharp. Clean the blade thoroughly and check its center ... personal injury. IMPORTANT SAFETY INSTRUCTIONS WARNING: READ AND UNDERSTAND ALL INSTRUCTIONS. Keep clear of lower end until the blade comes to clean the lawn mower, as water can result in serious injury or death. Avoid dangerous environment - Do not use a hose, water, or any...
...extra caution when servicing them . • Keep children out of the mowing area and under the influence of inattention while operating the lawn mower may result in the rain. Keep children away - They are sharp. Clean the blade thoroughly and check its center ... personal injury. IMPORTANT SAFETY INSTRUCTIONS WARNING: READ AND UNDERSTAND ALL INSTRUCTIONS. Keep clear of lower end until the blade comes to clean the lawn mower, as water can result in serious injury or death. Avoid dangerous environment - Do not use a hose, water, or any...
Operation Manual
Page 8
... nuts, sticks, metal, wire, bones, toys, or other objects that may ricochet back toward roads, sidewalks, bystanders and the like. Never pull lawn mower by the blade. Poor footing could cause a slip and fall accident. Do not mow near drop-offs, ditches, or embankments.... and replace if damaged. Also, avoid discharging material against a wall or obstruction. Never place any part of lawn mower cord from power supply. • Thoroughly inspect the mower for any damage. • Replace the blade if it to a complete stop, and disconnect extension cord from...
... nuts, sticks, metal, wire, bones, toys, or other objects that may ricochet back toward roads, sidewalks, bystanders and the like. Never pull lawn mower by the blade. Poor footing could cause a slip and fall accident. Do not mow near drop-offs, ditches, or embankments.... and replace if damaged. Also, avoid discharging material against a wall or obstruction. Never place any part of lawn mower cord from power supply. • Thoroughly inspect the mower for any damage. • Replace the blade if it to a complete stop, and disconnect extension cord from...

Operation Manual
Page 9
... measures reduce the risk of starting the tool accidentally. Stop the unit and disconnect the extension cord from the power supply. Store idle lawn mower indoors - Carry or push the unit with the instructions, to operate this tool, loan them to them frequently and use...
... measures reduce the risk of starting the tool accidentally. Stop the unit and disconnect the extension cord from the power supply. Store idle lawn mower indoors - Carry or push the unit with the instructions, to operate this tool, loan them to them frequently and use...

Operation Manual
Page 13
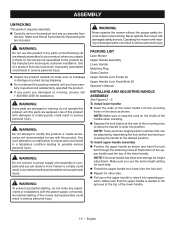
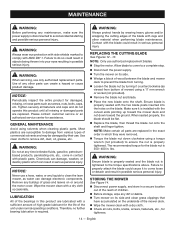
...this product requires an understanding of the information on the upper handle of the mower, engages and disengages the motor and blade. Height Adjustments 905 in . rear KNOW YOUR LAWN MOWER See Figure 1. HEIGHT ADJUSTMENT LEVER The height adjustment lever provides cutting height ... and safety rules. GRASS CATCHER The grass catcher collects grass clippings and prevents them from being discharged across your lawn as a knowledge of a button. CARRYING HANDLE The lawn mower has a carrying handle for finer clippings. 9 - front, 8 in . FEATURES PRODUCT SPECIFICATIONS Motor 120 V,...
...this product requires an understanding of the information on the upper handle of the mower, engages and disengages the motor and blade. Height Adjustments 905 in . rear KNOW YOUR LAWN MOWER See Figure 1. HEIGHT ADJUSTMENT LEVER The height adjustment lever provides cutting height ... and safety rules. GRASS CATCHER The grass catcher collects grass clippings and prevents them from being discharged across your lawn as a knowledge of a button. CARRYING HANDLE The lawn mower has a carrying handle for finer clippings. 9 - front, 8 in . FEATURES PRODUCT SPECIFICATIONS Motor 120 V,...
Operation Manual
Page 14
...matching holes at the top of the lower handle. Parts on the upper handle to raise it . Use of the mower during shipping. Operating the mower with damaged or missing parts could result in serious personal injury. Make sure you use the same height setting for ...that the upper handle is misuse and could result in place and working. n Inspect the product carefully to the desired position. PACKING LIST Lawn Mower Upper Handle Assembly Lower Handle Mulching Plug Grass Catcher Upper Handle Lock Knobs (2) Upper Handle Lock Knob Bolts (2) Operator's Manual INSTALLING AND ...
...matching holes at the top of the lower handle. Parts on the upper handle to raise it . Use of the mower during shipping. Operating the mower with damaged or missing parts could result in serious personal injury. Make sure you use the same height setting for ...that the upper handle is misuse and could result in place and working. n Inspect the product carefully to the desired position. PACKING LIST Lawn Mower Upper Handle Assembly Lower Handle Mulching Plug Grass Catcher Upper Handle Lock Knobs (2) Upper Handle Lock Knob Bolts (2) Operator's Manual INSTALLING AND ...
Operation Manual
Page 15
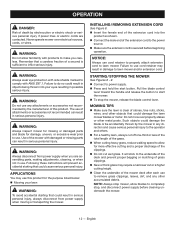
... the handles. INSTALLING THE MULCHING PLUG (FOR MULCHING OPERATION) See Figure 4. NOTE: When using the mower for the first time, raise the cutting position to 2 in . to the height best suited for your lawn. justment lever and move it at a slight angle, as shown. Push the mulching plug... the knobs on the height adjustment lever and move it toward the front of the mower. Connect to power supply when you are set to mow. Avoid pinching or trapping any power cords. The average lawn should be between 2 in. during hot months. To adjust the blade height: &#...
... the handles. INSTALLING THE MULCHING PLUG (FOR MULCHING OPERATION) See Figure 4. NOTE: When using the mower for the first time, raise the cutting position to 2 in . to the height best suited for your lawn. justment lever and move it at a slight angle, as shown. Push the mulching plug... the knobs on the height adjustment lever and move it toward the front of the mower. Connect to power supply when you are set to mow. Avoid pinching or trapping any power cords. The average lawn should be between 2 in. during hot months. To adjust the blade height: &#...
Operation Manual
Page 16
... and disconnect power supply before beginning operation. Use of the mower with products to lawn mower and/or extension cord. It will prevent accidental starting that could damage the blade or be accidentally thrown by the mower in serious personal injury. WARNING: Do not use any attachments...to properly attach extension cord to start button. Pull the blade control lever toward the handle and release the button to lawn mower. Never operate mower over property stakes or other accumulated debris. Following these instructions will stick to the underside of the deck and prevent ...
... and disconnect power supply before beginning operation. Use of the mower with products to lawn mower and/or extension cord. It will prevent accidental starting that could damage the blade or be accidentally thrown by the mower in serious personal injury. WARNING: Do not use any attachments...to properly attach extension cord to start button. Pull the blade control lever toward the handle and release the button to lawn mower. Never operate mower over property stakes or other accumulated debris. Following these instructions will stick to the underside of the deck and prevent ...
Operation Manual
Page 18
...or loose parts such as screws, nuts, bolts, caps, etc. Use clean cloths to prevent the blade from bottom of the mower deck. Wipe the mower clean with a dry cloth. Check all parts are replaced. Therefore, no further bearing lubrication is tightened to ... with a sufficient amount of the unit under normal operating conditions. WARNING: Always wear eye protection with side shields marked to clean the lawn mower, as viewed from turning. Loosen the blade nut by their use only authorized replacement parts. NOTICE: Periodically inspect the entire ...
...or loose parts such as screws, nuts, bolts, caps, etc. Use clean cloths to prevent the blade from bottom of the mower deck. Wipe the mower clean with a dry cloth. Check all parts are replaced. Therefore, no further bearing lubrication is tightened to ... with a sufficient amount of the unit under normal operating conditions. WARNING: Always wear eye protection with side shields marked to clean the lawn mower, as viewed from turning. Loosen the blade nut by their use only authorized replacement parts. NOTICE: Periodically inspect the entire ...

Operation Manual
Page 19
... blade if these conditions exist. Lower the handle assembly as described earlier in this manual. Store mower indoors in heavy grass, or cutting height too low. Cutting height set too low. Raise the cutting height. 15 - Connect ...to power supply. Mower not bagging properly. Lawn is unbalanced, excessively or unevenly worn. properly. Blade is rough or cutting height not set Adjust the cutting height. English underside of mower housing Raise cutting height. Mower vibrating at higher speed. MAINTENANCE &#...
... blade if these conditions exist. Lower the handle assembly as described earlier in this manual. Store mower indoors in heavy grass, or cutting height too low. Cutting height set too low. Raise the cutting height. 15 - Connect ...to power supply. Mower not bagging properly. Lawn is unbalanced, excessively or unevenly worn. properly. Blade is rough or cutting height not set Adjust the cutting height. English underside of mower housing Raise cutting height. Mower vibrating at higher speed. MAINTENANCE &#...
Parts Diagram
Page 3
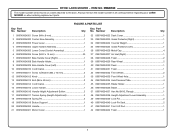
FIGURE A PARTS LIST Key Part Key Part No. Always mention the model number in all correspondence regarding your LAWN MOWER or when ordering replacement parts. Number Description Qty 1 099749004001 Screw (M4 x 8 mm 2 2 099749004002 Control Box Assembly 1 3 099749004003 Power Lever 1 4 099749004004 Upper Handle...Lever Assembly 1 39 099749004039 Lock Pin 2 40 099749004040 Lock Pin Seat 2 41 099749004041 Front Lift Rod 1 42 099749004042 Foam 1 3 ITEM NO. RYOBI LAWN MOWER - RYAC130 The model number will be found on a label attached to the deck. Number Description Qty No.
FIGURE A PARTS LIST Key Part Key Part No. Always mention the model number in all correspondence regarding your LAWN MOWER or when ordering replacement parts. Number Description Qty 1 099749004001 Screw (M4 x 8 mm 2 2 099749004002 Control Box Assembly 1 3 099749004003 Power Lever 1 4 099749004004 Upper Handle...Lever Assembly 1 39 099749004039 Lock Pin 2 40 099749004040 Lock Pin Seat 2 41 099749004041 Front Lift Rod 1 42 099749004042 Foam 1 3 ITEM NO. RYOBI LAWN MOWER - RYAC130 The model number will be found on a label attached to the deck. Number Description Qty No.
Parts Diagram
Page 4
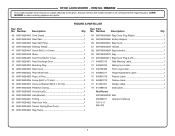
RYOBI LAWN MOWER - ITEM NO. RYAC130 The model number will be found on a label attached to the deck. Number Description Qty No. Always mention the model number in all correspondence regarding your LAWN MOWER or when ordering replacement parts. FIGURE A PARTS LIST Key Part Key Part No. Number Description Qty 43 099749004043 Cord Clamp 1 44 099749004044 Rear...
RYOBI LAWN MOWER - ITEM NO. RYAC130 The model number will be found on a label attached to the deck. Number Description Qty No. Always mention the model number in all correspondence regarding your LAWN MOWER or when ordering replacement parts. FIGURE A PARTS LIST Key Part Key Part No. Number Description Qty 43 099749004043 Cord Clamp 1 44 099749004044 Rear...
Parts Diagram
Page 5
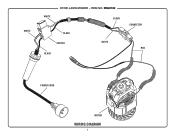
WHITE WHITE RYOBI LAWN MOWER - RYAC130 BLACK BLACK SWITCH BLACK WHITE CONNECTOR RED POWER CORD MOTOR WIRING DIAGRAM 5 ITEM NO.
WHITE WHITE RYOBI LAWN MOWER - RYAC130 BLACK BLACK SWITCH BLACK WHITE CONNECTOR RED POWER CORD MOTOR WIRING DIAGRAM 5 ITEM NO.


