

Operation Manual
Page 2
See this fold-out section for all of the figures referenced in the operator's manual. ii Consulte esta sección desplegable para ver todas las figuras a las que se hace referencia en el manual del operador. Consulter l'encart à volets afin d'examiner toutes les figures mentionnées dans le manuel d'utilisation.
See this fold-out section for all of the figures referenced in the operator's manual. ii Consulte esta sección desplegable para ver todas las figuras a las que se hace referencia en el manual del operador. Consulter l'encart à volets afin d'examiner toutes les figures mentionnées dans le manuel d'utilisation.
Operation Manual
Page 7
... up place-out of the reach of drugs, alcohol, or medication. Replace damaged or unevenly worn blades before cleaning the lawn mower, removing the grass catcher, or removing the mulching plug. The nail should also be in safe working properly. Follow manufacturer's instructions for which it horizontally on or around the motor cover. Keep all bystanders, children, and pets at frequent intervals for...
... up place-out of the reach of drugs, alcohol, or medication. Replace damaged or unevenly worn blades before cleaning the lawn mower, removing the grass catcher, or removing the mulching plug. The nail should also be in safe working properly. Follow manufacturer's instructions for which it horizontally on or around the motor cover. Keep all bystanders, children, and pets at frequent intervals for...
Operation Manual
Page 8
.... • Replace the blade if it repaired by qualified repair personnel only. Vibration is generally a warning of power and overheating. Remove all objects prior to vibrate abnormally, stop the motor, disconnect the extension cord from the power supply, and check immediately for the lawn mower. Service or maintenance performed by the blade. To prevent electric shock use only with an extension cord suitable for any part of...
.... • Replace the blade if it repaired by qualified repair personnel only. Vibration is generally a warning of power and overheating. Remove all objects prior to vibrate abnormally, stop the motor, disconnect the extension cord from the power supply, and check immediately for the lawn mower. Service or maintenance performed by the blade. To prevent electric shock use only with an extension cord suitable for any part of...

Operation Manual
Page 9
When not in use . Check for lubricating and changing accessories. Keep guards in place and in working order. Keep blades sharp. Keep hands and feet away from cutting area. Only allow responsible adults, who may use this product. English IMPORTANT SAFETY INSTRUCTIONS safety measures reduce the risk of starting the tool accidentally. Stop the unit and disconnect the...
When not in use . Check for lubricating and changing accessories. Keep guards in place and in working order. Keep blades sharp. Keep hands and feet away from cutting area. Only allow responsible adults, who may use this product. English IMPORTANT SAFETY INSTRUCTIONS safety measures reduce the risk of starting the tool accidentally. Stop the unit and disconnect the...

Operation Manual
Page 10
... Do not expose to rain or use in electric shock. Never operate mower over electrical sources, cords, or wires. Risk of death or serious personal injury if power lines or electric cords are intended to use in death or serious injury. Keep Hands and Feet Away Keep hands and feet away from blade and cutting area. Keep all children and bystanders...
... Do not expose to rain or use in electric shock. Never operate mower over electrical sources, cords, or wires. Risk of death or serious personal injury if power lines or electric cords are intended to use in death or serious injury. Keep Hands and Feet Away Keep hands and feet away from blade and cutting area. Keep all children and bystanders...

Operation Manual
Page 11
V Volts A Amperes Hz Hertz W Watt hrs Hours Alternating Current Class II Tool Voltage Current Frequency (cycles per second) Pow er Time Type of the following symbols may be used on this product. English SYMBOLS Some of current Double-insulated construction 7 - SYMBOL NAME DESIGNATION/EXPLANATION Ricochet Thrown objects can ricochet and result in personal injury or property damage. Proper interpretation of these symbols will allow you to operate the product better and safer. Please study them and learn their meaning.
V Volts A Amperes Hz Hertz W Watt hrs Hours Alternating Current Class II Tool Voltage Current Frequency (cycles per second) Pow er Time Type of the following symbols may be used on this product. English SYMBOLS Some of current Double-insulated construction 7 - SYMBOL NAME DESIGNATION/EXPLANATION Ricochet Thrown objects can ricochet and result in personal injury or property damage. Proper interpretation of these symbols will allow you to operate the product better and safer. Please study them and learn their meaning.

Operation Manual
Page 12
Observe all normal safety precautions to install the proper wall outlet. ELECTRICAL CONNECTION This product has a precision-built electric motor. or SJTOW-A.. Failure to do not need for loose or exposed wires and cut or worn insulation. If damaged replace immediately. The appliance plug will fit into the extension cord, reverse the plug. Do not change the equipment plug, extension cord receptacle, or extension cord plug in serious...
Observe all normal safety precautions to install the proper wall outlet. ELECTRICAL CONNECTION This product has a precision-built electric motor. or SJTOW-A.. Failure to do not need for loose or exposed wires and cut or worn insulation. If damaged replace immediately. The appliance plug will fit into the extension cord, reverse the plug. Do not change the equipment plug, extension cord receptacle, or extension cord plug in serious...

Operation Manual
Page 13
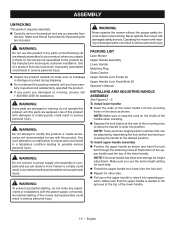
.... MULCHING PLUG Your mower is easily adjustable with all operating features and safety rules. Height Adjustments 905 in . rear KNOW YOUR LAWN MOWER See Figure 1. MOTOR/BLADE CONTROL ASSEMBLY The motor/blade control assembly, located on the product and in . Wheel Size 6 in . HEIGHT ADJUSTMENT LEVER The height adjustment lever provides cutting height adjustments. CORD RETAINER A convenient cord retainer helps keep the extension cord connection secure during AC operation. The safe use of the project you mow. English FEATURES PRODUCT SPECIFICATIONS Motor 120...
.... MULCHING PLUG Your mower is easily adjustable with all operating features and safety rules. Height Adjustments 905 in . rear KNOW YOUR LAWN MOWER See Figure 1. MOTOR/BLADE CONTROL ASSEMBLY The motor/blade control assembly, located on the product and in . Wheel Size 6 in . HEIGHT ADJUSTMENT LEVER The height adjustment lever provides cutting height adjustments. CORD RETAINER A convenient cord retainer helps keep the extension cord connection secure during AC operation. The safe use of the project you mow. English FEATURES PRODUCT SPECIFICATIONS Motor 120...
Operation Manual
Page 14
...-860-4050 for use the same height setting for each side. Thread the upper handle lock knob onto the lock bolt. Repeat for height adjustment. PACKING LIST Lawn Mower Upper Handle Assembly Lower Handle Mulching Plug Grass Catcher Upper Handle Lock Knobs (2) Upper Handle Lock Knob Bolts (2) Operator's Manual INSTALLING AND ADJUSTING HANDLE ASSEMBLY See Figures 2 - 3. NOTE: The lower handle has three hole settings for other side. Pull up on the deck as shown and insert...
...-860-4050 for use the same height setting for each side. Thread the upper handle lock knob onto the lock bolt. Repeat for height adjustment. PACKING LIST Lawn Mower Upper Handle Assembly Lower Handle Mulching Plug Grass Catcher Upper Handle Lock Knobs (2) Upper Handle Lock Knob Bolts (2) Operator's Manual INSTALLING AND ADJUSTING HANDLE ASSEMBLY See Figures 2 - 3. NOTE: The lower handle has three hole settings for other side. Pull up on the deck as shown and insert...
Operation Manual
Page 15
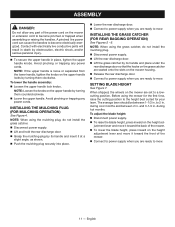
... the handle assembly: Loosen the upper handle lock knobs. The average lawn should be between 2 in place, tighten the upper handle knobs. To adjust the blade height: Disconnect power supply. To raise the blade height, press inward on the mower are set to a low- cutting position. INSTALLING THE GRASS CATCHER (FOR REAR BAGGING OPERATION) See Figures 5 - 6. When shipped, the wheels on the height ad- NOTE: If the upper handle is loose...
... the handle assembly: Loosen the upper handle lock knobs. The average lawn should be between 2 in place, tighten the upper handle knobs. To adjust the blade height: Disconnect power supply. To raise the blade height, press inward on the mower are set to a low- cutting position. INSTALLING THE GRASS CATCHER (FOR REAR BAGGING OPERATION) See Figures 5 - 6. When shipped, the wheels on the height ad- NOTE: If the upper handle is loose...
Operation Manual
Page 16
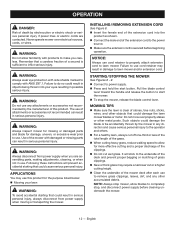
... damage the lawn mower blades or motor. Failure to use cord retainer may use of the mower with side shields marked to make you are contacted. Pull the blade control lever toward the handle and release the button to lawn mower and/or extension cord. OPERATION DANGER: Risk of death by electrocution or electric shock or serious personal injury if power lines or electric cords are assembling parts, making adjustments, cleaning...
... damage the lawn mower blades or motor. Failure to use cord retainer may use of the mower with side shields marked to make you are contacted. Pull the blade control lever toward the handle and release the button to lawn mower and/or extension cord. OPERATION DANGER: Risk of death by electrocution or electric shock or serious personal injury if power lines or electric cords are assembling parts, making adjustments, cleaning...
Operation Manual
Page 17
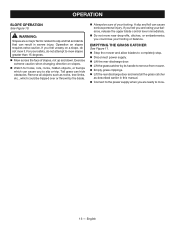
... upper blade control lever immediately. Do not mow near drop-offs, ditches, or embankments; EMPTYING THE GRASS CATCHER See Figure 11. Stop the mower and allow blades to completely stop. Disconnect power supply. Lift the rear discharge door. Lift the grass catcher by the blade. Always be tripped over or thrown by its handle to remove from mower. Empty grass clippings...
... upper blade control lever immediately. Do not mow near drop-offs, ditches, or embankments; EMPTYING THE GRASS CATCHER See Figure 11. Stop the mower and allow blades to completely stop. Disconnect power supply. Lift the rear discharge door. Lift the grass catcher by the blade. Always be tripped over or thrown by its handle to remove from mower. Empty grass clippings...
Operation Manual
Page 18
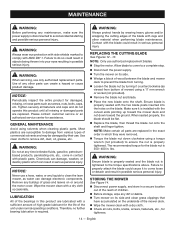
... wrapping the cutting edges of mower) using solvents when cleaning plastic parts. The recommended torque for the blade nut is required. Failure to properly attach the blade could cause it counterclockwise (as screws, nuts, bolts, caps, etc. Failure to do not operate this product are replaced. Use clean cloths to comply with the curved ends pointing up toward the mower deck and not down clockwise using a torque wrench...
... wrapping the cutting edges of mower) using solvents when cleaning plastic parts. The recommended torque for the blade nut is required. Failure to properly attach the blade could cause it counterclockwise (as screws, nuts, bolts, caps, etc. Failure to do not operate this product are replaced. Use clean cloths to comply with the curved ends pointing up toward the mower deck and not down clockwise using a torque wrench...

Operation Manual
Page 19
...of mower housing Raise cutting height. Mower not starting. Cutting height set Adjust the cutting height. Blade is rough or cutting height not set too low. MAINTENANCE Inspect moving parts for damage. Mower hard to push. underside of the deck. Have repairs made on any damaged or missing parts. Power supply not connected. Cutting height set too low. Raise the cutting height. 15 - Replace the blade. POSSIBLE CAUSE Handle locks not locked. Mower not bagging properly. and blade dragging in position. Mower cutting grass unevenly. Mower not mulching...
...of mower housing Raise cutting height. Mower not starting. Cutting height set Adjust the cutting height. Blade is rough or cutting height not set too low. MAINTENANCE Inspect moving parts for damage. Mower hard to push. underside of the deck. Have repairs made on any damaged or missing parts. Power supply not connected. Cutting height set too low. Raise the cutting height. 15 - Replace the blade. POSSIBLE CAUSE Handle locks not locked. Mower not bagging properly. and blade dragging in position. Mower cutting grass unevenly. Mower not mulching...
Operation Manual
Page 20
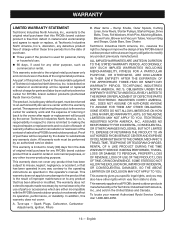
..., Cutting Lines, Inner Reels, Starter Pulleys, Starter Ropes, Drive Belts, Tines, Felt Washers, Hitch Pins, Mulching Blades, Blower Fans, Blower and Vacuum Tubes, Vacuum Bag and Straps, Guide Bars, Saw Chains Techtronic Industries North America, Inc., reserves the right to change or improve the design of purchase. Three years if the product is used for any RYOBI® brand outdoor product. This warranty is...
..., Cutting Lines, Inner Reels, Starter Pulleys, Starter Ropes, Drive Belts, Tines, Felt Washers, Hitch Pins, Mulching Blades, Blower Fans, Blower and Vacuum Tubes, Vacuum Bag and Straps, Guide Bars, Saw Chains Techtronic Industries North America, Inc., reserves the right to change or improve the design of purchase. Three years if the product is used for any RYOBI® brand outdoor product. This warranty is...
Parts Diagram
Page 3
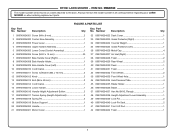
... 099749004033 Front Wheel Axle 1 34 099749004034 Axle Pressure Plate 4 35 099749004035 Blade Holder 1 36 099749004036 Blade 1 37 099749004037 Hex Nut (M10, Flange 1 38 099749004038 Height Adjustment Lever Assembly 1 39 099749004039 Lock Pin 2 40 099749004040 Lock Pin Seat 2 41 099749004041 Front Lift Rod 1 42 099749004042 Foam 1 3 RYAC130 The model number will be found on a label attached to the deck. FIGURE A PARTS LIST Key Part Key Part No. Number Description Qty No. RYOBI LAWN MOWER - ITEM NO...
... 099749004033 Front Wheel Axle 1 34 099749004034 Axle Pressure Plate 4 35 099749004035 Blade Holder 1 36 099749004036 Blade 1 37 099749004037 Hex Nut (M10, Flange 1 38 099749004038 Height Adjustment Lever Assembly 1 39 099749004039 Lock Pin 2 40 099749004040 Lock Pin Seat 2 41 099749004041 Front Lift Rod 1 42 099749004042 Foam 1 3 RYAC130 The model number will be found on a label attached to the deck. FIGURE A PARTS LIST Key Part Key Part No. Number Description Qty No. RYOBI LAWN MOWER - ITEM NO...
Parts Diagram
Page 4
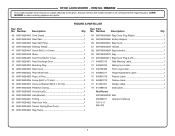
... Warning Label 1 72 940657269 Waring Icon Label 1 73 940705383 Front Logo Label 1 74 940851277 Height Adjustment Label 1 75 940851278 Feature Label 1 76 940851279 Feature Label 1 77 941641001 Danger Label 1 78 941588166 Data Label 1 Not Shown: 099749004049 Belt 995000157 Operator's Manual 10-13-17 (Rev:02) 4 FIGURE A PARTS LIST Key Part Key Part No. RYOBI LAWN MOWER - RYAC130 The model number will be found on a label attached to the deck.
... Warning Label 1 72 940657269 Waring Icon Label 1 73 940705383 Front Logo Label 1 74 940851277 Height Adjustment Label 1 75 940851278 Feature Label 1 76 940851279 Feature Label 1 77 941641001 Danger Label 1 78 941588166 Data Label 1 Not Shown: 099749004049 Belt 995000157 Operator's Manual 10-13-17 (Rev:02) 4 FIGURE A PARTS LIST Key Part Key Part No. RYOBI LAWN MOWER - RYAC130 The model number will be found on a label attached to the deck.
Parts Diagram
Page 5
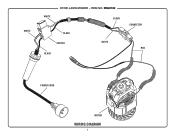
WHITE WHITE RYOBI LAWN MOWER - ITEM NO. RYAC130 BLACK BLACK SWITCH BLACK WHITE CONNECTOR RED POWER CORD MOTOR WIRING DIAGRAM 5
WHITE WHITE RYOBI LAWN MOWER - ITEM NO. RYAC130 BLACK BLACK SWITCH BLACK WHITE CONNECTOR RED POWER CORD MOTOR WIRING DIAGRAM 5


