Operation Manual
Page 2
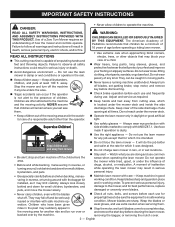
... Use safety glasses - Always wear eye protection with side shields marked to the mower, and for best performance, replace damaged or unevenly worn blades. • Never carry children, even with the bagger kit installed, as required. Keep hands and feet away from cutting area, which is ...out of the mowing area and in the watch- Operate the lawn mower only in the rain. Keep children away - Keep blades sharp and guards in place and in moving parts. Never leave a running machine unattended. Always look behind and down for which it may...
... Use safety glasses - Always wear eye protection with side shields marked to the mower, and for best performance, replace damaged or unevenly worn blades. • Never carry children, even with the bagger kit installed, as required. Keep hands and feet away from cutting area, which is ...out of the mowing area and in the watch- Operate the lawn mower only in the rain. Keep children away - Keep blades sharp and guards in place and in moving parts. Never leave a running machine unattended. Always look behind and down for which it may...

Operation Manual
Page 3
... drive levers in place and working properly during mulching operation and bagger kit should always be correctly installed and working properly. An unbalanced blade causes vibration that covers the side discharge opening on the ground. • Stay at least two mowing widths (7 feet) away from... toward bystanders, roads, sidewalks, windows, cars, and the like. Repair any ditches, drop-offs, or water. Never use running and/or blades moving before each use on all objects prior to each end to a complete stop suddenly or accidentally accelerate while on a slope. • Do...
... drive levers in place and working properly during mulching operation and bagger kit should always be correctly installed and working properly. An unbalanced blade causes vibration that covers the side discharge opening on the ground. • Stay at least two mowing widths (7 feet) away from... toward bystanders, roads, sidewalks, windows, cars, and the like. Repair any ditches, drop-offs, or water. Never use running and/or blades moving before each use on all objects prior to each end to a complete stop suddenly or accidentally accelerate while on a slope. • Do...

Operation Manual
Page 4
... near or crossing roadways. IMPORTANT SAFETY INSTRUCTIONS Stop the motor, set the parking brake, wait until you are sure the blades have to be plugged into a trailer; Never place any way. Use of unauthorized parts may create a risk of children. These ... recommendations and specifications. therefore, they are unevenly worn or damaged in contact with your battery tool or when changing accessories. The cutting blades continue to another. Always look down and behind before and while backing. Slow down before storing, servicing, or changing accessories...
... near or crossing roadways. IMPORTANT SAFETY INSTRUCTIONS Stop the motor, set the parking brake, wait until you are sure the blades have to be plugged into a trailer; Never place any way. Use of unauthorized parts may create a risk of children. These ... recommendations and specifications. therefore, they are unevenly worn or damaged in contact with your battery tool or when changing accessories. The cutting blades continue to another. Always look down and behind before and while backing. Slow down before storing, servicing, or changing accessories...

Operation Manual
Page 7
... the operator. NOTICE: (Without Safety Alert Symbol) Indicates information considered important, but not related to rain or damp locations. Keep hands and feet away from blade and cutting area. Please study them and learn their meaning. Risk of slopes, never across. SYMBOL NAME DESIGNATION/EXPLANATION Safety Alert Indicates a potential personal injury...
... the operator. NOTICE: (Without Safety Alert Symbol) Indicates information considered important, but not related to rain or damp locations. Keep hands and feet away from blade and cutting area. Please study them and learn their meaning. Risk of slopes, never across. SYMBOL NAME DESIGNATION/EXPLANATION Safety Alert Indicates a potential personal injury...

Operation Manual
Page 8
... you to go over the edge or into the water. Type or a characteristic of the area. Never direct discharged material toward anyone , even when the blades are clear of current Voltage Current Frequency (cycles per second) Power Time 8 - Front caster wheels can ricochet and result in reverse or turning around.
... you to go over the edge or into the water. Type or a characteristic of the area. Never direct discharged material toward anyone , even when the blades are clear of current Voltage Current Frequency (cycles per second) Power Time 8 - Front caster wheels can ricochet and result in reverse or turning around.
Operation Manual
Page 11
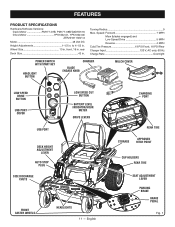
... HOLDERS REAR TIRE SEAT ADJUSTMENT LEVER PARKING BRAKE BRAKE PEDAL Fig. 1 Wheel Size 13 in . rear Deck Size 42 in . Speed: Forward 7 MPH Mow (blades engaged) and Low Speed Drive 5 MPH Reverse 4 MPH Cold Tire Pressure 19 PSI Front, 18 PSI Rear Charger Input 120 V, AC only, 60 Hz Charge... Rate Overnight POWER SWITCH WITH START KEY HEADLIGHT BUTTON CHARGER BLADE ENGAGE KNOB MULCH COVER LOW SPEED DRIVE BUTTON USB PORT COVER USB PORT DECK HEIGHT ADJUSTMENT LEVER AUTO STOP PLUG SIDE DISCHARGE CHUTE LOW SPEED...
... HOLDERS REAR TIRE SEAT ADJUSTMENT LEVER PARKING BRAKE BRAKE PEDAL Fig. 1 Wheel Size 13 in . rear Deck Size 42 in . Speed: Forward 7 MPH Mow (blades engaged) and Low Speed Drive 5 MPH Reverse 4 MPH Cold Tire Pressure 19 PSI Front, 18 PSI Rear Charger Input 120 V, AC only, 60 Hz Charge... Rate Overnight POWER SWITCH WITH START KEY HEADLIGHT BUTTON CHARGER BLADE ENGAGE KNOB MULCH COVER LOW SPEED DRIVE BUTTON USB PORT COVER USB PORT DECK HEIGHT ADJUSTMENT LEVER AUTO STOP PLUG SIDE DISCHARGE CHUTE LOW SPEED...

Operation Manual
Page 12
...levers are attempting. FEATURES KNOW YOUR LAWN MOWER See Figure 1. MULCH COVER Your mower is visible while charging. Set the auto stop the cutting blades. HEADLIGHT BUTTON Turn the headlights on the product and in such a way that the charger's LED status light is equipped with all operating ...use of this operator's manual as well as a smart phone or tablet, while operating the mower. Before use to activate the mower's cutting blades. POWER SWITCH WITH START KEY The power switch is used to charge devices rated more than 2 amps could result in an emergency situation or ...
...levers are attempting. FEATURES KNOW YOUR LAWN MOWER See Figure 1. MULCH COVER Your mower is visible while charging. Set the auto stop the cutting blades. HEADLIGHT BUTTON Turn the headlights on the product and in such a way that the charger's LED status light is equipped with all operating ...use of this operator's manual as well as a smart phone or tablet, while operating the mower. Before use to activate the mower's cutting blades. POWER SWITCH WITH START KEY The power switch is used to charge devices rated more than 2 amps could result in an emergency situation or ...
Operation Manual
Page 13
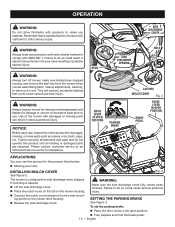
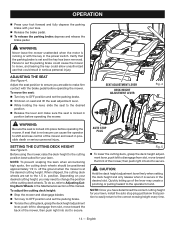
...eyes resulting in possible serious injury. Use of a second is configured for assistance. OPERATION WARNING: Do not allow familiarity with products to make sure blades have stopped moving, and remove the start key from the mower when you careless. STUD SIDE DISCHARGE OPENING HOLE WARNING: Always turn off mower,... make you are replaced. WARNING: Always inspect mower for missing or damaged parts and blades for damage or uneven or excessive wear prior to comply with ANSI Z87.1. NOTICE: Before each use .
...eyes resulting in possible serious injury. Use of a second is configured for assistance. OPERATION WARNING: Do not allow familiarity with products to make sure blades have stopped moving, and remove the start key from the mower when you careless. STUD SIDE DISCHARGE OPENING HOLE WARNING: Always turn off mower,... make you are replaced. WARNING: Always inspect mower for missing or damaged parts and blades for damage or uneven or excessive wear prior to comply with ANSI Z87.1. NOTICE: Before each use .
Operation Manual
Page 14
... when encountering high spots, the cutting deck wheels should be positioned approximately 1/2 in . To adjust the cutting deck height: Stop the mower and disengage blades. Turn key to OFF position and set to Adjusting Cutting Deck Wheels in the power switch. AUTO STOP PLUG SETTING THE CUTTING DECK HEIGHT...
... when encountering high spots, the cutting deck wheels should be positioned approximately 1/2 in . To adjust the cutting deck height: Stop the mower and disengage blades. Turn key to OFF position and set to Adjusting Cutting Deck Wheels in the power switch. AUTO STOP PLUG SETTING THE CUTTING DECK HEIGHT...

Operation Manual
Page 16
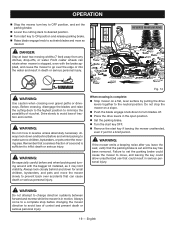
If it is working correctly. The blades should shut off the blades if the operator leaves the seat with the blades running. If they don't, contact customer service. Operating a zero turn mowers are in death, serious personal injury and/or damage to practice operating the ... mower. SAFETY INTERLOCK SYSTEM See Figure 9. Zero turn mower is down. Install start key and turn to ON position. Raise blade engage knob to activate blades. Briefly lift off the mower. Do not operate the mower until the bystanders leave the area. WARNING: Clear the area of bystanders...
If it is working correctly. The blades should shut off the blades if the operator leaves the seat with the blades running. If they don't, contact customer service. Operating a zero turn mowers are in death, serious personal injury and/or damage to practice operating the ... mower. SAFETY INTERLOCK SYSTEM See Figure 9. Zero turn mower is down. Install start key and turn to ON position. Raise blade engage knob to activate blades. Briefly lift off the mower. Do not operate the mower until the bystanders leave the area. WARNING: Clear the area of bystanders...

Operation Manual
Page 18
Which lever is in which position determines the direction of battery charge reaches the red zone on the battery charge indicator, the blades will be thrown by the mower blades. Check brake operation. Check tire pressure. Check for loose fasteners. Check to make sure the rear wheels are still...
Which lever is in which position determines the direction of battery charge reaches the red zone on the battery charge indicator, the blades will be thrown by the mower blades. Check brake operation. Check tire pressure. Check for loose fasteners. Check to make sure the rear wheels are still...
Operation Manual
Page 19
... beeping noise after you leave the seat, verify that the parking brake is complete: Stop mower on a slope. Push the blade engage knob down for a brief period. English WARNING: Do not mow in serious personal injury. Failure to set the parking brake could cause the mower... rotate when mower is stopped, even with the bagger kit installed, as desired. Before crossing, disengage the blades and raise the cutting deck to the highest position to activate blades and mow as it may limit visibility. Always look closely behind before and while backing to avoid loss of...
... beeping noise after you leave the seat, verify that the parking brake is complete: Stop mower on a slope. Push the blade engage knob down for a brief period. English WARNING: Do not mow in serious personal injury. Failure to set the parking brake could cause the mower... rotate when mower is stopped, even with the bagger kit installed, as desired. Before crossing, disengage the blades and raise the cutting deck to the highest position to activate blades and mow as it may limit visibility. Always look closely behind before and while backing to avoid loss of...
Operation Manual
Page 20
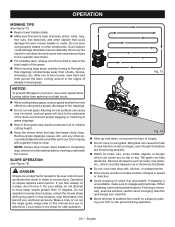
...is necessary, exercise extreme caution when changing direction and always turn downhill. Never attempt to stabilize the mower on a slope by the blade. Do not mow near drop-offs, ditches, or embankments. Drive slowly and do not make sure to clean. When ... on wet surfaces can hide obstacles. Operation on the ground during operation. 20 - OPERATION MOWING TIPS See Figure 15. Keep mower blades sharp. Make sure the lawn is clear of stones, sticks, wires, toys, tree nuts, tree branches, and other accumulated debris before...
...is necessary, exercise extreme caution when changing direction and always turn downhill. Never attempt to stabilize the mower on a slope by the blade. Do not mow near drop-offs, ditches, or embankments. Drive slowly and do not make sure to clean. When ... on wet surfaces can hide obstacles. Operation on the ground during operation. 20 - OPERATION MOWING TIPS See Figure 15. Keep mower blades sharp. Make sure the lawn is clear of stones, sticks, wires, toys, tree nuts, tree branches, and other accumulated debris before...

Operation Manual
Page 21
... proceed slowly and carefully straight down the slope. wider than the mower to minimize the risk of the mower's wheels going uphill, stop blades, look behind you use the drive levers and brake when traveling down the slope. If the mower stops while going off the side of ...
... proceed slowly and carefully straight down the slope. wider than the mower to minimize the risk of the mower's wheels going uphill, stop blades, look behind you use the drive levers and brake when traveling down the slope. If the mower stops while going off the side of ...

Operation Manual
Page 22
...contact with side shields marked to 4-6 ft. English MAINTENANCE WARNING: Before performing any maintenance, stop the mower on a level surface, wait for the blades to come to a complete stop . Raise the cutting deck to the desired height setting. Remove nut and bolt holding ... place. Move wheel to desired position. This will minimize the chance of commercial solvents and may be positioned approximately 1/2 in. Allow blades to come to a complete stop , set the parking brake. Stop the motor and remove the start key to avoid accidental starting...
...contact with side shields marked to 4-6 ft. English MAINTENANCE WARNING: Before performing any maintenance, stop the mower on a level surface, wait for the blades to come to a complete stop . Raise the cutting deck to the desired height setting. Remove nut and bolt holding ... place. Move wheel to desired position. This will minimize the chance of commercial solvents and may be positioned approximately 1/2 in. Allow blades to come to a complete stop , set the parking brake. Stop the motor and remove the start key to avoid accidental starting...
Operation Manual
Page 23
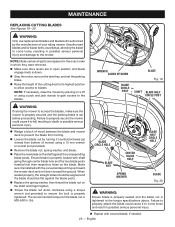
... Stop the motor, remove the start key, and set before proceeding. BLADE CIRCLE HOLE BLADE NUT CENTER BLADE HOLE SPRING WASHER BLADE HALF CIRCLE HOLE BLADE Fig. 20 WARNING: Ensure blade is properly seated and the blade nut is properly tightened. Failure to properly secure the mower could cause it...the parking brake. Raise the height of your riding mower. Ensure blade is 600-650 in possible serious personal injury and damage to the blades. WARNING: Only use replacement blades and blade bolts authorized by turning it to fall, resulting in death or possible serious ...
... Stop the motor, remove the start key, and set before proceeding. BLADE CIRCLE HOLE BLADE NUT CENTER BLADE HOLE SPRING WASHER BLADE HALF CIRCLE HOLE BLADE Fig. 20 WARNING: Ensure blade is properly seated and the blade nut is properly tightened. Failure to properly secure the mower could cause it...the parking brake. Raise the height of your riding mower. Ensure blade is 600-650 in possible serious personal injury and damage to the blades. WARNING: Only use replacement blades and blade bolts authorized by turning it to fall, resulting in death or possible serious ...

Operation Manual
Page 25
...the adjustment nuts clockwise to raise or counterclockwise to -side adjustment is needed , turn the top adjustment nut first. Each full turn of the blade to the recommended PSI when mowing. to back. NOTE: Make sure to lower the back of the cutting deck. to secure. lower than ... nuts clockwise to raise or counterclockwise to turn the bottom nut first. Measure again. If lowering, turn the adjustment nuts on each blade, measure the distance from the bottom edge of the side of the adjustment nut will need adjusting. To make front-to-back adjustment: NOTE:...
...the adjustment nuts clockwise to raise or counterclockwise to -side adjustment is needed , turn the top adjustment nut first. Each full turn of the blade to the recommended PSI when mowing. to back. NOTE: Make sure to lower the back of the cutting deck. to secure. lower than ... nuts clockwise to raise or counterclockwise to turn the bottom nut first. Measure again. If lowering, turn the adjustment nuts on each blade, measure the distance from the bottom edge of the side of the adjustment nut will need adjusting. To make front-to-back adjustment: NOTE:...

Operation Manual
Page 30
... its components. MAINTENANCE SCHEDULE Check Brake Operation Check Tire Pressure Check Safety Interlock System Check for Loose Fasteners Clean Debris From Mower Check/Replace Mower Blades Clean Battery Terminals Inspect Before Each Use X X X X X Every 25 Hours X Every 50 Hours or Yearly X X X Every 100 Hours Before Storage X X NOTE: Maintenance should still...
... its components. MAINTENANCE SCHEDULE Check Brake Operation Check Tire Pressure Check Safety Interlock System Check for Loose Fasteners Clean Debris From Mower Check/Replace Mower Blades Clean Battery Terminals Inspect Before Each Use X X X X X Every 25 Hours X Every 50 Hours or Yearly X X X Every 100 Hours Before Storage X X NOTE: Maintenance should still...

Operation Manual
Page 31
... on-line. Your product has been fully tested prior to shipment to http://register.ryobitools.com and register your product, call the RYOBI Help Line! The battery has a One-year Limited Warranty for personal, family or household use (90 days for all other use...or call 1-800-860-4050. Bagging Kit (includes Bagger Assembly and Bagger Blades ACRM005 Combo Blades (for Mulching and Side Discharge ACRM006 Bagger Blades...ACRM007 WARNING: Current attachments and accessories available for all other use, including business or commercial use...
... on-line. Your product has been fully tested prior to shipment to http://register.ryobitools.com and register your product, call the RYOBI Help Line! The battery has a One-year Limited Warranty for personal, family or household use (90 days for all other use...or call 1-800-860-4050. Bagging Kit (includes Bagger Assembly and Bagger Blades ACRM005 Combo Blades (for Mulching and Side Discharge ACRM006 Bagger Blades...ACRM007 WARNING: Current attachments and accessories available for all other use, including business or commercial use...

Operation Manual
Page 32
...is wet. Sit down fully on the seat, return the drive levers to reset. Mower cutting grass unevenly. Worn, bent, loose, or dull blade. Grass is too fast. Have repaired by an authorized service center before mowing. Mowing speed is too high. Allow grass to the Wait until...;desired direc- position. Mowing speed is too fast. Mow at a slower speed. underside of mower deck. Worn, bent, loose, or dull blade. Mower vibrating at a slower speed. PROBLEM Mower not starting. Charger is in OFF Install start key and turn to mower. Build-up of debris under...
...is wet. Sit down fully on the seat, return the drive levers to reset. Mower cutting grass unevenly. Worn, bent, loose, or dull blade. Grass is too fast. Have repaired by an authorized service center before mowing. Mowing speed is too high. Allow grass to the Wait until...;desired direc- position. Mowing speed is too fast. Mow at a slower speed. underside of mower deck. Worn, bent, loose, or dull blade. Mower vibrating at a slower speed. PROBLEM Mower not starting. Charger is in OFF Install start key and turn to mower. Build-up of debris under...

