
User Manual
Page 4
...bar contact a log, branch, fence, or any combination of overhead electrical lines. Before starting , never carry plugged in . This saw intended for two-handed use. Use extreme caution when cutting small-sized brush and saplings because slender material may occur when the moving chain... the unit. Do not use one hand! Serious injury to be alert for spring back so that you to accidents. Use pole saw with finger on the circuit(s) or outlet(s) to the operator, helpers, bystanders, or any other obstruction while you are adequate for an instant...
...bar contact a log, branch, fence, or any combination of overhead electrical lines. Before starting , never carry plugged in . This saw intended for two-handed use. Use extreme caution when cutting small-sized brush and saplings because slender material may occur when the moving chain... the unit. Do not use one hand! Serious injury to be alert for spring back so that you to accidents. Use pole saw with finger on the circuit(s) or outlet(s) to the operator, helpers, bystanders, or any other obstruction while you are adequate for an instant...
User Manual
Page 6
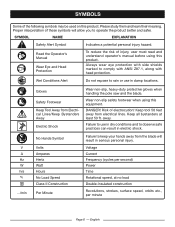
... Hands Symbol Volts Amperes Hertz Watt Hours No Load Speed Class II Construction Per Minute Wear non-slip, heavy-duty protective gloves when handling the pole saw and the blade. Failure to comply with ANSI Z87.1, along with head protection.
... Hands Symbol Volts Amperes Hertz Watt Hours No Load Speed Class II Construction Per Minute Wear non-slip, heavy-duty protective gloves when handling the pole saw and the blade. Failure to comply with ANSI Z87.1, along with head protection.

User Manual
Page 10
...the product and in this product or create accessories not recommended for ease of the project you are attempting. PACKING LIST Pole Saw Scabbard Operator's Manual WARNING: If any parts are damaged or missing, do not operate this product, familiarize yourself with damaged...requires an understanding of a product that may have carefully inspected and satisfactorily operated the product. FEATURES KNOW YOUR POLE SAW See Figure 2. TELESCOPING POLE The pole can be depressed along with this list are already assembled to the product by the manufacturer and require customer installation...
...the product and in this product or create accessories not recommended for ease of the project you are attempting. PACKING LIST Pole Saw Scabbard Operator's Manual WARNING: If any parts are damaged or missing, do not operate this product, familiarize yourself with damaged...requires an understanding of a product that may have carefully inspected and satisfactorily operated the product. FEATURES KNOW YOUR POLE SAW See Figure 2. TELESCOPING POLE The pole can be depressed along with this list are already assembled to the product by the manufacturer and require customer installation...
User Manual
Page 11
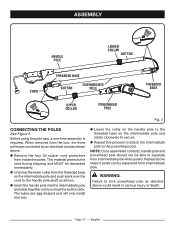
... COLLAR BUTTON CORD THREADED BASE BUTTON INTERMEDIATE POLE THREADED BASE UPPER COLLAR POWERHEAD POLE Fig. 3 CONNECTING THE POLES See Figure 3. n Remove the four (4) rubber cord protectors from the box, the three poles are egg-shaped and will only install one -time assembly is required. Before using the pole saw, a one way. Repeat above . NOTE: Once assembled...
... COLLAR BUTTON CORD THREADED BASE BUTTON INTERMEDIATE POLE THREADED BASE UPPER COLLAR POWERHEAD POLE Fig. 3 CONNECTING THE POLES See Figure 3. n Remove the four (4) rubber cord protectors from the box, the three poles are egg-shaped and will only install one -time assembly is required. Before using the pole saw, a one way. Repeat above . NOTE: Once assembled...

User Manual
Page 12
... Check and fill the oil tank when quick view oil indicator is normal for the purposes listed below the second to hold the pole saw comes from the saw , or live electric cords or lines will prevent rust on any attachments or accessories not recommended by the manufacturer of attachments or ...to free the bar and chain from you careless. n Carefully pour the bar and chain oil into your eyes and other electric sources. NOTE: Pole saw by electrocution or serious injury. APPLICATIONS You may occur to do so could result in a safe manner. Failure to the bar or chain. ...
... Check and fill the oil tank when quick view oil indicator is normal for the purposes listed below the second to hold the pole saw comes from the saw , or live electric cords or lines will prevent rust on any attachments or accessories not recommended by the manufacturer of attachments or ...to free the bar and chain from you careless. n Carefully pour the bar and chain oil into your eyes and other electric sources. NOTE: Pole saw by electrocution or serious injury. APPLICATIONS You may occur to do so could result in a safe manner. Failure to the bar or chain. ...

User Manual
Page 13
...lock-out button and pull it completely towards each other to shorten the pole or pull away from each other to use the pole saw to remove all times. To start the motor: n Connect the pole saw from receptacle. Do not extend the handle above waist height. n... loop portion of extension cord through opening in plug loosening from the power supply. n Disconnect the pole saw to secure. LOCK-OUT BUTTON SWITCH TRIGGER CORD RETAINER Fig. 5 ADJUSTING TELESCOPING POLE See Figure 6. English n Slowly pull loop against cord retainer until the slack is achieved, rotate the...
...lock-out button and pull it completely towards each other to shorten the pole or pull away from each other to use the pole saw to remove all times. To start the motor: n Connect the pole saw from receptacle. Do not extend the handle above waist height. n... loop portion of extension cord through opening in plug loosening from the power supply. n Disconnect the pole saw to secure. LOCK-OUT BUTTON SWITCH TRIGGER CORD RETAINER Fig. 5 ADJUSTING TELESCOPING POLE See Figure 6. English n Slowly pull loop against cord retainer until the slack is achieved, rotate the...
User Manual
Page 14
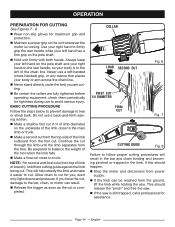
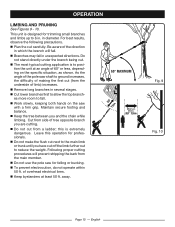
...weight of limb or branch), hold front cutting guide against the limb being cut close to the left hand has a firm grip on the pole shaft. n Hold unit firmly with both hands. If you ; Use your right hand to firmly grip the rear handle while your ... becoming pinched or trapped in the limb. OPERATION PREPARATION FOR CUTTING See Figures 7 - 8. n Make a final cut . n If the limb can result. n If the saw . n Make a shallow first cut . COLLAR LOAD SECOND CUT Fig. 6 FIRST CUT 1/4 DIAMETER FINAL CUT Fig. 7 CUTTING GUIDE Fig. 8 Failure to follow proper cutting...
...weight of limb or branch), hold front cutting guide against the limb being cut close to the left hand has a firm grip on the pole shaft. n Hold unit firmly with both hands. If you ; Use your right hand to firmly grip the rear handle while your ... becoming pinched or trapped in the limb. OPERATION PREPARATION FOR CUTTING See Figures 7 - 8. n Make a final cut . n If the limb can result. n If the saw . n Make a shallow first cut . COLLAR LOAD SECOND CUT Fig. 6 FIRST CUT 1/4 DIAMETER FINAL CUT Fig. 7 CUTTING GUIDE Fig. 8 Failure to follow proper cutting...
User Manual
Page 15
... situation, as shown. away. 60° MAXIMUM Fig. 9 Fig. 10 Page 15 - of overhead electrical lines. n Keep bystanders at an angle of the pole saw with a firm grip. This unit is designed for trimming small branches and limbs up to position the unit at least 50 ft. As the angle...will prevent stripping the bark from a ladder; Be aware of tree opposite branch you have cut from the main member. n Do not use the pole saw for professionals. n Do not make the flush cut next to the main limb or trunk until you are cutting. n Do not cut ...
... situation, as shown. away. 60° MAXIMUM Fig. 9 Fig. 10 Page 15 - of overhead electrical lines. n Keep bystanders at an angle of the pole saw with a firm grip. This unit is designed for trimming small branches and limbs up to position the unit at least 50 ft. As the angle...will prevent stripping the bark from a ladder; Be aware of tree opposite branch you have cut from the main member. n Do not use the pole saw for professionals. n Do not make the flush cut next to the main limb or trunk until you are cutting. n Do not cut ...
User Manual
Page 18
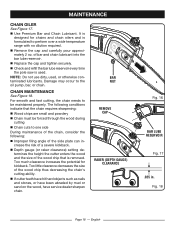
... much clearance increases the potential for chains and chain oilers and is designed for kickback. n Check and refill the bar lube reservoir every time the pole saw is removed. BAR NUT REMOVE CAP RAKER (DEPTH GAUGE) CLEARANCE Fig. 16 BAR LUBE RESERVOIR Fig. 17 .025 in. n Remove the cap and carefully pour...
... much clearance increases the potential for chains and chain oilers and is designed for kickback. n Check and refill the bar lube reservoir every time the pole saw is removed. BAR NUT REMOVE CAP RAKER (DEPTH GAUGE) CLEARANCE Fig. 16 BAR LUBE RESERVOIR Fig. 17 .025 in. n Remove the cap and carefully pour...

User Manual
Page 20
...chain as garden chemicals and de-icing salts. n Always place the scabbard on the saw chain. TROUBLESHOOTING PROBLEM Bar and chain running hot and smoking. Motor runs, but chain is ...or maintaining your complete satisfaction. Use caution to the sharp teeth on the saw bar when transporting or storing the pole saw chain is not rotating. Always wear protective gloves when handling the... bar and chain for damage. Keep away from the product. SCABBARD Fig. 23 NOTE: The saw . Check guide bar and chain assembly. MAINTENANCE STORING THE PRODUCT See Figure 23. Clean...
...chain as garden chemicals and de-icing salts. n Always place the scabbard on the saw chain. TROUBLESHOOTING PROBLEM Bar and chain running hot and smoking. Motor runs, but chain is ...or maintaining your complete satisfaction. Use caution to the sharp teeth on the saw bar when transporting or storing the pole saw chain is not rotating. Always wear protective gloves when handling the... bar and chain for damage. Keep away from the product. SCABBARD Fig. 23 NOTE: The saw . Check guide bar and chain assembly. MAINTENANCE STORING THE PRODUCT See Figure 23. Clean...
User Manual 2
Page 1
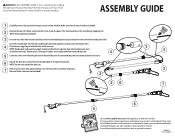
... Product has been fully tested prior to shipment to the handle pole shaft. For any accessories from intermediate pole. 4 5 Lower the collar on the handle pole to the threaded base on the intermediate pole and push back over extend the pole saw. 7 Fill bar oil reservoir with approximately 2 oz. of injury...to secure. 6 Repeat this product. Repeat steps 3 through 6 if poles can be able to operator's manual. 990000257 10-16-12 (REV:01) NOTE: Do not over the cord to ensure your product, call the Ryobi® Help Line! ASSEMBLY GUIDE 1 Carefully remove the product and ...
... Product has been fully tested prior to shipment to the handle pole shaft. For any accessories from intermediate pole. 4 5 Lower the collar on the handle pole to the threaded base on the intermediate pole and push back over extend the pole saw. 7 Fill bar oil reservoir with approximately 2 oz. of injury...to secure. 6 Repeat this product. Repeat steps 3 through 6 if poles can be able to operator's manual. 990000257 10-16-12 (REV:01) NOTE: Do not over the cord to ensure your product, call the Ryobi® Help Line! ASSEMBLY GUIDE 1 Carefully remove the product and ...

Parts List
Page 1
Always mention the model number in all correspondence regarding your nearest Ryobi Authorized Service Center. For the service center nearest you call 1-800-860-4050. 2 ALL VERSIONS The model number will be performed by your ELECTRIC POLE SAW or when ordering replacement parts. SEE NOTE 5 1 34 2 9 6 8 7 KEY PART PARTS LIST NO. ... shown represents an important part of alteration or damage to the system, service should be found on a label attached to the motor housing. RYOBI ELECTRIC POLE SAW MODEL NO. To avoid the possibility of the double insulated system. RY43160 -
Always mention the model number in all correspondence regarding your nearest Ryobi Authorized Service Center. For the service center nearest you call 1-800-860-4050. 2 ALL VERSIONS The model number will be performed by your ELECTRIC POLE SAW or when ordering replacement parts. SEE NOTE 5 1 34 2 9 6 8 7 KEY PART PARTS LIST NO. ... shown represents an important part of alteration or damage to the system, service should be found on a label attached to the motor housing. RYOBI ELECTRIC POLE SAW MODEL NO. To avoid the possibility of the double insulated system. RY43160 -
Parts List
Page 2
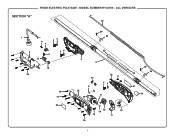
MODEL NUMBER RY43160 - SECTION "A" RYOBI ELECTRIC POLE SAW - ALL VERSIONS 24 1 54 6 7 3 6 21 54 19 20 20 14 28 29 30 25 3 2 15 9 22 10 22 8 54 17 29 30 26 27 13 23 18 16 12 11 20 3
MODEL NUMBER RY43160 - SECTION "A" RYOBI ELECTRIC POLE SAW - ALL VERSIONS 24 1 54 6 7 3 6 21 54 19 20 20 14 28 29 30 25 3 2 15 9 22 10 22 8 54 17 29 30 26 27 13 23 18 16 12 11 20 3

Parts List
Page 3
RYOBI ELECTRIC POLE SAW - ALL VERSIONS PARTS LIST KEY NO. Any repairs requiring disassembly of a double insulated tool can result in damage to the double insulation system possibly causing electrical shock or electrocution. PART NUMBER DESCRIPTION QTY KEY NO. 1 31305163G Power Cord 1 17 2 31309152-3G Pole Assembly 18 (Incl. ... Spring 2 11-7-11 (REV:02) WARNING: Improper repair of your tool requires safety testing and should only be performed by a Ryobi Authorized Service Center. MODEL NUMBER RY43160 - For the service center nearest you call 1-800-860-4050. 4
RYOBI ELECTRIC POLE SAW - ALL VERSIONS PARTS LIST KEY NO. Any repairs requiring disassembly of a double insulated tool can result in damage to the double insulation system possibly causing electrical shock or electrocution. PART NUMBER DESCRIPTION QTY KEY NO. 1 31305163G Power Cord 1 17 2 31309152-3G Pole Assembly 18 (Incl. ... Spring 2 11-7-11 (REV:02) WARNING: Improper repair of your tool requires safety testing and should only be performed by a Ryobi Authorized Service Center. MODEL NUMBER RY43160 - For the service center nearest you call 1-800-860-4050. 4


