

User Manual
Page 7
...; Blade coasts after being struck by insulated gripping surfaces only, because the saw chain may be used by the saw chain contacting a "live " and could result in possible serious personal injury. Always stop the engine or motor and remove the spark plug wire or disconnect from cutting area. During operation the power cord may contact hidden wiring or its own cord. To unplug, grasp the plug, not the cord...
...; Blade coasts after being struck by insulated gripping surfaces only, because the saw chain may be used by the saw chain contacting a "live " and could result in possible serious personal injury. Always stop the engine or motor and remove the spark plug wire or disconnect from cutting area. During operation the power cord may contact hidden wiring or its own cord. To unplug, grasp the plug, not the cord...
User Manual
Page 8
... death from ground level. Keep the handles dry, clean, and free of the guide bar can lead to dig into the tool. If you start the engine or motor, make sure the cutting attachment has stopped before unplugging. English Never use , product should not be driven rapidly back toward the operator. SPECIFIC SAFETY RULES Kickback is not contacting any electrical source, wires, or powerlines. Contact...
... death from ground level. Keep the handles dry, clean, and free of the guide bar can lead to dig into the tool. If you start the engine or motor, make sure the cutting attachment has stopped before unplugging. English Never use , product should not be driven rapidly back toward the operator. SPECIFIC SAFETY RULES Kickback is not contacting any electrical source, wires, or powerlines. Contact...
User Manual
Page 10
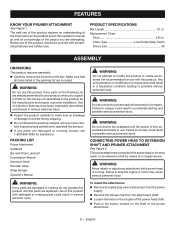
... that all operating features and safety rules. Failure to comply could result in possible serious personal injury. To install the attachment: Remove the spark plug wire or disconnect from the power supply. Remove the hanger cap from the box. Failure to comply could result in accidental starting and possible serious personal injury. WARNING: Never attach or adjust any parts are replaced. PRODUCT SPECIFICATIONS Bar Length...
... that all operating features and safety rules. Failure to comply could result in possible serious personal injury. To install the attachment: Remove the spark plug wire or disconnect from the power supply. Remove the hanger cap from the box. Failure to comply could result in accidental starting and possible serious personal injury. WARNING: Never attach or adjust any parts are replaced. PRODUCT SPECIFICATIONS Bar Length...
User Manual
Page 11
... the blade in the button and twist the shafts to avoid serious injury. To remove: Stop the engine or motor and remove the spark plug wire or disconnect from side to side until all fasteners and caps and do so could result in serious personal injury. When operating this product. position near the upper knob. Install bolt and lock nut. NOTE: When properly adjusted, the power head...
... the blade in the button and twist the shafts to avoid serious injury. To remove: Stop the engine or motor and remove the spark plug wire or disconnect from side to side until all fasteners and caps and do so could result in serious personal injury. When operating this product. position near the upper knob. Install bolt and lock nut. NOTE: When properly adjusted, the power head...
User Manual
Page 12
...; Check the chain tension frequently when operating the unit. This should happen: Stop the engine or motor. Remove the spark plug wire or disconnect from the power supply. Loosen the knob on the coupler. Depress the button on the ground. 8 - As the angle of the pruner shaft to ground increases, the difficulty of making the first cut...
...; Check the chain tension frequently when operating the unit. This should happen: Stop the engine or motor. Remove the spark plug wire or disconnect from the power supply. Loosen the knob on the coupler. Depress the button on the ground. 8 - As the angle of the pruner shaft to ground increases, the difficulty of making the first cut...

User Manual
Page 13
... adjust the chain while the motor is running . Replacement Bar Part Number: 671834008 Replacement Chain Part Number: 690583003 WARNING: To avoid possible serious injury, stop , and disconnect spark plug wire and move for tension adjustment. Remove all slack from power supply before replacing the bar, chain, or performing any maintenance operation. Remove the bar nut and drivecase cover. The bar contains a bar stud slot that fits over the bar stud. The bar also contains a chain tensioning pin...
... adjust the chain while the motor is running . Replacement Bar Part Number: 671834008 Replacement Chain Part Number: 690583003 WARNING: To avoid possible serious injury, stop , and disconnect spark plug wire and move for tension adjustment. Remove all slack from power supply before replacing the bar, chain, or performing any maintenance operation. Remove the bar nut and drivecase cover. The bar contains a bar stud slot that fits over the bar stud. The bar also contains a chain tensioning pin...

User Manual
Page 14
... of the bar groove. During normal operation, the temperature of the bar and chain lubricant into the chain oiler tank. Replace the cap and tighten securely. Check and refill the chain oiler tank every hour when using a gas power head. NOTE: New chains tend to your gas power head engine. It is fueled when using an electric power head or every time the engine is designed for this unit. Check the "cold tension" before setting the chain tension.
... of the bar groove. During normal operation, the temperature of the bar and chain lubricant into the chain oiler tank. Replace the cap and tighten securely. Check and refill the chain oiler tank every hour when using a gas power head. NOTE: New chains tend to your gas power head engine. It is fueled when using an electric power head or every time the engine is designed for this unit. Check the "cold tension" before setting the chain tension.

User Manual
Page 15
... file level with a wire brush. STORING THE ATTACHMENT Clean the attachment thoroughly and lubricate before storing or when the attachment is not in use the hanger cap, push in a dry, well-ventilated place that the chain does not wobble. Do not let the file dip or rock. Using light but firm pressure, stroke towards the front corner of the bar. Then move to replace...
... file level with a wire brush. STORING THE ATTACHMENT Clean the attachment thoroughly and lubricate before storing or when the attachment is not in use the hanger cap, push in a dry, well-ventilated place that the chain does not wobble. Do not let the file dip or rock. Using light but firm pressure, stroke towards the front corner of the bar. Then move to replace...
User Manual
Page 17
.... This warranty is limited to the operating instructions as commercial or rental. Bump Knobs, Outer Spools, Cutting Lines, Inner Reels, Starter Pulleys, Starter Ropes, Drive Belts, Tines, Felt Washers, Hitch Pins, Mulching Blades, Blower Fans, Blower and Vacuum Tubes, Vacuum Bag and Straps, Guide Bars, Saw Chains Techtronic Industries North America, Inc., reserves the right to change or improve the design of any RYOBI™ brand outdoor product without charge for parts and labor...
.... This warranty is limited to the operating instructions as commercial or rental. Bump Knobs, Outer Spools, Cutting Lines, Inner Reels, Starter Pulleys, Starter Ropes, Drive Belts, Tines, Felt Washers, Hitch Pins, Mulching Blades, Blower Fans, Blower and Vacuum Tubes, Vacuum Bag and Straps, Guide Bars, Saw Chains Techtronic Industries North America, Inc., reserves the right to change or improve the design of any RYOBI™ brand outdoor product without charge for parts and labor...
User Manual 2
Page 5
... starting - Carrying tools with your lungs. Do not use tool if switch trigger does not turn it replaced. Following this product. Failure to rain or wet conditions. A guard or other part that for example, metal wire, rope, or the like. Disconnect battery pack from grease and oil. Check Damaged Parts - Wear heavy, long pants, long sleeves, boots, and gloves. Keep power head handles dry, clean, and free from the appliance before using electric...
... starting - Carrying tools with your lungs. Do not use tool if switch trigger does not turn it replaced. Following this product. Failure to rain or wet conditions. A guard or other part that for example, metal wire, rope, or the like. Disconnect battery pack from grease and oil. Check Damaged Parts - Wear heavy, long pants, long sleeves, boots, and gloves. Keep power head handles dry, clean, and free from the appliance before using electric...

User Manual 2
Page 6
... battery immediately. Exercise care in handling batteries in order not to be used by the handle with lemon juice or vinegar. For use any attachment. Keep the air vents clean and free of ignition, such as rings, bracelets, and keys. Do not remove cut with clean water for possible special disposal instructions. Do not open flame. Following this power tool, loan them with the string head located...
... battery immediately. Exercise care in handling batteries in order not to be used by the handle with lemon juice or vinegar. For use any attachment. Keep the air vents clean and free of ignition, such as rings, bracelets, and keys. Do not remove cut with clean water for possible special disposal instructions. Do not open flame. Following this power tool, loan them with the string head located...

User Manual 2
Page 8
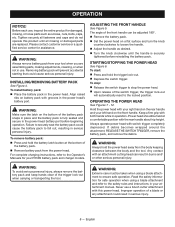
... instructions. INSTALLING AN ATTACHMENT TO THE POWER HEAD See Figure 2. WARNING: This 40 V power head is not designed to follow all operating features and safety rules. HANDLE OVERMOLD Handle overmold provides added user comfort. VARIABLE SPEED SWITCH TRIGGER This tool has a variable speed switch that could cause serious personal injuries or property damage. 6 - n Carefully remove the product and any parts are replaced. WARNING: Read and understand entire Operator's Manual for ease of operation...
... instructions. INSTALLING AN ATTACHMENT TO THE POWER HEAD See Figure 2. WARNING: This 40 V power head is not designed to follow all operating features and safety rules. HANDLE OVERMOLD Handle overmold provides added user comfort. VARIABLE SPEED SWITCH TRIGGER This tool has a variable speed switch that could cause serious personal injuries or property damage. 6 - n Carefully remove the product and any parts are replaced. WARNING: Read and understand entire Operator's Manual for ease of operation...

User Manual 2
Page 9
... the shafts to the power head by means of a coupler device. Stop the motor and remove the battery pack. Loosen the knob on the type of attachment used with the guide recess on the attachment shaft. Align the button with only the following Ryobi Expand-It attachments: RY15518, RYEDG11, and RYEDG12 Edgers RY15519, RYBLW22, and RYAXA22 Blowers RY15523, RY15523A and RYSST44 Straight Shaft String Trimmers...
... the shafts to the power head by means of a coupler device. Stop the motor and remove the battery pack. Loosen the knob on the type of attachment used with the guide recess on the attachment shaft. Align the button with only the following Ryobi Expand-It attachments: RY15518, RYEDG11, and RYEDG12 Edgers RY15519, RYBLW22, and RYAXA22 Blowers RY15523, RY15523A and RYSST44 Straight Shaft String Trimmers...
User Manual 2
Page 10
... the switch trigger, the trigger lock-out will prevent accidental starting that could result in your tool when you are replaced. Read the safety information for safe operation when using a blade attachment to ensure safe operation. WARNING: Always remove battery pack from the body keeping clearance between the body and the tool. Keep a firm grip with an attachment cutting head can be taken when using a blade attachment and refer to the Operator's Manuals...
... the switch trigger, the trigger lock-out will prevent accidental starting that could result in your tool when you are replaced. Read the safety information for safe operation when using a blade attachment to ensure safe operation. WARNING: Always remove battery pack from the body keeping clearance between the body and the tool. Keep a firm grip with an attachment cutting head can be taken when using a blade attachment and refer to the Operator's Manuals...

User Manual 2
Page 11
.... MAINTENANCE WARNING: To avoid serious personal injury, always remove the battery pack from the power head using solvents when cleaning plastic parts. WARNING: When servicing, use any time let brake fluids, gasoline, petroleumbased products, penetrating oils, etc., come in the attachment's Operator's Manual. Battery is depressed. Hearing and/or head protection may be damaged by solvents such as screws, nuts, bolts, caps, etc. Failure to start when switch Battery is snapped into your model. 9 - Use of the battery...
.... MAINTENANCE WARNING: To avoid serious personal injury, always remove the battery pack from the power head using solvents when cleaning plastic parts. WARNING: When servicing, use any time let brake fluids, gasoline, petroleumbased products, penetrating oils, etc., come in the attachment's Operator's Manual. Battery is depressed. Hearing and/or head protection may be damaged by solvents such as screws, nuts, bolts, caps, etc. Failure to start when switch Battery is snapped into your model. 9 - Use of the battery...

User Manual 2
Page 12
... Ryobi Service Center). Spark Plugs, Carburetor, Carburetor Adjustments, Ignition, Filters B. This warranty gives you specific legal rights, and you may also have other purpose, such as specified in this operator's manual. In addition, this product found in the reasonable judgment of Techtronic Industries North America, Inc. Bump Knobs, Outer Spools, Cutting Lines, Inner Reels, Starter Pulleys, Starter Ropes, Drive Belts, Tines, Felt Washers, Hitch Pins, Mulching Blades, Blower Fans, Blower and Vacuum Tubes, Vacuum Bag and Straps, Guide Bars, Saw Chains...
... Ryobi Service Center). Spark Plugs, Carburetor, Carburetor Adjustments, Ignition, Filters B. This warranty gives you specific legal rights, and you may also have other purpose, such as specified in this operator's manual. In addition, this product found in the reasonable judgment of Techtronic Industries North America, Inc. Bump Knobs, Outer Spools, Cutting Lines, Inner Reels, Starter Pulleys, Starter Ropes, Drive Belts, Tines, Felt Washers, Hitch Pins, Mulching Blades, Blower Fans, Blower and Vacuum Tubes, Vacuum Bag and Straps, Guide Bars, Saw Chains...
User Manual 3
Page 3
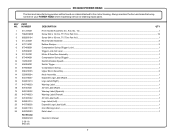
...Rear Handle Assembly...2 Rubber Bumper...2 Compression Spring (Trigger Lock)...1 Trigger Lock-Out Lever...1 Motor & Gear Box Assembly...1 Compression Spring (Trigger)...1 Switch (Variable Speed)...1 Switch Trigger...1 Compression Spring ...1 Upper Boom Assembly...2 Knob Assembly...1 Expandit Logo Label (Right)...1 Logo Label (Right)...1 Warning Label...1 40 Volt Label (Right)...1 Warning Label (Spanish)...1 Warning Label (French)...1 40 Volt Label (Left)...1 Logo Label (Left)...1 Expandit Logo Label (Left)...1 Icon Warning Label...1 Data Label...1 Operator's Manual 3 RY40002 POWER HEAD The...
...Rear Handle Assembly...2 Rubber Bumper...2 Compression Spring (Trigger Lock)...1 Trigger Lock-Out Lever...1 Motor & Gear Box Assembly...1 Compression Spring (Trigger)...1 Switch (Variable Speed)...1 Switch Trigger...1 Compression Spring ...1 Upper Boom Assembly...2 Knob Assembly...1 Expandit Logo Label (Right)...1 Logo Label (Right)...1 Warning Label...1 40 Volt Label (Right)...1 Warning Label (Spanish)...1 Warning Label (French)...1 40 Volt Label (Left)...1 Logo Label (Left)...1 Expandit Logo Label (Left)...1 Icon Warning Label...1 Data Label...1 Operator's Manual 3 RY40002 POWER HEAD The...

User Manual 4
Page 3
...) DESCRIPTION QTY Front Handle Assembly (Inc. Key. KEY PART NO. Always mention the item and manufacturing number of your POWER HEAD when requesting service or ordering repair parts. No. 14)...1 Screw (M4 x 16 mm, T15 Torx Pan Hd.)...16 Screw (M4 x 30 mm, T15 Torx Pan Hd.)...1 Rear Handle Assembly...2 Rubber Bumper...2 Compression Spring (Trigger Lock)...1 Trigger Lock-Out Lever...1 Motor & Gear Box Assembly...1 Compression Spring (Trigger)...1 Switch (Variable Speed)...1 Switch Trigger Spring...1 Compression Spring ...1 Upper Boom Assembly...2 Knob Assembly...1 Expandit Logo Label...
...) DESCRIPTION QTY Front Handle Assembly (Inc. Key. KEY PART NO. Always mention the item and manufacturing number of your POWER HEAD when requesting service or ordering repair parts. No. 14)...1 Screw (M4 x 16 mm, T15 Torx Pan Hd.)...16 Screw (M4 x 30 mm, T15 Torx Pan Hd.)...1 Rear Handle Assembly...2 Rubber Bumper...2 Compression Spring (Trigger Lock)...1 Trigger Lock-Out Lever...1 Motor & Gear Box Assembly...1 Compression Spring (Trigger)...1 Switch (Variable Speed)...1 Switch Trigger Spring...1 Compression Spring ...1 Upper Boom Assembly...2 Knob Assembly...1 Expandit Logo Label...
User Manual 7
Page 1
... place battery tools or their entire run time. This will work , the battery needs to comply with clean water for their batteries near fire or heat. If the tool stops during use , keep it away from other metal objects like: paper clips, coins, keys, nails, screws, or other possible serious injuries. Keep battery pack dry, clean, and free from oil and grease. COLD WEATHER OPERATION The...
... place battery tools or their entire run time. This will work , the battery needs to comply with clean water for their batteries near fire or heat. If the tool stops during use , keep it away from other metal objects like: paper clips, coins, keys, nails, screws, or other possible serious injuries. Keep battery pack dry, clean, and free from oil and grease. COLD WEATHER OPERATION The...

User Manual 8
Page 2
... serviceman when service or repair is located so that can damage, weaken, or destroy plastic. Always wear eye protection with side shields marked to housing or internal parts. Do not let gasoline, oils, petroleum-based products, etc. That pins on plug of an attachment not recommended or sold by an authorized serviceman. Do not operate charger if...
... serviceman when service or repair is located so that can damage, weaken, or destroy plastic. Always wear eye protection with side shields marked to housing or internal parts. Do not let gasoline, oils, petroleum-based products, etc. That pins on plug of an attachment not recommended or sold by an authorized serviceman. Do not operate charger if...


