

Operator's Manual
Page 8
... not use . Keep string head below waist level. Be sure the string head or blade is properly installed and securely fastened. Failure to this string trimmer can cause serious injury. Make sure all guards, straps, deflectors, and handles are in good condition. Maintain a firm grip on both handles while...
... not use . Keep string head below waist level. Be sure the string head or blade is properly installed and securely fastened. Failure to this string trimmer can cause serious injury. Make sure all guards, straps, deflectors, and handles are in good condition. Maintain a firm grip on both handles while...

Operator's Manual
Page 10
...The top-mounted motor improves balance and is located away from the dust and debris of 2-Cycle Lubricant Operator's Manual 6 - PACKING LIST CS26 Trimmer Assembly Front Handle Curved Shaft Grass Deflector Dual Spool™ Fixed Line String Head Insert Bottle of 2-Cycle Lubricant Operator's Manual SS26... Trimmer Assembly Front Handle Dual Spool™ Fixed Line String Head Insert Straight Shaft Grass Deflector Bottle of the cutting area. max. Parts ...
...The top-mounted motor improves balance and is located away from the dust and debris of 2-Cycle Lubricant Operator's Manual 6 - PACKING LIST CS26 Trimmer Assembly Front Handle Curved Shaft Grass Deflector Dual Spool™ Fixed Line String Head Insert Bottle of 2-Cycle Lubricant Operator's Manual SS26... Trimmer Assembly Front Handle Dual Spool™ Fixed Line String Head Insert Straight Shaft Grass Deflector Bottle of the cutting area. max. Parts ...
Operator's Manual
Page 11
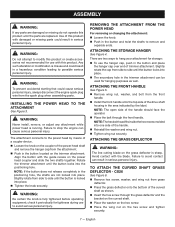
... and bolt from side to side until the button locks into one side of the drive shaft housing in the button located on the trimmer attachment. Failure to stop the engine can cause serious personal injury. ASSEMBLY WARNING: If any attachment while power head is running. Slightly...personal injury. WARNING: Never install, remove, or adjust any parts are not locked into place. The secondary hole in the trimmer attachment can result in a hazardous condition leading to remove and separate ends. Use of this product until the button locks into place. check it...
... and bolt from side to side until the button locks into one side of the drive shaft housing in the button located on the trimmer attachment. Failure to stop the engine can cause serious personal injury. ASSEMBLY WARNING: If any attachment while power head is running. Slightly...personal injury. WARNING: Never install, remove, or adjust any parts are not locked into place. The secondary hole in the trimmer attachment can result in a hazardous condition leading to remove and separate ends. Use of this product until the button locks into place. check it...
Operator's Manual
Page 12
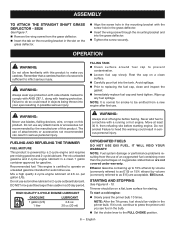
...ANSI Z87.1, along with a running or hot engine. Move at 2.6 oz. Do not smoke! OXYGENATED FUELS DO NOT USE E85 FUEL. Ethanol. Trimmer should be visible in the grass deflector. Insert the wing screw through the mounting bracket and into the grass deflector. Tighten ... ATTACH THE STRAIGHT SHAFT GRASS DEFLECTOR - IT WILL VOID YOUR WARRANTY. Failure to press the primer until you careless. FUELING AND REFUELING THE TRIMMER FUEL MIXTURE This product is not, continue to do so could result in a clean 1 gallon container approved for automotive use of oxygenates stated...
...ANSI Z87.1, along with a running or hot engine. Move at 2.6 oz. Do not smoke! OXYGENATED FUELS DO NOT USE E85 FUEL. Ethanol. Trimmer should be visible in the grass deflector. Insert the wing screw through the mounting bracket and into the grass deflector. Tighten ... ATTACH THE STRAIGHT SHAFT GRASS DEFLECTOR - IT WILL VOID YOUR WARRANTY. Failure to press the primer until you careless. FUELING AND REFUELING THE TRIMMER FUEL MIXTURE This product is not, continue to do so could result in a clean 1 gallon container approved for automotive use of oxygenates stated...

Operator's Manual
Page 13
...faster than normal, or when trimming efficiency diminishes. GRASS DEFLECTOR LINE TRIMMING CUT-OFF BLADE See Figure 14. WARNING: Always hold the string trimmer away from the top down while pulling on the operator's right side. To restart a warm engine: Slowly press the primer ...string. Avoid cutting in the dangerous area shown in burns and/or other serious personal injury. ADVANCING THE STRING MANUALLY Hold the trimmer with the rear handle about hip height. OPERATION Squeeze the throttle trigger fully and pull starter handle sharply until the engine...
...faster than normal, or when trimming efficiency diminishes. GRASS DEFLECTOR LINE TRIMMING CUT-OFF BLADE See Figure 14. WARNING: Always hold the string trimmer away from the top down while pulling on the operator's right side. To restart a warm engine: Slowly press the primer ...string. Avoid cutting in the dangerous area shown in burns and/or other serious personal injury. ADVANCING THE STRING MANUALLY Hold the trimmer with the rear handle about hip height. OPERATION Squeeze the throttle trigger fully and pull starter handle sharply until the engine...
Operator's Manual
Page 14
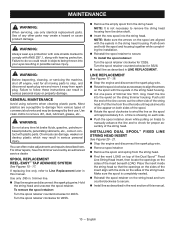
...; Remove spool retainer. Remove the spool and spring from the other side until the end of the line comes out the other side of trimmer line 10 ft. Place the insert inside the string head so that the openings on the sides of the insert align with the eyelets in...: Turn the spool retainer counterclockwise for all moving parts to do so could result in possible serious injury. Push down while pulling on the string trimmer housing. Use of commercial solvents and may be damaged by an authorized service dealer. NOTE: Make sure the arrows on the string head and turn...
...; Remove spool retainer. Remove the spool and spring from the other side until the end of the line comes out the other side of trimmer line 10 ft. Place the insert inside the string head so that the openings on the sides of the insert align with the eyelets in...: Turn the spool retainer counterclockwise for all moving parts to do so could result in possible serious injury. Push down while pulling on the string trimmer housing. Use of commercial solvents and may be damaged by an authorized service dealer. NOTE: Make sure the arrows on the string head and turn...

Operator's Manual
Page 15
diameter. Stop the engine and disconnect the spark plug wire. Gather two of the pre-cut lengths of trimmer line provided or cut two pieces of the string head. CLEANING THE EXHAUST PORT AND MUFFLER NOTE: Depending on the model purchased. Spark arrestors may ... the tabs on the bottom of the cover into the slots on the sides of trimmer line in 11 in . Replace fuel cap if required. SPARK PLUG REPLACEMENT This engine uses a Champion RCJ-6Y, NGK BPMR7A, or Ryobi AC00160 spark plug with your product. and .105 in . Turn the idle speed screw...
diameter. Stop the engine and disconnect the spark plug wire. Gather two of the pre-cut lengths of trimmer line provided or cut two pieces of the string head. CLEANING THE EXHAUST PORT AND MUFFLER NOTE: Depending on the model purchased. Spark arrestors may ... the tabs on the bottom of the cover into the slots on the sides of trimmer line in 11 in . Replace fuel cap if required. SPARK PLUG REPLACEMENT This engine uses a Champion RCJ-6Y, NGK BPMR7A, or Ryobi AC00160 spark plug with your product. and .105 in . Turn the idle speed screw...

Operator's Manual
Page 16
.... Line is dirty. 3. Turn idle speed screw clockwise to the RUN position. Screw threads are dirty or damaged. 1. Operating trimmer at full throttle. English Squeeze the trigger and pull the rope repeatedly until bulb is full of fuel. Engine does not reach full...spark plug. Engine speed is tangled on and releasing spool retainer. 4. Refer to the applicable line replacement section in this manual. 3. Operate trimmer at ground level. 2. Contact an authorized servicing dealer. 4. Reset spark plug gap. Not enough line on carburetor needs adjustment. 1. Refer to...
.... Line is dirty. 3. Turn idle speed screw clockwise to the RUN position. Screw threads are dirty or damaged. 1. Operating trimmer at full throttle. English Squeeze the trigger and pull the rope repeatedly until bulb is full of fuel. Engine does not reach full...spark plug. Engine speed is tangled on and releasing spool retainer. 4. Refer to the applicable line replacement section in this manual. 3. Operate trimmer at ground level. 2. Contact an authorized servicing dealer. 4. Reset spark plug gap. Not enough line on carburetor needs adjustment. 1. Refer to...
Repair Sheet
Page 2
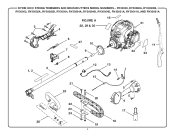
RY30000, RY30000A, RY30000B, RY30002, RY30002A, RY30002B, RY30004, RY30004A, RY30004B, RY30004D, RY30021A, RY30041A, AND RY30061A 16 FIGURE A 31 5 28, 29 & 30 4 2 1, 3 26 6 27 10 7 9 8 12 21 25 22 23 24 15 20 19 22 32 13 14 5 5 4 17 18 11 33 RYOBI 30CC STRING TRIMMERS AND BRUSHCUTTERS MODEL NUMBERS -
RY30000, RY30000A, RY30000B, RY30002, RY30002A, RY30002B, RY30004, RY30004A, RY30004B, RY30004D, RY30021A, RY30041A, AND RY30061A 16 FIGURE A 31 5 28, 29 & 30 4 2 1, 3 26 6 27 10 7 9 8 12 21 25 22 23 24 15 20 19 22 32 13 14 5 5 4 17 18 11 33 RYOBI 30CC STRING TRIMMERS AND BRUSHCUTTERS MODEL NUMBERS -

Repair Sheet
Page 3
... NUMBER 984032002 985383001 985384001 984102002 985382001 82589 PS06258 PS06259 PS01718 986493001 985835001 944701 PS02764 PA00387 82538 PS01177 985157001 PS02155 FIGURE A PARTS LIST DESCRIPTION QTY. RYOBI 30CC STRING TRIMMERS AND BRUSHCUTTERS MODEL NUMBERS - "J" HANDLE AND GRIP (BC 1 LOCK WASHER (BC 2 HEX HEAD BOLT (BC 1 SCREW (BC 1 HANDLE BAR CLAMP (BC 2 WASHER (BC 2 HEX...
... NUMBER 984032002 985383001 985384001 984102002 985382001 82589 PS06258 PS06259 PS01718 986493001 985835001 944701 PS02764 PA00387 82538 PS01177 985157001 PS02155 FIGURE A PARTS LIST DESCRIPTION QTY. RYOBI 30CC STRING TRIMMERS AND BRUSHCUTTERS MODEL NUMBERS - "J" HANDLE AND GRIP (BC 1 LOCK WASHER (BC 2 HEX HEAD BOLT (BC 1 SCREW (BC 1 HANDLE BAR CLAMP (BC 2 WASHER (BC 2 HEX...

Repair Sheet
Page 4
RY30000, RY30000A, RY30000B, RY30002, RY30002A, RY30002B, RY30004, RY30004A, RY30004B, RY30004D, RY30021A, RY30041A, AND RY30061A 39 57 33 45 31 29 58 53 54 55 36 52 59 56 4 38 60 2 27 44 49 50 51 3 1 26 23 40 25 41 24 47 32 34 30 42 21 35 37 46 22 6 19 5 16 7 9 17 48 20 43 28 10 11 14 13 12 18 8 15 4 RYOBI 30CC STRING TRIMMERS AND BRUSHCUTTERS MODEL NUMBERS -
RY30000, RY30000A, RY30000B, RY30002, RY30002A, RY30002B, RY30004, RY30004A, RY30004B, RY30004D, RY30021A, RY30041A, AND RY30061A 39 57 33 45 31 29 58 53 54 55 36 52 59 56 4 38 60 2 27 44 49 50 51 3 1 26 23 40 25 41 24 47 32 34 30 42 21 35 37 46 22 6 19 5 16 7 9 17 48 20 43 28 10 11 14 13 12 18 8 15 4 RYOBI 30CC STRING TRIMMERS AND BRUSHCUTTERS MODEL NUMBERS -

Repair Sheet
Page 5
... 1 SCREEN 1 PISTON W/PINS 1 PISTON RING 30CC 2 RETAINING RING 2 PISTON PIN 1 CONNECTING ROD ASSEMBLY 1 COMPLETE STARTER ASSEMBLY 1 CYLINDER, 30CC 1 CYLINDER GASKET 1 SCREW (12-24 X 5/8 in . RYOBI 30CC STRING TRIMMERS AND BRUSHCUTTERS MODEL NUMBERS - SEMS 2 BOLTS 2 HEAT DAM GASKET 1 HEAT DAM 1 LOCK NUT HX 10-24 2 * SCREW (TORX PAN HD. AP04108) . 1 BUMPER 2 LEAD W/TERMINALS...
... 1 SCREEN 1 PISTON W/PINS 1 PISTON RING 30CC 2 RETAINING RING 2 PISTON PIN 1 CONNECTING ROD ASSEMBLY 1 COMPLETE STARTER ASSEMBLY 1 CYLINDER, 30CC 1 CYLINDER GASKET 1 SCREW (12-24 X 5/8 in . RYOBI 30CC STRING TRIMMERS AND BRUSHCUTTERS MODEL NUMBERS - SEMS 2 BOLTS 2 HEAT DAM GASKET 1 HEAT DAM 1 LOCK NUT HX 10-24 2 * SCREW (TORX PAN HD. AP04108) . 1 BUMPER 2 LEAD W/TERMINALS...

Repair Sheet
Page 6
... 20 PART NUMBER 985165001 984032002 985391001 984443004 984931001 PS04438 A97910A 984244001 983381007 PS04420 983774003 983379078 AP04101 984238001 06713 A98231A PS04379 82543 984099001 985625001 DESCRIPTION QTY. RYOBI 30CC STRING TRIMMERS AND BRUSHCUTTERS MODEL NUMBERS -
... 20 PART NUMBER 985165001 984032002 985391001 984443004 984931001 PS04438 A97910A 984244001 983381007 PS04420 983774003 983379078 AP04101 984238001 06713 A98231A PS04379 82543 984099001 985625001 DESCRIPTION QTY. RYOBI 30CC STRING TRIMMERS AND BRUSHCUTTERS MODEL NUMBERS -
Setup Guide
Page 1
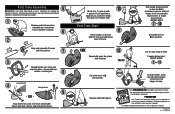
... wing nut. 8 Curved Shaft 4 Straight Shaft 9 - First Time Start 11 Place trimmer on the top of fresh gasoline in separate gas container. For any questions about operating or maintaining your product, call the Ryobi® Help Line! 1-800-860-4050 Your Product has been fully tested prior to ...powerfully to start (6x MAX.) Continue to operator's manual. 990000226 9-13-12 (REV:01) Snap shield into place over boom and snap into trimmer tank. To reduce the risk of injury, user must read and understand operator's manual before using this product. 1 Remove product from you. ...
... wing nut. 8 Curved Shaft 4 Straight Shaft 9 - First Time Start 11 Place trimmer on the top of fresh gasoline in separate gas container. For any questions about operating or maintaining your product, call the Ryobi® Help Line! 1-800-860-4050 Your Product has been fully tested prior to ...powerfully to start (6x MAX.) Continue to operator's manual. 990000226 9-13-12 (REV:01) Snap shield into place over boom and snap into trimmer tank. To reduce the risk of injury, user must read and understand operator's manual before using this product. 1 Remove product from you. ...


