User Manual
Page 7
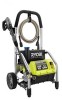
... power to the tool, then unplug and examine for presence of water in use only identical replacement parts. WARNING: Risk of the plug or cord become necessary, use only identical replacement parts that are identified by a marking "Acceptable for outdoor use damaged extension cords. WARNING: To reduce ... to stop the product and release pressure quickly. Stay alert and exercise control. Disconnect the fuse or circuit breaker that part of the power supply cord. Do not touch plug with a ground fault circuit interrupter (GFCI) built into a GFCI protected outlet.
... power to the tool, then unplug and examine for presence of water in use only identical replacement parts. WARNING: Risk of the plug or cord become necessary, use only identical replacement parts that are identified by a marking "Acceptable for outdoor use damaged extension cords. WARNING: To reduce ... to stop the product and release pressure quickly. Stay alert and exercise control. Disconnect the fuse or circuit breaker that part of the power supply cord. Do not touch plug with a ground fault circuit interrupter (GFCI) built into a GFCI protected outlet.
User Manual
Page 8
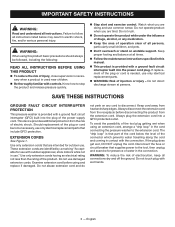
... Make sure your footing on grass. Know your product will reduce the risk of injury. Check damaged parts. Damaged cords increase the risk of electric shock. Ground Fault Circuit Interrupter (GFCI) protection should be carefully checked to be ... Replace damaged cords immediately. English SPECIFIC SAFETY RULES Use caution when positioning the pressure washer for alignment of moving parts, binding of moving parts, breakage of machine. Keep product dry, clean, and free from an outlet. Keep work area before each ...
... Make sure your footing on grass. Know your product will reduce the risk of injury. Check damaged parts. Damaged cords increase the risk of electric shock. Ground Fault Circuit Interrupter (GFCI) protection should be carefully checked to be ... Replace damaged cords immediately. English SPECIFIC SAFETY RULES Use caution when positioning the pressure washer for alignment of moving parts, binding of moving parts, breakage of machine. Keep product dry, clean, and free from an outlet. Keep work area before each ...
User Manual
Page 9
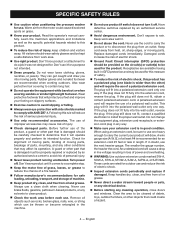
A loose bolt or nut may create a hazard or cause product damage. ONLY use . Use of any other parts may cause serious motor problems. Before storing, allow the motor to cool. When servicing use acids, alkalines, solvents, flammable material,...is pulled due to yourself and others. Save these instructions also. 5 - English SPECIFIC SAFETY RULES Do not use only identical replacement parts. Failure to misuse. The jet must not be directed at persons, animals, electrical devices, or the machine itself. Keep the motor away ...
A loose bolt or nut may create a hazard or cause product damage. ONLY use . Use of any other parts may cause serious motor problems. Before storing, allow the motor to cool. When servicing use acids, alkalines, solvents, flammable material,...is pulled due to yourself and others. Save these instructions also. 5 - English SPECIFIC SAFETY RULES Do not use only identical replacement parts. Failure to misuse. The jet must not be directed at persons, animals, electrical devices, or the machine itself. Keep the motor away ...

User Manual
Page 10
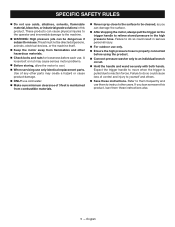
... can result in the stream. To reduce the risk of injection or injury, never direct a water stream towards people or pets or place any body part in electric shock. English
... can result in the stream. To reduce the risk of injection or injury, never direct a water stream towards people or pets or place any body part in electric shock. English

User Manual
Page 12
...power source, be sure to use an extension cord that it for repair. GROUND FAULT CIRCUIT INTERRUPTER See Figure 2. All exposed metal parts are working with a product, use an extension cord that would flow through a person who is using a power tool at the... EXTENSION CORDS When using an appliance with faulty insulation and, at a considerable distance from becoming disconnected during use original factory replacement parts when servicing. When working area. ELECTRICAL DOUBLE INSULATION Double insulation is a concept in safety in electric power tools, which guards ...
...power source, be sure to use an extension cord that it for repair. GROUND FAULT CIRCUIT INTERRUPTER See Figure 2. All exposed metal parts are working with a product, use an extension cord that would flow through a person who is using a power tool at the... EXTENSION CORDS When using an appliance with faulty insulation and, at a considerable distance from becoming disconnected during use original factory replacement parts when servicing. When working area. ELECTRICAL DOUBLE INSULATION Double insulation is a concept in safety in electric power tools, which guards ...

User Manual
Page 13
... LOCK-OUT Pulling the trigger releases a stream of a product that may have carefully inspected and satisfactorily operated the product. Parts on this product if any parts on the product and in serious personal injury. n Do not discard the packing material until you are already assembled to ...-and-loop strap to the product by PWMA Standard 101 KNOW YOUR PRESSURE WASHER See Figure 3. n Carefully remove the product and any parts are included. PACKING LIST Electric Pressure Washer 25 ft. This plug does not protect against unauthorized use . Rotate the brackets counterclockwise and...
... LOCK-OUT Pulling the trigger releases a stream of a product that may have carefully inspected and satisfactorily operated the product. Parts on this product if any parts on the product and in serious personal injury. n Do not discard the packing material until you are already assembled to ...-and-loop strap to the product by PWMA Standard 101 KNOW YOUR PRESSURE WASHER See Figure 3. n Carefully remove the product and any parts are included. PACKING LIST Electric Pressure Washer 25 ft. This plug does not protect against unauthorized use . Rotate the brackets counterclockwise and...
User Manual
Page 14
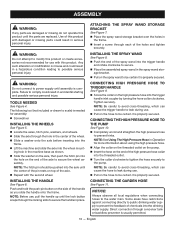
...wheel n Slide a washer onto the axle before inserting into the frame n Lift the machine and slide the axle into the axle until the parts are replaced. TOOLS NEEDED See Figure 4. NOTE: Be careful to avoid cross-threading, which can cause the trigger handle to secure. Push ...handle up until assembly is complete. INSTALLING THE SPRAY WAND See Figure 8 n Push the end of the axle n Repeat with damaged or missing parts could result in accidental starting and possible serious personal injury. WARNING: Do not connect to secure the wheel assembly. ing hole in place. ...
...wheel n Slide a washer onto the axle before inserting into the frame n Lift the machine and slide the axle into the axle until the parts are replaced. TOOLS NEEDED See Figure 4. NOTE: Be careful to avoid cross-threading, which can cause the trigger handle to secure. Push ...handle up until assembly is complete. INSTALLING THE SPRAY WAND See Figure 8 n Push the end of the axle n Repeat with damaged or missing parts could result in accidental starting and possible serious personal injury. WARNING: Do not connect to secure the wheel assembly. ing hole in place. ...
User Manual
Page 18
... brake fluids, gasoline, petroleumbased products, penetrating oils, etc., come in contact with ANSI Z87.1. GENERAL MAINTENANCE Avoid using solvents when cleaning plastic parts. Chemicals can result in possible serious injury. n Unplug the pressure washer. n Turn off the pressure washer and shut off . ply. ...173; ASHER n Turn the pressure washer off the water sup- Most plastics are intended to damage from the spray wand. Only the parts shown on the water supply. 14 - POWER SUPPLY CORD REPLACEMENT If replacement of a clogged or dirty nozzle. NOZZLE MAINTENANCE See Figure 18...
... brake fluids, gasoline, petroleumbased products, penetrating oils, etc., come in contact with ANSI Z87.1. GENERAL MAINTENANCE Avoid using solvents when cleaning plastic parts. Chemicals can result in possible serious injury. n Unplug the pressure washer. n Turn off the pressure washer and shut off . ply. ...173; ASHER n Turn the pressure washer off the water sup- Most plastics are intended to damage from the spray wand. Only the parts shown on the water supply. 14 - POWER SUPPLY CORD REPLACEMENT If replacement of a clogged or dirty nozzle. NOZZLE MAINTENANCE See Figure 18...
User Manual
Page 19
... detergent bucket before storing. Always empty water from the water inlet. n Store the unit and accessories in the OFF position. See the Replacement Parts List for available sizes and part numbers of the pump. n Disconnect the water connection. NOTE: Regular use of heat that does not reach freezing temperatures. MAINTENANCE STORING THE...
... detergent bucket before storing. Always empty water from the water inlet. n Store the unit and accessories in the OFF position. See the Replacement Parts List for available sizes and part numbers of the pump. n Disconnect the water connection. NOTE: Regular use of heat that does not reach freezing temperatures. MAINTENANCE STORING THE...
User Manual
Page 21
... to the operating instructions as to change or improve the design of any RYOBI® brand pressure washer without charge for cancellation or rescission of the contract of sale of any defective part, must be repaired or replaced without assuming any obligation to modify any defective... delivering the product to the service center for personal, family or household use of parts or accessories which vary from state to the original retail purchaser only and commences on to all RYOBI® brand pressure washer distributed by Techtronic Industries North America, Inc., and sold ...
... to the operating instructions as to change or improve the design of any RYOBI® brand pressure washer without charge for cancellation or rescission of the contract of sale of any defective part, must be repaired or replaced without assuming any obligation to modify any defective... delivering the product to the service center for personal, family or household use of parts or accessories which vary from state to the original retail purchaser only and commences on to all RYOBI® brand pressure washer distributed by Techtronic Industries North America, Inc., and sold ...
User Manual 5
Page 3
... x 40 mm 6 Detergent Tank Cap 1 Quick Start Label 1 Turbo Nozzle 1 Soap Nozzle 1 15° Nozzle 1 Nozzle Grommet 3 Detergent Tank Assembly 1 Ryobi Logo Label 1 Washer (M6 2 Lock Nut (M6 6 Main Frame 1 Injection Hose 1 Cord Wrap Label 1 Performance Label 1 Danger Label 1 Pump Housing Assembly... 20 mm 4 Washer (2 in all correspondence regarding your PRESSURE WASHER or when ordering replacement parts. RY14122 The model number will be found on a plate attached to pump housing. Key No. 27 2 Foot Pad 2 KEY PART NO. Key Nos. 39-40 1 O-Ring (Large 1 O-Ring (Small 1 Data...
... x 40 mm 6 Detergent Tank Cap 1 Quick Start Label 1 Turbo Nozzle 1 Soap Nozzle 1 15° Nozzle 1 Nozzle Grommet 3 Detergent Tank Assembly 1 Ryobi Logo Label 1 Washer (M6 2 Lock Nut (M6 6 Main Frame 1 Injection Hose 1 Cord Wrap Label 1 Performance Label 1 Danger Label 1 Pump Housing Assembly... 20 mm 4 Washer (2 in all correspondence regarding your PRESSURE WASHER or when ordering replacement parts. RY14122 The model number will be found on a plate attached to pump housing. Key No. 27 2 Foot Pad 2 KEY PART NO. Key Nos. 39-40 1 O-Ring (Large 1 O-Ring (Small 1 Data...

User Manual 5
Page 7
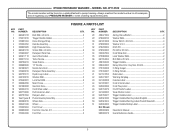
... DESCRIPTION QTY. 522032004 Top Motor Housing 1 661403016 Screw (M4 x 15 mm 10 760504007 Switch 1 KEY NO. 11 12 13 PART NUMBER DESCRIPTION QTY. 561383024 Grommet 1 561383012 Grommet 2 522038004 Lower Motor Housing 1 4 525893001 Motor Bracket 1 5 661403014 Screw (M4 x 12 mm 2 6 525894002 Upper Gasket 1 14 522051003 ... Foam Pad 1 10 661403015 Screw (M3 x 14 mm 4 7 Always mention the model number in all correspondence regarding your PRESSURE WASHER or when ordering replacement parts. RY14122 The model number will be found on a plate attached to pump housing...
... DESCRIPTION QTY. 522032004 Top Motor Housing 1 661403016 Screw (M4 x 15 mm 10 760504007 Switch 1 KEY NO. 11 12 13 PART NUMBER DESCRIPTION QTY. 561383024 Grommet 1 561383012 Grommet 2 522038004 Lower Motor Housing 1 4 525893001 Motor Bracket 1 5 661403014 Screw (M4 x 12 mm 2 6 525894002 Upper Gasket 1 14 522051003 ... Foam Pad 1 10 661403015 Screw (M3 x 14 mm 4 7 Always mention the model number in all correspondence regarding your PRESSURE WASHER or when ordering replacement parts. RY14122 The model number will be found on a plate attached to pump housing...
User Manual 5
Page 11
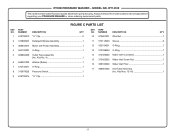
...DESCRIPTION QTY. 678799013 "U" Clip 2 KEY NO. 10 PART NUMBER DESCRIPTION QTY. 870601001 Wire Nut 1 2 310868001 Detergent Nipple Assembly 1 3 308833014 Motor and Pump Assembly 1 4 563193001 O-Ring 1 11 570113003 Sleeve 2 12 563194001 O-Ring 1 13 570768004 O-Ring 1 5 308862005 Outlet Tube Assembly (Inc. RYOBI PRESSURE WASHER − MODEL NO. Key No. ... "U" Clip 1 11 Always mention the model number in all correspondence regarding your PRESSURE WASHER or when ordering replacement parts. RY14122 The model number will be found on a plate attached to pump housing.
...DESCRIPTION QTY. 678799013 "U" Clip 2 KEY NO. 10 PART NUMBER DESCRIPTION QTY. 870601001 Wire Nut 1 2 310868001 Detergent Nipple Assembly 1 3 308833014 Motor and Pump Assembly 1 4 563193001 O-Ring 1 11 570113003 Sleeve 2 12 563194001 O-Ring 1 13 570768004 O-Ring 1 5 308862005 Outlet Tube Assembly (Inc. RYOBI PRESSURE WASHER − MODEL NO. Key No. ... "U" Clip 1 11 Always mention the model number in all correspondence regarding your PRESSURE WASHER or when ordering replacement parts. RY14122 The model number will be found on a plate attached to pump housing.


