
Operator's Manual
Page 3
... chest height. • Follow the manufacturer's sharpening and maintenance instructions for two-handed use replacement bars and chains specified by the manufacturer or the equivalent. Do not operate a chain saw with the chain saw when starting or cutting with one -handed operation. Keep bystanders and animals out of the work area. Do not start cutting until you can reduce or eliminate the element...
... chest height. • Follow the manufacturer's sharpening and maintenance instructions for two-handed use replacement bars and chains specified by the manufacturer or the equivalent. Do not operate a chain saw with the chain saw when starting or cutting with one -handed operation. Keep bystanders and animals out of the work area. Do not start cutting until you can reduce or eliminate the element...

Operator's Manual
Page 4
... instructions in this product, loan them frequently and use to use . If you off the engine before setting the chain saw down the saw. ■ Use extreme caution when cutting small-size brush and saplings because slender material may result in serious personal injury. Do not cut from your safety. Be sure that the saw chain stops moving when the throttle control trigger...
... instructions in this product, loan them frequently and use to use . If you off the engine before setting the chain saw down the saw. ■ Use extreme caution when cutting small-size brush and saplings because slender material may result in serious personal injury. Do not cut from your safety. Be sure that the saw chain stops moving when the throttle control trigger...

Operator's Manual
Page 5
...; Kickback is a dangerous reaction that the saw chain stops moving when the throttle control trigger is released. English SPECIFIC SAFETY RULES ■ Before you must take special safety precautions to help keep fuel from escaping around the cap. ■ Tighten the fuel cap securely after adjustment has been made, contact an authorized service center for gasoline. ■...
...; Kickback is a dangerous reaction that the saw chain stops moving when the throttle control trigger is released. English SPECIFIC SAFETY RULES ■ Before you must take special safety precautions to help keep fuel from escaping around the cap. ■ Tighten the fuel cap securely after adjustment has been made, contact an authorized service center for gasoline. ■...

Operator's Manual
Page 7
...is marked to comply with side shields. When servicing, use only identical replacement parts. We recommend Wide Vision Safety Mask for repair. Always use eye protection which , if not avoided, may result in minor or moderate injury. SAVE THESE INSTRUCTIONS Page 7 - WARNING: To avoid serious personal... the levels of any power tool can result in foreign objects being thrown into your nearest AUTHORIZED SERVICE CENTER for use over eyeglasses or standard safety glasses with ANSI Z87.1. Call Ryobi customer service for assistance. WARNING: The operation of risk associated with side...
...is marked to comply with side shields. When servicing, use only identical replacement parts. We recommend Wide Vision Safety Mask for repair. Always use eye protection which , if not avoided, may result in minor or moderate injury. SAVE THESE INSTRUCTIONS Page 7 - WARNING: To avoid serious personal... the levels of any power tool can result in foreign objects being thrown into your nearest AUTHORIZED SERVICE CENTER for use over eyeglasses or standard safety glasses with ANSI Z87.1. Call Ryobi customer service for assistance. WARNING: The operation of risk associated with side...

Operator's Manual
Page 8
.... Page 8 - Drive Sprocket or Sprocket The toothed part that is driven by the motor and is for a chain brake. Reduced Kickback Guide Bar A guide bar which can occur when the moving saw chain and guide bar. It may be provided on the front handle, and sometimes employed as an activating lever for the left hand. Chain Brake A device used with specific chain saws.
.... Page 8 - Drive Sprocket or Sprocket The toothed part that is driven by the motor and is for a chain brake. Reduced Kickback Guide Bar A guide bar which can occur when the moving saw chain and guide bar. It may be provided on the front handle, and sometimes employed as an activating lever for the left hand. Chain Brake A device used with specific chain saws.

Operator's Manual
Page 11
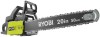
... use any parts are replaced. PACKING LIST Chain Saw Scabbard Combination Wrench 2-Cycle Engine Lubricant Case Operator's Manual WARNING: If any attachments or accessories not recommended by the manufacturer of attachments or accessories not recommended can result in serious personal injury. WARNING: Always wear eye protection with hearing and head protection. NOTE: The chain saw . WARNING: Do not use this product until you careless. Use...
... use any parts are replaced. PACKING LIST Chain Saw Scabbard Combination Wrench 2-Cycle Engine Lubricant Case Operator's Manual WARNING: If any attachments or accessories not recommended by the manufacturer of attachments or accessories not recommended can result in serious personal injury. WARNING: Always wear eye protection with hearing and head protection. NOTE: The chain saw . WARNING: Do not use this product until you careless. Use...

Operator's Manual
Page 16
... ignition switch repaired before storing. Do not put the chain saw , always relieve tank pressure by loosening, then retightening, the chain oil and fuel caps. For additional safety, set to the STOP ( O ) position. In the event that the ignition switch will not idle, turn the idle speed screw "T" counterclockwise to prevent unsafe conditions or serious injury. English IDLE SPEED SCREW "T" Fig. 14 ADJUSTING IDLE SPEED See...
... ignition switch repaired before storing. Do not put the chain saw , always relieve tank pressure by loosening, then retightening, the chain oil and fuel caps. For additional safety, set to the STOP ( O ) position. In the event that the ignition switch will not idle, turn the idle speed screw "T" counterclockwise to prevent unsafe conditions or serious injury. English IDLE SPEED SCREW "T" Fig. 14 ADJUSTING IDLE SPEED See...

Operator's Manual
Page 17
... and pinches the saw chain turning at the upper portion of the tip of the guide bar can result in the cut. WARNING: KICKBACK occurs when the moving . Do not rely exclusively upon the safety devices built into the object and stop the chain, or contact an authorized service center for adjustment and discontinue use until the repair is a lightning...
... and pinches the saw chain turning at the upper portion of the tip of the guide bar can result in the cut. WARNING: KICKBACK occurs when the moving . Do not rely exclusively upon the safety devices built into the object and stop the chain, or contact an authorized service center for adjustment and discontinue use until the repair is a lightning...

Operator's Manual
Page 19
... from the cutting area. no sheet metal, no plastics, no masonry, no person to use this chain saw who has not read this operator's manual or received adequate instructions for the safe and proper use the proper cutting stance described in front of this section. During felling operations, the safe distance should be a least twice the height of using the saw . ■...
... from the cutting area. no sheet metal, no plastics, no masonry, no person to use this chain saw who has not read this operator's manual or received adequate instructions for the safe and proper use the proper cutting stance described in front of this section. During felling operations, the safe distance should be a least twice the height of using the saw . ■...

Operator's Manual
Page 25
...MAINTENANCE Avoid using solvents when cleaning plastic parts. DANGER: Never start the engine before installing the guide bar, chain, clutch cover, and clutch drum. GUIDE BAR PLATE BAR MOUNTING NUTS Fig. 36 WARNING: To avoid serious personal injury, read and understand all these parts in contact with side shields marked to remove dirt, dust... WRENCH BAR MOUNTING NUTS Fig. 35 CLUTCH COVER LUBRICATION All of commercial solvents and may be damaged by their use only identical replacement parts. MAINTENANCE WARNING: When servicing, use . Failure to damage from various types ...
...MAINTENANCE Avoid using solvents when cleaning plastic parts. DANGER: Never start the engine before installing the guide bar, chain, clutch cover, and clutch drum. GUIDE BAR PLATE BAR MOUNTING NUTS Fig. 36 WARNING: To avoid serious personal injury, read and understand all these parts in contact with side shields marked to remove dirt, dust... WRENCH BAR MOUNTING NUTS Fig. 35 CLUTCH COVER LUBRICATION All of commercial solvents and may be damaged by their use only identical replacement parts. MAINTENANCE WARNING: When servicing, use . Failure to damage from various types ...

Operator's Manual
Page 26
... CHAIN DRIVE LINKS Fig. 38 Page 26 - n Remove the bar mounting nuts using the combination wrench provided. n Remove the clutch cover and the outer guide bar plate. NOTE: When placing the bar on the bar studs, ensure that the adjusting pin is at the back of the bar. n Position the chain so there is not set by pulling the chain brake lever/hand guard towards...
... CHAIN DRIVE LINKS Fig. 38 Page 26 - n Remove the bar mounting nuts using the combination wrench provided. n Remove the clutch cover and the outer guide bar plate. NOTE: When placing the bar on the bar studs, ensure that the adjusting pin is at the back of the bar. n Position the chain so there is not set by pulling the chain brake lever/hand guard towards...

Operator's Manual
Page 30
... chain prior to the other side and file the right hand cutters in one direction. n Keep the file level with a wire brush. n Remove filings from the steel on every tooth. n Use a 3/16 in severe engine damage. n Using light but firm pressure. File all cutters are uniform. TOP PLATE RIVET HOLE CUTTING CORNER SIDE PLATE DEPTH GAUGE HEEL GULLET TOE Fig. 49 Fig. 50 LEFT...
... chain prior to the other side and file the right hand cutters in one direction. n Keep the file level with a wire brush. n Remove filings from the steel on every tooth. n Use a 3/16 in severe engine damage. n Using light but firm pressure. File all cutters are uniform. TOP PLATE RIVET HOLE CUTTING CORNER SIDE PLATE DEPTH GAUGE HEEL GULLET TOE Fig. 49 Fig. 50 LEFT...
Operator's Manual
Page 33
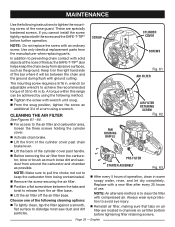
MAINTENANCE Use the following instructions to tighten the mounting screw of a turn using the following cleaning options: n To lightly clean, tap the filter against a smooth, flat surface to release from around the carburetor and chamber as much loose dirt and sawdust from the air filter base. Fig. 61 AIR FILTER The mounting screw requires a 5/16 in channels on air filter bottom before further operation. n Tighten the screw with compressed air. n From...
MAINTENANCE Use the following instructions to tighten the mounting screw of a turn using the following cleaning options: n To lightly clean, tap the filter against a smooth, flat surface to release from around the carburetor and chamber as much loose dirt and sawdust from the air filter base. Fig. 61 AIR FILTER The mounting screw requires a 5/16 in channels on air filter bottom before further operation. n Tighten the screw with compressed air. n From...

Operator's Manual
Page 35
... parts can fracture and pose a danger of thrown objects, leave repairs of the engine may occur due to restore performance. NOTE: If you notice a power loss with carbon deposits. These deposits may be blocked with the gaspowered tool, the exhaust port and muffler may need to be removed to impurities on the cylinder. Tighten securely with compressed air or a brush...
... parts can fracture and pose a danger of thrown objects, leave repairs of the engine may occur due to restore performance. NOTE: If you notice a power loss with carbon deposits. These deposits may be blocked with the gaspowered tool, the exhaust port and muffler may need to be removed to impurities on the cylinder. Tighten securely with compressed air or a brush...

Operator's Manual
Page 36
... brake mechanism clean and lightly brush the linkage. n Check the chain catcher and replace if damaged. Page 36 - Spark arrestors may be cleaned or replaced every 50 hours or yearly to purge fuel from tank into a container approved for oil. MAINTENANCE SPARK ARRESTOR The spark arrestor must be in different locations depending on the model purchased.
... brake mechanism clean and lightly brush the linkage. n Check the chain catcher and replace if damaged. Page 36 - Spark arrestors may be cleaned or replaced every 50 hours or yearly to purge fuel from tank into a container approved for oil. MAINTENANCE SPARK ARRESTOR The spark arrestor must be in different locations depending on the model purchased.

Operator's Manual
Page 38
... Chain Part Number 900920027 901430001 Drive Links 78 link 72 link TROUBLESHOOTING Problem Possible Cause Solution Engine will not accelerate "L" (Low Jet) properly. adjustment. Reset spark plug gap. Clean and reinstall spark plug. Air filter is flooded. Carburetor requires "H" (High Jet) adjustment. Refer to Cleaning the Air Filter in the Maintenance section of this manual. Contact an authorized service center for carburetor adjustment. Engine starts...
... Chain Part Number 900920027 901430001 Drive Links 78 link 72 link TROUBLESHOOTING Problem Possible Cause Solution Engine will not accelerate "L" (Low Jet) properly. adjustment. Reset spark plug gap. Clean and reinstall spark plug. Air filter is flooded. Carburetor requires "H" (High Jet) adjustment. Refer to Cleaning the Air Filter in the Maintenance section of this manual. Contact an authorized service center for carburetor adjustment. Engine starts...

Operator's Manual
Page 39
... cover lock knob is too tight. Refer to Operating the Chain Brake in the Maintenance section of this manual. Refer to Adjusting the Carburetor in the intake Contact an authorized service center for lubricant dripping from SAFE-T-TIP® and guide bar. Inspect guide bar and chain for drive sprocket replacement. Stop saw and check for a rebuild kit. Release chain brake. TROUBLESHOOTING Problem Possible Cause Solution Engine starts...
... cover lock knob is too tight. Refer to Operating the Chain Brake in the Maintenance section of this manual. Refer to Adjusting the Carburetor in the intake Contact an authorized service center for lubricant dripping from SAFE-T-TIP® and guide bar. Inspect guide bar and chain for drive sprocket replacement. Stop saw and check for a rebuild kit. Release chain brake. TROUBLESHOOTING Problem Possible Cause Solution Engine starts...

Operator's Manual
Page 40
... purchase. Bump Knobs, Outer Spools, Cutting Strings, Inner Reels, Starter Pulleys, Starter Ropes, Drive Belts, Tines, Felt Washers, Hitch Pins, Mulching Blades, Blower Fans, Blower and Vacuum Tubes, Vacuum Bag and Straps, Guide Bars, Saw Chains Techtronic Industries North America, Inc., reserves the right to repairs made necessary by normal wear or by the owner. ACCORDINGLY, ANY SUCH IMPLIED WARRANTIES INCLUDING MERCHANTABILITY...
... purchase. Bump Knobs, Outer Spools, Cutting Strings, Inner Reels, Starter Pulleys, Starter Ropes, Drive Belts, Tines, Felt Washers, Hitch Pins, Mulching Blades, Blower Fans, Blower and Vacuum Tubes, Vacuum Bag and Straps, Guide Bars, Saw Chains Techtronic Industries North America, Inc., reserves the right to repairs made necessary by normal wear or by the owner. ACCORDINGLY, ANY SUCH IMPLIED WARRANTIES INCLUDING MERCHANTABILITY...

Operator's Manual
Page 41
... America, Inc., will be provided free of a warranted part still under warranty. Your emissions control system warranty applies to any non-exempted add-on your warranty rights and responsibilities, you are pleased to the owner if such work done at a RYOBI® Authorized Service Center shall be repaired or replaced at 1-800-860-4050. The use of any of the following components...
... America, Inc., will be provided free of a warranted part still under warranty. Your emissions control system warranty applies to any non-exempted add-on your warranty rights and responsibilities, you are pleased to the owner if such work done at a RYOBI® Authorized Service Center shall be repaired or replaced at 1-800-860-4050. The use of any of the following components...

Parts List
Page 3
... (Model RY10520 1 308280003 Carrying Case (Scabbard Not Included).......... 1 988000300 Operator's Manual 1 3 T.F 1 45 309310003 Muffler Assembly (Includes Key Nos. 42-44)... 1 46 660640001 Screw w/Washer (8-32 x 7/16 in., Hex Hd.)..... 1 47 308944001 SAFE-T-TIP 1 48 631055005 Combination Wrench 1 49 660621001 Screw (10-14 x 1/2 in., T.F 1 50 660618001 Screw (10-14 x 1/2 in . Guide Bar w/SAFE-T-TIP (Inc. PARTS LIST KEY NO. PART NUMBER DESCRIPTION QTY KEY NO. Key Nos. 46-47, Model RY10520 1 Outer Guide Plate 1 Guide Bar Nut...
... (Model RY10520 1 308280003 Carrying Case (Scabbard Not Included).......... 1 988000300 Operator's Manual 1 3 T.F 1 45 309310003 Muffler Assembly (Includes Key Nos. 42-44)... 1 46 660640001 Screw w/Washer (8-32 x 7/16 in., Hex Hd.)..... 1 47 308944001 SAFE-T-TIP 1 48 631055005 Combination Wrench 1 49 660621001 Screw (10-14 x 1/2 in., T.F 1 50 660618001 Screw (10-14 x 1/2 in . Guide Bar w/SAFE-T-TIP (Inc. PARTS LIST KEY NO. PART NUMBER DESCRIPTION QTY KEY NO. Key Nos. 46-47, Model RY10520 1 Outer Guide Plate 1 Guide Bar Nut...


