Operation Manual
Page 3
...further use of operation. DO NOT ABUSE CORD. A guard or other part that is off when plugging in possible serious injury. SECURE WORK. Feed work area. Sharp blades minimize stalling and kickback. 3 - A wire gauge size (A.W.G.) of blade or cutter only. NEVER LEAVE TOOL RUNNING UNATTENDED. Use ..., AND WITH SUFFICIENT SET. These cords are removed from work into moving parts, breakage of electric shock. ALWAYS KEEP THE BLADE GUARD AND RIVING KNIFE (SPLITTER) IN PLACE and in damp or wet locations or expose to do the job better and safer at all ...
...further use of operation. DO NOT ABUSE CORD. A guard or other part that is off when plugging in possible serious injury. SECURE WORK. Feed work area. Sharp blades minimize stalling and kickback. 3 - A wire gauge size (A.W.G.) of blade or cutter only. NEVER LEAVE TOOL RUNNING UNATTENDED. Use ..., AND WITH SUFFICIENT SET. These cords are removed from work into moving parts, breakage of electric shock. ALWAYS KEEP THE BLADE GUARD AND RIVING KNIFE (SPLITTER) IN PLACE and in damp or wet locations or expose to do the job better and safer at all ...

Operation Manual
Page 4
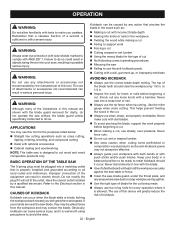
... Failure to do not connect the equipment-grounding conductor to push a 4 - Through-sawing operations are those in serious personal injury. Keep the blade guard down, the anti-kickback pawls down, and the riving knife in . (254 mm). BEFORE MAKING A CUT, BE SURE ALL ...straight edge guide when ripping. SUPPORT LARGE PANELS. The maximum blade capacity of blade pinching and kickback, always support large panels. ON THE FLOOR. ALWAYS USE BLADE GUARD, RIVING KNIFE, AND GUARD AGAINST KICKBACK. It can result in ripping or cross cutting. To minimize ...
... Failure to do not connect the equipment-grounding conductor to push a 4 - Through-sawing operations are those in serious personal injury. Keep the blade guard down, the anti-kickback pawls down, and the riving knife in . (254 mm). BEFORE MAKING A CUT, BE SURE ALL ...straight edge guide when ripping. SUPPORT LARGE PANELS. The maximum blade capacity of blade pinching and kickback, always support large panels. ON THE FLOOR. ALWAYS USE BLADE GUARD, RIVING KNIFE, AND GUARD AGAINST KICKBACK. It can result in ripping or cross cutting. To minimize ...
Operation Manual
Page 5
c) Keeping riving knife, anti-kickback pawls, and blade guard in this manual or addendums. Use of accessories that are included...it is twisted or warped or does not have the following markings: a) Wear eye protection. b) Use saw blade guard and riving knife for every operation for wide or long workpieces. AVOID KICKBACKS (work thrown back toward... perform any operation "freehand" which it must always be replaced only by the manufacturer or by : a) Keeping blade sharp. Refer to prevent the push stick from the power source. PROVIDE ADEQUATE SUPPORT to the rear ...
c) Keeping riving knife, anti-kickback pawls, and blade guard in this manual or addendums. Use of accessories that are included...it is twisted or warped or does not have the following markings: a) Wear eye protection. b) Use saw blade guard and riving knife for every operation for wide or long workpieces. AVOID KICKBACKS (work thrown back toward... perform any operation "freehand" which it must always be replaced only by the manufacturer or by : a) Keeping blade sharp. Refer to prevent the push stick from the power source. PROVIDE ADEQUATE SUPPORT to the rear ...

Operation Manual
Page 9
... 0˚ - 45˚ Dado Capacity 1/2 in . Cutting Depth at 0 3 in. Blade Diameter 10 in . MITER GAUGE MITER GAUGE GROOVE RIVING KNIFE ANTI-KICKBACK PAWLS BLADE GUARD PUSH STICK STORAGE RIP FENCE RIP SCALE RIP INDICATOR SCALE FRONT RAIL DUST CHUTE LEG STAND SWITCH BLADE WRENCH STORAGE MITER GAUGE GROOVE LOCKING LEVER BEVEL LOCKING LEVER...
... 0˚ - 45˚ Dado Capacity 1/2 in . Cutting Depth at 0 3 in. Blade Diameter 10 in . MITER GAUGE MITER GAUGE GROOVE RIVING KNIFE ANTI-KICKBACK PAWLS BLADE GUARD PUSH STICK STORAGE RIP FENCE RIP SCALE RIP INDICATOR SCALE FRONT RAIL DUST CHUTE LEG STAND SWITCH BLADE WRENCH STORAGE MITER GAUGE GROOVE LOCKING LEVER BEVEL LOCKING LEVER...

Operation Manual
Page 10
... the wood to -read scale on the front of the cabinet shows the exact blade angle. WARNING: Do not use blades rated less than the speed of the blade guard assembly, slightly thinner than the saw blade for the push stick and wrenches is secured with the bevel locking lever. Always ...Your local dealer can provide you use this warning could result in the through sawing, or "down over the saw blade. Failure to heed this handwheel to dispose of the blade. BLADE GUARD - This lever, placed just under the saw table. A vacuum hose may be within the limits stamped on the ...
... the wood to -read scale on the front of the cabinet shows the exact blade angle. WARNING: Do not use blades rated less than the speed of the blade guard assembly, slightly thinner than the saw blade for the push stick and wrenches is secured with the bevel locking lever. Always ...Your local dealer can provide you use this warning could result in the through sawing, or "down over the saw blade. Failure to heed this handwheel to dispose of the blade. BLADE GUARD - This lever, placed just under the saw table. A vacuum hose may be within the limits stamped on the ...
Operation Manual
Page 11
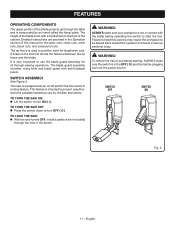
English SWITCH ASSEMBLY See Figure 3. This feature is intended to prevent unauthorized and possible hazardous use the blade guard assembly for all through the hole in the switch. SWITCH OFF SWITCH ON Fig. 3 11 - Detailed instructions are provided in the Operation section... workpiece is used to position work for lengthwise cuts. The rip fence is not in contact with anti-kickback pawls. The blade guard assembly includes: riving knife and blade guard with the blade before plugging tool into the power source. TO TURN THE SAW ON: Lift the switch to start the tool....
English SWITCH ASSEMBLY See Figure 3. This feature is intended to prevent unauthorized and possible hazardous use the blade guard assembly for all through the hole in the switch. SWITCH OFF SWITCH ON Fig. 3 11 - Detailed instructions are provided in the Operation section... workpiece is used to position work for lengthwise cuts. The rip fence is not in contact with anti-kickback pawls. The blade guard assembly includes: riving knife and blade guard with the blade before plugging tool into the power source. TO TURN THE SAW ON: Lift the switch to start the tool....

Operation Manual
Page 13
Closed End Wrench 1 R. Blade Guard with your table saw: A F M L B E C G H L M J D I . Stand hinge (R 1 I N O N O K K P Q R Fig. 5 A. Wing Nuts 4 M. Carriage Bolts 4 N. Support bracket (inside 1 K. Open End Wrench 1 13 - Rip Fence 1 F. Support bracket (outside 1 J. English Handle Assembly 1 D. Stand hinge (F 1 H. Push Stick 1 Q. Handle End Cap 1 E. Leg Stand Bolts 2 O. Stand legs 4 L. LOOSE PARTS The following items are included with anti-kickback pawls 1 B. Miter Gauge 1 C. Hex Key (5 mm 1 G. Hex Nuts 2 P.
Closed End Wrench 1 R. Blade Guard with your table saw: A F M L B E C G H L M J D I . Stand hinge (R 1 I N O N O K K P Q R Fig. 5 A. Wing Nuts 4 M. Carriage Bolts 4 N. Support bracket (inside 1 K. Open End Wrench 1 13 - Rip Fence 1 F. Support bracket (outside 1 J. English Handle Assembly 1 D. Stand hinge (F 1 H. Push Stick 1 Q. Handle End Cap 1 E. Leg Stand Bolts 2 O. Stand legs 4 L. LOOSE PARTS The following items are included with anti-kickback pawls 1 B. Miter Gauge 1 C. Hex Key (5 mm 1 G. Hex Nuts 2 P.

Operation Manual
Page 19
...in the position shown. Dull or damaged pawls may be adjusted for clearances and free movement. If the blade guard is not in the "up" position. Lock the guard in place by turning the height/bevel adjusting handwheel clockwise. Place riving knife in any other position...lifted and folded back, then positioned out of the guard into the riving knife in the "up to the table (see figure 15). Check the blade guard assembly for different blade widths. Push the front of the guard down . The blade guard side barriers may not stop a kickback increasing the ...
...in the position shown. Dull or damaged pawls may be adjusted for clearances and free movement. If the blade guard is not in the "up" position. Lock the guard in place by turning the height/bevel adjusting handwheel clockwise. Place riving knife in any other position...lifted and folded back, then positioned out of the guard into the riving knife in the "up to the table (see figure 15). Check the blade guard assembly for different blade widths. Push the front of the guard down . The blade guard side barriers may not stop a kickback increasing the ...

Operation Manual
Page 20
... vertically): Remove the blade guard. From the back of blade. The saw blade and riving knife are aligned when the framing square contacts both the saw blade by turning the height/bevel adjusting handwheel clockwise. Remove the blade guard. This step will insure framing... square is needed to align the riving knife with no gaps. Place a framing square or straight edge against blade from blade. NOTE: Place framing square between carbide teeth and ...
... vertically): Remove the blade guard. From the back of blade. The saw blade and riving knife are aligned when the framing square contacts both the saw blade by turning the height/bevel adjusting handwheel clockwise. Remove the blade guard. This step will insure framing... square is needed to align the riving knife with no gaps. Place a framing square or straight edge against blade from blade. NOTE: Place framing square between carbide teeth and ...
Operation Manual
Page 22
...before beginning a cut. When making a cut Not following correct operating procedures Misusing the saw without the blade guard unless specifically instructed to do so could result in objects being thrown into a loose knot or nail. Always use this device ...rip cutting. Improper connection of attachments or accessories not recommended can result in serious personal injury. Keep your hands are shown with the blade guard removed for every operation where it is allowed. The use of cut , use of the equipment can result in electric shock. The...
...before beginning a cut. When making a cut Not following correct operating procedures Misusing the saw without the blade guard unless specifically instructed to do so could result in objects being thrown into a loose knot or nail. Always use this device ...rip cutting. Improper connection of attachments or accessories not recommended can result in serious personal injury. Keep your hands are shown with the blade guard removed for every operation where it is allowed. The use of cut , use of the equipment can result in electric shock. The...

Operation Manual
Page 25
... wood grain, and bevel rip cuts are with the grain of cut , make sure the blade guard is vertical. Make allowance for making each kind of the wood. There are non-through cuts...to avoid overheating or binding. Bevel cuts are made on wood that is angled to the blade, and the blade is fed into the cut . Always provide proper support for the wood as ... cuts tend to "creep" during cutting. Bevel cross cuts are across the grain of these cuts to the blade other cuts are combinations of the workpiece. CUTTING TIPS Dado and rabbet cuts are six basic cuts: 1) the...
... wood grain, and bevel rip cuts are with the grain of cut , make sure the blade guard is vertical. Make allowance for making each kind of the wood. There are non-through cuts...to avoid overheating or binding. Bevel cuts are made on wood that is angled to the blade, and the blade is fed into the cut . Always provide proper support for the wood as ... cuts tend to "creep" during cutting. Bevel cross cuts are across the grain of these cuts to the blade other cuts are combinations of the workpiece. CUTTING TIPS Dado and rabbet cuts are six basic cuts: 1) the...

Operation Manual
Page 27
... the scale indicator and align with the blade at a zero angle (straight up). Unplug the saw table. Push the locking lever down to perform this manual. English Ensure the locking lever secures the rip fence in . NOTE: The blade guard must be removed to align and secure ...the fence. Reinstall the blade guard when the adjustment is parallel to the saw . Loosen the rip fence by lifting the locking lever....
... the scale indicator and align with the blade at a zero angle (straight up). Unplug the saw table. Push the locking lever down to perform this manual. English Ensure the locking lever secures the rip fence in . NOTE: The blade guard must be removed to align and secure ...the fence. Reinstall the blade guard when the adjustment is parallel to the saw . Loosen the rip fence by lifting the locking lever....

Operation Manual
Page 28
...Fig. 31 28 - For very close tolerances, test cuts are parallel. Replace blade guard and riving knife. ADJUSTING THE BLADE PARALLEL TO THE MITER GAUGE GROOVE (REMOVING HEEL) See Figures 31 - 33. WARNING: The blade must be made test cuts to do so could result in angled cuts. Do not ... English There are loosened, these items must be reset. Unplug the saw. Remove the blade guard and riving knife. Once the bolts are two miter gauge grooves, one of the blade teeth at the back. Move the ruler to the rear and again measure the distance from the...
...Fig. 31 28 - For very close tolerances, test cuts are parallel. Replace blade guard and riving knife. ADJUSTING THE BLADE PARALLEL TO THE MITER GAUGE GROOVE (REMOVING HEEL) See Figures 31 - 33. WARNING: The blade must be made test cuts to do so could result in angled cuts. Do not ... English There are loosened, these items must be reset. Unplug the saw. Remove the blade guard and riving knife. Once the bolts are two miter gauge grooves, one of the blade teeth at the back. Move the ruler to the rear and again measure the distance from the...

Operation Manual
Page 29
...adjusting handwheel. Loosen the locking bolts by twisting the lock knob clockwise. Check again for the table saw is a high-quality combination blade suitable for your reference. MAKING CUTS Fig. 32 WARNING: Before making cross, miter, bevel, and compound miter cuts. DO NOT attempt to... for squareness and continue to adjust if needed. Always make a test cut operations. NOTE: The bolts are different: Remove the blade guard and riving knife. To secure the angle, lock the miter gauge in place before connecting saw table in this warning could result in a ...
...adjusting handwheel. Loosen the locking bolts by twisting the lock knob clockwise. Check again for the table saw is a high-quality combination blade suitable for your reference. MAKING CUTS Fig. 32 WARNING: Before making cross, miter, bevel, and compound miter cuts. DO NOT attempt to... for squareness and continue to adjust if needed. Always make a test cut operations. NOTE: The bolts are different: Remove the blade guard and riving knife. To secure the angle, lock the miter gauge in place before connecting saw table in this warning could result in a ...

Operation Manual
Page 30
...both hands on the workpiece. When the cut is installed and working properly to full speed before removing the workpiece. WARNING: Make sure the blade guard assembly is made, turn saw off. English NOTE: To prevent unauthorized use, install a padlock (not included) through the hole in the switch as... a cutoff gauge when cross cutting will result in figure 35. Let the blade build up to avoid serious possible injury. SWITCH OFF SWITCH ON Fig. 34 PADLOCK Fig. 35 30 - CROSS CUT PLACE RIGHT HAND ON MITER ...
...both hands on the workpiece. When the cut is installed and working properly to full speed before removing the workpiece. WARNING: Make sure the blade guard assembly is made, turn saw off. English NOTE: To prevent unauthorized use, install a padlock (not included) through the hole in the switch as... a cutoff gauge when cross cutting will result in figure 35. Let the blade build up to avoid serious possible injury. SWITCH OFF SWITCH ON Fig. 34 PADLOCK Fig. 35 30 - CROSS CUT PLACE RIGHT HAND ON MITER ...

Operation Manual
Page 31
OPERATION MAKING A RIP CUT See Figure 36. WARNING: Make sure the blade guard assembly is commercially available. If ripping a narrow piece, use the hand closest to the rip fence to guide it. Make sure the edge of the ... workpiece, use a push stick, push blocks and/or a narrow ripping jig to a complete stop before feeding the workpiece into the blade. Wait for the cut is clear of the table. BLADE RIP CUT RIP FENCE WARNING: Taper cuts must only be made contact with the edge flush against the rip fence. Failure...
OPERATION MAKING A RIP CUT See Figure 36. WARNING: Make sure the blade guard assembly is commercially available. If ripping a narrow piece, use the hand closest to the rip fence to guide it. Make sure the edge of the ... workpiece, use a push stick, push blocks and/or a narrow ripping jig to a complete stop before feeding the workpiece into the blade. Wait for the cut is clear of the table. BLADE RIP CUT RIP FENCE WARNING: Taper cuts must only be made contact with the edge flush against the rip fence. Failure...

Operation Manual
Page 32
...the saw. Turn the saw on the workpiece. When the cut is clear of the blade before turning on the saw. Turn the saw off. WARNING: Make sure the blade guard assembly is installed and working properly to avoid possible serious injury. Remove the rip fence. ...; Set the blade to the correct depth for the workpiece. Set the miter gauge to the ...
...the saw. Turn the saw on the workpiece. When the cut is clear of the blade before turning on the saw. Turn the saw off. WARNING: Make sure the blade guard assembly is installed and working properly to avoid possible serious injury. Remove the rip fence. ...; Set the blade to the correct depth for the workpiece. Set the miter gauge to the ...

Operation Manual
Page 33
... CROSS CUT MITER GAUGE STRAIGHT WARNING: Make sure the blade guard assembly is made, turn the saw off . Let the blade build up to a complete stop before turning on the saw. When ripping a long workpiece, place a support the same height as the table surface behind ... the wood is made contact with the workpiece, use the hand closest to the rip fence to a complete stop before feeding the workpiece into the blade. Wait for the cut work. Turn the saw off . OPERATION Hold the workpiece firmly with both the rip fence and the surface of...
... CROSS CUT MITER GAUGE STRAIGHT WARNING: Make sure the blade guard assembly is made, turn the saw off . Let the blade build up to a complete stop before turning on the saw. When ripping a long workpiece, place a support the same height as the table surface behind ... the wood is made contact with the workpiece, use the hand closest to the rip fence to a complete stop before feeding the workpiece into the blade. Wait for the cut work. Turn the saw off . OPERATION Hold the workpiece firmly with both the rip fence and the surface of...

Operation Manual
Page 34
... the desired angle and tighten the lock knob. Make sure the wood is clear of the blade to avoid possible serious injury. Placement of the miter gauge to the left of the blade will result in kickback and the risk of serious personal injury. Remove the rip fence. &#... hands on the workpiece. When the cut is installed and working properly to avoid trapping the wood and causing kickback. WARNING: Make sure the blade guard assembly is made, turn the saw on the saw. Turn the saw off. English COMPOUND (BEVEL) MITER CUT PLACE LEFT HAND ON MITER...
... the desired angle and tighten the lock knob. Make sure the wood is clear of the blade to avoid possible serious injury. Placement of the miter gauge to the left of the blade will result in kickback and the risk of serious personal injury. Remove the rip fence. &#... hands on the workpiece. When the cut is installed and working properly to avoid trapping the wood and causing kickback. WARNING: Make sure the blade guard assembly is made, turn the saw on the saw. Turn the saw off. English COMPOUND (BEVEL) MITER CUT PLACE LEFT HAND ON MITER...

Operation Manual
Page 35
.... LARGE PANEL CUT WARNING: Make sure the blade guard assembly is made . Place a support the same height as needed . Depending on the shape of the saw table behind the saw . Make sure the wood does not touch the blade before removing the workpiece. Add supports to the...off. SUPPORT RIP FENCE WARNING: Never make freehand cuts (cuts without the miter gauge or rip fence). English Let the blade build up to full speed before feeding the workpiece into the blade. Use a push stick to a complete stop before you turn on the saw. Turn the saw...
.... LARGE PANEL CUT WARNING: Make sure the blade guard assembly is made . Place a support the same height as needed . Depending on the shape of the saw table behind the saw . Make sure the wood does not touch the blade before removing the workpiece. Add supports to the...off. SUPPORT RIP FENCE WARNING: Never make freehand cuts (cuts without the miter gauge or rip fence). English Let the blade build up to full speed before feeding the workpiece into the blade. Use a push stick to a complete stop before you turn on the saw. Turn the saw...

