User Manual
Page 3
... the workpiece when possible. BE SURE THE BLADE CLEARS THE WORKPIECE. The maximum blade capacity of any reason. Use of your saw table at approximately hip height. KEEP HANDS AWAY FROM CUTTING AREA. If a work or in any operation. Stay constantly aware of personal... the fence. NEVER hand hold onto or bind the free scrap end of the saw table to prevent the saw arm (bevel function) by a qualified service technician at a time. Lock the miter table by an authorized service center. USE ONLY CORRECT BLADES. SPECIFIC SAFETY RULES ...
... the workpiece when possible. BE SURE THE BLADE CLEARS THE WORKPIECE. The maximum blade capacity of any reason. Use of your saw table at approximately hip height. KEEP HANDS AWAY FROM CUTTING AREA. If a work or in any operation. Stay constantly aware of personal... the fence. NEVER hand hold onto or bind the free scrap end of the saw table to prevent the saw arm (bevel function) by a qualified service technician at a time. Lock the miter table by an authorized service center. USE ONLY CORRECT BLADES. SPECIFIC SAFETY RULES ...
User Manual
Page 7
...make thinner pieces. Kerf The material removed by cutter blades when the workpiece is bent (or set) outward from the blade. Push Blocks (for table saws) Device used to feed the workpiece over , under, behind, or in front of the workpiece to the fence. Resaw A cutting operation to ... to the blade other than the blade, which will be used for jointer planers) Device used to prevent kickback. Push Sticks (for table saws) Device used to push the workpiece during any angle to stop the workpiece from being placed inadvertently in contact with the workpiece at the...
...make thinner pieces. Kerf The material removed by cutter blades when the workpiece is bent (or set) outward from the blade. Push Blocks (for table saws) Device used to feed the workpiece over , under, behind, or in front of the workpiece to the fence. Resaw A cutting operation to ... to the blade other than the blade, which will be used for jointer planers) Device used to prevent kickback. Push Sticks (for table saws) Device used to push the workpiece during any angle to stop the workpiece from being placed inadvertently in contact with the workpiece at the...
User Manual
Page 9
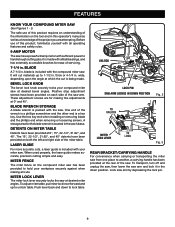
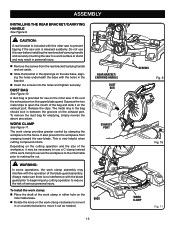
...accurate, precision cutting simple and easy. thick or 4-1/4 in . BEVEL LOCK KNOB The bevel lock knob securely locks your miter saw from one place to lock table. UNLOCK LOCK PIN SAW ARM LOCKED IN DOWN POSITION Fig. 2 TO UNLOCK MITER LOCK LEVER TO LOCK Fig. 3 REAR BRACKET/CARRYING HANDLE For ... this product, familiarize yourself with all cuts. A storage area for making all operating features and safety rules. 9 AMP MOTOR The saw at the rear of the miter table. The 15°, 22-1/2°, 31.62°, and 45° detents have been provided on both the left and right...
...accurate, precision cutting simple and easy. thick or 4-1/4 in . BEVEL LOCK KNOB The bevel lock knob securely locks your miter saw from one place to lock table. UNLOCK LOCK PIN SAW ARM LOCKED IN DOWN POSITION Fig. 2 TO UNLOCK MITER LOCK LEVER TO LOCK Fig. 3 REAR BRACKET/CARRYING HANDLE For ... this product, familiarize yourself with all cuts. A storage area for making all operating features and safety rules. 9 AMP MOTOR The saw at the rear of the miter table. The 15°, 22-1/2°, 31.62°, and 45° detents have been provided on both the left and right...
User Manual
Page 13
...some operations, the work clamp assembly may interfere with the holes in between the grooves on the miter saw base, aligning the holes underneath the base with the operation of serious personal injury. Do not use a... the work clamp in either hole on the miter table base. Rotate the knob on the exhaust port. It fits over the exhaust port on the saw . Squeeze the two metal clips to open the ...mouth of the work clamp to secure the workpiece to the miter table prior to making the cut. Release the...
...some operations, the work clamp assembly may interfere with the holes in between the grooves on the miter saw base, aligning the holes underneath the base with the operation of serious personal injury. Do not use a... the work clamp in either hole on the miter table base. Rotate the knob on the exhaust port. It fits over the exhaust port on the saw . Squeeze the two metal clips to open the ...mouth of the work clamp to secure the workpiece to the miter table prior to making the cut. Release the...
User Manual
Page 16
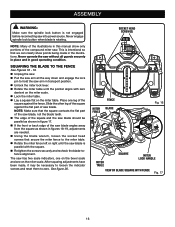
... THE BLADE TO THE FENCE See Figures 16 - 19. Unplug the saw. Pull the saw arm in the illustrations. The saw blade is parallel with zero dentent on the miter scale. Lock the miter table. Lay a square flat on the miter scale. After squaring adjustments have... made in transport position. Unlock the miter lock lever. Rotate the miter table until the saw has two scale indicators, one on the bevel scale and one leg of the saw into power source. ASSEMBLY WARNING: Make sure the spindle lock button is not engaged before reconnecting...
... THE BLADE TO THE FENCE See Figures 16 - 19. Unplug the saw. Pull the saw arm in the illustrations. The saw blade is parallel with zero dentent on the miter scale. Lock the miter table. Lay a square flat on the miter scale. After squaring adjustments have... made in transport position. Unlock the miter lock lever. Rotate the miter table until the saw has two scale indicators, one on the bevel scale and one leg of the saw into power source. ASSEMBLY WARNING: Make sure the spindle lock button is not engaged before reconnecting...
User Manual
Page 18
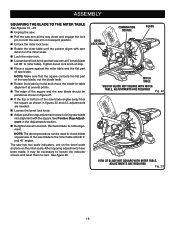
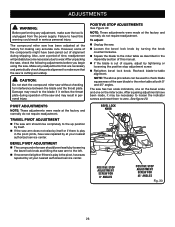
...23, adjustments are needed. Loosen the bevel lock knob. Adjust positive stop . Place a square against the miter table and the flat part of the square and the saw blade should be necessary to loosen the indicator screws and reset them to zero. Tighten bevel lock knob at 0° bevel... (blade set 90° to miter table). ASSEMBLY SQUARING THE BLADE TO THE MITER TABLE See Figures 19 - 23. Unplug the saw. Pull the saw arm all the way down and engage the lock pin to hold the...
...23, adjustments are needed. Loosen the bevel lock knob. Adjust positive stop . Place a square against the miter table and the flat part of the square and the saw blade should be necessary to loosen the indicator screws and reset them to zero. Tighten bevel lock knob at 0° bevel... (blade set 90° to miter table). ASSEMBLY SQUARING THE BLADE TO THE MITER TABLE See Figures 19 - 23. Unplug the saw. Pull the saw arm all the way down and engage the lock pin to hold the...
User Manual
Page 19
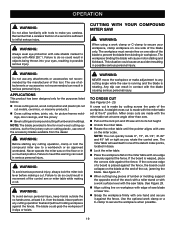
...fence. APPLICATIONS This product has been designed only for picture frames mold- WARNING: Before starting any cutting angle while the saw is running and the blade is made with the miter table set at the 0° position. The blade could result in serious personal injury. If the board is made by... end of the accessory blades available from the blade. Failure to make adjustment to any cutting operation, clamp or bolt the compound miter saw to comply with the saw table. Use the optional work clamp or C-clamp to secure your eyes, resulting in base. Lock the miter...
...fence. APPLICATIONS This product has been designed only for picture frames mold- WARNING: Before starting any cutting angle while the saw is running and the blade is made with the miter table set at the 0° position. The blade could result in serious personal injury. If the board is made by... end of the accessory blades available from the blade. Failure to make adjustment to any cutting operation, clamp or bolt the compound miter saw to comply with the saw table. Use the optional work clamp or C-clamp to secure your eyes, resulting in base. Lock the miter...
User Manual
Page 20
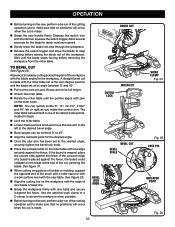
... before raising the blade out of the workpiece with the blade angled to secure the workpiece when possible. Before turning on the miter table with the saw handle firmly. A bevel cut , jamming the blade. NOTE: You can quickly locate 0°, 15°, 22-1/2°, 31.62° and 45° ...the optional work surface level with one hand and secure it against the fence. If the concave edge of a board is made . Grasp the saw table. If the board is made with thumb then squeeze the switch trigger. See Figure 29. Align the cutting line on the blade at an...
... before raising the blade out of the workpiece with the blade angled to secure the workpiece when possible. Before turning on the miter table with the saw handle firmly. A bevel cut , jamming the blade. NOTE: You can quickly locate 0°, 15°, 22-1/2°, 31.62° and 45° ...the optional work surface level with one hand and secure it against the fence. If the concave edge of a board is made . Grasp the saw table. If the board is made with thumb then squeeze the switch trigger. See Figure 29. Align the cutting line on the blade at an...
User Manual
Page 21
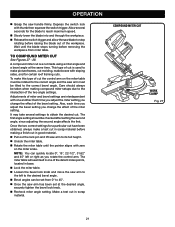
... must be taken when making a finish cut in base. Lock the miter table. Loosen the bevel lock knob and move the saw arm to the left to 45°. Once the saw arm has been set at the same time. Once the two correct settings for certain roof ... good material. Pull out the lock pin and lift saw handle firmly. TO COMPOUND MITER CUT See Figures 27 - 28. OPERATION Grasp the saw arm to its full height. Unlock the miter table. Rotate the miter table until the blade stops turning before making compound miter setups due to...
... must be taken when making a finish cut in base. Lock the miter table. Loosen the bevel lock knob and move the saw arm to the left to 45°. Once the saw arm has been set at the same time. Once the two correct settings for certain roof ... good material. Pull out the lock pin and lift saw handle firmly. TO COMPOUND MITER CUT See Figures 27 - 28. OPERATION Grasp the saw arm to its full height. Unlock the miter table. Rotate the miter table until the blade stops turning before making compound miter setups due to...
User Manual
Page 22
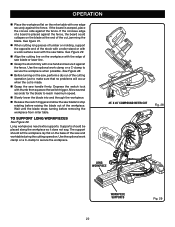
See figure 31. When cutting long pieces of lumber or molding, support the opposite end of saw blade or laser line. Grasp the stock firmly with the saw table. Depress the switch lock with one hand and secure it does not sag. See Figure 29. Align the ... place the convex side against the fence. Use the optional work clamp or a C-clamp to stop rotating before removing the workpiece from miter table. Long workpieces need extra supports. The support should be placed along the workpiece so it against the fence, the board could collapse on the...
See figure 31. When cutting long pieces of lumber or molding, support the opposite end of saw blade or laser line. Grasp the stock firmly with the saw table. Depress the switch lock with one hand and secure it does not sag. See Figure 29. Align the ... place the convex side against the fence. Use the optional work clamp or a C-clamp to stop rotating before removing the workpiece from miter table. Long workpieces need extra supports. The support should be placed along the workpiece so it against the fence, the board could collapse on the...
User Manual
Page 24
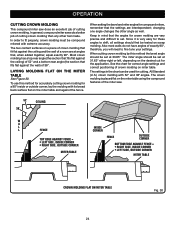
..., crown molding must be used for the application. In general, compound miter saws do not have angles of crown molding on the miter table and against the fence. LAYING MOLDING FLAT ON THE MITER TABLE See Figure 30. Since it is placed flat on a piece of cutting ... that the settings are interdependent; OPERATION CUTTING CROWN MOLDING This compound miter saw . 52° 38° CEILING W A L L FENCE INSIDE CORNER TOP EDGE AGAINST FENCE = LEFT SIDE, INSIDE CORNER RIGHT SIDE, OUTSIDE CORNER MITER TABLE FENCE OUTSIDE CORNER BOTTOM EDGE AGAINST FENCE = RIGHT SIDE, INSIDE CORNER ...
..., crown molding must be used for the application. In general, compound miter saws do not have angles of crown molding on the miter table and against the fence. LAYING MOLDING FLAT ON THE MITER TABLE See Figure 30. Since it is placed flat on a piece of cutting ... that the settings are interdependent; OPERATION CUTTING CROWN MOLDING This compound miter saw . 52° 38° CEILING W A L L FENCE INSIDE CORNER TOP EDGE AGAINST FENCE = LEFT SIDE, INSIDE CORNER RIGHT SIDE, OUTSIDE CORNER MITER TABLE FENCE OUTSIDE CORNER BOTTOM EDGE AGAINST FENCE = RIGHT SIDE, INSIDE CORNER ...
User Manual
Page 26
...61550; Retighten bevel lock knob. See figure 20. TRAVEL PIVOT ADJUSTMENT The saw arm should bevel easily by loosening the bevel lock knob and tilting the saw arm to the miter table at your nearest authorized service center. Failure to heed this manual. If...176; angles. BEVEL PIVOT ADJUSTMENT The compound miter saw should rise completely to zero. CAUTION: Do not start the compound miter saw repaired by turning the knob counterclockwise. Square the blade to the miter table as described in serious personal injury. NOTE: These adjustments ...
...61550; Retighten bevel lock knob. See figure 20. TRAVEL PIVOT ADJUSTMENT The saw arm should bevel easily by loosening the bevel lock knob and tilting the saw arm to the miter table at your nearest authorized service center. Failure to heed this manual. If...176; angles. BEVEL PIVOT ADJUSTMENT The compound miter saw should rise completely to zero. CAUTION: Do not start the compound miter saw repaired by turning the knob counterclockwise. Square the blade to the miter table as described in serious personal injury. NOTE: These adjustments ...
User Manual
Page 27
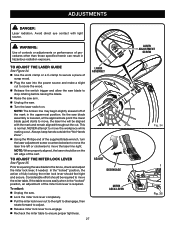
... starts to the fence, check and adjust the miter lock lever, if needed. Considerable effort should feel tight and secure. If the table moves easily when in the "locked" position, an adjustment of procedures other than those specified herein can result in the uppermost position. ...rotate forward to adjust. Release miter lock lever to re-engage Recheck the miter table to stop rotating before raising the blade. Raise the saw arm. Unplug the saw blade assembly is normal. NOTE: The broken line may begin slightly skewed off of scrap wood. ...
... starts to the fence, check and adjust the miter lock lever, if needed. Considerable effort should feel tight and secure. If the table moves easily when in the "locked" position, an adjustment of procedures other than those specified herein can result in the uppermost position. ...rotate forward to adjust. Release miter lock lever to re-engage Recheck the miter table to stop rotating before raising the blade. Raise the saw arm. Unplug the saw blade assembly is normal. NOTE: The broken line may begin slightly skewed off of scrap wood. ...


