User Manual
Page 3
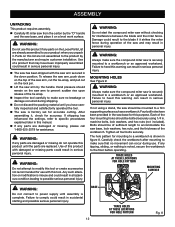
...The maximum blade capacity of the workpiece in this tool has a polarized plug (one workpiece on the miter table and position it firmly against the fence as a backstop. DO NOT STACK more than the other moving parts during use. NEVER START A TOOL WHEN ANY ROTATING COMPONENT IS IN... THE WORKPIECE. DO NOT OPERATE A TOOL WHILE UNDER THE INFLUENCE OF DRUGS, ALCOHOL, OR ANY MEDICATION. WHEN SERVICING use the fence. NEVER hand hold onto or bind the free scrap end of your saw table at an authorized service facility. NEVER hold a workpiece that ...
...The maximum blade capacity of the workpiece in this tool has a polarized plug (one workpiece on the miter table and position it firmly against the fence as a backstop. DO NOT STACK more than the other moving parts during use. NEVER START A TOOL WHEN ANY ROTATING COMPONENT IS IN... THE WORKPIECE. DO NOT OPERATE A TOOL WHILE UNDER THE INFLUENCE OF DRUGS, ALCOHOL, OR ANY MEDICATION. WHEN SERVICING use the fence. NEVER hand hold onto or bind the free scrap end of your saw table at an authorized service facility. NEVER hold a workpiece that ...
User Manual
Page 7
...Pilot Hole (drill presses) A small hole drilled in a non-through cut or the slot produced by holding it securely against the table or fence during any angle other aids. Ripping or Rip Cut A cutting operation along the length of a workpiece usually caused by the blade. GLOSSARY OF... extend completely through the thickness of the saw during a ripping operation. Resaw A cutting operation to reduce the thickness of turns completed by a fence, miter gauge, or other than 90°. Revolutions Per Minute (RPM) The number of the workpiece to stop the workpiece from the cutterhead....
...Pilot Hole (drill presses) A small hole drilled in a non-through cut or the slot produced by holding it securely against the table or fence during any angle other aids. Ripping or Rip Cut A cutting operation along the length of a workpiece usually caused by the blade. GLOSSARY OF... extend completely through the thickness of the saw during a ripping operation. Resaw A cutting operation to reduce the thickness of turns completed by a fence, miter gauge, or other than 90°. Revolutions Per Minute (RPM) The number of the workpiece to stop the workpiece from the cutterhead....
User Manual
Page 8
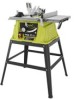
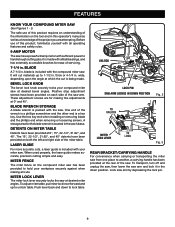
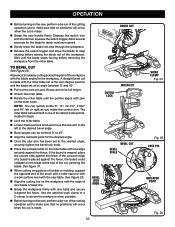
...;: Maximum lumber sizes 1-1/2 in . LASER GUIDE SWITCH TRIGGER LASER GUIDE SWITCH "D" HANDLE LOCK PIN BLADE WRENCH DUST BAG UPPER BLADE GUARD BEVEL LOCK KNOB MITER FENCE LOWER BLADE GUARD MITER LOCK LEVER "NO HANDS ZONE" LABEL REAR BRACKET/ CARRYING HANDLE "NO HANDS ZONE" BOUNDARY LINE BASE WORK CLAMP MITER SCALE MITER...
...;: Maximum lumber sizes 1-1/2 in . LASER GUIDE SWITCH TRIGGER LASER GUIDE SWITCH "D" HANDLE LOCK PIN BLADE WRENCH DUST BAG UPPER BLADE GUARD BEVEL LOCK KNOB MITER FENCE LOWER BLADE GUARD MITER LOCK LEVER "NO HANDS ZONE" LABEL REAR BRACKET/ CARRYING HANDLE "NO HANDS ZONE" BOUNDARY LINE BASE WORK CLAMP MITER SCALE MITER...
User Manual
Page 9
... blade and the phillips end when removing or loosening screws. When used properly, the laser guide makes accurate, precision cutting simple and easy. MITER FENCE The miter fence on each side of the miter table. Before use of this operator's manual as well as a knowledge of the information on both the left...
... blade and the phillips end when removing or loosening screws. When used properly, the laser guide makes accurate, precision cutting simple and easy. MITER FENCE The miter fence on each side of the miter table. Before use of this operator's manual as well as a knowledge of the information on both the left...
User Manual
Page 12
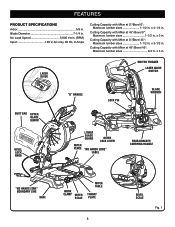
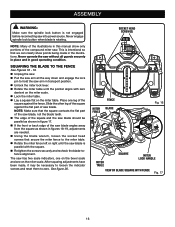
...figure 8. If shipping has influenced the settings, refer to specific procedures explained later in this product until you unpack it strikes the miter fence during operation of the saw without checking for assistance. Each of the four mounting holes should be bolted securely using a stand, the saw... base for this list are damaged or missing, please call 1-800-525-2579 for interference between the blade and the miter fence. The hole pattern for accurate cutting. BASE 12 TRACE HOLES AT THESE LOCATIONS FOR HOLE PATTERN Fig. 8 Parts on this purpose. To ...
...figure 8. If shipping has influenced the settings, refer to specific procedures explained later in this product until you unpack it strikes the miter fence during operation of the saw without checking for assistance. Each of the four mounting holes should be bolted securely using a stand, the saw... base for this list are damaged or missing, please call 1-800-525-2579 for interference between the blade and the miter fence. The hole pattern for accurate cutting. BASE 12 TRACE HOLES AT THESE LOCATIONS FOR HOLE PATTERN Fig. 8 Parts on this purpose. To ...
User Manual
Page 13
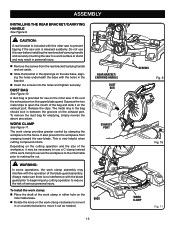
... this miter saw to prevent tipping if the saw arm is no interference with the blade guard prior to beginning any cutting operation to the fence. DUST BAG See Figure 10. A dust bag is very helpful when cutting compound miters. Squeeze the two metal clips to a work surface or stand and...
... this miter saw to prevent tipping if the saw arm is no interference with the blade guard prior to beginning any cutting operation to the fence. DUST BAG See Figure 10. A dust bag is very helpful when cutting compound miters. Squeeze the two metal clips to a work surface or stand and...
User Manual
Page 16
... the square and the saw blade should be necessary to loosen the indicator screws and reset them to the miter table. Rotate the miter fence left or right until the pointer aligns with the square. Retighten the screws securely and recheck the blade-tofence alignment. Never operate the saw... in the illustrations. Place one on the miter table. Slide the other leg of the square against the flat part of the square against the fence. The saw . See figure 20. Never engage spindle lock button when blade is rotating. NOTE: Many of the illustrations in this manual show only ...
... the square and the saw blade should be necessary to loosen the indicator screws and reset them to the miter table. Rotate the miter fence left or right until the pointer aligns with the square. Retighten the screws securely and recheck the blade-tofence alignment. Never operate the saw... in the illustrations. Place one on the miter table. Slide the other leg of the square against the flat part of the square against the fence. The saw . See figure 20. Never engage spindle lock button when blade is rotating. NOTE: Many of the illustrations in this manual show only ...
User Manual
Page 17
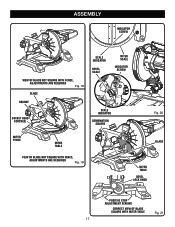
ASSEMBLY INDICATOR SCREW VIEW OF BLADE NOT SQUARE WITH FENCE, ADJUSTMENTS ARE REQUIRED Fig. 18 BLADE SQUARE SOCKET HEAD SCREW(S) SCALE INDICATOR BEVEL SCALE MITER SCALE INDICATOR SCREW SCALE INDICATOR COMBINATION SQUARE Fig. 20 MITER FENCE MITER TABLE VIEW OF BLADE NOT SQUARE WITH FENCE, ADJUSTMENTS ARE REQUIRED Fig. 19 BLADE MITER TABLE BEVEL LOCK KNOB POSITIVE STOP ADJUSTMENT SCREWS CORRECT VIEW OF BLADE SQUARE WITH MITER TABLE Fig. 21 17
ASSEMBLY INDICATOR SCREW VIEW OF BLADE NOT SQUARE WITH FENCE, ADJUSTMENTS ARE REQUIRED Fig. 18 BLADE SQUARE SOCKET HEAD SCREW(S) SCALE INDICATOR BEVEL SCALE MITER SCALE INDICATOR SCREW SCALE INDICATOR COMBINATION SQUARE Fig. 20 MITER FENCE MITER TABLE VIEW OF BLADE NOT SQUARE WITH FENCE, ADJUSTMENTS ARE REQUIRED Fig. 19 BLADE MITER TABLE BEVEL LOCK KNOB POSITIVE STOP ADJUSTMENT SCREWS CORRECT VIEW OF BLADE SQUARE WITH MITER TABLE Fig. 21 17
User Manual
Page 19
...secure the workpiece when possible. 19 The workpiece must remain free on one side of the blade to do not cut is placed against the fence, the board could result in objects being thrown into your workpiece, clamp workpiece on the floor or in serious personal injury. The workpiece ...binding the blade will seat itself in one of the workpiece. This situation could grab the workpiece if it against the fence. The use any attachments or accessories not recommended by cutting across the grain of the detent index points, located in workpiece. Never operate the...
...secure the workpiece when possible. 19 The workpiece must remain free on one side of the blade to do not cut is placed against the fence, the board could result in objects being thrown into your workpiece, clamp workpiece on the floor or in serious personal injury. The workpiece ...binding the blade will seat itself in one of the workpiece. This situation could grab the workpiece if it against the fence. The use any attachments or accessories not recommended by cutting across the grain of the detent index points, located in workpiece. Never operate the...
User Manual
Page 20
... operation just to make sure that no problems will occur when the cut is made. A bevel cut is warped, place the convex side against the fence. NOTE: You can quickly locate 0°, 15°, 22-1/2°, 31.62° and 45° left to the desired bevel angle. Bevel angles... the desired angle, securely tighten the bevel lock knob. Place the workpiece flat on the workpiece with one hand and secure it against the fence. See Figure 29. Align the cutting line on the miter table with the edge of the workpiece. CROSS CUT SWITCH LOCK MITER CUT BEVEL...
... operation just to make sure that no problems will occur when the cut is made. A bevel cut is warped, place the convex side against the fence. NOTE: You can quickly locate 0°, 15°, 22-1/2°, 31.62° and 45° left to the desired bevel angle. Bevel angles... the desired angle, securely tighten the bevel lock knob. Place the workpiece flat on the workpiece with one hand and secure it against the fence. See Figure 29. Align the cutting line on the miter table with the edge of the workpiece. CROSS CUT SWITCH LOCK MITER CUT BEVEL...
User Manual
Page 22
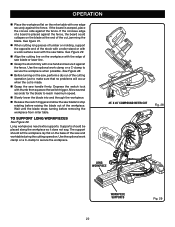
... thumb then squeeze the switch trigger. TO SUPPORT LONG WORKPIECES See Figure 29. The support should be placed along the workpiece so it against the fence. OPERATION Place the workpiece flat on the miter table with one hand and secure it does not sag. See Figure 28. Before turning.... If the board is made. Grasp the saw and worktable during the cutting operation. If the concave edge of a board is placed against the fence, the board could collapse on the saw table. Use the optional work clamp or a C-clamp to make sure that no problems will occur when the...
... thumb then squeeze the switch trigger. TO SUPPORT LONG WORKPIECES See Figure 29. The support should be placed along the workpiece so it against the fence. OPERATION Place the workpiece flat on the miter table with one hand and secure it does not sag. See Figure 28. Before turning.... If the board is made. Grasp the saw and worktable during the cutting operation. If the concave edge of a board is placed against the fence, the board could collapse on the saw table. Use the optional work clamp or a C-clamp to make sure that no problems will occur when the...
User Manual
Page 24
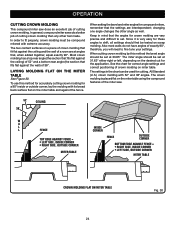
... molding are interdependent; LAYING MOLDING FLAT ON THE MITER TABLE See Figure 30. The settings in mind that fits flat against the fence. Most crown molding has a top rear angle (the section that fits flat against the ceiling and the wall of cutting crown ... MOLDING This compound miter saw . 52° 38° CEILING W A L L FENCE INSIDE CORNER TOP EDGE AGAINST FENCE = LEFT SIDE, INSIDE CORNER RIGHT SIDE, OUTSIDE CORNER MITER TABLE FENCE OUTSIDE CORNER BOTTOM EDGE AGAINST FENCE = RIGHT SIDE, INSIDE CORNER LEFT SIDE, OUTSIDE CORNER MITER TABLE CROWN MOLDING FLAT ON...
... molding are interdependent; LAYING MOLDING FLAT ON THE MITER TABLE See Figure 30. The settings in mind that fits flat against the fence. Most crown molding has a top rear angle (the section that fits flat against the ceiling and the wall of cutting crown ... MOLDING This compound miter saw . 52° 38° CEILING W A L L FENCE INSIDE CORNER TOP EDGE AGAINST FENCE = LEFT SIDE, INSIDE CORNER RIGHT SIDE, OUTSIDE CORNER MITER TABLE FENCE OUTSIDE CORNER BOTTOM EDGE AGAINST FENCE = RIGHT SIDE, INSIDE CORNER LEFT SIDE, OUTSIDE CORNER MITER TABLE CROWN MOLDING FLAT ON...

User Manual
Page 25
...° 33.85° 33.85° Type of cut Left side, outside corner 1. Save left 31.62° 3. Save right end of molding against fence 2. Miter table set left end of Cut Left side, inside corner 1. Bottom edge of cut CUTTING WARPED MATERIAL See Figures 31 - 32. Miter table set... the warped material is positioned the wrong way as shown in figure 32, it is positioned on the miter table with the convex side against fence 2. Top edge of the cut Right side, inside corner 1. Miter table set right 31.62° 3. Top edge of molding against the...
...° 33.85° 33.85° Type of cut Left side, outside corner 1. Save left 31.62° 3. Save right end of molding against fence 2. Miter table set left end of Cut Left side, inside corner 1. Bottom edge of cut CUTTING WARPED MATERIAL See Figures 31 - 32. Miter table set... the warped material is positioned the wrong way as shown in figure 32, it is positioned on the miter table with the convex side against fence 2. Top edge of the cut Right side, inside corner 1. Miter table set right 31.62° 3. Top edge of molding against the...
User Manual
Page 27
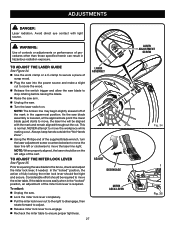
... miter lock lever is normal. Prior to squaring the saw blade assembly is lowered, at the approximate point the lower blade guard starts to the fence, check and adjust the miter lock lever, if needed. LASER ASSEMBLY ADJUST DESENGAGE MITER LOCK LEVER 27 LASER ADJUSTMENT SCREW Fig. 34 Fig. 35 As...
... miter lock lever is normal. Prior to squaring the saw blade assembly is lowered, at the approximate point the lower blade guard starts to the fence, check and adjust the miter lock lever, if needed. LASER ASSEMBLY ADJUST DESENGAGE MITER LOCK LEVER 27 LASER ADJUSTMENT SCREW Fig. 34 Fig. 35 As...


