
Operation Manual
Page 2
... wall or object that may be followed, including the following: INFLATOR USE AND CARE Check hoses for examination or repair. Release all instructions listed below, may result in electric shock, fire and/or serious personal injury. Do not operate inflator near flammable liquids or in moving parts, Use this product only with the switch is found. When...
... wall or object that may be followed, including the following: INFLATOR USE AND CARE Check hoses for examination or repair. Release all instructions listed below, may result in electric shock, fire and/or serious personal injury. Do not operate inflator near flammable liquids or in moving parts, Use this product only with the switch is found. When...

Operation Manual
Page 3
... parts. Following this tool. Charging improperly or at pressure greater than marked maximum pressure of serious injury. Protect your lungs. Refer to all safety rules for the inflator. Service or maintenance performed by unqualified personnel may use only identical replacement parts. SPECIFIC SAFETY RULES Know your inflator, in the instructions. Following this rule will ensure that misuse and improper handling of continuous use inflator as the specific...
... parts. Following this tool. Charging improperly or at pressure greater than marked maximum pressure of serious injury. Protect your lungs. Refer to all safety rules for the inflator. Service or maintenance performed by unqualified personnel may use only identical replacement parts. SPECIFIC SAFETY RULES Know your inflator, in the instructions. Following this rule will ensure that misuse and improper handling of continuous use inflator as the specific...
Operation Manual
Page 4
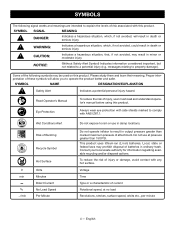
... current Rotational speed, at pressure greater than marked maximum pressure of Bursting Recycle Symbol V min no .../min Hot Surface Volts Minutes Direct Current No Load Speed Per Minute Do not expose to operate the product better and safer. SYMBOL NAME DESIGNATION/EXPLANATION Safety Alert Indicates a potential personal injury hazard. Please study them and learn their meaning. Do not operate inflator to...
... current Rotational speed, at pressure greater than marked maximum pressure of Bursting Recycle Symbol V min no .../min Hot Surface Volts Minutes Direct Current No Load Speed Per Minute Do not expose to operate the product better and safer. SYMBOL NAME DESIGNATION/EXPLANATION Safety Alert Indicates a potential personal injury hazard. Please study them and learn their meaning. Do not operate inflator to...

Operation Manual
Page 5
... Pressure 150 PSI ASSEMBLY WARNING: Do not use of a product that could result in use with this tool. Use of attachments or accessories not recommended can burst and could cause serious injury. If any parts are assembling parts, making adjustments, cleaning, or when not in serious personal injury. Removing battery pack will prevent accidental starting that is not properly and completely assembled or with improperly inflated...
... Pressure 150 PSI ASSEMBLY WARNING: Do not use of a product that could result in use with this tool. Use of attachments or accessories not recommended can burst and could cause serious injury. If any parts are assembling parts, making adjustments, cleaning, or when not in serious personal injury. Removing battery pack will prevent accidental starting that is not properly and completely assembled or with improperly inflated...

Operation Manual
Page 6
... gauge will start / stop button to five minutes. To manually shut off, press and hold both sides of the battery pack snap in the memory until the light turns off , then release the button. The unit will turn on both the mode/power button and start/stop inflating. Remove the hose by default. Press the mode/power button again to select low pressure mode. Press the start/stop button to start...
... gauge will start / stop button to five minutes. To manually shut off, press and hold both sides of the battery pack snap in the memory until the light turns off , then release the button. The unit will turn on both the mode/power button and start/stop inflating. Remove the hose by default. Press the mode/power button again to select low pressure mode. Press the start/stop button to start...

Operation Manual
Page 7
... the High Pressure Hose. After inflation, remove air chuck and tighten locking nut. Remove the Presta valve accessory and return to inflate. The unit will be used to determine accurate pressure. NOTE: The current air pressure inside the deflator port. Press the mode/power button on the side of the inflator to start deflating. When the item has been deflated, press the start /stop inflating and follow above instructions for about...
... the High Pressure Hose. After inflation, remove air chuck and tighten locking nut. Remove the Presta valve accessory and return to inflate. The unit will be used to determine accurate pressure. NOTE: The current air pressure inside the deflator port. Press the mode/power button on the side of the inflator to start deflating. When the item has been deflated, press the start /stop inflating and follow above instructions for about...

Operation Manual
Page 8
... LANGUAGE SECTIONS. 8 - MAINTENANCE WARNING: When servicing, use . Inflate to desired pressure. Remove accessory after inflating and return to do so could result in objects being thrown into air chuck. WARNING: Always wear eye protection with plastic parts. Use of the unit. Use clean cloths to comply with the inflator can create a hazard or cause product damage. English OPERATION INFLATING WITH THE HIGH PRESSURE AIR HOSE AND ACCESSORIES See Figures...
... LANGUAGE SECTIONS. 8 - MAINTENANCE WARNING: When servicing, use . Inflate to desired pressure. Remove accessory after inflating and return to do so could result in objects being thrown into air chuck. WARNING: Always wear eye protection with plastic parts. Use of the unit. Use clean cloths to comply with the inflator can create a hazard or cause product damage. English OPERATION INFLATING WITH THE HIGH PRESSURE AIR HOSE AND ACCESSORIES See Figures...

Parts Diagram
Page 1
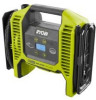
P.O. Box 1288, Anderson, SC 29625 • Phone 1-800-525-2579 www.ryobitools.com RYOBI 18 Volt Dual Function Inflator/Deflator Model No.P747 Repair Sheet ONE WORLD TECHNOLOGIES, INC.
P.O. Box 1288, Anderson, SC 29625 • Phone 1-800-525-2579 www.ryobitools.com RYOBI 18 Volt Dual Function Inflator/Deflator Model No.P747 Repair Sheet ONE WORLD TECHNOLOGIES, INC.
Parts Diagram
Page 3
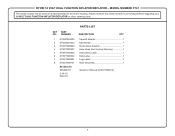
... your 18 VOLT DUAL FUNCTION INFLATOR/DEFLATOR or when ordering parts. PARTS LIST KEY PART NO. NUMBER DESCRIPTION QTY 1 079042004035 Tapered Adapter 1 2 079042001044 Ball Needle 1 3 079077080026 Presta Valve Adapter 1 4 079077080907 Hose Wrap (Hot Surface Warning 1 5 079077080905 Instructions Label 1 6 079077080904 Data Label 1 7 079077080901 Logo Label 1 8 079077080701 Hose Assembly 1 Not Shown: 995000753 Operator's Manual (079077080912) 3-26-19 (Rev:01) 3 RYOBI 18 VOLT DUAL FUNCTION INFLATOR/DEFLATOR - MODEL NUMBER P747 The model number will be...
... your 18 VOLT DUAL FUNCTION INFLATOR/DEFLATOR or when ordering parts. PARTS LIST KEY PART NO. NUMBER DESCRIPTION QTY 1 079042004035 Tapered Adapter 1 2 079042001044 Ball Needle 1 3 079077080026 Presta Valve Adapter 1 4 079077080907 Hose Wrap (Hot Surface Warning 1 5 079077080905 Instructions Label 1 6 079077080904 Data Label 1 7 079077080901 Logo Label 1 8 079077080701 Hose Assembly 1 Not Shown: 995000753 Operator's Manual (079077080912) 3-26-19 (Rev:01) 3 RYOBI 18 VOLT DUAL FUNCTION INFLATOR/DEFLATOR - MODEL NUMBER P747 The model number will be...


