
English Manual
Page 9
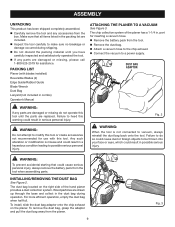
The chip collection system of the hand planer provides a dust collection system. WARNING: Do not attempt to modify... When the tool is misuse and could result in serious personal injury. The dust bag located on the planer. For more efficient operation, empty the dust bag when half full. Any such alteration or modification is ...particles are replaced. Make sure that could result in a hazardous condition leading to a power supply. PACKING LIST Planer (with this warning could result in possible serious injury. INSTALLING/REMOVING THE DUST BAG See Figure 2. To install...
The chip collection system of the hand planer provides a dust collection system. WARNING: Do not attempt to modify... When the tool is misuse and could result in serious personal injury. The dust bag located on the planer. For more efficient operation, empty the dust bag when half full. Any such alteration or modification is ...particles are replaced. Make sure that could result in a hazardous condition leading to a power supply. PACKING LIST Planer (with this warning could result in possible serious injury. INSTALLING/REMOVING THE DUST BAG See Figure 2. To install...
English Manual
Page 13
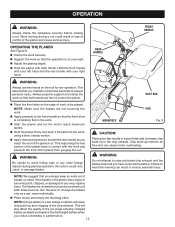
...will also affect the quality of blades on your right. Adjust the planing depth. Hold the planer with your left hand and the rear handle with both hands. Keep a freshly charged battery available and replace the discharged battery when you maintain control and avoid risk of the ...chip exhaust. Hold the front handle with your right hand. this warning can result in loss of control of the planed cut. FRONT HANDLE OPERATING THE PLANER See Figure 9. Clamp the work securely. Support the work . ...
...will also affect the quality of blades on your right. Adjust the planing depth. Hold the planer with your left hand and the rear handle with both hands. Keep a freshly charged battery available and replace the discharged battery when you maintain control and avoid risk of the ...chip exhaust. Hold the front handle with your right hand. this warning can result in loss of control of the planed cut. FRONT HANDLE OPERATING THE PLANER See Figure 9. Clamp the work securely. Support the work . ...
English Manual
Page 14
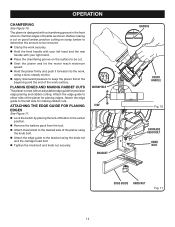
... the rear handle with your right hand. Place the chamfering groove on the surface to chamfer edges of boards as shown. OPERATION CHAMFERING See Figure 10. PLANING EDGES AND MAKING RABBET CUTS The planer comes with a chamfering groove in the center position. Remove the battery pack ...from the tool. Attach the bracket to the desired side of the planer using the knob bolt. Attach the edge guide to the bracket using a slow, steady motion. Apply downward pressure to either ...
... the rear handle with your right hand. Place the chamfering groove on the surface to chamfer edges of boards as shown. OPERATION CHAMFERING See Figure 10. PLANING EDGES AND MAKING RABBET CUTS The planer comes with a chamfering groove in the center position. Remove the battery pack ...from the tool. Attach the bracket to the desired side of the planer using the knob bolt. Attach the edge guide to the bracket using a slow, steady motion. Apply downward pressure to either ...
English Manual
Page 19
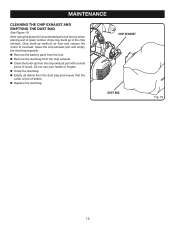
Do not use your hands or fingers. Unzip the dust bag. Empty all debris from the chip exhaust port with a small piece of debris. Replace the dust bag. Chip build-up in the chip exhaust. After using the planer for an extended period of time or when planing wet or...
Do not use your hands or fingers. Unzip the dust bag. Empty all debris from the chip exhaust port with a small piece of debris. Replace the dust bag. Chip build-up in the chip exhaust. After using the planer for an extended period of time or when planing wet or...

