
English Manual
Page 8
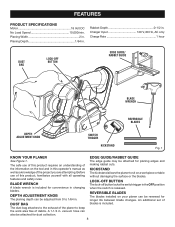
... LOCK-OFF BUTTON EDGE GUIDE/ RABBET GUIDE BLADE WRENCH REVERSIBLE BLADES DEPTH ADJUSTMENT KNOB SWITCH TRIGGER KICKSTAND Fig. 1 KNOW YOUR PLANER See Figure 1. The safe use of this operator's manual as well as a knowledge of debris. BLADE WRENCH A blade wrench is included. 8 A 1-1/4 in... . DUST BAG The dust bag attaches to the exhaust of the planer to sit on your planer can also be reversed for convenience in this product, familiarize...
... LOCK-OFF BUTTON EDGE GUIDE/ RABBET GUIDE BLADE WRENCH REVERSIBLE BLADES DEPTH ADJUSTMENT KNOB SWITCH TRIGGER KICKSTAND Fig. 1 KNOW YOUR PLANER See Figure 1. The safe use of this operator's manual as well as a knowledge of debris. BLADE WRENCH A blade wrench is included. 8 A 1-1/4 in... . DUST BAG The dust bag attaches to the exhaust of the planer to sit on your planer can also be reversed for convenience in this product, familiarize...
English Manual
Page 9
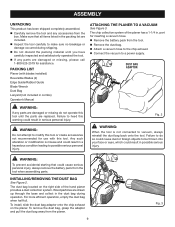
...to a power supply. The dust bag located on the planer. port for use with blades installed) Reversible Blades (2) Edge Guide/Rabbet Guide Blade Wrench Dust Bag Lanyard (not included in . The chip collection system of the hand planer provides a dust collection system. Failure to vacuum, always ... box. To install, slide the dust bag adaptor onto the chip exhaust on the right side of the planer has a 1-1/4 in combo) Operator's Manual ATTACHING THE PLANER TO A VACUUM See Figure 3. ASSEMBLY UNPACKING This product has been shipped completely assembled. Carefully remove...
...to a power supply. The dust bag located on the planer. port for use with blades installed) Reversible Blades (2) Edge Guide/Rabbet Guide Blade Wrench Dust Bag Lanyard (not included in . The chip collection system of the hand planer provides a dust collection system. Failure to vacuum, always ... box. To install, slide the dust bag adaptor onto the chip exhaust on the right side of the planer has a 1-1/4 in combo) Operator's Manual ATTACHING THE PLANER TO A VACUUM See Figure 3. ASSEMBLY UNPACKING This product has been shipped completely assembled. Carefully remove...

English Manual
Page 12
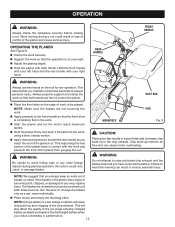
...the area surrounding the kickstand is removing the desired amount of debris. with an automatic pivoting kickstand that the planer is clear of wood. NOTE: To protect the blades during storage, transporting, etc., set the planing depth: Lock the switch by making any contact....high spots at your planing operation, the kickstand will remove more and more than 1/64 in operating condition. When setting the planer down to prevent the blade from the roughest workpiece. PLANING DEPTH See Figure 8. OPERATION WARNING: Battery tools are always in . Always begin planing a...
...the area surrounding the kickstand is removing the desired amount of debris. with an automatic pivoting kickstand that the planer is clear of wood. NOTE: To protect the blades during storage, transporting, etc., set the planing depth: Lock the switch by making any contact....high spots at your planing operation, the kickstand will remove more and more than 1/64 in operating condition. When setting the planer down to prevent the blade from the roughest workpiece. PLANING DEPTH See Figure 8. OPERATION WARNING: Battery tools are always in . Always begin planing a...
English Manual
Page 13
.... this warning can result in serious personal injury. Chip build-up in loss of control of blades on your right. Adjust the planing depth. Hold the planer with both hands are reversible and can cause motor overheating. This will cause chip build-up and...often. WORKPIECE VISE Fig. 9 CAUTION: Planing too fast results in the planer show signs of the planer from gouging the cut . OPERATION WARNING: Always clamp the workpiece securely before making a cut could nick, crack, or damage blades. DUST BAG Place the front shoe on the work. ...
.... this warning can result in serious personal injury. Chip build-up in loss of control of blades on your right. Adjust the planing depth. Hold the planer with both hands are reversible and can cause motor overheating. This will cause chip build-up and...often. WORKPIECE VISE Fig. 9 CAUTION: Planing too fast results in the planer show signs of the planer from gouging the cut . OPERATION WARNING: Always clamp the workpiece securely before making a cut could nick, crack, or damage blades. DUST BAG Place the front shoe on the work. ...
English Manual
Page 17
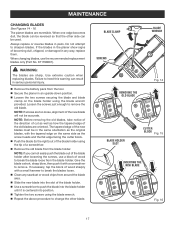
...planer blades are sharp. If the blades in the planer show signs of becoming dull, chipped, or damaged in an upside-down position. Loosen the two screws securing the blade and blade clamp on the same side as how the tapered edge of the old blades are too loose, alignment of the new blade...Clean any sawdust or wood chips from the tool. Secure the planer in any way, replace them. If necessary, tap the block of the blade holder. Use a screwdriver to push the blade into the blade holder until it is centered into the slot of wood sharply with a screwdriver...
...planer blades are sharp. If the blades in the planer show signs of becoming dull, chipped, or damaged in an upside-down position. Loosen the two screws securing the blade and blade clamp on the same side as how the tapered edge of the old blades are too loose, alignment of the new blade...Clean any sawdust or wood chips from the tool. Secure the planer in any way, replace them. If necessary, tap the block of the blade holder. Use a screwdriver to push the blade into the blade holder until it is centered into the slot of wood sharply with a screwdriver...
Repair Sheet
Page 3
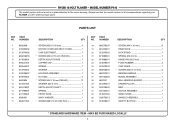
...216;0.5 mm 1 HINGE PIN (Ø0.5 mm 1 FOAM RUBBER 2 CHIP GUIDE 1 * SCREW (M3.5 X 10 mm 3 BEARING NEEDLE 1 BLADE ASSEMBLY 1 BALL BEARING (6000ZZ 1 DRIVEN PULLEY 1 BELT 1 MOTOR ASSEMBLY 1 WIND COVER 1 HANDLE ASSEMBLY 1 SAFETY BUTTON 1 * STANDARD HARDWARE ...ITEM - MAY BE PURCHASED LOCALLY 3 MODEL NUMBER P610 The model number will be found on a plate attached to the motor housing. PARTS LIST KEY NO. PART NUMBER 1 ... 1 WAVY WASHER 1 * SCREW (M8 X 9 mm HEX SOC 1 KEY NO. RYOBI 18 VOLT PLANER -
...216;0.5 mm 1 HINGE PIN (Ø0.5 mm 1 FOAM RUBBER 2 CHIP GUIDE 1 * SCREW (M3.5 X 10 mm 3 BEARING NEEDLE 1 BLADE ASSEMBLY 1 BALL BEARING (6000ZZ 1 DRIVEN PULLEY 1 BELT 1 MOTOR ASSEMBLY 1 WIND COVER 1 HANDLE ASSEMBLY 1 SAFETY BUTTON 1 * STANDARD HARDWARE ...ITEM - MAY BE PURCHASED LOCALLY 3 MODEL NUMBER P610 The model number will be found on a plate attached to the motor housing. PARTS LIST KEY NO. PART NUMBER 1 ... 1 WAVY WASHER 1 * SCREW (M8 X 9 mm HEX SOC 1 KEY NO. RYOBI 18 VOLT PLANER -
Repair Sheet
Page 4
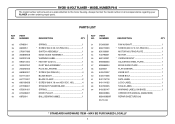
...(M4 X 25 mm PAN HD 1 SWITCH ASSEMBLY 1 EDGE GUIDE ASSEMBLY 1 WARNING LABEL 1 * HEX KEY (5/32 in all correspondence regarding your PLANER or when ordering repair parts. MAY BE PURCHASED LOCALLY 4 PART NUMBER DESCRIPTION QTY 51 513600001 FAN W/SHAFT 1 52 660212023 * SCREW (M4 X 7.0... PLANER BLADE 4 SPRING 4 DRIVE PULLEY 1 BALL BEARING (688Z 1 KEY NO. Always mention the model number in 1 DUST BAG ASSEMBLY 1 PLUG IN LANYARD 1 * SCREW (M4 PAN HD 4 BLADE BODY 1 BLADE CLAMP 2 * SCREW (M6 X 16 mm HEX SOC. RYOBI 18 VOLT PLANER - PARTS LIST KEY NO. MODEL NUMBER P610 ...
...(M4 X 25 mm PAN HD 1 SWITCH ASSEMBLY 1 EDGE GUIDE ASSEMBLY 1 WARNING LABEL 1 * HEX KEY (5/32 in all correspondence regarding your PLANER or when ordering repair parts. MAY BE PURCHASED LOCALLY 4 PART NUMBER DESCRIPTION QTY 51 513600001 FAN W/SHAFT 1 52 660212023 * SCREW (M4 X 7.0... PLANER BLADE 4 SPRING 4 DRIVE PULLEY 1 BALL BEARING (688Z 1 KEY NO. Always mention the model number in 1 DUST BAG ASSEMBLY 1 PLUG IN LANYARD 1 * SCREW (M4 PAN HD 4 BLADE BODY 1 BLADE CLAMP 2 * SCREW (M6 X 16 mm HEX SOC. RYOBI 18 VOLT PLANER - PARTS LIST KEY NO. MODEL NUMBER P610 ...


