
User Manual
Page 2
... lithium-ion battery packs, see tool/appliance/battery pack/charger correlation supplement 987000-432. Store idle power tools out of the reach of parts and any adjustments, changing accessories, or storing power tools. Distractions can result in explosive atmospheres, such as dust mask, nonskid safety shoes, hard hat, or hearing protection used . A wrench or a key left attached to operate the power tool. There is dangerous and must match the outlet. Keep cord...
... lithium-ion battery packs, see tool/appliance/battery pack/charger correlation supplement 987000-432. Store idle power tools out of the reach of parts and any adjustments, changing accessories, or storing power tools. Distractions can result in explosive atmospheres, such as dust mask, nonskid safety shoes, hard hat, or hearing protection used . A wrench or a key left attached to operate the power tool. There is dangerous and must match the outlet. Keep cord...
User Manual
Page 3
... with specifically designated battery packs. Refer to them frequently and use them these instructions. Use of electric shock, fire, or serious personal injury. Do not place battery tools or their batteries near fire or heat. SERVICE Have your battery tool or when changing accessories. JIG saw safety warnings Hold power tool by hand or against your skin, wash immediately with ANSI Z87.1 when assembling parts, operating the tool, or performing maintenance...
... with specifically designated battery packs. Refer to them frequently and use them these instructions. Use of electric shock, fire, or serious personal injury. Do not place battery tools or their batteries near fire or heat. SERVICE Have your battery tool or when changing accessories. JIG saw safety warnings Hold power tool by hand or against your skin, wash immediately with ANSI Z87.1 when assembling parts, operating the tool, or performing maintenance...
User Manual
Page 4
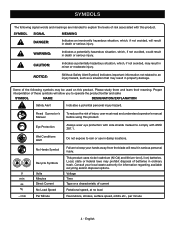
... Hands Symbol Recycle Symbols Volts Minutes Direct Current No Load Speed Per Minute Failure to operate the product better and safer. NOTICE: (Without Safety Alert Symbol) Indicates important information not related to rain or use in death or serious injury. English V min no load Revolutions, strokes, surface speed, orbits etc., per minute 4 - This product uses nickel-cadmium (Ni-Cd) and lithium-ion...
... Hands Symbol Recycle Symbols Volts Minutes Direct Current No Load Speed Per Minute Failure to operate the product better and safer. NOTICE: (Without Safety Alert Symbol) Indicates important information not related to rain or use in death or serious injury. English V min no load Revolutions, strokes, surface speed, orbits etc., per minute 4 - This product uses nickel-cadmium (Ni-Cd) and lithium-ion...

User Manual
Page 5
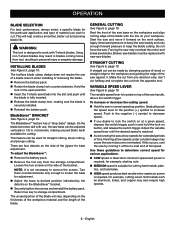
...) Cutting Angle 0° to make you are assembling parts, making adjustments, cleaning, or when not in use of attachments or accessories not recommended can result in serious personal injury. Removing battery pack will prevent accidental starting that a careless fraction of a second is located on the handle above the switch trigger. To turn the saw on: Depress the switch trigger. To turn the saw off: Release the switch trigger. To lock...
...) Cutting Angle 0° to make you are assembling parts, making adjustments, cleaning, or when not in use of attachments or accessories not recommended can result in serious personal injury. Removing battery pack will prevent accidental starting that a careless fraction of a second is located on the handle above the switch trigger. To turn the saw on: Depress the switch trigger. To turn the saw off: Release the switch trigger. To lock...
User Manual
Page 6
..., cool the saw by clamping a piece of wood or straight edge to keep the blade cutting. To adjust the BladeSaver™: Remove the battery pack. Remove the hex key from one direction only; Apply downward pressure to the workpiece and guiding the edge of the saw at full speed. Do not force the saw in and hold the lock-on the work with new saw base can be adjusted vertically in...
..., cool the saw by clamping a piece of wood or straight edge to keep the blade cutting. To adjust the BladeSaver™: Remove the battery pack. Remove the hex key from one direction only; Apply downward pressure to the workpiece and guiding the edge of the saw at full speed. Do not force the saw in and hold the lock-on the work with new saw base can be adjusted vertically in...
User Manual
Page 7
... crosscuts and rip cuts. Remove the battery pack. Insert the edge guide through the two slots in the base of the saw by guiding the direction of the cut with applied pressure on the work in place with the edge guide screw. Replace the battery pack. It can be used when fast cutting in broken blades or damage to the desired width and lock in the downstroke. NOTE: Using blades specifically designed for...
... crosscuts and rip cuts. Remove the battery pack. Insert the edge guide through the two slots in the base of the saw by guiding the direction of the cut with applied pressure on the work in place with the edge guide screw. Replace the battery pack. It can be used when fast cutting in broken blades or damage to the desired width and lock in the downstroke. NOTE: Using blades specifically designed for...
User Manual
Page 8
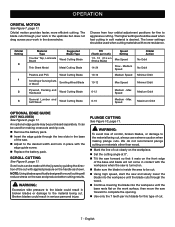
... positive stops at each of any attachments or accessories not recommended by their use only identical replacement parts. OPERATION ANGLE CUTTING (Bevel Cutting) See Figures 11-12, page 11. Angles for angles other parts could create a hazard or cause product damage. Notches on the underside of the base. NOTE: Do not completely remove screws. Slide the base backward until the base can result in 15° increments are listed...
... positive stops at each of any attachments or accessories not recommended by their use only identical replacement parts. OPERATION ANGLE CUTTING (Bevel Cutting) See Figures 11-12, page 11. Angles for angles other parts could create a hazard or cause product damage. Notches on the underside of the base. NOTE: Do not completely remove screws. Slide the base backward until the base can result in 15° increments are listed...
User Manual 2
Page 3
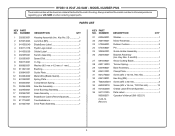
...model number in all correspondence regarding your JIG SAW or when ordering repair parts. Key No. 23 1 2 670974003 Lock Nut (M5 2 3 941003240 BladeSaver Label 1 4 940114178 Ryobi Logo Label 1 5 941003239 Orbital Label 1 6 202955001 Switch Assembly 1 7 526393001 Speed Dial 1 8 560174001 O-ring 1 9 680865001 Washer (8.5 mm x 4.2 mm x 1 mm 1 10 611841001 Bushing 1 11 630845001 Guide Plate 1 12 634964002 Metal Wire (Blade Guard 1 13 631252001 Spring Plate 1 14 693240001 Compression Spring 1 15 304944005 Saw Bar Assembly 1 16 202956001 Drive Bushing Assembly...
...model number in all correspondence regarding your JIG SAW or when ordering repair parts. Key No. 23 1 2 670974003 Lock Nut (M5 2 3 941003240 BladeSaver Label 1 4 940114178 Ryobi Logo Label 1 5 941003239 Orbital Label 1 6 202955001 Switch Assembly 1 7 526393001 Speed Dial 1 8 560174001 O-ring 1 9 680865001 Washer (8.5 mm x 4.2 mm x 1 mm 1 10 611841001 Bushing 1 11 630845001 Guide Plate 1 12 634964002 Metal Wire (Blade Guard 1 13 631252001 Spring Plate 1 14 693240001 Compression Spring 1 15 304944005 Saw Bar Assembly 1 16 202956001 Drive Bushing Assembly...
User Manual 2
Page 4
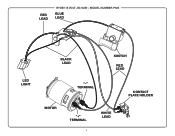
RED LEAD RYOBI 18 VOLT JIG SAW - MODEL NUMBER P523 BLUE LEAD LED LIGHT BLACK LEAD SWITCH RED LEAD "-" TERMINAL MOTOR "+" TERMINAL 4 WHITE LEAD CONTACT PLATE HOLDER
RED LEAD RYOBI 18 VOLT JIG SAW - MODEL NUMBER P523 BLUE LEAD LED LIGHT BLACK LEAD SWITCH RED LEAD "-" TERMINAL MOTOR "+" TERMINAL 4 WHITE LEAD CONTACT PLATE HOLDER


