Operation Manual
Page 2
...) power tools. ELECTRICAL SAFETY Power tool plugs must be controlled with the power tool or these are dangerous in serious personal injury. Remove any adjusting key or wrench before making any adapter plugs with your finger on . Never modify the plug in unexpected situations. Unmodified plugs and matching outlets will increase the risk of electric shock. When operating a power tool outdoors, use any adjustments, changing accessories or storing power tools...
...) power tools. ELECTRICAL SAFETY Power tool plugs must be controlled with the power tool or these are dangerous in serious personal injury. Remove any adjusting key or wrench before making any adapter plugs with your finger on . Never modify the plug in unexpected situations. Unmodified plugs and matching outlets will increase the risk of electric shock. When operating a power tool outdoors, use any adjustments, changing accessories or storing power tools...

Operation Manual
Page 3
... bind and are caused by a qualified repair person using only identical replacement parts. Exposure to control. Use the power tool, accessories and tool bits etc. Service of battery packs should only be performed by the manufacturer. GENERAL POWER TOOL SAFETY WARNINGS before use , keep it does not assure safe operation. The rated speed of the accessory must be at temperatures outside the temperature range specified in the instructions.
... bind and are caused by a qualified repair person using only identical replacement parts. Exposure to control. Use the power tool, accessories and tool bits etc. Service of battery packs should only be performed by the manufacturer. GENERAL POWER TOOL SAFETY WARNINGS before use , keep it does not assure safe operation. The rated speed of the accessory must be at temperatures outside the temperature range specified in the instructions.
Operation Manual
Page 4
... your power tool and the specific guard designed for which in the direction opposite of the accessory's rotation at the point of the guard lip. Abrasive cut-off wheel. Contact with the spinning accessory could give the operator an electric shock. Position the cord clear of control or kickback. Do not attach a saw chain woodcarving blade or toothed saw blade. If you to the power tool and...
... your power tool and the specific guard designed for which in the direction opposite of the accessory's rotation at the point of the guard lip. Abrasive cut-off wheel. Contact with the spinning accessory could give the operator an electric shock. Position the cord clear of control or kickback. Do not attach a saw chain woodcarving blade or toothed saw blade. If you to the power tool and...

Operation Manual
Page 5
... battery tool or when changing accessories. Overstressing the wheel increases the loading and susceptibility to a complete stop. A damaged battery is binding or when interrupting a cut . ADDITIONAL SAFETY WARNINGS Always wear eye protection with soap and water. Let the wheel reach full speed and carefully reenter the cut for any reason, switch off wheel or apply excessive pressure. therefore, they are of cut gas or water pipes, electrical wiring...
... battery tool or when changing accessories. Overstressing the wheel increases the loading and susceptibility to a complete stop. A damaged battery is binding or when interrupting a cut . ADDITIONAL SAFETY WARNINGS Always wear eye protection with soap and water. Let the wheel reach full speed and carefully reenter the cut for any reason, switch off wheel or apply excessive pressure. therefore, they are of cut gas or water pipes, electrical wiring...

Operation Manual
Page 6
... interpretation of risk associated with this product. SYMBOL NAME DESIGNATION/EXPLANATION Safety Alert Indicates a potential personal injury hazard. V min n .../min Recycle Symbol Volts Minutes Direct Current Rated Speed Per Minute This product uses lithium-ion (Li-ion) batteries. Voltage Time Type or a characteristic of injury, user must read and understand operator's manual before using this product. Local, state or federal laws may result in...
... interpretation of risk associated with this product. SYMBOL NAME DESIGNATION/EXPLANATION Safety Alert Indicates a potential personal injury hazard. V min n .../min Recycle Symbol Volts Minutes Direct Current Rated Speed Per Minute This product uses lithium-ion (Li-ion) batteries. Voltage Time Type or a characteristic of injury, user must read and understand operator's manual before using this product. Local, state or federal laws may result in...
Operation Manual
Page 7
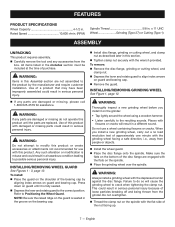
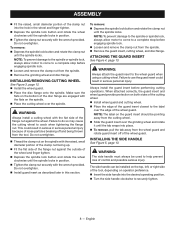
... grinder. Do not overtighten. Thread the clamp nut on guard and bearing cap. n Carefully remove the tool and any parts are not assembled to the resulting sounds. Press down on guard until the parts are engaged with the wrench provided. To remove: Remove the disc flange, grinding or cutting wheel, and clamp nut. Depress the lever and rotate guard to Positioning the Wheel Guard. Do not use...
... grinder. Do not overtighten. Thread the clamp nut on guard and bearing cap. n Carefully remove the tool and any parts are not assembled to the resulting sounds. Press down on guard until the parts are engaged with the wrench provided. To remove: Remove the disc flange, grinding or cutting wheel, and clamp nut. Depress the lever and rotate guard to Positioning the Wheel Guard. Do not use...
Operation Manual
Page 8
... cutting wheel to the wheel guard when using a cutting wheel. ATTACHING THE GUARD INSERT See Figure 4, page 13. n Turn the side handle clockwise to the label over the spindle. This could result in this section. To remove: Depress the spindle lock button and rotate the clamp nut until the spindle locks in position. Tighten the clamp nut securely with the flats on the spindle. Place the cutting wheel over the edge...
... cutting wheel to the wheel guard when using a cutting wheel. ATTACHING THE GUARD INSERT See Figure 4, page 13. n Turn the side handle clockwise to the label over the spindle. This could result in this section. To remove: Depress the spindle lock button and rotate the clamp nut until the spindle locks in position. Tighten the clamp nut securely with the flats on the spindle. Place the cutting wheel over the edge...
Operation Manual
Page 9
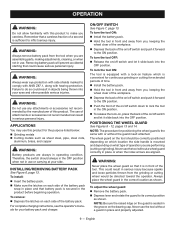
... without a wheel guard correctly in serious personal injury. Therefore, the switch should be directed toward the operator. To install: Insert the battery pack. Make sure the latches on each side of the battery pack. To remove: Depress the latches on what type of operation you careless. WARNING: Never place the wheel guard so that battery pack is secured in use the tool without a guard in...
... without a wheel guard correctly in serious personal injury. Therefore, the switch should be directed toward the operator. To install: Insert the battery pack. Make sure the latches on each side of the battery pack. To remove: Depress the latches on what type of operation you careless. WARNING: Never place the wheel guard so that battery pack is secured in use the tool without a guard in...
Operation Manual
Page 10
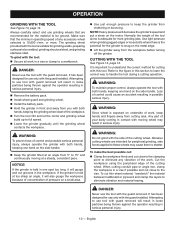
... an angle from 5° to 15° and continuously moving wheel may cause them to handle the tool during a cutting operation. Use light pressure when grinding jagged edges or loose bolts where there is held in serious injury. CUTTING WITH THE TOOL See Figure 14, page 14. It is 10,600 r/min. Abrasive cutting wheels are recommended for use only with guard removed will decrease the grinder's speed and...
... an angle from 5° to 15° and continuously moving wheel may cause them to handle the tool during a cutting operation. Use light pressure when grinding jagged edges or loose bolts where there is held in serious injury. CUTTING WITH THE TOOL See Figure 14, page 14. It is 10,600 r/min. Abrasive cutting wheels are recommended for use only with guard removed will decrease the grinder's speed and...
Operation Manual
Page 11
... guard it . OPERATION Remove the battery pack. Install cutting wheel and wheel guard with guard insert. Install the battery pack. Hold the tool in front and away from you with both hands, keeping the cutting wheel clear of commercial solvents and can damage, weaken or destroy plastic which could result in serious personal injury. Use clean cloths to Installing/Removing Wheel Guard earlier in this manual. Refer to remove dirt, dust, oil...
... guard it . OPERATION Remove the battery pack. Install cutting wheel and wheel guard with guard insert. Install the battery pack. Hold the tool in front and away from you with both hands, keeping the cutting wheel clear of commercial solvents and can damage, weaken or destroy plastic which could result in serious personal injury. Use clean cloths to Installing/Removing Wheel Guard earlier in this manual. Refer to remove dirt, dust, oil...
Parts Diagram
Page 3
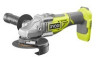
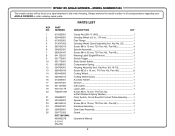
... Wheel Guard Assembly (Incl. Key Nos. 8 & 18-19 1 Screw (M3.5 x 16 mm, T15 Torx Hd., Pan Hd 6 Cutting Wheel 1 Cutting Wheel Guard 1 Auxiliary Handle 1 Wrench 1 Data Label 1 Logo Label 1 Screw (M3 x 75 mm, T10 Torx Hd., w/Flat Washer & Spring Washer 4 Field, Switch, Circuit Board & Contact Plate Assembly...........1 Spacer 1 Screw (M4 x 10 mm, T20 Torx Hd., Pan Hd 2 Armature Assembly 1 Gear Case Assembly 1 Guard 1 Operator's Manual 3 MODEL NUMBER P423 The model number will be found on a label attached to the motor housing. KEY NO. RYOBI 18V ANGLE GRINDER - PART NUMBER...
... Wheel Guard Assembly (Incl. Key Nos. 8 & 18-19 1 Screw (M3.5 x 16 mm, T15 Torx Hd., Pan Hd 6 Cutting Wheel 1 Cutting Wheel Guard 1 Auxiliary Handle 1 Wrench 1 Data Label 1 Logo Label 1 Screw (M3 x 75 mm, T10 Torx Hd., w/Flat Washer & Spring Washer 4 Field, Switch, Circuit Board & Contact Plate Assembly...........1 Spacer 1 Screw (M4 x 10 mm, T20 Torx Hd., Pan Hd 2 Armature Assembly 1 Gear Case Assembly 1 Guard 1 Operator's Manual 3 MODEL NUMBER P423 The model number will be found on a label attached to the motor housing. KEY NO. RYOBI 18V ANGLE GRINDER - PART NUMBER...
Parts Diagram
Page 4
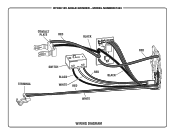
MODEL NUMBER P423 CONTACT PLATE RED BLACK RED TERMINAL SWITCH BLACK WHITE RED RED BLACK WHITE WIRING DIAGRAM RYOBI 18V ANGLE GRINDER -
MODEL NUMBER P423 CONTACT PLATE RED BLACK RED TERMINAL SWITCH BLACK WHITE RED RED BLACK WHITE WIRING DIAGRAM RYOBI 18V ANGLE GRINDER -


