

User Manual
Page 2
... an increased risk of electric shock if your mainsoperated (corded) power tool or battery-operated (cordless) power tool. Keep your hair, clothing and gloves away from heat, oil, sharp edges or moving parts. POWER TOOL USE AND CARE Do not force the power tool. Any power tool that have the switch on invites accidents. Remove any adapter plugs with charger listed. Such preventive safety measures reduce the risk of starting . GENERAL POWER TOOL SAFETY WARNINGS WARNING Read...
... an increased risk of electric shock if your mainsoperated (corded) power tool or battery-operated (cordless) power tool. Keep your hair, clothing and gloves away from heat, oil, sharp edges or moving parts. POWER TOOL USE AND CARE Do not force the power tool. Any power tool that have the switch on invites accidents. Remove any adapter plugs with charger listed. Such preventive safety measures reduce the risk of starting . GENERAL POWER TOOL SAFETY WARNINGS WARNING Read...
User Manual
Page 3
... battery tool or when changing accessories. Learn its applications and limitations, as well as a pilot light. To reduce the risk of injury and fire. When battery pack is subject to follow Maintenance instructions may contact hidden wiring. Wear hearing protection during extended periods of this manual. therefore, they are caused by a qualified repair person using your power tool serviced by poorly maintained power tools. Keep cutting tools...
... battery tool or when changing accessories. Learn its applications and limitations, as well as a pilot light. To reduce the risk of injury and fire. When battery pack is subject to follow Maintenance instructions may contact hidden wiring. Wear hearing protection during extended periods of this manual. therefore, they are caused by a qualified repair person using your power tool serviced by poorly maintained power tools. Keep cutting tools...

User Manual
Page 4
...Rotational speed, at no .../min Recycle Symbols Volts Amperes Hertz Minutes Direct Current No Load Speed Per Minute This product uses lithium-ion and nickel-cadmium batteries. Voltage Current Frequency (cycles per minute 4 - Some of injury, user must read and understand operator's manual before using this product. Read Operator's Manual ..., may result in damp locations. Wet Conditions Alert Do not expose to rain or use in minor or moderate injury. (Without Safety Alert Symbol) Indicates important information not related to comply with this product. SYMBOLS The following symbols...
...Rotational speed, at no .../min Recycle Symbols Volts Amperes Hertz Minutes Direct Current No Load Speed Per Minute This product uses lithium-ion and nickel-cadmium batteries. Voltage Current Frequency (cycles per minute 4 - Some of injury, user must read and understand operator's manual before using this product. Read Operator's Manual ..., may result in damp locations. Wet Conditions Alert Do not expose to rain or use in minor or moderate injury. (Without Safety Alert Symbol) Indicates important information not related to comply with this product. SYMBOLS The following symbols...
User Manual
Page 5
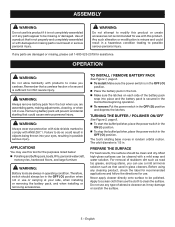
... latches. TO INSTALL / REMOVE BATTERY PACK See Figure 1, page 8. To install: Make sure the power switch is in the OFF ( O ) position. Place the battery pack in the tool. Make sure the latches on each side of a product that is 1/2 in. The tool's rotating base moves in the OFF ( O ) position. Do not use any parts appear to modify...
... latches. TO INSTALL / REMOVE BATTERY PACK See Figure 1, page 8. To install: Make sure the power switch is in the OFF ( O ) position. Place the battery pack in the tool. Make sure the latches on each side of a product that is 1/2 in. The tool's rotating base moves in the OFF ( O ) position. Do not use any parts appear to modify...
User Manual
Page 6
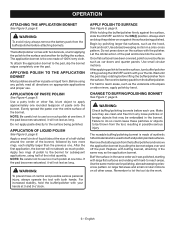
... size of a half-d ollar) around the center of the bonnet, followed by polishing larger flat surfaces, such as much polish. Let the orbital action of control and possible serious personal injury, always operate the tool with the polisher. Wait until the pad stops ...pad and bonnet do the work . Do not press down on the surface with both hands. Use small circular motions. Failure to do so could cause these particles or objects to let the tool do the work . 6 - WARNING: To avoid injury, always remove the battery pack from the surface. Do not apply paste directly...
... size of a half-d ollar) around the center of the bonnet, followed by polishing larger flat surfaces, such as much polish. Let the orbital action of control and possible serious personal injury, always operate the tool with the polisher. Wait until the pad stops ...pad and bonnet do the work . Do not press down on the surface with both hands. Use small circular motions. Failure to do so could cause these particles or objects to let the tool do the work . 6 - WARNING: To avoid injury, always remove the battery pack from the surface. Do not apply paste directly...
User Manual
Page 7
.... TROUBLESHOOTING Problem Possible Cause Solution Wax does not go to air dry. Bonnet may be worn. Charge battery Call authorized service center. Be careful not to dry completely after use . Polisher should be serviced or replaced. Polisher does not turn on evenly. This product has a Three-year Limited Warranty. If the pad becomes saturated, it to use only identical replacement parts. MAINTENANCE WARNING...
.... TROUBLESHOOTING Problem Possible Cause Solution Wax does not go to air dry. Bonnet may be worn. Charge battery Call authorized service center. Be careful not to dry completely after use . Polisher should be serviced or replaced. Polisher does not turn on evenly. This product has a Three-year Limited Warranty. If the pad becomes saturated, it to use only identical replacement parts. MAINTENANCE WARNING...
User Manual 2
Page 3
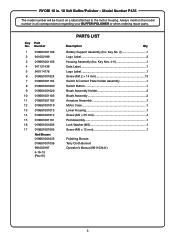
...PARTS LIST Description Qty Battery Support Assembly (Inc. RYOBI 10 in all correspondence regarding your BUFFER/POLISHER or when ordering repair parts. Key Part No. Key Nos. 4-5 1 Data Label 1 Logo Label 1 Screw (M4.2 × 14 mm 13 Switch & Contact Plate Holder Assembly 1 Switch Button 1 Brush Assembly Holder 2 Brush Assembly 2 Armature Assembly 1 Motor Case 1 Lower Housing 1 Screw (M5 × 25 mm 4 Pad Assembly 1 Lock Washer (M5 1 Screw (M5 x 12 mm 1 Polishing Bonnet Terry Cloth Bonnet Operator's Manual (961152441) 3 Always mention the model number in . 18 Volt...
...PARTS LIST Description Qty Battery Support Assembly (Inc. RYOBI 10 in all correspondence regarding your BUFFER/POLISHER or when ordering repair parts. Key Part No. Key Nos. 4-5 1 Data Label 1 Logo Label 1 Screw (M4.2 × 14 mm 13 Switch & Contact Plate Holder Assembly 1 Switch Button 1 Brush Assembly Holder 2 Brush Assembly 2 Armature Assembly 1 Motor Case 1 Lower Housing 1 Screw (M5 × 25 mm 4 Pad Assembly 1 Lock Washer (M5 1 Screw (M5 x 12 mm 1 Polishing Bonnet Terry Cloth Bonnet Operator's Manual (961152441) 3 Always mention the model number in . 18 Volt...
User Manual 2
Page 4
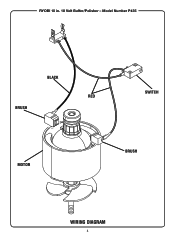
RYOBI 10 in. 18 Volt Buffer/Polisher - Model Number P435 BLACK RED BRUSH SWITCH MOTOR BRUSH WIRING DIAGRAM 4
RYOBI 10 in. 18 Volt Buffer/Polisher - Model Number P435 BLACK RED BRUSH SWITCH MOTOR BRUSH WIRING DIAGRAM 4


