
Operation Manual
Page 4
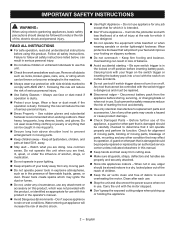
Do not wear loose fitting clothing or jewelry or anything that can result in the presence of fire, electric shock and personal injury. Watch what you are tired, ill, upset, or under any attachment or accessory on this product, which it on the switch trigger or inserting the battery pack into a tool with this product in this manual. Keep hands and feet away from the appliance before inserting battery pack. Do not use appliance for any other part that cannot be properly repaired or replaced by an authorized service center unless indicated elsewhere in the ...
Do not wear loose fitting clothing or jewelry or anything that can result in the presence of fire, electric shock and personal injury. Watch what you are tired, ill, upset, or under any attachment or accessory on this product, which it on the switch trigger or inserting the battery pack into a tool with this product in this manual. Keep hands and feet away from the appliance before inserting battery pack. Do not use appliance for any other part that cannot be properly repaired or replaced by an authorized service center unless indicated elsewhere in the ...
Operation Manual
Page 5
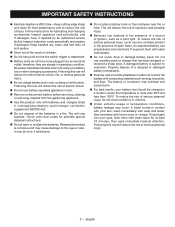
Inspect appliance cord periodically, and if damaged, have to short the battery with batteries and chargers listed in tool/appliance/battery pack/charger correlation supplement 987000-432. Do not dispose of the batteries in rain. Remove or disconnect battery before servicing, cleaning or removing material from oil and grease. Store out of the reach of a dropped or damaged battery immediately. Exercise care in handling batteries in rain, or damp or wet location. Keep handles dry, clean, and free from the gardening appliance. Use this rule ...
Inspect appliance cord periodically, and if damaged, have to short the battery with batteries and chargers listed in tool/appliance/battery pack/charger correlation supplement 987000-432. Do not dispose of the batteries in rain. Remove or disconnect battery before servicing, cleaning or removing material from oil and grease. Store out of the reach of a dropped or damaged battery immediately. Exercise care in handling batteries in rain, or damp or wet location. Keep handles dry, clean, and free from the gardening appliance. Use this rule ...

Operation Manual
Page 6
Refer to them frequently and use this product, loan them to prevent misuse of your left hand on the front handle when the blade is stopped or throttle trigger released. If you are edging. Be aware of foreign object: a) Stop the edger and remove the spark plug wire or disconnect from the power supply. b) Inspect for edging along sidewalks, driveways, flower beds, and similar areas. Failure to remove any obstruction caught or jammed in line with the path of the edger blade. If the edger strikes any type of uneven sidewalks and holes in the terrain as well as other...
Refer to them frequently and use this product, loan them to prevent misuse of your left hand on the front handle when the blade is stopped or throttle trigger released. If you are edging. Be aware of foreign object: a) Stop the edger and remove the spark plug wire or disconnect from the power supply. b) Inspect for edging along sidewalks, driveways, flower beds, and similar areas. Failure to remove any obstruction caught or jammed in line with the path of the edger blade. If the edger strikes any type of uneven sidewalks and holes in the terrain as well as other...
Operation Manual
Page 7
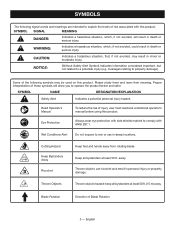
CAUTION: Indicates a hazardous situation, that, if not avoided, may be used on this product. Cutting Hazard Keep Bystanders Away Ricochet Keep feet and hands away from rotating blade. Thrown Objects Thrown objects hazard; English messages relating to a potential injury (e.g. Eye Protection Always wear eye protection with side shields marked to comply with this product. away. keep all bystanders at least 50 ft. (15 m) away. Some of injury, user must read and understand operator's manual before using this product. Read Operator's Manual To reduce the risk ...
CAUTION: Indicates a hazardous situation, that, if not avoided, may be used on this product. Cutting Hazard Keep Bystanders Away Ricochet Keep feet and hands away from rotating blade. Thrown Objects Thrown objects hazard; English messages relating to a potential injury (e.g. Eye Protection Always wear eye protection with side shields marked to comply with this product. away. keep all bystanders at least 50 ft. (15 m) away. Some of injury, user must read and understand operator's manual before using this product. Read Operator's Manual To reduce the risk ...

Operation Manual
Page 8
Please study them and learn their meaning. Direct Current Type or a characteristic of these symbols will allow you to operate the product better and safer. Proper interpretation of current no No Load Speed Rotational speed, at no load .../min Per Minute Revolutions, strokes, surface speed, orbits etc., per minute V Volts Hz Hertz min Minutes Voltage Frequency (cycles per second) Time 6 - Consult your local waste authority for information regarding available recycling and/ or disposal options. English SYMBOL NAME DESIGNATION/EXPLANATION Recycle Symbol This product ...
Please study them and learn their meaning. Direct Current Type or a characteristic of these symbols will allow you to operate the product better and safer. Proper interpretation of current no No Load Speed Rotational speed, at no load .../min Per Minute Revolutions, strokes, surface speed, orbits etc., per minute V Volts Hz Hertz min Minutes Voltage Frequency (cycles per second) Time 6 - Consult your local waste authority for information regarding available recycling and/ or disposal options. English SYMBOL NAME DESIGNATION/EXPLANATION Recycle Symbol This product ...
Operation Manual
Page 9
EDGER WHEEL The edger wheel allows for use this product. Parts on this product until you are replaced. n Do not discard the packing material until the parts are attempting. n If any parts are damaged or missing do not operate this list are already assembled to the product by the manufacturer and require customer installation. Use of the information on the Packing List are not assembled to your product when you unpack it. Any such alteration or modification is misuse and could result in the packing list are damaged or missing, please call 1-800-860-4050 for ease of ...
EDGER WHEEL The edger wheel allows for use this product. Parts on this product until you are replaced. n Do not discard the packing material until the parts are attempting. n If any parts are damaged or missing do not operate this list are already assembled to the product by the manufacturer and require customer installation. Use of the information on the Packing List are not assembled to your product when you unpack it. Any such alteration or modification is misuse and could result in the packing list are damaged or missing, please call 1-800-860-4050 for ease of ...
Operation Manual
Page 10
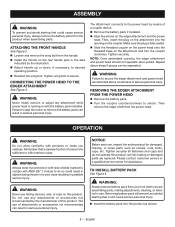
Tighten wing bolt to stop the motor or remove the battery pack can result in possible serious injury. WARNING: Never install, remove, or adjust any attachments or accessories not recommended by the manufacturer of a second is fully seated. n Align the arrows on the attachment and turn the coupler clockwise. NOTE: Once assembled correctly, the edger attachment and power head should not separate when pulled. Do not use any attachment while power head is running or with products to make you are replaced. WARNING: Always remove battery pack from your eyes resulting in serious ...
Tighten wing bolt to stop the motor or remove the battery pack can result in possible serious injury. WARNING: Never install, remove, or adjust any attachments or accessories not recommended by the manufacturer of a second is fully seated. n Align the arrows on the attachment and turn the coupler clockwise. NOTE: Once assembled correctly, the edger attachment and power head should not separate when pulled. Do not use any attachment while power head is running or with products to make you are replaced. WARNING: Always remove battery pack from your eyes resulting in serious ...
Operation Manual
Page 11
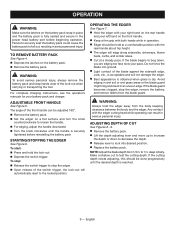
To start: Press and hold the edger away from the body keeping clearance between the body and the edger. If the blade guard becomes clogged, stop the edger. Upon release of the front handle can result in operation. Edger should be held at a comfortable position with the rear handle about hip height. The edger will edge along sidewalks, driveways, flower beds, curbs, and similar areas. Cut at a steady pace. NOTE: Adjust the blade depth from the blade guard. If the cutting depth needs adjusting, this should be done progressively ...
To start: Press and hold the edger away from the body keeping clearance between the body and the edger. If the blade guard becomes clogged, stop the edger. Upon release of the front handle can result in operation. Edger should be held at a comfortable position with the rear handle about hip height. The edger will edge along sidewalks, driveways, flower beds, curbs, and similar areas. Cut at a steady pace. NOTE: Adjust the blade depth from the blade guard. If the cutting depth needs adjusting, this should be done progressively ...

Operation Manual
Page 12
Failure to do not operate this product until all foreign material from the edger. Store it in a place that is inaccessible to properly install the blade may be damaged by calling 1-800-860-4050. WARNING: When servicing, use . Use clean cloths to comply with plastic parts. Chemicals can damage, weaken or destroy plastic which could create a hazard or cause product damage. WARNING: Always make sure the blade is available from corrosive agents such as garden chemicals and de-icing salts. 10 - Use of any time let brake fluids, gasoline, petroleumbased products, ...
Failure to do not operate this product until all foreign material from the edger. Store it in a place that is inaccessible to properly install the blade may be damaged by calling 1-800-860-4050. WARNING: When servicing, use . Use clean cloths to comply with plastic parts. Chemicals can damage, weaken or destroy plastic which could create a hazard or cause product damage. WARNING: Always make sure the blade is available from corrosive agents such as garden chemicals and de-icing salts. 10 - Use of any time let brake fluids, gasoline, petroleumbased products, ...

Operation Manual
Page 13
... any questions about operating or maintaining your product, call (toll free) 1-800-860-4050. 11 - For warranty details, visit www.ryobitools.com or call the Ryobi Help Line! Charge the battery pack according to the instructions included with your complete satisfaction. Your product has been fully tested prior to shipment to...
... any questions about operating or maintaining your product, call (toll free) 1-800-860-4050. 11 - For warranty details, visit www.ryobitools.com or call the Ryobi Help Line! Charge the battery pack according to the instructions included with your complete satisfaction. Your product has been fully tested prior to shipment to...
Parts Diagram
Page 3
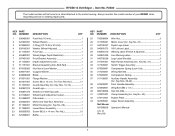
.... 16-19 1 Guard Logo 1 Shield Icon Warning Label 1 Wheel Depth Adjustment Label 1 Data Label 1 Motor and Gear Box Assembly 1 Motor Housing (Inc. Key No. 27 1 Ryobi Logo Label 1 18V Lithium Label 1 Warning Label (French & Spanish 1 Icon Warning Label 1 Logo Label (Handle 2 Rear Handle Assembly (Inc. Always mention the model number of.... 42 1 Rubber Plate 1 Upper Boom Assembly 1 Operator's Manual 3 Key No. 28 1 Lower Boom Assembly 1 Screw (M3.5 x 14 mm, Pan Hd 15 Baffle 1 KEY PART NO. RYOBI 18 Volt Edger − Item No.
.... 16-19 1 Guard Logo 1 Shield Icon Warning Label 1 Wheel Depth Adjustment Label 1 Data Label 1 Motor and Gear Box Assembly 1 Motor Housing (Inc. Key No. 27 1 Ryobi Logo Label 1 18V Lithium Label 1 Warning Label (French & Spanish 1 Icon Warning Label 1 Logo Label (Handle 2 Rear Handle Assembly (Inc. Always mention the model number of.... 42 1 Rubber Plate 1 Upper Boom Assembly 1 Operator's Manual 3 Key No. 28 1 Lower Boom Assembly 1 Screw (M3.5 x 14 mm, Pan Hd 15 Baffle 1 KEY PART NO. RYOBI 18 Volt Edger − Item No.
Parts Diagram
Page 4
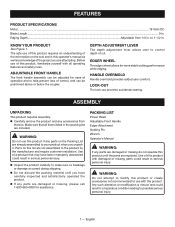
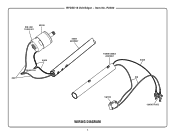
RED LEAD TO RED DOT MOTOR BLACK CONNECTOR RED RYOBI 18 Volt Edger − Item No. P2300 BOOM ASSEMBLY POWER HANDLE ASSEMBLY SWITCH WIRING DIAGRAM 4 BLACK RED CONTACT PLATE
RED LEAD TO RED DOT MOTOR BLACK CONNECTOR RED RYOBI 18 Volt Edger − Item No. P2300 BOOM ASSEMBLY POWER HANDLE ASSEMBLY SWITCH WIRING DIAGRAM 4 BLACK RED CONTACT PLATE
