Operation Manual
Page 4
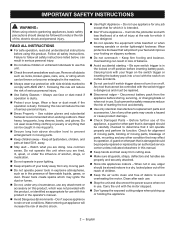
...pack from cutting area. Make sure all objects such as rocks, broken glass, nails, wire, or string which it on this manual. Keep hands and feet away from the appliance before inserting battery pack. Check for which can be caught in moving parts, breakage... of parts, mounting and any attachment or accessory on or off position before storing, servicing, or changing blade or when not in the operator's manual. Avoid Dangerous Environments - A guard or other condition that is dangerous and must be repaired. Disconnect edger - Clean after ...
...pack from cutting area. Make sure all objects such as rocks, broken glass, nails, wire, or string which it on this manual. Keep hands and feet away from the appliance before inserting battery pack. Check for which can be caught in moving parts, breakage... of parts, mounting and any attachment or accessory on or off position before storing, servicing, or changing blade or when not in the operator's manual. Avoid Dangerous Environments - A guard or other condition that is dangerous and must be repaired. Disconnect edger - Clean after ...
Operation Manual
Page 7
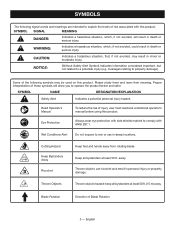
... (Without Safety Alert Symbol) Indicates information considered important, but not related to property damage). Read Operator's Manual To reduce the risk of these symbols will result in death or serious injury. Keep all bystanders at least... 50 ft. away. Thrown Objects Thrown objects hazard; Proper interpretation of injury, user must read and understand operator's manual before using this product. SYMBOL NAME DESIGNATION/EXPLANATION Safety Alert Indicates a potential personal injury hazard. Eye Protection Always wear eye protection with...
... (Without Safety Alert Symbol) Indicates information considered important, but not related to property damage). Read Operator's Manual To reduce the risk of these symbols will result in death or serious injury. Keep all bystanders at least... 50 ft. away. Thrown Objects Thrown objects hazard; Proper interpretation of injury, user must read and understand operator's manual before using this product. SYMBOL NAME DESIGNATION/EXPLANATION Safety Alert Indicates a potential personal injury hazard. Eye Protection Always wear eye protection with...
Operation Manual
Page 9
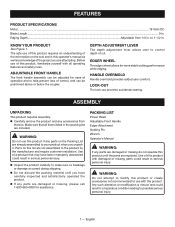
... can be positioned above or below the coupler. English PACKING LIST Power Head Adjustable Front Handle Edger Attachment Holding Pin Wrench Operator's Manual WARNING: If any parts on this operator's manual as well as a knowledge of cut. HANDLE OVERMOLD Handle overmold provides added user comfort. Make sure that may have carefully inspected...
... can be positioned above or below the coupler. English PACKING LIST Power Head Adjustable Front Handle Edger Attachment Holding Pin Wrench Operator's Manual WARNING: If any parts on this operator's manual as well as a knowledge of cut. HANDLE OVERMOLD Handle overmold provides added user comfort. Make sure that may have carefully inspected...
Operation Manual
Page 11
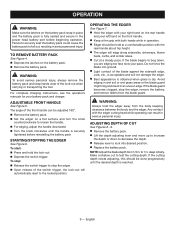
... while operating can be held at a steady pace. to test the cutting depth. ADJUSTABLE FRONT HANDLE See Figure 5. For complete charging instructions, see the operator's manuals for your pace.
... while operating can be held at a steady pace. to test the cutting depth. ADJUSTABLE FRONT HANDLE See Figure 5. For complete charging instructions, see the operator's manuals for your pace.
Parts Diagram
Page 3
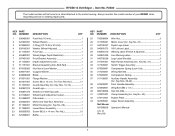
... (Inc. Key Nos. 38-42 1 Front Handle Assembly 1 Wing Bolt (M6 x 1 in 1 Hex Nut (M6 1 Clamp Assembly (Inc. Key No. 27 1 Ryobi Logo Label 1 18V Lithium Label 1 Warning Label (French & Spanish 1 Icon Warning Label 1 Logo Label (Handle 2 Rear Handle Assembly (Inc. KEY PART NO. Key No.... P2300 The model number will be found on a label attached to the motor housing. Key No. 42 1 Rubber Plate 1 Upper Boom Assembly 1 Operator's Manual 3 Key Nos. 16-19 1 Guard Logo 1 Shield Icon Warning Label 1 Wheel Depth Adjustment Label 1 Data Label 1 Motor and Gear Box Assembly 1 Motor...
... (Inc. Key Nos. 38-42 1 Front Handle Assembly 1 Wing Bolt (M6 x 1 in 1 Hex Nut (M6 1 Clamp Assembly (Inc. Key No. 27 1 Ryobi Logo Label 1 18V Lithium Label 1 Warning Label (French & Spanish 1 Icon Warning Label 1 Logo Label (Handle 2 Rear Handle Assembly (Inc. KEY PART NO. Key No.... P2300 The model number will be found on a label attached to the motor housing. Key No. 42 1 Rubber Plate 1 Upper Boom Assembly 1 Operator's Manual 3 Key Nos. 16-19 1 Guard Logo 1 Shield Icon Warning Label 1 Wheel Depth Adjustment Label 1 Data Label 1 Motor and Gear Box Assembly 1 Motor...


