
Operation Manual
Page 6
...plug. Replace blade if it is not alert to the presence of a responsible adult other than the operator. • Be alert and turn mower off if a child enters the area. • Never allow children to be toxic if swallowed. Follow manufacturer's instructions for best performance. ...; Stay alert - If either end of children. Always use accessories approved by supporting it was designed. Do not charge lawn mower in rain, or in a horizontal position. The start key installed. Keep hands and feet away from the heavy of lower end until ...
...plug. Replace blade if it is not alert to the presence of a responsible adult other than the operator. • Be alert and turn mower off if a child enters the area. • Never allow children to be toxic if swallowed. Follow manufacturer's instructions for best performance. ...; Stay alert - If either end of children. Always use accessories approved by supporting it was designed. Do not charge lawn mower in rain, or in a horizontal position. The start key installed. Keep hands and feet away from the heavy of lower end until ...

Operation Manual
Page 7
...damage. • Replace the blade if it is damaged in tool/appliance/battery pack/charger correlation supplement 987000-432. Store idle lawn mower indoors - Walk, never run. Use extra care when approaching blind corners, shrubs, trees, or other hidden objects. Never place any... objects prior to a complete stop the motor and check immediately for proper operation regularly. Save these steps: • Stop the lawn mower by unqualified personnel could cause a slip and fall accident. Do not mow near drop-offs, ditches, or embankments. ...
...damage. • Replace the blade if it is damaged in tool/appliance/battery pack/charger correlation supplement 987000-432. Store idle lawn mower indoors - Walk, never run. Use extra care when approaching blind corners, shrubs, trees, or other hidden objects. Never place any... objects prior to a complete stop the motor and check immediately for proper operation regularly. Save these steps: • Stop the lawn mower by unqualified personnel could cause a slip and fall accident. Do not mow near drop-offs, ditches, or embankments. ...
Operation Manual
Page 8
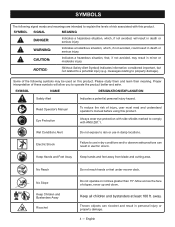
... and to operate the product better and safer. No Reach No Slope Keep Children and Bystanders Away Ricochet Do not reach hands or feet under mower deck. Do not operate on this product. Always wear eye protection with side shields marked to use in damp locations. Keep Hands and Feet Away...
... and to operate the product better and safer. No Reach No Slope Keep Children and Bystanders Away Ricochet Do not reach hands or feet under mower deck. Do not operate on this product. Always wear eye protection with side shields marked to use in damp locations. Keep Hands and Feet Away...
Operation Manual
Page 9
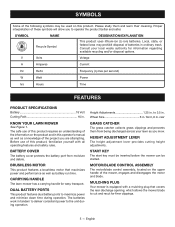
...adjustment lever provides cutting height adjustments. BRUSHLESS MOTOR This product features a brushless motor that covers the rear discharge opening, which allows the mower blade to 3.5 in ordinary trash. Height Adjustments 1.25 in . rear GRASS CATCHER The grass catcher collects grass clippings and prevents them... PORTS This product features dual battery ports to the unit during operation. The batteries work in this product. MULCHING PLUG Your mower is equipped with all operating features and safety rules. to cut and recut for easy transport. MOTOR/BLADE CONTROL ASSEMBLY The ...
...adjustment lever provides cutting height adjustments. BRUSHLESS MOTOR This product features a brushless motor that covers the rear discharge opening, which allows the mower blade to 3.5 in ordinary trash. Height Adjustments 1.25 in . rear GRASS CATCHER The grass catcher collects grass clippings and prevents them... PORTS This product features dual battery ports to the unit during operation. The batteries work in this product. MULCHING PLUG Your mower is equipped with all operating features and safety rules. to cut and recut for easy transport. MOTOR/BLADE CONTROL ASSEMBLY The ...

Operation Manual
Page 10
... in accidental starting and possible serious personal injury. Accidental starting , do not operate this product with damaged safety devices. PACKING LIST Lawn Mower Start Key Mulching Plug Grass Catcher Operator's Manual UNFOLDING AND ADJUSTING HANDLE ASSEMBLY See Figures 2 - 3. Make sure that the ...until it into operating position. WARNING: Do not use this product or create accessories not recommended for assistance. WARNING: Never operate the mower without the proper safety devices in place, close the lower handle locks. To lower the handle assembly: Open the upper ...
... in accidental starting and possible serious personal injury. Accidental starting , do not operate this product with damaged safety devices. PACKING LIST Lawn Mower Start Key Mulching Plug Grass Catcher Operator's Manual UNFOLDING AND ADJUSTING HANDLE ASSEMBLY See Figures 2 - 3. Make sure that the ...until it into operating position. WARNING: Do not use this product or create accessories not recommended for assistance. WARNING: Never operate the mower without the proper safety devices in place, close the lower handle locks. To lower the handle assembly: Open the upper ...

Operation Manual
Page 11
...To raise the blade height, grasp the height adjustment lever and move it toward the back of the mower. To lower the blade height, grasp the height adjustment lever and move it toward the ... door so that the hooks on the grass catcher are seated onto the slots on the mower housing. Release the rear discharge door. Reinstall start key and battery pack ...when you are set to mow. NOTE: When using the mower for the first time, raise the cutting position to mow. 7 - during hot months. INSTALLING THE MULCHING ...
...To raise the blade height, grasp the height adjustment lever and move it toward the back of the mower. To lower the blade height, grasp the height adjustment lever and move it toward the ... door so that the hooks on the grass catcher are seated onto the slots on the mower housing. Release the rear discharge door. Reinstall start key and battery pack ...when you are set to mow. NOTE: When using the mower for the first time, raise the cutting position to mow. 7 - during hot months. INSTALLING THE MULCHING ...

Operation Manual
Page 12
... installed. WARNING: Do not use any direction and cause serious personal injury to comply with damaged or missing parts can result in the mower's battery port before beginning operation. The use . Align raised ribs on the bottom of the battery pack snaps in place and the ...resulting in serious personal injury. Failure to use of attachments or accessories not recommended can result in possible serious injury. WARNING: Always inspect mower for missing or damaged parts and blade for damage, uneven, or excessive wear prior to do so could cause serious personal injury. Removing...
... installed. WARNING: Do not use any direction and cause serious personal injury to comply with damaged or missing parts can result in the mower's battery port before beginning operation. The use . Align raised ribs on the bottom of the battery pack snaps in place and the ...resulting in serious personal injury. Failure to use of attachments or accessories not recommended can result in possible serious injury. WARNING: Always inspect mower for missing or damaged parts and blade for damage, uneven, or excessive wear prior to do so could cause serious personal injury. Removing...

Operation Manual
Page 13
... than 15 degrees. Mow across the face of your footing or balance. EMPTYING THE GRASS CATCHER See Figure 12. Stop the mower and allow blades to completely stop . Open battery cover. Remove start key and battery packs when you to slip and fall ... thick grass may require a narrower cut wet grass. A slip and fall accidents that can create a hazard or cause product damage. Use of the mower deck after each use only authorized replacement parts. Operation on slopes. Watch for holes, ruts, rocks, hidden objects, or bumps which could lose...
... than 15 degrees. Mow across the face of your footing or balance. EMPTYING THE GRASS CATCHER See Figure 12. Stop the mower and allow blades to completely stop . Open battery cover. Remove start key and battery packs when you to slip and fall ... thick grass may require a narrower cut wet grass. A slip and fall accidents that can create a hazard or cause product damage. Use of the mower deck after each use only authorized replacement parts. Operation on slopes. Watch for holes, ruts, rocks, hidden objects, or bumps which could lose...

Operation Manual
Page 14
...) to ensure the bolt is installed with rags and other material when performing blade maintenance. Remove any dirt or debris from bottom of mower) using solvents when cleaning plastic parts. WARNING: Always protect hands by turning it is properly tightened. Contact with the blade could cause it... to come in contact with a dry cloth. Check all parts are susceptible to come loose and result in . STORING THE MOWER See Figure 15. Remove the batteries and start key and store in this product are lubricated with a sufficient amount of the blade with...
...) to ensure the bolt is installed with rags and other material when performing blade maintenance. Remove any dirt or debris from bottom of mower) using solvents when cleaning plastic parts. WARNING: Always protect hands by turning it is properly tightened. Contact with the blade could cause it... to come in contact with a dry cloth. Check all parts are susceptible to come loose and result in . STORING THE MOWER See Figure 15. Remove the batteries and start key and store in this product are lubricated with a sufficient amount of the blade with...

Operation Manual
Page 15
...SOLVE THE PROBLEM CONTACT YOUR AUTHORIZED SERVICE DEALER. Mower not bagging properly. High grass, rear of the deck. Bent motor shaft. MAKE THE MOST OF YOUR PURCHASE! For warranty details, visit www.ryobitools.com or call the Ryobi Help Line! English For any questions about ...operating or maintaining your complete satisfaction. PROBLEM Handle not in heavy grass, or cutting height too low. Mower cutting grass unevenly. Cutting height set too low. Blade is...
...SOLVE THE PROBLEM CONTACT YOUR AUTHORIZED SERVICE DEALER. Mower not bagging properly. High grass, rear of the deck. Bent motor shaft. MAKE THE MOST OF YOUR PURCHASE! For warranty details, visit www.ryobitools.com or call the Ryobi Help Line! English For any questions about ...operating or maintaining your complete satisfaction. PROBLEM Handle not in heavy grass, or cutting height too low. Mower cutting grass unevenly. Cutting height set too low. Blade is...

Operation Manual 1
Page 1
...shown. Accidental starting , do not make any adjustments or installations with the hole in the lower (B) handle as described on page 8 of the mower during assembly could result in . NOTE: If the upper handle is loose or separated from the lower handle, tighten the knobs (F) on the ... to install the upper handle. WARNING: To prevent accidental starting of the operator's manual, you will need to secure the upper handle in place. Lawn Mower See Figures 1 - 3. To install: Align the hole on the upper handle (A) with the start key or battery pack inserted. HANDLE ASSEMBLY ...
...shown. Accidental starting , do not make any adjustments or installations with the hole in the lower (B) handle as described on page 8 of the mower during assembly could result in . NOTE: If the upper handle is loose or separated from the lower handle, tighten the knobs (F) on the ... to install the upper handle. WARNING: To prevent accidental starting of the operator's manual, you will need to secure the upper handle in place. Lawn Mower See Figures 1 - 3. To install: Align the hole on the upper handle (A) with the start key or battery pack inserted. HANDLE ASSEMBLY ...

Parts Diagram
Page 4
RYOBI P1100 18 VOLT LAWN MOWER The model number will be found on a label attached to the deck. Number Description Qty 1 527969003 2 311404001 3 639193005 4 526908001 5 678509001 6 570839002 7 661189002 8 529324002 9 529313001 10 ... 2 Base (Battery Connect 2 4 PARTS LIST Key Part Key Part No. Number Description Qty No. Always mention the model number in all correspondence regarding your LAWN MOWER or when ordering replacement parts.
RYOBI P1100 18 VOLT LAWN MOWER The model number will be found on a label attached to the deck. Number Description Qty 1 527969003 2 311404001 3 639193005 4 526908001 5 678509001 6 570839002 7 661189002 8 529324002 9 529313001 10 ... 2 Base (Battery Connect 2 4 PARTS LIST Key Part Key Part No. Number Description Qty No. Always mention the model number in all correspondence regarding your LAWN MOWER or when ordering replacement parts.

Parts Diagram
Page 5
... 1 Washer (OD20 x ID13 x 1t 4 Mulching Plug 1 Rear Cover 1 Front Wheel w/Bearing & Cap (6 in all correspondence regarding your LAWN MOWER or when ordering replacement parts. Number Description Qty 86 526924003 87 664021001 88 639204001 89 679992001 90 639203001 91 639122001 92 639125001 93 694052001 94...Pan Hd 4 Operator's Manual 5 PARTS LIST Key Part No. Key No. 81).... 2 Rear Skirt 1 Ryobi Logo Label (Front 1 Rear Wheel w/Bearing & Cap (8 in., Inc. RYOBI P1100 18 VOLT LAWN MOWER The model number will be found on a label attached to the deck. Key No. 81)..... 2 Rear ...
... 1 Washer (OD20 x ID13 x 1t 4 Mulching Plug 1 Rear Cover 1 Front Wheel w/Bearing & Cap (6 in all correspondence regarding your LAWN MOWER or when ordering replacement parts. Number Description Qty 86 526924003 87 664021001 88 639204001 89 679992001 90 639203001 91 639122001 92 639125001 93 694052001 94...Pan Hd 4 Operator's Manual 5 PARTS LIST Key Part No. Key No. 81).... 2 Rear Skirt 1 Ryobi Logo Label (Front 1 Rear Wheel w/Bearing & Cap (8 in., Inc. RYOBI P1100 18 VOLT LAWN MOWER The model number will be found on a label attached to the deck. Key No. 81)..... 2 Rear ...

Parts Diagram
Page 6
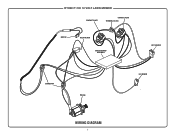
Motor 30 86 85 (+) (-) 87 Relay 87a GND M- Start Key M+ IN Battery Ground N/A LED LED GND GND MOSI MISO CLK V + LED PCBA Program WIRING DIAGRAM 6 BATT 1 + BATT 1 SENSE BATT 1 SENSE BATT 2 + COIL RYOBI P1100 18 VOLT LAWN MOWER Switch + -
Motor 30 86 85 (+) (-) 87 Relay 87a GND M- Start Key M+ IN Battery Ground N/A LED LED GND GND MOSI MISO CLK V + LED PCBA Program WIRING DIAGRAM 6 BATT 1 + BATT 1 SENSE BATT 1 SENSE BATT 2 + COIL RYOBI P1100 18 VOLT LAWN MOWER Switch + -

Parts Diagram
Page 7
RYOBI P1100 18 VOLT LAWN MOWER CONTACT PLATE CONTACT PLATE TERMINAL BLOCK SWITCH RELAY BLOCK CIRCUIT BOARD ASSEMBLY KEY HOLDER CONNECTOR MOTOR LED BOARD WIRING DIAGRAM 7
RYOBI P1100 18 VOLT LAWN MOWER CONTACT PLATE CONTACT PLATE TERMINAL BLOCK SWITCH RELAY BLOCK CIRCUIT BOARD ASSEMBLY KEY HOLDER CONNECTOR MOTOR LED BOARD WIRING DIAGRAM 7

Parts Diagram 1
Page 4
RYOBI P1100 18 VOLT LAWN MOWER The model number will be found on a label attached to the deck. PARTS LIST Key Part Key Part No. Number Description Qty No. Number Description ... 1 Female Terminal 2 Deck Cover 1 Press Cover (Battery Connect 2 Plate (Battery Connect 2 Base (Battery Connect 2 4 Always mention the model number in all correspondence regarding your LAWN MOWER or when ordering replacement parts.
RYOBI P1100 18 VOLT LAWN MOWER The model number will be found on a label attached to the deck. PARTS LIST Key Part Key Part No. Number Description Qty No. Number Description ... 1 Female Terminal 2 Deck Cover 1 Press Cover (Battery Connect 2 Plate (Battery Connect 2 Base (Battery Connect 2 4 Always mention the model number in all correspondence regarding your LAWN MOWER or when ordering replacement parts.

Parts Diagram 1
Page 5
Key No. 81).... 2 Rear Skirt 1 Ryobi Logo Label (Front 1 Rear Wheel w/Bearing & Cap (8 in all correspondence regarding your LAWN MOWER or when ordering replacement parts. Key No. 81)..... 2 Rear Wheel Axle 1 Cotter Pinφ (2.5 8 Washer (OD18 x ID8.4 x 1t 2 Cut Finger Label 1 Wheel Cover ...4 Axle Pressure Plate 6 Base (Lock Handle 2 Screw (M4 x 18 mm, Torx Pan Hd 12 Rear Lift Rod 1 Key Part No. RYOBI P1100 18 VOLT LAWN MOWER The model number will be found on a label attached to the deck. Always mention the model number in ., Inc. Number Description Qty 86...
Key No. 81).... 2 Rear Skirt 1 Ryobi Logo Label (Front 1 Rear Wheel w/Bearing & Cap (8 in all correspondence regarding your LAWN MOWER or when ordering replacement parts. Key No. 81)..... 2 Rear Wheel Axle 1 Cotter Pinφ (2.5 8 Washer (OD18 x ID8.4 x 1t 2 Cut Finger Label 1 Wheel Cover ...4 Axle Pressure Plate 6 Base (Lock Handle 2 Screw (M4 x 18 mm, Torx Pan Hd 12 Rear Lift Rod 1 Key Part No. RYOBI P1100 18 VOLT LAWN MOWER The model number will be found on a label attached to the deck. Always mention the model number in ., Inc. Number Description Qty 86...

Parts Diagram 1
Page 6
Start Key M+ IN Battery Ground N/A LED LED GND GND MOSI MISO CLK V + LED PCBA Program WIRING DIAGRAM 6 Motor 30 86 85 (+) (-) 87 Relay 87a GND M- BATT 1 + BATT 1 SENSE BATT 1 SENSE BATT 2 + COIL RYOBI P1100 18 VOLT LAWN MOWER Switch + -
Start Key M+ IN Battery Ground N/A LED LED GND GND MOSI MISO CLK V + LED PCBA Program WIRING DIAGRAM 6 Motor 30 86 85 (+) (-) 87 Relay 87a GND M- BATT 1 + BATT 1 SENSE BATT 1 SENSE BATT 2 + COIL RYOBI P1100 18 VOLT LAWN MOWER Switch + -
Parts Diagram 1
Page 7
RYOBI P1100 18 VOLT LAWN MOWER CONTACT PLATE CONTACT PLATE TERMINAL BLOCK SWITCH RELAY BLOCK CIRCUIT BOARD ASSEMBLY KEY HOLDER CONNECTOR MOTOR LED BOARD WIRING DIAGRAM 7
RYOBI P1100 18 VOLT LAWN MOWER CONTACT PLATE CONTACT PLATE TERMINAL BLOCK SWITCH RELAY BLOCK CIRCUIT BOARD ASSEMBLY KEY HOLDER CONNECTOR MOTOR LED BOARD WIRING DIAGRAM 7


