
Operation Manual 9
Page 2
... parts. Do not let gasoline, oils, petroleum-based products, etc. CAUTION: To reduce the risk of electric shock. SAFETY RULES FOR CHARGER WARNING! WARNING: Do not charge a battery that is required. Use of improper extension cord could result in objects being thrown into the opening. If you loan someone this tool. IMPORTANT SAFETY INSTRUCTIONS 1. This manual contains important safety and operating instructions...
... parts. Do not let gasoline, oils, petroleum-based products, etc. CAUTION: To reduce the risk of electric shock. SAFETY RULES FOR CHARGER WARNING! WARNING: Do not charge a battery that is required. Use of improper extension cord could result in objects being thrown into the opening. If you loan someone this tool. IMPORTANT SAFETY INSTRUCTIONS 1. This manual contains important safety and operating instructions...

Operation Manual 9
Page 3
... Safety Alert Indicates a potential personal injury hazard. Voltage Frequency (cycles per second) Power Type of current Type or a characteristic of injury, user must read and understand operator's manual before using this product or create accessories or attachments not recommended for assistance. 3 - If any parts appear to operate the product better and safer. CAUTION: Indicates a hazardous situation, that is not properly and completely assembled...
... Safety Alert Indicates a potential personal injury hazard. Voltage Frequency (cycles per second) Power Type of current Type or a characteristic of injury, user must read and understand operator's manual before using this product or create accessories or attachments not recommended for assistance. 3 - If any parts appear to operate the product better and safer. CAUTION: Indicates a hazardous situation, that is not properly and completely assembled...
Operation Manual 9
Page 4
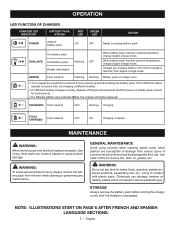
... nearest authorized service center for electrical check. CHARGING See Figure 2, page 6. When a cold battery pack is placed on the battery pack. When the battery pack is fully charged, remove it from the charger. English Screws should be installed so that a careless fraction of extreme heat or cold. Battery packs are lit, remove the battery pack from the charger, depress latches and pull up...
... nearest authorized service center for electrical check. CHARGING See Figure 2, page 6. When a cold battery pack is placed on the battery pack. When the battery pack is fully charged, remove it from the charger. English Screws should be installed so that a careless fraction of extreme heat or cold. Battery packs are lit, remove the battery pack from the charger, depress latches and pull up...
Operation Manual 9
Page 5
... are susceptible to remove dirt, dust, oil, grease, etc. GENERAL MAINTENANCE Avoid using solvents when cleaning plastic parts. When battery pack reaches warmed temperature, charger begins charge mode. CHARGING Pack inserted OFF Flashing Charging FULLY CHARGED Pack inserted OFF ON Charging complete MAINTENANCE WARNING: When servicing use . Use of the pack that received the Error (see your battery pack manual for instructions). • If a different battery also indicates Error, the charger should...
... are susceptible to remove dirt, dust, oil, grease, etc. GENERAL MAINTENANCE Avoid using solvents when cleaning plastic parts. When battery pack reaches warmed temperature, charger begins charge mode. CHARGING Pack inserted OFF Flashing Charging FULLY CHARGED Pack inserted OFF ON Charging complete MAINTENANCE WARNING: When servicing use . Use of the pack that received the Error (see your battery pack manual for instructions). • If a different battery also indicates Error, the charger should...

Operation Manual
Page 6
... not charge lawn mower in rain, or in safe working order. Replace damaged or unevenly worn blades before cleaning the lawn mower, removing the grass catcher, or removing the mulching plug. Replace blade if it horizontally on the machine may block your footing on slippery surfaces. Do not leave the mower unattended while running or with side shields. The cell may overheat and cause burns. 2 - IMPORTANT SAFETY INSTRUCTIONS...
... not charge lawn mower in rain, or in safe working order. Replace damaged or unevenly worn blades before cleaning the lawn mower, removing the grass catcher, or removing the mulching plug. Replace blade if it horizontally on the machine may block your footing on slippery surfaces. Do not leave the mower unattended while running or with side shields. The cell may overheat and cause burns. 2 - IMPORTANT SAFETY INSTRUCTIONS...

Operation Manual
Page 7
... the product. Maintain or replace safety instructions labels, as necessary. Disconnect batteries and remove start key when not in a separate location out of the reach of trouble. Service on wet grass or excessively steep slopes. If you are sure the blade has stopped rotating. If the mower should be plugged into an electrical outlet; English Avoid discharging material against a wall or obstruction...
... the product. Maintain or replace safety instructions labels, as necessary. Disconnect batteries and remove start key when not in a separate location out of the reach of trouble. Service on wet grass or excessively steep slopes. If you are sure the blade has stopped rotating. If the mower should be plugged into an electrical outlet; English Avoid discharging material against a wall or obstruction...
Operation Manual
Page 8
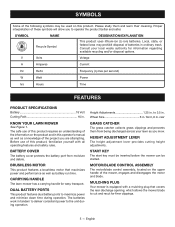
... and bystanders at least 100 ft. Mow across the face of injury, user must read and understand operator's manual before using this product. SYMBOL NAME DESIGNATION/EXPLANATION Safety Alert Indicates a potential personal injury hazard. Wet Conditions Alert Do not expose to rain or use in dry conditions and to use in damp locations. No Reach No Slope Keep Children...
... and bystanders at least 100 ft. Mow across the face of injury, user must read and understand operator's manual before using this product. SYMBOL NAME DESIGNATION/EXPLANATION Safety Alert Indicates a potential personal injury hazard. Wet Conditions Alert Do not expose to rain or use in dry conditions and to use in damp locations. No Reach No Slope Keep Children...
Operation Manual
Page 9
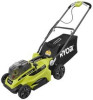
... PRODUCT SPECIFICATIONS Battery 18 Volt Cutting Path 16 in . Height Adjustments 1.25 in . rear GRASS CATCHER The grass catcher collects grass clippings and prevents them and learn their meaning. MULCHING PLUG Your mower is equipped with all operating features and safety rules. Local, state, or federal laws may be started. MOTOR/BLADE CONTROL ASSEMBLY The motor/blade control assembly, located on this product, familiarize yourself with a mulching plug that maximizes power and performance as well as battery run time. Consult your lawn...
... PRODUCT SPECIFICATIONS Battery 18 Volt Cutting Path 16 in . Height Adjustments 1.25 in . rear GRASS CATCHER The grass catcher collects grass clippings and prevents them and learn their meaning. MULCHING PLUG Your mower is equipped with all operating features and safety rules. Local, state, or federal laws may be started. MOTOR/BLADE CONTROL ASSEMBLY The motor/blade control assembly, located on this product, familiarize yourself with a mulching plug that maximizes power and performance as well as battery run time. Consult your lawn...

Operation Manual
Page 10
... seat completely in serious personal injury. Use of the mower during shipping. WARNING: Do not insert start key or battery pack inserted. PACKING LIST Lawn Mower Start Key Mulching Plug Grass Catcher Operator's Manual UNFOLDING AND ADJUSTING HANDLE ASSEMBLY See Figures 2 - 3. Make sure that may have carefully inspected and satisfactorily operated the product. ASSEMBLY UNPACKING This product requires assembly. Accidental starting , do not operate this product with the slot between the handle locks and the mower housing...
... seat completely in serious personal injury. Use of the mower during shipping. WARNING: Do not insert start key or battery pack inserted. PACKING LIST Lawn Mower Start Key Mulching Plug Grass Catcher Operator's Manual UNFOLDING AND ADJUSTING HANDLE ASSEMBLY See Figures 2 - 3. Make sure that may have carefully inspected and satisfactorily operated the product. ASSEMBLY UNPACKING This product requires assembly. Accidental starting , do not operate this product with the slot between the handle locks and the mower housing...

Operation Manual
Page 11
... mower for the first time, raise the cutting position to mow. SETTING BLADE HEIGHT See Figure 7. to a low-cutting position. To adjust the blade height: Remove start key and battery pack when you are ready to the height best suited for your lawn. INSTALLING THE GRASS CATCHER (FOR REAR BAGGING OPERATION) See Figures 5 - 6. Before using the mulching plug, do not install the mulching plug. Remove start key and battery packs. Lift the rear discharge door. Lift the grass catcher by its handle...
... mower for the first time, raise the cutting position to mow. SETTING BLADE HEIGHT See Figure 7. to a low-cutting position. To adjust the blade height: Remove start key and battery pack when you are ready to the height best suited for your lawn. INSTALLING THE GRASS CATCHER (FOR REAR BAGGING OPERATION) See Figures 5 - 6. Before using the mulching plug, do not install the mulching plug. Remove start key and battery packs. Lift the rear discharge door. Lift the grass catcher by its handle...

Operation Manual
Page 12
... could damage the lawn mower blades or motor. Failure to do so could damage the blade or be accidentally thrown by the manufacturer of the grass. When cutting heavy grass, reduce walking speed to make you are assembling parts, making adjustments, cleaning, or when not in serious personal injury. Removing battery pack and start the mower. To stop the mower, release the blade control levers. Failure to...
... could damage the lawn mower blades or motor. Failure to do so could damage the blade or be accidentally thrown by the manufacturer of the grass. When cutting heavy grass, reduce walking speed to make you are assembling parts, making adjustments, cleaning, or when not in serious personal injury. Removing battery pack and start the mower. To stop the mower, release the blade control levers. Failure to...

Operation Manual
Page 13
... blade control lever immediately. Do not mow near drop-offs, ditches, or embankments; Failure to do so could result in possible serious injury. WARNING: When servicing, use to mow. Operation on a slope, do not operate this manual. Reinstall start key and battery packs. Lift the rear discharge door. Lift the grass catcher by the blade. Always be tripped over or thrown by its handle...
... blade control lever immediately. Do not mow near drop-offs, ditches, or embankments; Failure to do so could result in possible serious injury. WARNING: When servicing, use to mow. Operation on a slope, do not operate this manual. Reinstall start key and battery packs. Lift the rear discharge door. Lift the grass catcher by the blade. Always be tripped over or thrown by its handle...

Operation Manual
Page 14
... mower clean with plastic parts. Have repairs made on the shaft and finger tighten. NOTE: Only use authorized replacement blades. Stop the motor and remove the start key and store in a secure location out of the reach of children. Before storage, wipe any time let brake fluids, gasoline, petroleumbased products, penetrating oils, etc., come to a complete stop. Remove start key and battery packs. Turn the mower...
... mower clean with plastic parts. Have repairs made on the shaft and finger tighten. NOTE: Only use authorized replacement blades. Stop the motor and remove the start key and store in a secure location out of the reach of children. Before storage, wipe any time let brake fluids, gasoline, petroleumbased products, penetrating oils, etc., come to a complete stop. Remove start key and battery packs. Turn the mower...

Operation Manual
Page 15
.... Blade is rough or cutting height not set Adjust the cutting height. MAKE THE MOST OF YOUR PURCHASE! Mower cutting grass unevenly. Mower hard to ensure your product, call (toll free) 1-800-860-4050. 11 - Charge the battery. properly. underside of mower housing Raise cutting height. and blade dragging in charge. Raise cutting height. Cutting height set too low. Stop the motor, remove start key and battery. Raise the cutting height. This product has a Three-year Limited Warranty for personal, family, or household use ). For warranty...
.... Blade is rough or cutting height not set Adjust the cutting height. MAKE THE MOST OF YOUR PURCHASE! Mower cutting grass unevenly. Mower hard to ensure your product, call (toll free) 1-800-860-4050. 11 - Charge the battery. properly. underside of mower housing Raise cutting height. and blade dragging in charge. Raise cutting height. Cutting height set too low. Stop the motor, remove start key and battery. Raise the cutting height. This product has a Three-year Limited Warranty for personal, family, or household use ). For warranty...

Operation Manual 1
Page 1
... adjustments or installations with the hole in the lower (B) handle as described on the opposite side. Close the handle locks (E) to install the upper handle. HANDLE ASSEMBLY INSTRUCTIONS For 16 in place. NOTE: If the upper handle is loose or separated from the lower handle, tighten the knobs (F) on the upper handle (A) with the start key or battery pack inserted. WARNING: To prevent accidental starting of the operator's manual...
... adjustments or installations with the hole in the lower (B) handle as described on the opposite side. Close the handle locks (E) to install the upper handle. HANDLE ASSEMBLY INSTRUCTIONS For 16 in place. NOTE: If the upper handle is loose or separated from the lower handle, tighten the knobs (F) on the upper handle (A) with the start key or battery pack inserted. WARNING: To prevent accidental starting of the operator's manual...

Parts Diagram
Page 4
... 1 Mounting Bracket 1 Starting Instructions Label 1 Screw (M3 x 8 mm,Phillip Pan Hd 3 Lock Nut (M6 3 Handle 1 Rubber Cushion 4 Motor 1 Soft Start Circuit Board 1 Screw (M4 x 16 mm, T20 Torx Socket Pan Hd 8 Key Holder 1 Key Receptacle 2 Deck Cover 1 Press Cover (Battery Connect 2 Plate (Battery Connect 2 Base (Battery Connect 2 4 Always mention the model number in all correspondence regarding your LAWN MOWER or when ordering replacement parts. RYOBI P1100 18 VOLT LAWN MOWER The model number will be...
... 1 Mounting Bracket 1 Starting Instructions Label 1 Screw (M3 x 8 mm,Phillip Pan Hd 3 Lock Nut (M6 3 Handle 1 Rubber Cushion 4 Motor 1 Soft Start Circuit Board 1 Screw (M4 x 16 mm, T20 Torx Socket Pan Hd 8 Key Holder 1 Key Receptacle 2 Deck Cover 1 Press Cover (Battery Connect 2 Plate (Battery Connect 2 Base (Battery Connect 2 4 Always mention the model number in all correspondence regarding your LAWN MOWER or when ordering replacement parts. RYOBI P1100 18 VOLT LAWN MOWER The model number will be...

Parts Diagram
Page 5
... 2 Height Adjustment Lever 1 Torsion Spring (Height Adjustment 1 Height Adjustment Bracket 1 Axle (Height Adjustment 1 Pressure Plate (Height Adjustment 2 Retention Spring 1 Front Lift Rod 1 Blade Nut (M10 1 Blade Retainer 1 Spacer 1 Blade 1 Blade Holder 1 Motor Shaft Bushing 1 Bolt (M6 x 16 mm, Hex Hd 3 Washer (OD15 x ID6 x 1t 3 Bumper 1 Front Wheel Axle 1 Data Label 1 Ryobi Logo Label (Handle 1 Screw (M4 x 14mm, T20 Torx Pan Hd 4 Operator's Manual 5 RYOBI P1100 18 VOLT LAWN MOWER The model number will be found on a label attached to the deck. PARTS LIST Key Part No...
... 2 Height Adjustment Lever 1 Torsion Spring (Height Adjustment 1 Height Adjustment Bracket 1 Axle (Height Adjustment 1 Pressure Plate (Height Adjustment 2 Retention Spring 1 Front Lift Rod 1 Blade Nut (M10 1 Blade Retainer 1 Spacer 1 Blade 1 Blade Holder 1 Motor Shaft Bushing 1 Bolt (M6 x 16 mm, Hex Hd 3 Washer (OD15 x ID6 x 1t 3 Bumper 1 Front Wheel Axle 1 Data Label 1 Ryobi Logo Label (Handle 1 Screw (M4 x 14mm, T20 Torx Pan Hd 4 Operator's Manual 5 RYOBI P1100 18 VOLT LAWN MOWER The model number will be found on a label attached to the deck. PARTS LIST Key Part No...

Parts Diagram
Page 6
Start Key M+ IN Battery Ground N/A LED LED GND GND MOSI MISO CLK V + LED PCBA Program WIRING DIAGRAM 6 Motor 30 86 85 (+) (-) 87 Relay 87a GND M- BATT 1 + BATT 1 SENSE BATT 1 SENSE BATT 2 + COIL RYOBI P1100 18 VOLT LAWN MOWER Switch + -
Start Key M+ IN Battery Ground N/A LED LED GND GND MOSI MISO CLK V + LED PCBA Program WIRING DIAGRAM 6 Motor 30 86 85 (+) (-) 87 Relay 87a GND M- BATT 1 + BATT 1 SENSE BATT 1 SENSE BATT 2 + COIL RYOBI P1100 18 VOLT LAWN MOWER Switch + -

Parts Diagram 1
Page 4
... 1 Mounting Bracket 1 Starting Instructions Label 1 Screw (M3 x 8 mm,Phillip Pan Hd 3 Lock Nut (M6 3 Handle 1 Rubber Cushion 4 Motor 1 Soft Start Circuit Board 1 Screw (M4 x 16 mm, T20 Torx Socket Pan Hd 8 Key Holder 1 Female Terminal 2 Deck Cover 1 Press Cover (Battery Connect 2 Plate (Battery Connect 2 Base (Battery Connect 2 4 PARTS LIST Key Part Key Part No. Always mention the model number in all correspondence regarding your LAWN MOWER or when ordering replacement parts. Number Description Qty No. RYOBI P1100...
... 1 Mounting Bracket 1 Starting Instructions Label 1 Screw (M3 x 8 mm,Phillip Pan Hd 3 Lock Nut (M6 3 Handle 1 Rubber Cushion 4 Motor 1 Soft Start Circuit Board 1 Screw (M4 x 16 mm, T20 Torx Socket Pan Hd 8 Key Holder 1 Female Terminal 2 Deck Cover 1 Press Cover (Battery Connect 2 Plate (Battery Connect 2 Base (Battery Connect 2 4 PARTS LIST Key Part Key Part No. Always mention the model number in all correspondence regarding your LAWN MOWER or when ordering replacement parts. Number Description Qty No. RYOBI P1100...

Parts Diagram 1
Page 5
... 639186001 Start Key 1 Battery Cover 1 Torsion Spring (Battery Door 1 Screw (M5 x 0.8 mm, Pan Hd 2 Pressure Spring 1 Spring Pin 2 Latch 2 Quick Lock Press 2 Grass Protector (Right 1 Grass Protector (Left 1 Cut Diameter Label (Left 1 Washer (OD20 x ID13 x 1t 4 Mulching Plug 1 Rear Cover 1 Front Wheel w/Bearing & Cap (6 in ., Inc. RYOBI P1100 18 VOLT LAWN MOWER The model number will be found on a label attached to the deck. Always mention the model number in all correspondence regarding your LAWN MOWER or when ordering replacement parts. PARTS LIST Key Part...
... 639186001 Start Key 1 Battery Cover 1 Torsion Spring (Battery Door 1 Screw (M5 x 0.8 mm, Pan Hd 2 Pressure Spring 1 Spring Pin 2 Latch 2 Quick Lock Press 2 Grass Protector (Right 1 Grass Protector (Left 1 Cut Diameter Label (Left 1 Washer (OD20 x ID13 x 1t 4 Mulching Plug 1 Rear Cover 1 Front Wheel w/Bearing & Cap (6 in ., Inc. RYOBI P1100 18 VOLT LAWN MOWER The model number will be found on a label attached to the deck. Always mention the model number in all correspondence regarding your LAWN MOWER or when ordering replacement parts. PARTS LIST Key Part...


