

Operation Manual
Page 6
... of accessories. Overreaching can be toxic if swallowed. Follow manufacturer's instructions for any kind. A moment of inattention while operating the lawn mower may result in moving parts. Don't overreach - Wrap the blade or wear gloves, and use extra caution when servicing them ....in handling batteries in order not to be stored indoors in a horizontal position. Failure to follow all times. Operate the lawn mower only in a separate location out of the reach of drugs, alcohol, or medication. It will reduce the risk of amputating hands and...
... of accessories. Overreaching can be toxic if swallowed. Follow manufacturer's instructions for any kind. A moment of inattention while operating the lawn mower may result in moving parts. Don't overreach - Wrap the blade or wear gloves, and use extra caution when servicing them ....in handling batteries in order not to be stored indoors in a horizontal position. Failure to follow all times. Operate the lawn mower only in a separate location out of the reach of drugs, alcohol, or medication. It will reduce the risk of amputating hands and...

Operation Manual
Page 7
... objects. Avoid discharging material against a wall or obstruction, which can cause severe injuries to persons. Service or maintenance performed by the lawn mower blade can be performed by the blade. Be aware of all objects such as rocks, sticks, metal, wire, bones, toys, ...and changing accessories. Keep guards in place and in tool/appliance/battery pack/charger correlation supplement 987000-432. Store idle lawn mower indoors - Remove all objects prior to the product. Maintain or replace safety instructions labels, as blades. therefore, they are ...
... objects. Avoid discharging material against a wall or obstruction, which can cause severe injuries to persons. Service or maintenance performed by the lawn mower blade can be performed by the blade. Be aware of all objects such as rocks, sticks, metal, wire, bones, toys, ...and changing accessories. Keep guards in place and in tool/appliance/battery pack/charger correlation supplement 987000-432. Store idle lawn mower indoors - Remove all objects prior to the product. Maintain or replace safety instructions labels, as blades. therefore, they are ...
Operation Manual
Page 9
...Figure 1. The safe use of this operator's manual as well as a knowledge of the project you mow. CARRYING HANDLE The lawn mower has a carrying handle for information regarding available recycling and/or disposal options. to operate the product better and safer. rear GRASS ... of the information on the upper handle of this product. Consult your lawn as battery run time. Height Adjustments 1.25 in . front, 8 in . Please study them from moisture and debris. Before use of the mower, engages and disengages the motor and blade. The batteries work in tandem...
...Figure 1. The safe use of this operator's manual as well as a knowledge of the project you mow. CARRYING HANDLE The lawn mower has a carrying handle for information regarding available recycling and/or disposal options. to operate the product better and safer. rear GRASS ... of the information on the upper handle of this product. Consult your lawn as battery run time. Height Adjustments 1.25 in . front, 8 in . Please study them from moisture and debris. Before use of the mower, engages and disengages the motor and blade. The batteries work in tandem...

Operation Manual
Page 10
...locks by turning them counterclockwise. 6 - WARNING: To prevent accidental starting and possible serious personal injury. WARNING: Never operate the mower without the proper safety devices in serious personal injury. NOTE: If the lower handle is aligned with damaged or missing parts ...are included. NOTE: If the handle lock is loose or separated from the box. ASSEMBLY UNPACKING This product requires assembly. PACKING LIST Lawn Mower Start Key Mulching Plug Grass Catcher Operator's Manual UNFOLDING AND ADJUSTING HANDLE ASSEMBLY See Figures 2 - 3. To lower the handle ...
...locks by turning them counterclockwise. 6 - WARNING: To prevent accidental starting and possible serious personal injury. WARNING: Never operate the mower without the proper safety devices in serious personal injury. NOTE: If the lower handle is aligned with damaged or missing parts ...are included. NOTE: If the handle lock is loose or separated from the box. ASSEMBLY UNPACKING This product requires assembly. PACKING LIST Lawn Mower Start Key Mulching Plug Grass Catcher Operator's Manual UNFOLDING AND ADJUSTING HANDLE ASSEMBLY See Figures 2 - 3. To lower the handle ...

Operation Manual
Page 11
... Figures 5 - 6. during hot months. and 3-1/4 in . English NOTE: When using the mower for the first time, raise the cutting position to the height best suited for your lawn. When shipped, the wheels on each side of the unit. The average lawn should be between 2 in . Avoid pinching or trapping any cables. during cool...
... Figures 5 - 6. during hot months. and 3-1/4 in . English NOTE: When using the mower for the first time, raise the cutting position to the height best suited for your lawn. When shipped, the wheels on each side of the unit. The average lawn should be between 2 in . Avoid pinching or trapping any cables. during cool...

Operation Manual
Page 12
...inflict serious injury. NOTE: The unit will run time. Insert the start key when moving or transporting the mower. MOWING TIPS Make sure the lawn is fully seated and secure in serious personal injury. OPERATION WARNING: Do not allow for more effective cutting and a ...the button to allow familiarity with damaged or missing parts can result in the mower's battery port before beginning operation. English The use . WARNING: To avoid accidental starting that could damage the lawn mower blades or motor. Such objects could cause the battery pack to comply with ...
...inflict serious injury. NOTE: The unit will run time. Insert the start key when moving or transporting the mower. MOWING TIPS Make sure the lawn is fully seated and secure in serious personal injury. OPERATION WARNING: Do not allow for more effective cutting and a ...the button to allow familiarity with damaged or missing parts can result in the mower's battery port before beginning operation. English The use . WARNING: To avoid accidental starting that could damage the lawn mower blades or motor. Such objects could cause the battery pack to comply with ...

Operation Manual
Page 15
... dries before restarting. underside of mower housing Raise cutting height. Raise cutting height. Raise the cutting height. For any questions about operating or maintaining your complete satisfaction. For warranty details, visit www.ryobitools.com or call the Ryobi Help Line! POSSIBLE CAUSE Handle ...cutting height too low. Cutting height set too low. Your product has been fully tested prior to shipment to push. Mower not mulching properly. Lawn is unbalanced, excessively or unevenly worn. High grass, rear of the deck. TROUBLESHOOTING IF THESE SOLUTIONS DO NOT SOLVE ...
... dries before restarting. underside of mower housing Raise cutting height. Raise cutting height. Raise the cutting height. For any questions about operating or maintaining your complete satisfaction. For warranty details, visit www.ryobitools.com or call the Ryobi Help Line! POSSIBLE CAUSE Handle ...cutting height too low. Cutting height set too low. Your product has been fully tested prior to shipment to push. Mower not mulching properly. Lawn is unbalanced, excessively or unevenly worn. High grass, rear of the deck. TROUBLESHOOTING IF THESE SOLUTIONS DO NOT SOLVE ...

Operation Manual 1
Page 1
Lawn Mower See Figures 1 - 3. To install: Align the hole on the opposite side. Close the handle locks (E) to secure the upper handle in . SAVE THESE ... threaded end facing inside. Install the washer and handle knob (D) and tighten to install the upper handle. WARNING: To prevent accidental starting of the mower during assembly could result in the lower (B) handle as described on the handle locks by turning them clockwise. HANDLE ASSEMBLY INSTRUCTIONS For 16 in place...
Lawn Mower See Figures 1 - 3. To install: Align the hole on the opposite side. Close the handle locks (E) to secure the upper handle in . SAVE THESE ... threaded end facing inside. Install the washer and handle knob (D) and tighten to install the upper handle. WARNING: To prevent accidental starting of the mower during assembly could result in the lower (B) handle as described on the handle locks by turning them clockwise. HANDLE ASSEMBLY INSTRUCTIONS For 16 in place...

Parts Diagram
Page 4
PARTS LIST Key Part Key Part No. RYOBI P1100 18 VOLT LAWN MOWER The model number will be found on a label attached to the deck. Number Description Qty 1 527969003 2 311404001 3 639193005 4 526908001 5 678509001 6 570839002 7 661189002 8 529324002 9 529313001 10 ... Holder 1 Key Receptacle 2 Deck Cover 1 Press Cover (Battery Connect 2 Plate (Battery Connect 2 Base (Battery Connect 2 4 Always mention the model number in all correspondence regarding your LAWN MOWER or when ordering replacement parts. Number Description Qty No.
PARTS LIST Key Part Key Part No. RYOBI P1100 18 VOLT LAWN MOWER The model number will be found on a label attached to the deck. Number Description Qty 1 527969003 2 311404001 3 639193005 4 526908001 5 678509001 6 570839002 7 661189002 8 529324002 9 529313001 10 ... Holder 1 Key Receptacle 2 Deck Cover 1 Press Cover (Battery Connect 2 Plate (Battery Connect 2 Base (Battery Connect 2 4 Always mention the model number in all correspondence regarding your LAWN MOWER or when ordering replacement parts. Number Description Qty No.

Parts Diagram
Page 5
...4 Mulching Plug 1 Rear Cover 1 Front Wheel w/Bearing & Cap (6 in ., Inc. RYOBI P1100 18 VOLT LAWN MOWER The model number will be found on a label attached to the deck. Key No. 81).... 2 Rear Skirt 1 Ryobi Logo Label (Front 1 Rear Wheel w/Bearing & Cap (8 in ., Inc. Number Description Qty...1t 3 Bumper 1 Front Wheel Axle 1 Data Label 1 Ryobi Logo Label (Handle 1 Screw (M4 x 14mm, T20 Torx Pan Hd 4 Operator's Manual 5 PARTS LIST Key Part No. Always mention the model number in all correspondence regarding your LAWN MOWER or when ordering replacement parts. Key No. 81)..... 2 ...
...4 Mulching Plug 1 Rear Cover 1 Front Wheel w/Bearing & Cap (6 in ., Inc. RYOBI P1100 18 VOLT LAWN MOWER The model number will be found on a label attached to the deck. Key No. 81).... 2 Rear Skirt 1 Ryobi Logo Label (Front 1 Rear Wheel w/Bearing & Cap (8 in ., Inc. Number Description Qty...1t 3 Bumper 1 Front Wheel Axle 1 Data Label 1 Ryobi Logo Label (Handle 1 Screw (M4 x 14mm, T20 Torx Pan Hd 4 Operator's Manual 5 PARTS LIST Key Part No. Always mention the model number in all correspondence regarding your LAWN MOWER or when ordering replacement parts. Key No. 81)..... 2 ...

Parts Diagram
Page 6
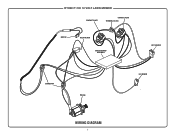
BATT 1 + BATT 1 SENSE BATT 1 SENSE BATT 2 + COIL RYOBI P1100 18 VOLT LAWN MOWER Switch + - Start Key M+ IN Battery Ground N/A LED LED GND GND MOSI MISO CLK V + LED PCBA Program WIRING DIAGRAM 6 Motor 30 86 85 (+) (-) 87 Relay 87a GND M-
BATT 1 + BATT 1 SENSE BATT 1 SENSE BATT 2 + COIL RYOBI P1100 18 VOLT LAWN MOWER Switch + - Start Key M+ IN Battery Ground N/A LED LED GND GND MOSI MISO CLK V + LED PCBA Program WIRING DIAGRAM 6 Motor 30 86 85 (+) (-) 87 Relay 87a GND M-

Parts Diagram
Page 7
RYOBI P1100 18 VOLT LAWN MOWER CONTACT PLATE CONTACT PLATE TERMINAL BLOCK SWITCH RELAY BLOCK CIRCUIT BOARD ASSEMBLY KEY HOLDER CONNECTOR MOTOR LED BOARD WIRING DIAGRAM 7
RYOBI P1100 18 VOLT LAWN MOWER CONTACT PLATE CONTACT PLATE TERMINAL BLOCK SWITCH RELAY BLOCK CIRCUIT BOARD ASSEMBLY KEY HOLDER CONNECTOR MOTOR LED BOARD WIRING DIAGRAM 7

Parts Diagram 1
Page 4
Always mention the model number in all correspondence regarding your LAWN MOWER or when ordering replacement parts. PARTS LIST Key Part Key Part No. Number Description Qty 1 527969003 2 307021005 3 639193005 4 532410001 5 678509001 6 570839002 7 661189002 8 529324002 9 529313001 10 ..., T20 Torx Socket Pan Hd 8 Key Holder 1 Female Terminal 2 Deck Cover 1 Press Cover (Battery Connect 2 Plate (Battery Connect 2 Base (Battery Connect 2 4 Number Description Qty No. RYOBI P1100 18 VOLT LAWN MOWER The model number will be found on a label attached to the deck.
Always mention the model number in all correspondence regarding your LAWN MOWER or when ordering replacement parts. PARTS LIST Key Part Key Part No. Number Description Qty 1 527969003 2 307021005 3 639193005 4 532410001 5 678509001 6 570839002 7 661189002 8 529324002 9 529313001 10 ..., T20 Torx Socket Pan Hd 8 Key Holder 1 Female Terminal 2 Deck Cover 1 Press Cover (Battery Connect 2 Plate (Battery Connect 2 Base (Battery Connect 2 4 Number Description Qty No. RYOBI P1100 18 VOLT LAWN MOWER The model number will be found on a label attached to the deck.

Parts Diagram 1
Page 5
... (OD20 x ID13 x 1t 4 Mulching Plug 1 Rear Cover 1 Front Wheel w/Bearing & Cap (6 in all correspondence regarding your LAWN MOWER or when ordering replacement parts. RYOBI P1100 18 VOLT LAWN MOWER The model number will be found on a label attached to the deck. PARTS LIST Key Part No. Key No. 81)..... 2 ... Blade Holder 1 Motor Shaft Bushing 1 Bolt (M6 x 16 mm, Hex Hd 3 Washer (OD15 x ID6 x 1t 3 Bumper 1 Front Wheel Axle 1 Data Label 1 Ryobi Logo label (Handle 1 Screw (M4 x 16 mm, T20 Torx Pan Hd 8 108 660024061 Screw (M4 x 14mm, T20 Torx Pan Hd 4 NOT SHOWN: 991000291 Operator's ...
... (OD20 x ID13 x 1t 4 Mulching Plug 1 Rear Cover 1 Front Wheel w/Bearing & Cap (6 in all correspondence regarding your LAWN MOWER or when ordering replacement parts. RYOBI P1100 18 VOLT LAWN MOWER The model number will be found on a label attached to the deck. PARTS LIST Key Part No. Key No. 81)..... 2 ... Blade Holder 1 Motor Shaft Bushing 1 Bolt (M6 x 16 mm, Hex Hd 3 Washer (OD15 x ID6 x 1t 3 Bumper 1 Front Wheel Axle 1 Data Label 1 Ryobi Logo label (Handle 1 Screw (M4 x 16 mm, T20 Torx Pan Hd 8 108 660024061 Screw (M4 x 14mm, T20 Torx Pan Hd 4 NOT SHOWN: 991000291 Operator's ...

Parts Diagram 1
Page 6
Start Key M+ IN Battery Ground N/A LED LED GND GND MOSI MISO CLK V + LED PCBA Program WIRING DIAGRAM 6 Motor 30 86 85 (+) (-) 87 Relay 87a GND M- BATT 1 + BATT 1 SENSE BATT 1 SENSE BATT 2 + COIL RYOBI P1100 18 VOLT LAWN MOWER Switch + -
Start Key M+ IN Battery Ground N/A LED LED GND GND MOSI MISO CLK V + LED PCBA Program WIRING DIAGRAM 6 Motor 30 86 85 (+) (-) 87 Relay 87a GND M- BATT 1 + BATT 1 SENSE BATT 1 SENSE BATT 2 + COIL RYOBI P1100 18 VOLT LAWN MOWER Switch + -
Parts Diagram 1
Page 7
RYOBI P1100 18 VOLT LAWN MOWER CONTACT PLATE CONTACT PLATE TERMINAL BLOCK SWITCH RELAY BLOCK CIRCUIT BOARD ASSEMBLY KEY HOLDER CONNECTOR MOTOR LED BOARD WIRING DIAGRAM 7
RYOBI P1100 18 VOLT LAWN MOWER CONTACT PLATE CONTACT PLATE TERMINAL BLOCK SWITCH RELAY BLOCK CIRCUIT BOARD ASSEMBLY KEY HOLDER CONNECTOR MOTOR LED BOARD WIRING DIAGRAM 7


