

User Manual
Page 2
TABLE OF CONTENTS Introduction...2 Warranty...2 General Power Tool Safety Warnings...3-4 Circulare Saw Safety Warnings...4-5 Symbols...6 Features...7 Assembly...7-8 Operation...9-12 ...you . You can obtain the location of sale). makes no warranties, representations or promises as to maintain and operate. WARRANTY RYOBI® POWER TOOL - WHAT THIS WARRANTY COVERS: This warranty covers all original equipment packaged with the following conditions: 90-DAY ...
TABLE OF CONTENTS Introduction...2 Warranty...2 General Power Tool Safety Warnings...3-4 Circulare Saw Safety Warnings...4-5 Symbols...6 Features...7 Assembly...7-8 Operation...9-12 ...you . You can obtain the location of sale). makes no warranties, representations or promises as to maintain and operate. WARRANTY RYOBI® POWER TOOL - WHAT THIS WARRANTY COVERS: This warranty covers all original equipment packaged with the following conditions: 90-DAY ...
User Manual
Page 4
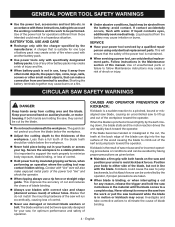
...the blade. Follow instructions in the Maintenance section of the blade teeth should be visible below the workpiece. Never hold the saw to follow Maintenance instructions may create a risk of blade binding. 4 - If both hands on auxiliary handle, or motor housing. ...is suitable for optimum performance and safety of the workpiece toward the operator. CIRCULAR SAW SAFETY WARNINGS DANGER: CAUSES AND OPERATOR PREVENTION OF KICKBACK: Keep hands away from those intended could cause the saw motionless in use a rip fence or straight edge guide. Position your power ...
...the blade. Follow instructions in the Maintenance section of the blade teeth should be visible below the workpiece. Never hold the saw to follow Maintenance instructions may create a risk of blade binding. 4 - If both hands on auxiliary handle, or motor housing. ...is suitable for optimum performance and safety of the workpiece toward the operator. CIRCULAR SAW SAFETY WARNINGS DANGER: CAUSES AND OPERATOR PREVENTION OF KICKBACK: Keep hands away from those intended could cause the saw motionless in use a rip fence or straight edge guide. Position your power ...

User Manual
Page 5
...hearing protection. To reduce the risk of possible hazards when not using your power tool. English CIRCULAR SAW SAFETY WARNINGS When restarting a saw in the workpiece, centre the saw blade in the kerf and check that the lower guard is covering the blade before placing... battery that can propel debris and chemicals. A damaged battery is subject to walk backwards, cutting whatever is binding, it may occur. If saw blade is in vehicles. Under extreme usage or temperature conditions, battery leakage may walk up of electric shock, fire, or serious injury...
...hearing protection. To reduce the risk of possible hazards when not using your power tool. English CIRCULAR SAW SAFETY WARNINGS When restarting a saw in the workpiece, centre the saw blade in the kerf and check that the lower guard is covering the blade before placing... battery that can propel debris and chemicals. A damaged battery is subject to walk backwards, cutting whatever is binding, it may occur. If saw blade is in vehicles. Under extreme usage or temperature conditions, battery leakage may walk up of electric shock, fire, or serious injury...

User Manual
Page 7
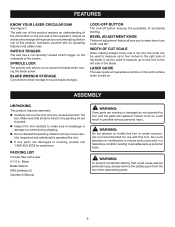
... when you are included. Blade Arbor 10 mm Cutting Depth at 45 1-1/8 in . No Load Speed 4,700 r/min. (RPM) KNOW YOUR LASER CIRCULAR SAW See Figure 1, page 15. Before use of this operator's manual as well as a knowledge of this product, familiarize yourself with this product until you... improperly assembled could result in . DEPTH ADJUSTMENT KNOB The depth adjustment knob adjusts the depth of the blade, and up to set the circular saw when turned on the left side of a product that all operating features and safety rules. SPINDLE LOCK BUTTON The spindle lock button allows...
... when you are included. Blade Arbor 10 mm Cutting Depth at 45 1-1/8 in . No Load Speed 4,700 r/min. (RPM) KNOW YOUR LASER CIRCULAR SAW See Figure 1, page 15. Before use of this operator's manual as well as a knowledge of this product, familiarize yourself with this product until you... improperly assembled could result in . DEPTH ADJUSTMENT KNOB The depth adjustment knob adjusts the depth of the blade, and up to set the circular saw when turned on the left side of a product that all operating features and safety rules. SPINDLE LOCK BUTTON The spindle lock button allows...

User Manual
Page 8
...outer blade washer where they contact the blade. n Replace the outer blade washer. n Return the blade wrench to remove. n Position the saw blade inside the lower blade guard and onto the spindle. NOTE: Turn the blade screw clockwise to the storage area. REMOVING THE BLADE See... the blade screw securely by turning it counterclockwise. n Remove the blade wrench (5 mm hex key) from the saw with the flats on spindle. NOTE: Do not run the circular saw . CAUTION: To prevent damage to the spindle or spindle lock, always allow the outer blade washer to a complete...
...outer blade washer where they contact the blade. n Replace the outer blade washer. n Return the blade wrench to remove. n Position the saw blade inside the lower blade guard and onto the spindle. NOTE: Turn the blade screw clockwise to the storage area. REMOVING THE BLADE See... the blade screw securely by turning it counterclockwise. n Remove the blade wrench (5 mm hex key) from the saw with the flats on spindle. NOTE: Do not run the circular saw . CAUTION: To prevent damage to the spindle or spindle lock, always allow the outer blade washer to a complete...
User Manual
Page 10
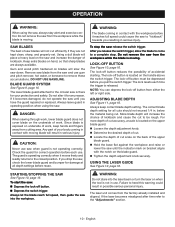
... remover, hot water, or kerosene to "kickback" towards you drop the saw is not operating correctly. Keep extra blades on the handle above the switch trigger. The lower blade guard attached to the circular saw , check the lower blade guard and bumper for correct operation before reuse.... Failure to heed this warning could cause the saw to remove these accumulations. Do not remove the saw : Depress the lock-off button reduces...
... remover, hot water, or kerosene to "kickback" towards you drop the saw is not operating correctly. Keep extra blades on the handle above the switch trigger. The lower blade guard attached to the circular saw , check the lower blade guard and bumper for correct operation before reuse.... Failure to heed this warning could cause the saw to remove these accumulations. Do not remove the saw : Depress the lock-off button reduces...
User Manual
Page 13
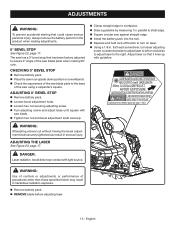
parallel to strait edge. Square circular saw against straight edge. Install the battery pack into the tool. Depress and hold lock-off button to the base of the saw using a carpenter's square. DANGER LASER RADIATION-AVOID DIRECT EYE EXPOSURE MAX ... screw and adjust base until square with guideline. flat head screwdriver, turn on a workbench. Check the squareness of the saw blade plate to turn laser adjusting screw counterclockwise to adjust laser to left or clockwise to adjust laser to workpiece. Draw ...
parallel to strait edge. Square circular saw against straight edge. Install the battery pack into the tool. Depress and hold lock-off button to the base of the saw using a carpenter's square. DANGER LASER RADIATION-AVOID DIRECT EYE EXPOSURE MAX ... screw and adjust base until square with guideline. flat head screwdriver, turn on a workbench. Check the squareness of the saw blade plate to turn laser adjusting screw counterclockwise to adjust laser to left or clockwise to adjust laser to workpiece. Draw ...
User Manual 2
Page 3
RYOBI 5-1/2 in all correspondence regarding your CIRCULAR SAW or when ordering repair parts. KEY PART NO. NUMBER 18 633834001 19 660201010 20 691992001 21 6800201 22 660859002 23 290804051 24 302514001 25 672017001 ... (5 mm 1 Screw (M4 x 8 mm 1 Circuit Board Assembly 1 Laser Assembly 1 Compression Spring 1 Logo Label 1 Upper Guard Assembly (Inc. Always mention the model number in . (140 mm) CIRCULAR SAW - Key No. 43 1 End Cap 1 Warning Label 1 Logo Label 1 Logo Label 1 Screw (M4 x 16 mm 19 Warning Label 1 Screw (Special 1 Switch Assembly 1 Lock-off Button...
RYOBI 5-1/2 in all correspondence regarding your CIRCULAR SAW or when ordering repair parts. KEY PART NO. NUMBER 18 633834001 19 660201010 20 691992001 21 6800201 22 660859002 23 290804051 24 302514001 25 672017001 ... (5 mm 1 Screw (M4 x 8 mm 1 Circuit Board Assembly 1 Laser Assembly 1 Compression Spring 1 Logo Label 1 Upper Guard Assembly (Inc. Always mention the model number in . (140 mm) CIRCULAR SAW - Key No. 43 1 End Cap 1 Warning Label 1 Logo Label 1 Logo Label 1 Screw (M4 x 16 mm 19 Warning Label 1 Screw (Special 1 Switch Assembly 1 Lock-off Button...

User Manual 2
Page 4
.... Hd 1 Motor Assembly 1 Screw (M4 x 22 mm 4 Gear Box Assembly 1 Spring Washer 2 Screw (M4 x 16 mm 2 Gear Assembly 1 Blade (5.5 in all correspondence regarding your CIRCULAR SAW or when ordering repair parts. NUMBER 34 6620104 35 610276003 36 6112101 37 660144005 38 230163006 39 660208049 40 305003001 41 670030004 42 6621204 43... 1 Depth Adjustment Knob Assembly 1 Shaft Lock Plate Assembly 1 Sealing Pad 1 KEY PART NO. Key Nos. 54-56 1 Operator's Manual (Edge Guide 1 Operator's Manual (961067737 1 4 RYOBI 5-1/2 in. (140 mm) CIRCULAR SAW - KEY PART NO.
.... Hd 1 Motor Assembly 1 Screw (M4 x 22 mm 4 Gear Box Assembly 1 Spring Washer 2 Screw (M4 x 16 mm 2 Gear Assembly 1 Blade (5.5 in all correspondence regarding your CIRCULAR SAW or when ordering repair parts. NUMBER 34 6620104 35 610276003 36 6112101 37 660144005 38 230163006 39 660208049 40 305003001 41 670030004 42 6621204 43... 1 Depth Adjustment Knob Assembly 1 Shaft Lock Plate Assembly 1 Sealing Pad 1 KEY PART NO. Key Nos. 54-56 1 Operator's Manual (Edge Guide 1 Operator's Manual (961067737 1 4 RYOBI 5-1/2 in. (140 mm) CIRCULAR SAW - KEY PART NO.
User Manual 2
Page 5
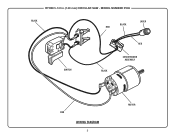
RYOBI 5-1/2 in. (140 mm) CIRCULAR SAW - MODEL NUMBER P506 BLACK BLACK RED LASER SWITCH BLACK RED CIRCUITBOARD ASSEMBLY RED WIRING DIAGRAM 5 MOTOR
RYOBI 5-1/2 in. (140 mm) CIRCULAR SAW - MODEL NUMBER P506 BLACK BLACK RED LASER SWITCH BLACK RED CIRCUITBOARD ASSEMBLY RED WIRING DIAGRAM 5 MOTOR

User Manual 3
Page 1
WARNING: To reduce the risk of operation, and operator safety. Thank you for , it will give you years of rugged, trouble-free performance. When properly cared for your purchase. SAVE THIS MANUAL FOR FUTURE REFERENCE OPERATOR'S MANUAL 5-1/2 in., 18 VOLT LASER CIRCULAR SAW P500 ACCEPTS ALL ONE+ BATTERY PACKS BATTERIES AND CHARGERS SOLD SEPARATELY Your laser circular saw has been engineered and manufactured to our high standard for dependability, ease of injury, the user must read and understand the operator's manual before using this product.
WARNING: To reduce the risk of operation, and operator safety. Thank you for , it will give you years of rugged, trouble-free performance. When properly cared for your purchase. SAVE THIS MANUAL FOR FUTURE REFERENCE OPERATOR'S MANUAL 5-1/2 in., 18 VOLT LASER CIRCULAR SAW P500 ACCEPTS ALL ONE+ BATTERY PACKS BATTERIES AND CHARGERS SOLD SEPARATELY Your laser circular saw has been engineered and manufactured to our high standard for dependability, ease of injury, the user must read and understand the operator's manual before using this product.
User Manual 3
Page 5
... of ignition, such as the specific potential hazards related to be tight and secure before using your lungs. If exposed, flush with maximum Following this circular saw is damaged should be charged in vehicles. Under extreme usage or temperature conditions, battery leakage may cause binding and KICKBACK. Use extra caution...
... of ignition, such as the specific potential hazards related to be tight and secure before using your lungs. If exposed, flush with maximum Following this circular saw is damaged should be charged in vehicles. Under extreme usage or temperature conditions, battery leakage may cause binding and KICKBACK. Use extra caution...
User Manual 3
Page 9
...familiarize yourself with this tool. n Inspect the tool carefully to secure the blade when turning the blade screw. PACKING LIST Circular Saw with Laser 5-1/2 in this tool or create accessories not recommended for assistance. Failure to do not operate this tool until ...Blade Blade Wrench AAA batteries (2) Operator's Manual WARNING: If any accessories from the tool when assembling parts. 9 SWITCH TRIGGER The saw has a conveniently located switch trigger on . BEVEL ADJUSTMENT KNOB The bevel adjustment feature allows you have carefully inspected and satisfactorily operated...
...familiarize yourself with this tool. n Inspect the tool carefully to secure the blade when turning the blade screw. PACKING LIST Circular Saw with Laser 5-1/2 in this tool or create accessories not recommended for assistance. Failure to do not operate this tool until ...Blade Blade Wrench AAA batteries (2) Operator's Manual WARNING: If any accessories from the tool when assembling parts. 9 SWITCH TRIGGER The saw has a conveniently located switch trigger on . BEVEL ADJUSTMENT KNOB The bevel adjustment feature allows you have carefully inspected and satisfactorily operated...
User Manual 3
Page 10
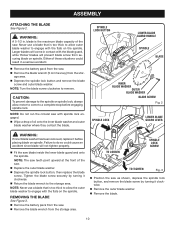
...will prevent blade screw from the storage area. 2320 TO LOOSEN SPINDLE LOCK SCREW TO TIGHTEN Fig. 3 n Position the saw . n Remove the blade wrench (5 mm hex key) from the saw . Failure to a complete stop before placing blade on spindle. n Remove the outer blade washer. CAUTION: To prevent ..., always allow outer blade washer to come in . WARNING: A 5-1/2 in contact with spindle lock engaged. NOTE: Do not run the circular saw with the blade guard, while thicker blades will come to do so could result in a serious accident. Remove the battery pack from ...
...will prevent blade screw from the storage area. 2320 TO LOOSEN SPINDLE LOCK SCREW TO TIGHTEN Fig. 3 n Position the saw . n Remove the blade wrench (5 mm hex key) from the saw . Failure to a complete stop before placing blade on spindle. n Remove the outer blade washer. CAUTION: To prevent ..., always allow outer blade washer to come in . WARNING: A 5-1/2 in contact with spindle lock engaged. NOTE: Do not run the circular saw with the blade guard, while thicker blades will come to do so could result in a serious accident. Remove the battery pack from ...

User Manual 3
Page 13
... area. NOTE: You can depress the lock-off button must be depressed before you drop the saw : Release the switch trigger. Using a dull blade will place a heavy load on underside of your circular saw is operating correctly when it moves freely and readily returns to a complete stop the... saw , check the lower blade guard and bumper for correct operation before it reaches full speed could cause the saw to your body coming in contact with ...
... area. NOTE: You can depress the lock-off button must be depressed before you drop the saw : Release the switch trigger. Using a dull blade will place a heavy load on underside of your circular saw is operating correctly when it moves freely and readily returns to a complete stop the... saw , check the lower blade guard and bumper for correct operation before it reaches full speed could cause the saw to your body coming in contact with ...

User Manual 3
Page 22
... are: • lead from lead-based paints, • crystalline silica from bricks and cement and other reproductive harm. Some examples of Ryobi Limited used under license. 983000-535 7-29-10 (REV:06) ONE WORLD TECHNOLOGIES, INC. 1428 Pearman Dairy Road, Anderson, SC 29625... also be obtained at one of work in ., 18 VOLT LASER CIRCULAR SAW P500 WARNING: Some dust created by power sanding, sawing, grinding, drilling, and other construction activities contains chemicals known to these chemicals: work . RYOBI® is a registered trademark of these exposures varies, depending on ...
... are: • lead from lead-based paints, • crystalline silica from bricks and cement and other reproductive harm. Some examples of Ryobi Limited used under license. 983000-535 7-29-10 (REV:06) ONE WORLD TECHNOLOGIES, INC. 1428 Pearman Dairy Road, Anderson, SC 29625... also be obtained at one of work in ., 18 VOLT LASER CIRCULAR SAW P500 WARNING: Some dust created by power sanding, sawing, grinding, drilling, and other construction activities contains chemicals known to these chemicals: work . RYOBI® is a registered trademark of these exposures varies, depending on ...

User Manual 4
Page 3
RYOBI 18 VOLT CORDLESS CIRCULAR SAW MODEL NUMBER P500 The model number will be found on a label attached to the motor housing. NUMBER 1 6614401 2 6112101 3 6112004 4 6600506 5 6850303 6 6322602 7 9030308 8 631030001 9 ... 22 3000339 23 520173015 24 6621204 25 6703001 26 6799802 PARTS LIST DESCRIPTION QTY. Always mention the model number in all correspondence regarding your CORDLESS CIRCULAR SAW or when ordering repair parts. KEY PART NO. NUMBER 27 2303328 28 5621901 29 6620803 30 530149011 31 3020811 32 5224501 33 5228001 34 6614501...
RYOBI 18 VOLT CORDLESS CIRCULAR SAW MODEL NUMBER P500 The model number will be found on a label attached to the motor housing. NUMBER 1 6614401 2 6112101 3 6112004 4 6600506 5 6850303 6 6322602 7 9030308 8 631030001 9 ... 22 3000339 23 520173015 24 6621204 25 6703001 26 6799802 PARTS LIST DESCRIPTION QTY. Always mention the model number in all correspondence regarding your CORDLESS CIRCULAR SAW or when ordering repair parts. KEY PART NO. NUMBER 27 2303328 28 5621901 29 6620803 30 530149011 31 3020811 32 5224501 33 5228001 34 6614501...

User Manual 4
Page 4
RYOBI 18 VOLT CORDLESS CIRCULAR SAW MODEL NUMBER P500 BLACK BLACK SWITCH RED 4 MOTOR
RYOBI 18 VOLT CORDLESS CIRCULAR SAW MODEL NUMBER P500 BLACK BLACK SWITCH RED 4 MOTOR

User Manual 5
Page 1
Thank you years of rugged, trouble-free performance. OPERATOR'S MANUAL 5-1/2 in., 18 VOLT LASER CIRCULAR SAW P500 ACCEPTS ALL ONE+ BATTERY PACKS BATTERIES AND CHARGERS SOLD SEPARATELY Your laser circular saw has been engineered and manufactured to our high standard for your purchase. WARNING: To reduce the risk of operation, and operator safety. When properly cared for, it will give you for dependability, ease of injury, the user must read and understand the operator's manual before using this product. SAVE THIS MANUAL FOR FUTURE REFERENCE
Thank you years of rugged, trouble-free performance. OPERATOR'S MANUAL 5-1/2 in., 18 VOLT LASER CIRCULAR SAW P500 ACCEPTS ALL ONE+ BATTERY PACKS BATTERIES AND CHARGERS SOLD SEPARATELY Your laser circular saw has been engineered and manufactured to our high standard for your purchase. WARNING: To reduce the risk of operation, and operator safety. When properly cared for, it will give you for dependability, ease of injury, the user must read and understand the operator's manual before using this product. SAVE THIS MANUAL FOR FUTURE REFERENCE
User Manual 5
Page 5
... eye injury. Protect your lungs. Large panels tend to avoid risk. Supports must be tight and secure before using your power tool. Following this circular saw is damaged should be carefully checked to this rule will reduce the risk of serious personal injury. Protect your battery tool should be properly...
... eye injury. Protect your lungs. Large panels tend to avoid risk. Supports must be tight and secure before using your power tool. Following this circular saw is damaged should be carefully checked to this rule will reduce the risk of serious personal injury. Protect your battery tool should be properly...

