

Manual 1
Page 2
... better and safer performance. TURN THE POWER OFF. PROTECT YOUR LUNGS. Have defective switches replaced by an authorized service center to avoid risk of parts, mounting and any tool. USE RECOMMENDED ACCESSORIES. Keep tools sharp and clean for a purpose not intended. USE THE PROPER EXTENSION CORD. It's safer than using your hand and frees both hands to this tool. GUARD AGAINST ELECTRICAL SHOCK BY PREVENTING BODY...
... better and safer performance. TURN THE POWER OFF. PROTECT YOUR LUNGS. Have defective switches replaced by an authorized service center to avoid risk of parts, mounting and any tool. USE RECOMMENDED ACCESSORIES. Keep tools sharp and clean for a purpose not intended. USE THE PROPER EXTENSION CORD. It's safer than using your hand and frees both hands to this tool. GUARD AGAINST ELECTRICAL SHOCK BY PREVENTING BODY...

Manual 1
Page 3
..., missing, or failed parts replaced before connecting to grind. Use light pressure when starting to power supply. GROUND ALL TOOLS. If damaged, have the proper outlet installed by a qualified electrician. SPECIFIC SAFETY RULES FIRMLY BOLT THE GRINDER TO A WORK BENCH OR LEG STAND at an authorized service facility. Check the wheel for fissures and cracks, and test for safe use wheel washers or wheel bolts that are...
..., missing, or failed parts replaced before connecting to grind. Use light pressure when starting to power supply. GROUND ALL TOOLS. If damaged, have the proper outlet installed by a qualified electrician. SPECIFIC SAFETY RULES FIRMLY BOLT THE GRINDER TO A WORK BENCH OR LEG STAND at an authorized service facility. Check the wheel for fissures and cracks, and test for safe use wheel washers or wheel bolts that are...

Manual 1
Page 4
... particles. 4 - To reduce your exposure, work . SPECIFIC SAFETY RULES DO NOT USE THE BENCH GRINDER if the flange nut or clamp nut is missing or if the spindle shaft is bent. FREQUENTLY clean grinding dust from beneath grinder. SECURE LONG HAIR so it must be replaced only by the manufacturer or by power sanding, sawing, grinding, drilling, and other construction activities may contain...
... particles. 4 - To reduce your exposure, work . SPECIFIC SAFETY RULES DO NOT USE THE BENCH GRINDER if the flange nut or clamp nut is missing or if the spindle shaft is bent. FREQUENTLY clean grinding dust from beneath grinder. SECURE LONG HAIR so it must be replaced only by the manufacturer or by power sanding, sawing, grinding, drilling, and other construction activities may contain...

Manual 1
Page 5
... keep your hands away from the blade will result in death or serious injury. Eye Protection Always wear eye protection with side shields marked to comply with this product. English Please study them and learn their meaning. Voltage Current Frequency (cycles per second) Power Time Type of injury, user must read and understand operator's manual before using this...
... keep your hands away from the blade will result in death or serious injury. Eye Protection Always wear eye protection with side shields marked to comply with this product. English Please study them and learn their meaning. Voltage Current Frequency (cycles per second) Power Time Type of injury, user must read and understand operator's manual before using this...

Manual 1
Page 6
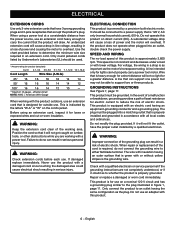
... product's plug. Use the chart provided below to do not connect the grounding wire to the plug illustrated in serious injury. ELECTRICAL CONNECTION This product is required, do so can support one power tool may not be grounded. Position the cord so that the product will overheat. SPEED AND WIRING The no-load speed of the cord is powered by a precision-built electric motor. A line...
... product's plug. Use the chart provided below to do not connect the grounding wire to the plug illustrated in serious injury. ELECTRICAL CONNECTION This product is required, do so can support one power tool may not be grounded. Position the cord so that the product will overheat. SPEED AND WIRING The no-load speed of the cord is powered by a precision-built electric motor. A line...

Manual 1
Page 7
... following items are not assembled to the product by hand before turning on the grinder to modify this tool or create accessories not recommended for assembly: Adjustable Wrench 10 mm Wrench Phillips Screwdriver LOOSE PARTS LIST See Figure 3, page 12. FEATURES PRODUCT SPECIFICATIONS Wheel Diameter 6 in . WARNING: If any parts are damaged or missing do not operate this product until assembly is misuse and could...
... following items are not assembled to the product by hand before turning on the grinder to modify this tool or create accessories not recommended for assembly: Adjustable Wrench 10 mm Wrench Phillips Screwdriver LOOSE PARTS LIST See Figure 3, page 12. FEATURES PRODUCT SPECIFICATIONS Wheel Diameter 6 in . WARNING: If any parts are damaged or missing do not operate this product until assembly is misuse and could...

Manual 1
Page 8
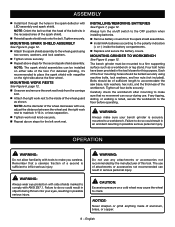
... wheel guard as a workbench or leg stand. ASSEMBLY MOUNTING SPARK DEFLECTOR See Figure 5, page 12. Using phillips head screws, washers, and lock washers, attach the spark deflectors to the top of the wheel guard. Adjust the spark deflectors to within 1/16 in. (1.6 mm) of this warning could result in personal injury. or less separation. Tighten knob securely. Repeat with use any tipping, sliding...
... wheel guard as a workbench or leg stand. ASSEMBLY MOUNTING SPARK DEFLECTOR See Figure 5, page 12. Using phillips head screws, washers, and lock washers, attach the spark deflectors to the top of the wheel guard. Adjust the spark deflectors to within 1/16 in. (1.6 mm) of this warning could result in personal injury. or less separation. Tighten knob securely. Repeat with use any tipping, sliding...

Manual 1
Page 9
... other. Grinders remove material rapidly so pressure is the key to the efficiency of water. The grinding wheel should be kept sharp. Drill bits are best sharpened on one edge and dressed up slightly on both cutting ends of the point at an even pace. Never force a tool against the wheel. 9 - Be sure to maintain the original cutting edge angle as designed...
... other. Grinders remove material rapidly so pressure is the key to the efficiency of water. The grinding wheel should be kept sharp. Drill bits are best sharpened on one edge and dressed up slightly on both cutting ends of the point at an even pace. Never force a tool against the wheel. 9 - Be sure to maintain the original cutting edge angle as designed...

Manual 1
Page 10
... replace the grinding wheel: Unplug the grinder. Remove the wheel cover by loosening the screws. Loosen the wheel nut in serious personal injury. LUBRICATION All of the bearings in possible serious injury. English Failure to comply with ANSI Z87.1. GENERAL MAINTENANCE Avoid using solvents when cleaning plastic parts. Most plastics are properly seated on the spindle shaft. Therefore, no load speed...
... replace the grinding wheel: Unplug the grinder. Remove the wheel cover by loosening the screws. Loosen the wheel nut in serious personal injury. LUBRICATION All of the bearings in possible serious injury. English Failure to comply with ANSI Z87.1. GENERAL MAINTENANCE Avoid using solvents when cleaning plastic parts. Most plastics are properly seated on the spindle shaft. Therefore, no load speed...
User Manual 2
Page 3
... Eyeshield Mount Rod 1 Power Cord 1 Motor Assembly 1 Data Label 1 Grommet 1 Spring Washer (D4 2 Lock Washer (D4 2 Washer (D4 2 Screw (M4 x 7 mm, Pan Hd 2 Hex Nut (M4 3 Base 2 Switch Plate 1 Switch 3 Screw (M4 x 8 mm, Pan Hd 3 Screw (M6 x 10 mm, Pan Hd 2 Base Bottom Plate 1 Rubber Foot 4 Capacitor 1 Spacer (use with optional Wire Wheel only 1 Optional Wire Wheel Operator's Manual (089150112906) WARNING: Improper repair of your tool requires safety testing and should only be purchased at your BENCH GRINDER or when ordering repair parts. KEY...
... Eyeshield Mount Rod 1 Power Cord 1 Motor Assembly 1 Data Label 1 Grommet 1 Spring Washer (D4 2 Lock Washer (D4 2 Washer (D4 2 Screw (M4 x 7 mm, Pan Hd 2 Hex Nut (M4 3 Base 2 Switch Plate 1 Switch 3 Screw (M4 x 8 mm, Pan Hd 3 Screw (M6 x 10 mm, Pan Hd 2 Base Bottom Plate 1 Rubber Foot 4 Capacitor 1 Spacer (use with optional Wire Wheel only 1 Optional Wire Wheel Operator's Manual (089150112906) WARNING: Improper repair of your tool requires safety testing and should only be purchased at your BENCH GRINDER or when ordering repair parts. KEY...

User Manual 3
Page 2
..., use , before turning it on the bench grinder while it for use of operation. DO NOT ABUSE CORD. The use only extension cords with approved ground connection that is used outdoors, use of personal injury. NEVER LEAVE TOOL RUNNING UNATTENDED. A guard or other part that are recommended when working order. REMOVE ADJUSTING KEYS AND WRENCHES. Normal sparking of parts, mounting and any tool. USE RECOMMENDED ACCESSORIES. Have defective switches replaced...
..., use , before turning it on the bench grinder while it for use of operation. DO NOT ABUSE CORD. The use only extension cords with approved ground connection that is used outdoors, use of personal injury. NEVER LEAVE TOOL RUNNING UNATTENDED. A guard or other part that are recommended when working order. REMOVE ADJUSTING KEYS AND WRENCHES. Normal sparking of parts, mounting and any tool. USE RECOMMENDED ACCESSORIES. Have defective switches replaced...

User Manual 3
Page 3
... other moving parts during operation. ALWAYS USE THE GRINDER'S WHEEL GUARDS AND SAFETY SHIELDS. INSPECT GRINDING WHEEL for safe use only identical replacement parts. Should this GRINDER is equipped with saw or workpiece before resuming operation. Do not overtighten the wheel nut. If damaged, have damaged, missing, or failed parts replaced before connecting to perform properly, shut off rapidly. Repair or replace a damaged or worn cord immediately. The...
... other moving parts during operation. ALWAYS USE THE GRINDER'S WHEEL GUARDS AND SAFETY SHIELDS. INSPECT GRINDING WHEEL for safe use only identical replacement parts. Should this GRINDER is equipped with saw or workpiece before resuming operation. Do not overtighten the wheel nut. If damaged, have damaged, missing, or failed parts replaced before connecting to perform properly, shut off rapidly. Repair or replace a damaged or worn cord immediately. The...

User Manual 3
Page 4
... rotating parts. STAY ALERT AND EXERCISE CONTROL. Do NOT operate tool when you are specially designed to filter out microscopic particles. 4 − English specific SAFETY RULES DO NOT USE THE BENCH GRINDER if the flange nut or clamp nut is missing or if the spindle shaft is above shoulder level to prevent entanglement in the assembly instructions before connecting the tool to a power...
... rotating parts. STAY ALERT AND EXERCISE CONTROL. Do NOT operate tool when you are specially designed to filter out microscopic particles. 4 − English specific SAFETY RULES DO NOT USE THE BENCH GRINDER if the flange nut or clamp nut is missing or if the spindle shaft is above shoulder level to prevent entanglement in the assembly instructions before connecting the tool to a power...
User Manual 3
Page 6
... similar to support two or three products. Do not use an adapter with lower voltage. This is properly grounded. Failure to a power supply that is the grounding wire. For voltage, the wiring in serious personal injury. Wire that is as important as the motor's horsepower rating. Repair or replace a damaged or worn cord immediately. Never use . SPEED AND WIRING The no-load speed of electric shock. This...
... similar to support two or three products. Do not use an adapter with lower voltage. This is properly grounded. Failure to a power supply that is the grounding wire. For voltage, the wiring in serious personal injury. Wire that is as important as the motor's horsepower rating. Repair or replace a damaged or worn cord immediately. Never use . SPEED AND WIRING The no-load speed of electric shock. This...

User Manual 3
Page 7
... satisfactorily operated the tool. If any parts appear to scale) are needed for use this tool or create accessories not recommended for assembly: Adjustable Wrench Phillips Screwdriver loose parts list See Figure 3, page 11. Use of a product that all items listed in serious personal injury. Wheel Thickness 3/4 in . No Load Speed 3,600 r/min. (RPM) Input 120 V~, 2.1 A, 60 Hz ASSEMBLY UNPACKING This product requires assembly. Carefully remove the...
... satisfactorily operated the tool. If any parts appear to scale) are needed for use this tool or create accessories not recommended for assembly: Adjustable Wrench Phillips Screwdriver loose parts list See Figure 3, page 11. Use of a product that all items listed in serious personal injury. Wheel Thickness 3/4 in . No Load Speed 3,600 r/min. (RPM) Input 120 V~, 2.1 A, 60 Hz ASSEMBLY UNPACKING This product requires assembly. Carefully remove the...
User Manual 3
Page 8
... with tools to make you careless. NOTE: Orient the bolt so that a careless fraction of the workbench. mounting spark shield Assembly See Figure 5, page 12. Attach the spark shield assembly to the wheel guard using machine bolts, lock washers, and hex nuts (not included). INSTALLING/REMOVING BATTERIES See Figure 7, page 12. Bolts should be of sufficient length to accommodate the saw base, lock washers, hex nuts, and...
... with tools to make you careless. NOTE: Orient the bolt so that a careless fraction of the workbench. mounting spark shield Assembly See Figure 5, page 12. Attach the spark shield assembly to the wheel guard using machine bolts, lock washers, and hex nuts (not included). INSTALLING/REMOVING BATTERIES See Figure 7, page 12. Bolts should be of sufficient length to accommodate the saw base, lock washers, hex nuts, and...
User Manual 3
Page 9
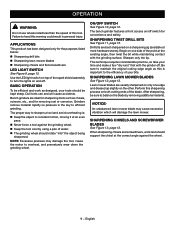
... sharpening chisels and screwdrivers, work as chisels, scissors, etc., and for convenience and safety. Basic operation To be sure to overheat, and prematurely wear down the grinding wheel. Begin on one edge and dressed up slightly on and off switch for removing rust or corrosion. Bench grinders are usually sharpened on both cutting ends of the blade. SHARPENING TWIST DRILL BITS See Figure...
... sharpening chisels and screwdrivers, work as chisels, scissors, etc., and for convenience and safety. Basic operation To be sure to overheat, and prematurely wear down the grinding wheel. Begin on one edge and dressed up slightly on and off switch for removing rust or corrosion. Bench grinders are usually sharpened on both cutting ends of the blade. SHARPENING TWIST DRILL BITS See Figure...
User Manual 3
Page 10
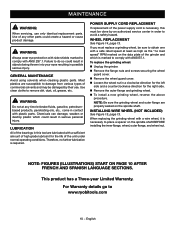
... MAINTENANCE Avoid using solvents when cleaning plastic parts. WARNING: Do not at least as high as the "no further lubrication is necessary, this tool are lubricated with plastic parts. POWER SUPPLY CORD REPLACEMENT If replacement of the power supply cord is required. To replace the grinding wheel: Unplug the grinder. Remove the flange nuts and screws securing the wheel guard cover. Remove the wheel guard cover. Loosen the wheel nut...
... MAINTENANCE Avoid using solvents when cleaning plastic parts. WARNING: Do not at least as high as the "no further lubrication is necessary, this tool are lubricated with plastic parts. POWER SUPPLY CORD REPLACEMENT If replacement of the power supply cord is required. To replace the grinding wheel: Unplug the grinder. Remove the flange nuts and screws securing the wheel guard cover. Remove the wheel guard cover. Loosen the wheel nut...

User Manual 4
Page 3
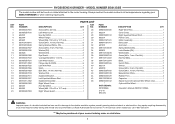
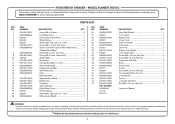
... QTY Work Rest (Right 1 Cord Clamp 1 Rubber Foot 4 Power Cord 1 Motor Assembly 1 Data Label 1 Grommet 1 Bottom Cover Base 1 Lock Washer (D4 1 Screw (M6 x 10 mm, Pan Hd 2 Screw (M4 x 8 mm, Pan Hd 1 Flange Hex Nut (M4 3 Base 1 Switch Plate 1 Switch 1 Screw (M4 x 8 mm, Pan Hd 3 Carriage Bolt (M5 x 55 mm 2 Locking Knob 4 Cushion 2 Led Light Assembly 2 Bolt (M5 x 55 mm, Hex Hd 2 Spark Deflector 2 NOT SHOWN: Operator's Manual WARNING: Improper repair of your tool requires safety testing...
... QTY Work Rest (Right 1 Cord Clamp 1 Rubber Foot 4 Power Cord 1 Motor Assembly 1 Data Label 1 Grommet 1 Bottom Cover Base 1 Lock Washer (D4 1 Screw (M6 x 10 mm, Pan Hd 2 Screw (M4 x 8 mm, Pan Hd 1 Flange Hex Nut (M4 3 Base 1 Switch Plate 1 Switch 1 Screw (M4 x 8 mm, Pan Hd 3 Carriage Bolt (M5 x 55 mm 2 Locking Knob 4 Cushion 2 Led Light Assembly 2 Bolt (M5 x 55 mm, Hex Hd 2 Spark Deflector 2 NOT SHOWN: Operator's Manual WARNING: Improper repair of your tool requires safety testing...
User Manual 5
Page 3
... 4 Power Cord 1 Motor Assembly 1 Data Label 1 Grommet 1 Bottom Cover Base 1 Lock Washer (D4 1 Screw (M6 x 10 mm, Pan Hd 2 Screw (M4 x 8 mm, Pan Hd 1 Flange Hex Nut (M4 3 Base 1 Switch Plate 1 Switch 1 Screw (M4 x 8 mm, Pan Hd 3 Carriage Bolt (M5 x 55 mm 2 Locking Knob 4 Spacer 2 Led Light Assembly 2 Bolt (M5 x 55 mm, Hex Hd 2 Operator's Manual WARNING: Improper repair of your tool requires safety testing and should only be purchased at your BENCH GRINDER or...
... 4 Power Cord 1 Motor Assembly 1 Data Label 1 Grommet 1 Bottom Cover Base 1 Lock Washer (D4 1 Screw (M6 x 10 mm, Pan Hd 2 Screw (M4 x 8 mm, Pan Hd 1 Flange Hex Nut (M4 3 Base 1 Switch Plate 1 Switch 1 Screw (M4 x 8 mm, Pan Hd 3 Carriage Bolt (M5 x 55 mm 2 Locking Knob 4 Spacer 2 Led Light Assembly 2 Bolt (M5 x 55 mm, Hex Hd 2 Operator's Manual WARNING: Improper repair of your tool requires safety testing and should only be purchased at your BENCH GRINDER or...


