
Warranty (English)
Page 1
...due to incorrect operation or maintenance • Connection to you purchased the product at a retail store location, take your Rocketfish product during the Warranty Period of God, such as the original packaging. This warranty is determined to be purchased from an... instruction • Installation • Set up adjustments • Cosmetic damage • Damage due to acts of a defect covered by an authorized Rocketfish repair center or store personnel, Rocketfish will (at no charge with the product. 1 Year Limited Warranty Rocketfish Products ("Rocketfish") warrants to an...
...due to incorrect operation or maintenance • Connection to you purchased the product at a retail store location, take your Rocketfish product during the Warranty Period of God, such as the original packaging. This warranty is determined to be purchased from an... instruction • Installation • Set up adjustments • Cosmetic damage • Damage due to acts of a defect covered by an authorized Rocketfish repair center or store personnel, Rocketfish will (at no charge with the product. 1 Year Limited Warranty Rocketfish Products ("Rocketfish") warrants to an...
User Manual (English)
Page 3
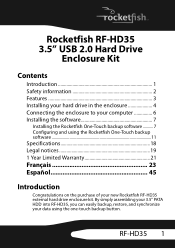
RF-HD35 1 Rocketfish RF-HD35 3.5" USB 2.0 Hard Drive Enclosure Kit Contents Introduction 1 Safety information 2 Features 3 Installing your hard drive in the enclosure 4 Connecting the enclosure to your new Rocketfish RF-HD35 external hard drive enclosure kit. By simply assembling your 3.5" PATA HDD into RF-HD35, you can easily backup, restore, and synchronize your data using the Rocketfish One-Touch backup software 11 Specifications...
RF-HD35 1 Rocketfish RF-HD35 3.5" USB 2.0 Hard Drive Enclosure Kit Contents Introduction 1 Safety information 2 Features 3 Installing your hard drive in the enclosure 4 Connecting the enclosure to your new Rocketfish RF-HD35 external hard drive enclosure kit. By simply assembling your 3.5" PATA HDD into RF-HD35, you can easily backup, restore, and synchronize your data using the Rocketfish One-Touch backup software 11 Specifications...
User Manual (English)
Page 4
... 90%, and can affect the reliability of data transfer to constitute a risk of important operating and maintenance (servicing) instructions in the accessory package. 7 Before you install or use the device, please read the User manual and assemble the enclosure carefully. 8 To prevent short circuits, do not leave any metal objects inside...
... 90%, and can affect the reliability of data transfer to constitute a risk of important operating and maintenance (servicing) instructions in the accessory package. 7 Before you install or use the device, please read the User manual and assemble the enclosure carefully. 8 To prevent short circuits, do not leave any metal objects inside...
User Manual (English)
Page 6
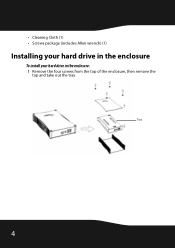
Tray 4 • Cleaning Cloth (1) • Screws package (includes Allen wrench) (1) Installing your hard drive in the enclosure To install your hard drive in the enclosure: 1 Remove the four screws from the top of the enclosure, then remove the top and take out the tray.
Tray 4 • Cleaning Cloth (1) • Screws package (includes Allen wrench) (1) Installing your hard drive in the enclosure To install your hard drive in the enclosure: 1 Remove the four screws from the top of the enclosure, then remove the top and take out the tray.
User Manual (English)
Page 9
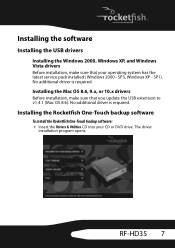
No additional driver is required. RF-HD35 7 SP1). No additional driver is required. The driver installation program opens. Installing the Rocketfish One-Touch backup software To install the Rocketfish One-Touch backup software: 1 Insert the Drivers & Utilities CD into your operating system has the latest service pack installed (Windows 2000 - Installing the software Installing the USB drivers Installing the Windows 2000, Windows...
No additional driver is required. RF-HD35 7 SP1). No additional driver is required. The driver installation program opens. Installing the Rocketfish One-Touch backup software To install the Rocketfish One-Touch backup software: 1 Insert the Drivers & Utilities CD into your operating system has the latest service pack installed (Windows 2000 - Installing the software Installing the USB drivers Installing the Windows 2000, Windows...
User Manual (English)
Page 10
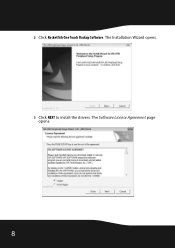
The Software License Agreement page opens. 8 The Installation Wizard opens. 3 Click NEXT to install the drivers. 2 Click Rocketfish One Touch Backup Software.
The Software License Agreement page opens. 8 The Installation Wizard opens. 3 Click NEXT to install the drivers. 2 Click Rocketfish One Touch Backup Software.
User Manual (English)
Page 11
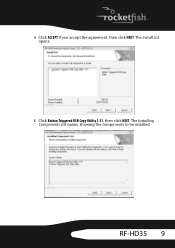
4 Click ACCEPT if you accept the agreement, then click NEXT. The Install List opens. 5 Click Button Triggered USB Copy Utility 1.51, then click NEXT. RF-HD35 9 The Installing Components List opens, showing the components to be installed.
4 Click ACCEPT if you accept the agreement, then click NEXT. The Install List opens. 5 Click Button Triggered USB Copy Utility 1.51, then click NEXT. RF-HD35 9 The Installing Components List opens, showing the components to be installed.
User Manual (English)
Page 12
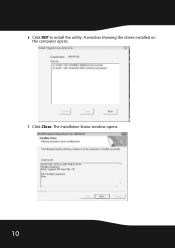
The Installation Status window opens. 10 6 Click NEXT to install the utility. A window showing the drives installed on the computer opens. 7 Click Close.
The Installation Status window opens. 10 6 Click NEXT to install the utility. A window showing the drives installed on the computer opens. 7 Click Close.
User Manual (English)
Page 13
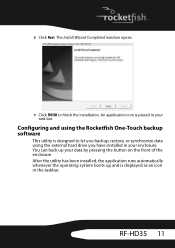
... in your enclosure. You can back up and is designed to finish the installation. After the utility has been installed, the application runs automatically whenever the operating system boots up your task bar. The Install Wizard Completed window opens. 9 Click FINISH to let you backup, restore, ...or synchronize data using the external hard drive you have installed in your data by pressing the button on the front of the enclosure. RF-HD35 11 8 Click Next. Configuring and using the Rocketfish One-Touch backup software This utility is displayed as an icon in the...
... in your enclosure. You can back up and is designed to finish the installation. After the utility has been installed, the application runs automatically whenever the operating system boots up your task bar. The Install Wizard Completed window opens. 9 Click FINISH to let you backup, restore, ...or synchronize data using the external hard drive you have installed in your data by pressing the button on the front of the enclosure. RF-HD35 11 8 Click Next. Configuring and using the Rocketfish One-Touch backup software This utility is displayed as an icon in the...
User Manual (English)
Page 14
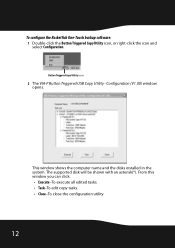
Configuration (V1.00) window opens. The supported disk will be shown with an asterisk(*). To configure the Rocketfish One-Touch backup software: 1 Double-click the Button Triggered Copy Utility icon, or right-click the icon and select Configuration. This window shows the computer name and the disks installed in the system. Button Triggered Copy Utility icon 2 The VIA-P Button Triggered USB Copy Utility - From this window you can click: • Execute-To execute all edited tasks. • Task-To edit copy tasks. • Close-To close the configuration utility. 12
Configuration (V1.00) window opens. The supported disk will be shown with an asterisk(*). To configure the Rocketfish One-Touch backup software: 1 Double-click the Button Triggered Copy Utility icon, or right-click the icon and select Configuration. This window shows the computer name and the disks installed in the system. Button Triggered Copy Utility icon 2 The VIA-P Button Triggered USB Copy Utility - From this window you can click: • Execute-To execute all edited tasks. • Task-To edit copy tasks. • Close-To close the configuration utility. 12
User Manual (English)
Page 20
... USB icon into the TRASH. • Unplug the enclosure. Disconnecting the enclosure from your computer To disconnect the enclosure from your computer without hard drive installed USB 2.0 (USB 1.1 compatible) 480 Mbps AC power adapter (AC input: 100~240 V/ 0.8 A Max., 50~60 Hz DC output: DC 12 V +5/-8% / 0~2 A Max.) Aluminum with mirror treatment...
... USB icon into the TRASH. • Unplug the enclosure. Disconnecting the enclosure from your computer To disconnect the enclosure from your computer without hard drive installed USB 2.0 (USB 1.1 compatible) 480 Mbps AC power adapter (AC input: 100~240 V/ 0.8 A Max., 50~60 Hz DC output: DC 12 V +5/-8% / 0~2 A Max.) Aluminum with mirror treatment...
User Manual (English)
Page 23
... of protection as you own your original receipt and the Product to the store you purchased it from an authorized dealer of Rocketfish brand products and packaged with new or rebuilt comparable products or parts. or (2) replace the Product at no charge with this...RF-HD35 21 HOW LONG DOES THE COVERAGE LAST? WHAT DOES THIS WARRANTY COVER? If you purchased the Product at its sole option): (1) repair the Product with the Product. If you purchased the Product from the purchase of the Product ("Warranty Period"). This warranty does not cover: • Customer instruction • Installation...
... of protection as you own your original receipt and the Product to the store you purchased it from an authorized dealer of Rocketfish brand products and packaged with new or rebuilt comparable products or parts. or (2) replace the Product at no charge with this...RF-HD35 21 HOW LONG DOES THE COVERAGE LAST? WHAT DOES THIS WARRANTY COVER? If you purchased the Product at its sole option): (1) repair the Product with the Product. If you purchased the Product from the purchase of the Product ("Warranty Period"). This warranty does not cover: • Customer instruction • Installation...