User Manual (English)
Page 3
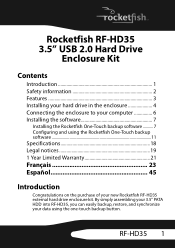
RF-HD35 1 Rocketfish RF-HD35 3.5" USB 2.0 Hard Drive Enclosure Kit Contents Introduction 1 Safety information 2 Features 3 Installing your hard drive in the enclosure 4 Connecting the enclosure to your new Rocketfish RF-HD35 external hard drive enclosure kit. By simply assembling your 3.5" PATA HDD into RF-HD35, you can easily backup, restore, and synchronize your data using the Rocketfish One-Touch backup software 11 Specifications 18 Legal notices 19 1 Year...
RF-HD35 1 Rocketfish RF-HD35 3.5" USB 2.0 Hard Drive Enclosure Kit Contents Introduction 1 Safety information 2 Features 3 Installing your hard drive in the enclosure 4 Connecting the enclosure to your new Rocketfish RF-HD35 external hard drive enclosure kit. By simply assembling your 3.5" PATA HDD into RF-HD35, you can easily backup, restore, and synchronize your data using the Rocketfish One-Touch backup software 11 Specifications 18 Legal notices 19 1 Year...
User Manual (English)
Page 4
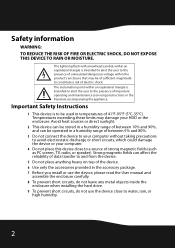
... read the User manual and assemble the enclosure carefully. 8 To prevent short circuits, do not leave any metal objects inside the enclosure when installing the hard drive. 9 To prevent short circuits, do not use the device close to the presence of electric shock. Temperatures exceeding these limits may be stored in temperatures...
... read the User manual and assemble the enclosure carefully. 8 To prevent short circuits, do not leave any metal objects inside the enclosure when installing the hard drive. 9 To prevent short circuits, do not use the device close to the presence of electric shock. Temperatures exceeding these limits may be stored in temperatures...
User Manual (English)
Page 5
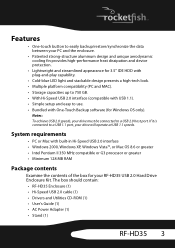
Features • One-touch button to easily backup/restore/synchronize the data between your RF-HD35 USB 2.0 Hard Drive Enclosure Kit. System requirements • PC or Mac with built-in Hi-Speed USB 2.0 interface • Windows 2000, Windows XP, Windows ...and Utilities CD-ROM (1) • User's Guide (1) • AC Power Adapter (1) • Stand (1) RF-HD35 3 Notes: To achieve USB 2.0 speeds, your drive will operate at USB 1.1 speeds. If it is connected to a USB 1.1 port, your drive must be connected to use. • Bundled with One-Touch Backup software (for Windows OS only).
Features • One-touch button to easily backup/restore/synchronize the data between your RF-HD35 USB 2.0 Hard Drive Enclosure Kit. System requirements • PC or Mac with built-in Hi-Speed USB 2.0 interface • Windows 2000, Windows XP, Windows ...and Utilities CD-ROM (1) • User's Guide (1) • AC Power Adapter (1) • Stand (1) RF-HD35 3 Notes: To achieve USB 2.0 speeds, your drive will operate at USB 1.1 speeds. If it is connected to a USB 1.1 port, your drive must be connected to use. • Bundled with One-Touch Backup software (for Windows OS only).
User Manual (English)
Page 6
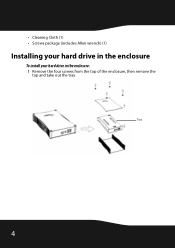
Tray 4 • Cleaning Cloth (1) • Screws package (includes Allen wrench) (1) Installing your hard drive in the enclosure To install your hard drive in the enclosure: 1 Remove the four screws from the top of the enclosure, then remove the top and take out the tray.
Tray 4 • Cleaning Cloth (1) • Screws package (includes Allen wrench) (1) Installing your hard drive in the enclosure To install your hard drive in the enclosure: 1 Remove the four screws from the top of the enclosure, then remove the top and take out the tray.
User Manual (English)
Page 7
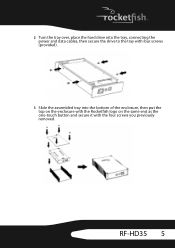
RF-HD35 5 2 Turn the tray over, place the hard drive into the tray, connecting the power and data cables, then secure the drive to the tray with four screws (provided). 3 Slide the assembled tray into the bottom of the enclosure, then put the top on the enclosure with the Rocketfish logo on the same end as the one-touch button and secure it with the four screws you previously removed.
RF-HD35 5 2 Turn the tray over, place the hard drive into the tray, connecting the power and data cables, then secure the drive to the tray with four screws (provided). 3 Slide the assembled tray into the bottom of the enclosure, then put the top on the enclosure with the Rocketfish logo on the same end as the one-touch button and secure it with the four screws you previously removed.
User Manual (English)
Page 8
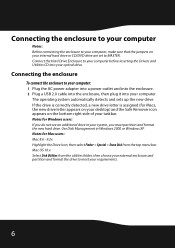
...menu bar. Connect the Hard Drive Enclosure to your computer before inserting the Drivers and Utilities CD into your system, you must partition and format the new hard drive. If the drive is correctly detected, a new drive letter is assigned (for Macs, the new drive letter appears on your ...desktop) and the Safe Remover icon appears on your optical drive. Use Disk Management in your computer. Connecting ...
...menu bar. Connect the Hard Drive Enclosure to your computer before inserting the Drivers and Utilities CD into your system, you must partition and format the new hard drive. If the drive is correctly detected, a new drive letter is assigned (for Macs, the new drive letter appears on your ...desktop) and the Safe Remover icon appears on your optical drive. Use Disk Management in your computer. Connecting ...
User Manual (English)
Page 13
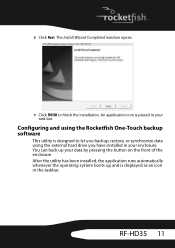
... task bar. Configuring and using the external hard drive you backup, restore, or synchronize data using the Rocketfish One-Touch backup software This utility is designed to finish the installation. The Install Wizard Completed window opens. 9 Click FINISH to let you have installed in the taskbar. RF-HD35 11 8 Click Next. An application icon is...
... task bar. Configuring and using the external hard drive you backup, restore, or synchronize data using the Rocketfish One-Touch backup software This utility is designed to finish the installation. The Install Wizard Completed window opens. 9 Click FINISH to let you have installed in the taskbar. RF-HD35 11 8 Click Next. An application icon is...
User Manual (English)
Page 20
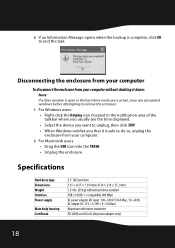
...V +5/-8% / 0~2 A Max.) Aluminum with mirror treatment FCC (EMI) and UL/cUL (for power adapter only) 18 Specifications Hard drive type Dimensions Weight Interface Power supply Main body housing Certificate 3.5" IDE hard drive 5.35 × 8.27 × 1.39 inches (136 × 210 × 35.2 mm) 1.21 lbs. (550... g) without shutting it down: Note: If a drive window is open or the hard drive enclosure is active, close any associated windows before attempting to remove the enclosure. 1 For Windows users: • Right-click the Hotplug icon...
...V +5/-8% / 0~2 A Max.) Aluminum with mirror treatment FCC (EMI) and UL/cUL (for power adapter only) 18 Specifications Hard drive type Dimensions Weight Interface Power supply Main body housing Certificate 3.5" IDE hard drive 5.35 × 8.27 × 1.39 inches (136 × 210 × 35.2 mm) 1.21 lbs. (550... g) without shutting it down: Note: If a drive window is open or the hard drive enclosure is active, close any associated windows before attempting to remove the enclosure. 1 For Windows users: • Right-click the Hotplug icon...

