Quick Setup Guide (English)
Page 1
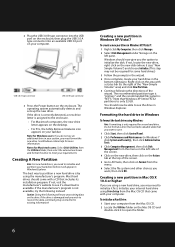
... connect to a USB 2.0 port, but it will appear in Windows Explorer or on your Mac desktop. See Windows online help for details. For Windows users: 1 Click Start, then Control Panel. 2 Click Performance and Maintenance, then Administrative Tools. 3 Click Computer Management, then click Disk Management from your computer. Using one-touch backup To use one -touch backup if you need to initialize and partition your hard drive before installing the software. • Before installing the backup software, make sure that your Windows operating...
... connect to a USB 2.0 port, but it will appear in Windows Explorer or on your Mac desktop. See Windows online help for details. For Windows users: 1 Click Start, then Control Panel. 2 Click Performance and Maintenance, then Administrative Tools. 3 Click Computer Management, then click Disk Management from your computer. Using one-touch backup To use one -touch backup if you need to initialize and partition your hard drive before installing the software. • Before installing the backup software, make sure that your Windows operating...

User Manual (English)
Page 2
...Features...3 Package contents 3 System requirements 3 Setting up your hard drive enclosure 4 Installing your hard drive in the enclosure 4 Connecting the enclosure to your computer 5 Installing the software 8 Using your enclosure 9 Backing up your files 9 Starting Roxio Back On Track 9 Selecting files to back up 10 Creating a new Backup Files project 11 Using the Backup Files scheduler 12 Backup Files options 13 Restoring files 14 Disconnecting the enclosure from your computer 14 Uninstalling the backup software 14 Troubleshooting 15 Specifications...15 Legal notices ...15 One...
...Features...3 Package contents 3 System requirements 3 Setting up your hard drive enclosure 4 Installing your hard drive in the enclosure 4 Connecting the enclosure to your computer 5 Installing the software 8 Using your enclosure 9 Backing up your files 9 Starting Roxio Back On Track 9 Selecting files to back up 10 Creating a new Backup Files project 11 Using the Backup Files scheduler 12 Backup Files options 13 Restoring files 14 Disconnecting the enclosure from your computer 14 Uninstalling the backup software 14 Troubleshooting 15 Specifications...15 Legal notices ...15 One...

User Manual (English)
Page 3
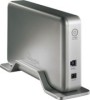
... enclosure. • Has one power-on LED, with an available USB 3.0 port. (You can connect to a source of data transfer to and from the device. • Do not place anything heavy on your computer. • Do not place this device to water, rain, or high humidity. Important safety instructions • This device is present within your new Rocketfish RF-HD3035 external hard drive enclosure kit. This symbol indicates that dangerous voltage...
... enclosure. • Has one power-on LED, with an available USB 3.0 port. (You can connect to a source of data transfer to and from the device. • Do not place anything heavy on your computer. • Do not place this device to water, rain, or high humidity. Important safety instructions • This device is present within your new Rocketfish RF-HD3035 external hard drive enclosure kit. This symbol indicates that dangerous voltage...
User Manual (English)
Page 4
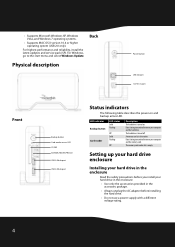
... and the memory card. For Windows, go to the Start menu and select Windows Update. Back Physical description Power button USB 3.0 port 12V DC in the enclosure Read the safety precautions before you install your computer and the hard drive. Data is turned off. Setting up your hard drive enclosure Installing your hard drive in port Front Backup button Card reader access LED CF/MD SD/MMC/MS/MS PRO/xD USB 3.0 hub port USB 3.0 hub port Status indicators The following table describes...
... and the memory card. For Windows, go to the Start menu and select Windows Update. Back Physical description Power button USB 3.0 port 12V DC in the enclosure Read the safety precautions before you install your computer and the hard drive. Data is turned off. Setting up your hard drive enclosure Installing your hard drive in port Front Backup button Card reader access LED CF/MD SD/MMC/MS/MS PRO/xD USB 3.0 hub port USB 3.0 hub port Status indicators The following table describes...
User Manual (English)
Page 5
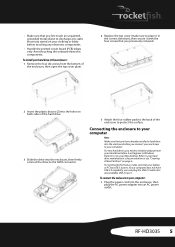
... need to your hard drive manufacturer's documentation or see "Creating A New Partition" on your Mac desktop. For new hard drives, you can plug the USB 3.0 cable into an AC power outlet. Refer to initialize and partition your computer. If your computer does not have already installed a hard drive into the enclosure, then firmly connect the drive to the SATA connector. 5 Attach the four rubber pads to the back of the enclosure, then open the...
... need to your hard drive manufacturer's documentation or see "Creating A New Partition" on your Mac desktop. For new hard drives, you can plug the USB 3.0 cable into an AC power outlet. Refer to initialize and partition your computer. If your computer does not have already installed a hard drive into the enclosure, then firmly connect the drive to the SATA connector. 5 Attach the four rubber pads to the back of the enclosure, then open the...
User Manual (English)
Page 6
.... Do not format a drive that contains valuable data that Windows XP limits FAT32 partitions to open the folder. 6 USB 3.0 A-type connector USB 3.0 B-type connector 3 Press the Power button on the enclosure. Most hard drives should come with a status bar (to initialize and partition your hard drive in Windows Explorer. You should now give you must format the new drive. Creating a new partition in Mac OS X 10.4 or higher If you are using a new hard drive, you want to save. 1 Click Start, then click...
.... Do not format a drive that contains valuable data that Windows XP limits FAT32 partitions to open the folder. 6 USB 3.0 A-type connector USB 3.0 B-type connector 3 Press the Power button on the enclosure. Most hard drives should come with a status bar (to initialize and partition your hard drive in Windows Explorer. You should now give you must format the new drive. Creating a new partition in Mac OS X 10.4 or higher If you are using a new hard drive, you want to save. 1 Click Start, then click...
User Manual (English)
Page 7
... the Type menu in the correct direction. Caution: Make sure that software drivers be installed before connecting them to Low level format, then click OK. RF-HD3035 7 To format the hard drive: 1 Start the Disk Utility tool (under its memory card icon. 4 Click Start. If initialization fails, do so may result in your camera or by the manufacturer. When installing a USB device, always follow the USB peripheral's installation instructions provided by using . 3 To access files and folders...
... the Type menu in the correct direction. Caution: Make sure that software drivers be installed before connecting them to Low level format, then click OK. RF-HD3035 7 To format the hard drive: 1 Start the Disk Utility tool (under its memory card icon. 4 Click Start. If initialization fails, do so may result in your camera or by the manufacturer. When installing a USB device, always follow the USB peripheral's installation instructions provided by using . 3 To access files and folders...
User Manual (English)
Page 8
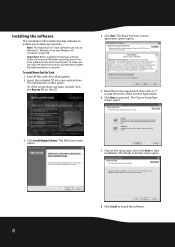
... Windows operating system has been updated to install the software. 8 No additional driver is required. Note: This Roxio Back On Track software runs only on the CD. 4 Click Next. Or, if the screen does not open, double-click the Run.exe file on Windows 7, Windows Vista, and Windows XP computers using USB. Important: Before installing the backup software, make sure you to back up your files. The Ready to Install screen opens...
... Windows operating system has been updated to install the software. 8 No additional driver is required. Note: This Roxio Back On Track software runs only on the CD. 4 Click Next. Or, if the screen does not open, double-click the Run.exe file on Windows 7, Windows Vista, and Windows XP computers using USB. Important: Before installing the backup software, make sure you to back up your files. The Ready to Install screen opens...

User Manual (English)
Page 9
..., or monthly. RF-HD3035 9 A Backup Files project can choose to archive all the files in the selected path or just certain types of the enclosure. -ORClick Start, BackOnTrack (folder), then click BackOnTrack. 3 To back up important files to run the software, the Product Registration screen opens. 10 When installation is complete, the Setup Wizard Completed screen opens. 2 Complete the product registration information as required. Several preset file categories are...
..., or monthly. RF-HD3035 9 A Backup Files project can choose to archive all the files in the selected path or just certain types of the enclosure. -ORClick Start, BackOnTrack (folder), then click BackOnTrack. 3 To back up important files to run the software, the Product Registration screen opens. 10 When installation is complete, the Setup Wizard Completed screen opens. 2 Complete the product registration information as required. Several preset file categories are...
User Manual (English)
Page 10
... is located on the drive or in the folder you selected to archive. Your entire My Music folder (Windows XP) or Music folder (Windows Vista and Windows 7) is included if it is located on the Backup options panel. By default, files will be selected from the project window: Email, Financial, Music, Photos, Productivity, and Video and Recorded TV. In Windows XP, your Pictures, Videos...
... is located on the drive or in the folder you selected to archive. Your entire My Music folder (Windows XP) or Music folder (Windows Vista and Windows 7) is included if it is located on the Backup options panel. By default, files will be selected from the project window: Email, Financial, Music, Photos, Productivity, and Video and Recorded TV. In Windows XP, your Pictures, Videos...
User Manual (English)
Page 11
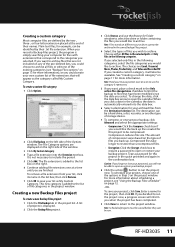
... the Only archive files changed since checkbox to limit the backup to the list of the Options window. Note: Hold your backup project. 8 Click the action button to the project window. RF-HD3035 11 Creating a custom category Most computer files are defined by their names. To create a custom file category: 1 Click Options. 2 Click File Backup on different source drives cannot be available. This new category is simply...
... the Only archive files changed since checkbox to limit the backup to the list of the Options window. Note: Hold your backup project. 8 Click the action button to the project window. RF-HD3035 11 Creating a custom category Most computer files are defined by their names. To create a custom file category: 1 Click Options. 2 Click File Backup on different source drives cannot be available. This new category is simply...
User Manual (English)
Page 12
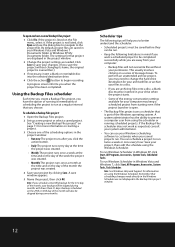
..., click Open and use your Windows scheduling software to customize when your computer: • Backup Files will help you to change the hard drive destination for more information on the day of message boxes. To open . • The Backup Files project uses a scheduler that scheduling changes made directly in the Windows Scheduler are not displayed in your Windows Vista and Windows 7 Documents folder or Windows XP My Documents folder. See "Creating a new Backup Files project" on using the scheduler...
..., click Open and use your Windows scheduling software to customize when your computer: • Backup Files will help you to change the hard drive destination for more information on the day of message boxes. To open . • The Backup Files project uses a scheduler that scheduling changes made directly in the Windows Scheduler are not displayed in your Windows Vista and Windows 7 Documents folder or Windows XP My Documents folder. See "Creating a new Backup Files project" on using the scheduler...
User Manual (English)
Page 13
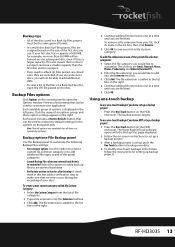
... instructions for setting up a backup project: 1 Press the One-Touch button on the HDD enclosure. RF-HD3035 13 The file extension is set up, push the One-Touch button to the list box on the right. 4 Continue adding file extensions one at a time until you have NOT set up files to an external hard drive. • Verify data written to the disc after burning-A check mark in this option to create a custom file...
... instructions for setting up a backup project: 1 Press the One-Touch button on the HDD enclosure. RF-HD3035 13 The file extension is set up, push the One-Touch button to the list box on the right. 4 Continue adding file extensions one at a time until you have NOT set up files to an external hard drive. • Verify data written to the disc after burning-A check mark in this option to create a custom file...
User Manual (English)
Page 14
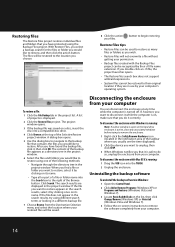
... are in use by your permission. • Backup files created with the Backup Files project can be recognized by their original location if they are displayed in the project window. 6 Select the files and folders you would like to remove the software completely from your computer. 14 To disconnect the enclosure while Mac OS X is displayed. 2 Click the Restore Files project. Uninstalling the backup software To uninstall the backup software in the...
... are in use by your permission. • Backup files created with the Backup Files project can be recognized by their original location if they are displayed in the project window. 6 Select the files and folders you would like to remove the software completely from your computer. 14 To disconnect the enclosure while Mac OS X is displayed. 2 Click the Restore Files project. Uninstalling the backup software To uninstall the backup software in the...
User Manual (English)
Page 15
... is a USB icon in the toolbar when Windows was booting. Power supply AC power adapter (12 V/3 A) Indicator Compatibility Power-on the back of the computer instead of this product is not broken. • Open the enclosure and make sure that may cause harmful interference to provide reasonable protection against harmful interference in accordance with Part 15 of the FCC Rules. RF-HD3035 15 Specifications Hard drive type 3.5" SATA HDD, up to...
... is a USB icon in the toolbar when Windows was booting. Power supply AC power adapter (12 V/3 A) Indicator Compatibility Power-on the back of the computer instead of this product is not broken. • Open the enclosure and make sure that may cause harmful interference to provide reasonable protection against harmful interference in accordance with Part 15 of the FCC Rules. RF-HD3035 15 Specifications Hard drive type 3.5" SATA HDD, up to...

User Manual (English)
Page 16
Canada ICES-003 statement This Class B digital apparatus complies with the FCC Rules could void the user's authority to operate this equipment. FCC warning Changes or modifications not expressly approved by the party responsible for help. • Increase the separation between the equipment and receiver. • Connect the equipment into an outlet on a circuit different from that to which the receiver is connected. • Consult the dealer or an experienced technician for compliance with Canadian ICES-003. 16
Canada ICES-003 statement This Class B digital apparatus complies with the FCC Rules could void the user's authority to operate this equipment. FCC warning Changes or modifications not expressly approved by the party responsible for help. • Increase the separation between the equipment and receiver. • Connect the equipment into an outlet on a circuit different from that to which the receiver is connected. • Consult the dealer or an experienced technician for compliance with Canadian ICES-003. 16
User Manual (English)
Page 17
One-year limited warranty Rocketfish Products ("Rocketfish") warrants to you, the original purchaser of this new RF-HD3035 ("Product"), that the Product shall be free of defects in the original manufacture of the material or workmanship for one (1) year from an online web site, mail your original receipt and the Product to an incorrect voltage supply • Attempted repair by an authorized Rocketfish repair center or store personnel, Rocketfish will (at no...
One-year limited warranty Rocketfish Products ("Rocketfish") warrants to you, the original purchaser of this new RF-HD3035 ("Product"), that the Product shall be free of defects in the original manufacture of the material or workmanship for one (1) year from an online web site, mail your original receipt and the Product to an incorrect voltage supply • Attempted repair by an authorized Rocketfish repair center or store personnel, Rocketfish will (at no...

User Manual (English)
Page 18
All rights reserved. All other products and brand names are trademarks of BBY Solutions, Inc. ROCKETFISH is a trademark of their respective owners. 10-1087 ENGLISH www.rocketfishproducts.com (800) 620-2790 Distributed by Best Buy Purchasing, LLC 7601 Penn Avenue South, Richfield, MN 55423-3645 USA © 2010 BBY Solutions, Inc.
All rights reserved. All other products and brand names are trademarks of BBY Solutions, Inc. ROCKETFISH is a trademark of their respective owners. 10-1087 ENGLISH www.rocketfishproducts.com (800) 620-2790 Distributed by Best Buy Purchasing, LLC 7601 Penn Avenue South, Richfield, MN 55423-3645 USA © 2010 BBY Solutions, Inc.


