User Manual (English)
Page 2
Rocketfish RF-AHD35 3.5" Hard Drive Enclosure Kit Contents Introduction 2 Safety information 3 Features 3 Using the hard drive enclosure 7 Appendix 25 Troubleshooting 28 Specifications 30 Legal notices 31 One-year limited warranty 33 Introduction Congratulations on your purchase of the Rocketfish RF-AHD35 SATA Hard Drive Enclosure Kit. You can install a high-speed SATA hard drive into this enclosure and connect it to a computer using either a USB 2.0 or eSATA port. This enclosure also has a built-in USB 2.0 hub and memory card reader. 2
Rocketfish RF-AHD35 3.5" Hard Drive Enclosure Kit Contents Introduction 2 Safety information 3 Features 3 Using the hard drive enclosure 7 Appendix 25 Troubleshooting 28 Specifications 30 Legal notices 31 One-year limited warranty 33 Introduction Congratulations on your purchase of the Rocketfish RF-AHD35 SATA Hard Drive Enclosure Kit. You can install a high-speed SATA hard drive into this enclosure and connect it to a computer using either a USB 2.0 or eSATA port. This enclosure also has a built-in USB 2.0 hub and memory card reader. 2
User Manual (English)
Page 3
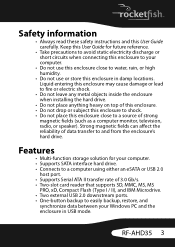
...top of this enclosure. • Do not drop or subject this enclosure to shock. • Do not place this enclosure in USB mode. RF-AHD35 3 Strong magnetic fields can affect the reliability of strong magnetic fields (such as a computer monitor, television, radio, or speaker). Safety information ..., restore, and synchronize data between your Windows PC and the enclosure in damp locations. Keep this User Guide for your computer. • Supports SATA interface hard drive. • Connects to a computer using either an eSATA or USB 2.0 host port. • Supports Serial ATA II transfer ...
...top of this enclosure. • Do not drop or subject this enclosure to shock. • Do not place this enclosure in USB mode. RF-AHD35 3 Strong magnetic fields can affect the reliability of strong magnetic fields (such as a computer monitor, television, radio, or speaker). Safety information ..., restore, and synchronize data between your Windows PC and the enclosure in damp locations. Keep this User Guide for your computer. • Supports SATA interface hard drive. • Connects to a computer using either an eSATA or USB 2.0 host port. • Supports Serial ATA II transfer ...
User Manual (English)
Page 4
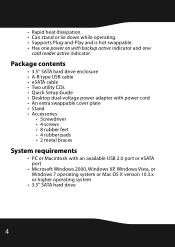
Package contents • 3.5" SATA hard drive enclosure • A-B type USB cable • eSATA cable • Two utility CDs • Quick Setup Guide • Desktop dual-voltage power adapter with ... or eSATA port • Microsoft Windows 2000, Windows XP, Windows Vista, or Windows 7 operating system or Mac OS X version 10.3.x or higher operating system • 3.5" SATA hard drive 4 • Rapid heat dissipation. • Can stand or lie down while operating. • Supports Plug-and-Play and is hot swappable. • Has...
Package contents • 3.5" SATA hard drive enclosure • A-B type USB cable • eSATA cable • Two utility CDs • Quick Setup Guide • Desktop dual-voltage power adapter with ... or eSATA port • Microsoft Windows 2000, Windows XP, Windows Vista, or Windows 7 operating system or Mac OS X version 10.3.x or higher operating system • 3.5" SATA hard drive 4 • Rapid heat dissipation. • Can stand or lie down while operating. • Supports Plug-and-Play and is hot swappable. • Has...
User Manual (English)
Page 7
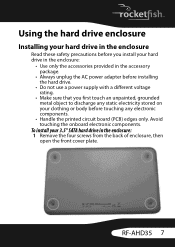
... unpainted, grounded metal object to discharge any electronic components. • Handle the printed circuit board (PCB) edges only. RF-AHD35 7 To install your clothing or body before touching any static electricity stored on your 3.5" SATA hard drive in the enclosure: 1 Remove the four screws from the back of enclosure, then open the front...
... unpainted, grounded metal object to discharge any electronic components. • Handle the printed circuit board (PCB) edges only. RF-AHD35 7 To install your clothing or body before touching any static electricity stored on your 3.5" SATA hard drive in the enclosure: 1 Remove the four screws from the back of enclosure, then open the front...
User Manual (English)
Page 8
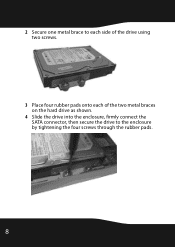
2 Secure one metal brace to each side of the drive using two screws. 3 Place four rubber pads onto each of the two metal braces on the hard drive as shown. 4 Slide the drive into the enclosure, firmly connect the SATA connector, then secure the drive to the enclosure by tightening the four screws through the rubber pads. 8
2 Secure one metal brace to each side of the drive using two screws. 3 Place four rubber pads onto each of the two metal braces on the hard drive as shown. 4 Slide the drive into the enclosure, firmly connect the SATA connector, then secure the drive to the enclosure by tightening the four screws through the rubber pads. 8
User Manual (English)
Page 10
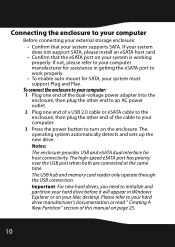
... to initialize and partition your hard drive before it will appear in getting the eSATA port to work properly. • To enable auto mount for SATA, your system must support Plug and Play. To connect the enclosure to your computer: 1 Plug one end of the dual-voltage power adapter into the...
... to initialize and partition your hard drive before it will appear in getting the eSATA port to work properly. • To enable auto mount for SATA, your system must support Plug and Play. To connect the enclosure to your computer: 1 Plug one end of the dual-voltage power adapter into the...
User Manual (English)
Page 29
... issues. Refer to your enclosure and computer. • Make sure that the SATA cable or the USB cable is connected firmly to "Creating A New Partition" on the back of the PC instead of a mechanical pencil or paper clip. RF-AHD35 29 My memory card does not appear in My Computer or Windows Explorer...
... issues. Refer to your enclosure and computer. • Make sure that the SATA cable or the USB cable is connected firmly to "Creating A New Partition" on the back of the PC instead of a mechanical pencil or paper clip. RF-AHD35 29 My memory card does not appear in My Computer or Windows Explorer...
User Manual (English)
Page 30
Hard drive type Dimensions Interface to drive Interface to the computer Connectors/buttons front Connectors/buttons back 3.5"SATA HDD 1.67 × 8.74 × 5.19 in the same slot. Specifications Specifications are subject to store does not exceed the capacity of your memory card. ... switch is fully inserted into the slot. • Try a different memory card of the same type in (42.5 × 222 × 132 mm) D×W×L SATA USB 2.0 / eSATA • Backup button • Memory card reader (two slots) • Two USB ports • Power button • DC power jack • B type ...
Hard drive type Dimensions Interface to drive Interface to the computer Connectors/buttons front Connectors/buttons back 3.5"SATA HDD 1.67 × 8.74 × 5.19 in the same slot. Specifications Specifications are subject to store does not exceed the capacity of your memory card. ... switch is fully inserted into the slot. • Try a different memory card of the same type in (42.5 × 222 × 132 mm) D×W×L SATA USB 2.0 / eSATA • Backup button • Memory card reader (two slots) • Two USB ports • Power button • DC power jack • B type ...