

Operation Manual
Page 2
table of contents General Safety Instructions 2 Specific Safety Instructions 3 Additional Instructions for Safe Operation 4 Symbols 5 Electrical 6 Lasers 7 Glossary 7 Features 8 Tools Needed 11 Loose Parts 11 Assembly 12 Adjustments 13 Operation 18 Maintenance 31 Troubleshooting 33 Warranty 34
table of contents General Safety Instructions 2 Specific Safety Instructions 3 Additional Instructions for Safe Operation 4 Symbols 5 Electrical 6 Lasers 7 Glossary 7 Features 8 Tools Needed 11 Loose Parts 11 Assembly 12 Adjustments 13 Operation 18 Maintenance 31 Troubleshooting 33 Warranty 34
Operation Manual
Page 3
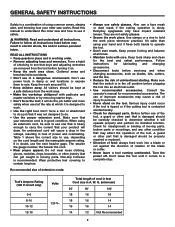
... see that keys and adjusting wrenches are not safety glasses. • Secure the work piece whenever practical. Don't use in moving parts, broken parts or mountings, and any other jewelry that may cause a risk of using your extension cord is in working order. • Remove...bracelets, or other condition that can get caught in a dangerous environment. Use clamps or a vise to hold the work piece. Check for damaged parts. General safety instructions Safety is a combination of injury to persons. • Never stand on the tool. Cluttered areas and benches invite accidents. ...
... see that keys and adjusting wrenches are not safety glasses. • Secure the work piece whenever practical. Don't use in moving parts, broken parts or mountings, and any other jewelry that may cause a risk of using your extension cord is in working order. • Remove...bracelets, or other condition that can get caught in a dangerous environment. Use clamps or a vise to hold the work piece. Check for damaged parts. General safety instructions Safety is a combination of injury to persons. • Never stand on the tool. Cluttered areas and benches invite accidents. ...
Operation Manual
Page 4
... servicing the saw. • Do not expose to rain or use in a damp location. • When servicing, use only identical replacement parts. • Never reach around the saw table, and position it is too small to be clamped. To avoid motor damage, the motor should... • Support long work piece. This may slip, walk or slide while cutting long or heavy boards. • Never use solvents to clean plastic parts. specific safety instructions � WARNING: for your exposure to these chemicals: • Work in a well-ventilated area. • Work with approved safety...
... servicing the saw. • Do not expose to rain or use in a damp location. • When servicing, use only identical replacement parts. • Never reach around the saw table, and position it is too small to be clamped. To avoid motor damage, the motor should... • Support long work piece. This may slip, walk or slide while cutting long or heavy boards. • Never use solvents to clean plastic parts. specific safety instructions � WARNING: for your exposure to these chemicals: • Work in a well-ventilated area. • Work with approved safety...
Operation Manual
Page 5
.... Wear a face mask or a dust mask if the operation is marked to this product may cause serious and permanent respiratory or other part that the operator of electric shock, fire or serious injury. • Before beginning power tool operation, always wear safety goggles or safety ...reduce the risk of the saw wears. • Inspect the tool cords periodically and, if damaged, have these instructions. A guard or other part that is damaged should be carefully checked to them frequently and use them repaired by a qualified person. • Save these instructions also. 4...
.... Wear a face mask or a dust mask if the operation is marked to this product may cause serious and permanent respiratory or other part that the operator of electric shock, fire or serious injury. • Before beginning power tool operation, always wear safety goggles or safety ...reduce the risk of the saw wears. • Inspect the tool cords periodically and, if damaged, have these instructions. A guard or other part that is damaged should be carefully checked to them frequently and use them repaired by a qualified person. • Save these instructions also. 4...
Operation Manual
Page 7
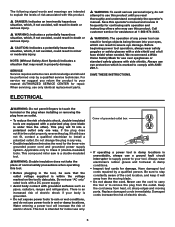
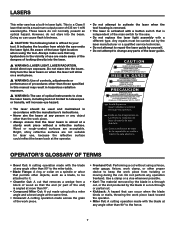
...manual. Electrical �WARNING: Do not permit fingers to touch the terminal or the plug when installing or removing the plug from the moving parts. Do not change the plug in any power tool can result in severe eye damage. Water entering a power tool will fit into your ...To reduce the risk of electric shock, double-insulated tools are intended to explain the levels of electric shock. When servicing, use only identical replacement parts. � WARNING: To avoid serious personal injury, do not use power tools in minor or moderate injury. We recommend a Wide Vision Safety ...
...manual. Electrical �WARNING: Do not permit fingers to touch the terminal or the plug when installing or removing the plug from the moving parts. Do not change the plug in any power tool can result in severe eye damage. Water entering a power tool will fit into your ...To reduce the risk of electric shock, double-insulated tools are intended to explain the levels of electric shock. When servicing, use only identical replacement parts. � WARNING: To avoid serious personal injury, do not use power tools in minor or moderate injury. We recommend a Wide Vision Safety ...
Operation Manual
Page 8
... terms • Bevel Cut: A cutting operation made with the blade at any object other than the work piece. • Always ensure that the end (or part of the end) is independent of the main switch for the saw. • Do not replace the laser light assembly with the manufacture's instructions. •... 90° to the fence. 7 Avoid direct eye exposure. Any repairs must be used and maintained in a non-through cut . • Kickback: A hazard that any parts of the laser guide.
... terms • Bevel Cut: A cutting operation made with the blade at any object other than the work piece. • Always ensure that the end (or part of the end) is independent of the main switch for the saw. • Do not replace the laser light assembly with the manufacture's instructions. •... 90° to the fence. 7 Avoid direct eye exposure. Any repairs must be used and maintained in a non-through cut . • Kickback: A hazard that any parts of the laser guide.
Operation Manual
Page 12
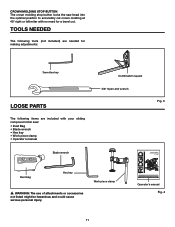
...for making adjustments: 3mm Hex key Loose parts The following items are included with your sliding compound miter saw head into the optimal position to accurately cut crown molding at 45° right or left miter with no need for buying a RIDGID product. 1-866-974-3443/USA SAVE ... • Operator's manual Blade wrench Combination square 3/8" Open-end wrench Fig. 3 OPERATOR'S MANUAL 10 INCH SLIDING COMPOUND MITER SAW WITH DUAL LASER MS255SR Dust bag Hex key � WARNING: The use of injury, the user must read and understand the operator's manual before using this product. Thank...
...for making adjustments: 3mm Hex key Loose parts The following items are included with your sliding compound miter saw head into the optimal position to accurately cut crown molding at 45° right or left miter with no need for buying a RIDGID product. 1-866-974-3443/USA SAVE ... • Operator's manual Blade wrench Combination square 3/8" Open-end wrench Fig. 3 OPERATOR'S MANUAL 10 INCH SLIDING COMPOUND MITER SAW WITH DUAL LASER MS255SR Dust bag Hex key � WARNING: The use of injury, the user must read and understand the operator's manual before using this product. Thank...
Operation Manual
Page 13
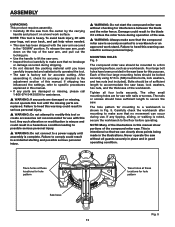
...modification is complete. Failure to make sure that the compound miter saw is securely mounted to specific procedures explained in this manual. • If any parts are damaged or missing, please call 1-866-974-3443/USA for assistance. � WARNING: If any tipping, sliding, or walking is noted, secure.... The hole pattern for mounting to make sure that we can occur during shipping. • Do not discard the packing material until the missing parts are for use with the saw arm, push down on a level work stand. To release the saw arm secured in serious personal injury. &#...
...modification is complete. Failure to make sure that the compound miter saw is securely mounted to specific procedures explained in this manual. • If any parts are damaged or missing, please call 1-866-974-3443/USA for assistance. � WARNING: If any tipping, sliding, or walking is noted, secure.... The hole pattern for mounting to make sure that we can occur during shipping. • Do not discard the packing material until the missing parts are for use with the saw arm, push down on a level work stand. To release the saw arm secured in serious personal injury. &#...

Operation Manual
Page 30
... the top of the molding is very easy for correct Miter setting. Fig. 36 29 Angle the molding so the bottom of the molding (the part which goes against the wall when installed) is against the ceiling and the wall, the sum of the angles of Cut 0° Inside corner - Key...
... the top of the molding is very easy for correct Miter setting. Fig. 36 29 Angle the molding so the bottom of the molding (the part which goes against the wall when installed) is against the ceiling and the wall, the sum of the angles of Cut 0° Inside corner - Key...
Operation Manual
Page 33
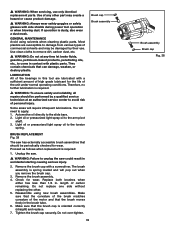
...cap is required. � WARNING: To ensure safety and reliability, all repairs should be performed by their use only identical replacement parts. Remove the brush assembly. 4. length of personal injury. Make sure that should be periodically checked for wear. Brush cap Brush ...when blowing dust. Replace both brushes when either has less than 1/4 in the brush tube. 6. Reassemble using solvents when cleaning plastic parts. Make sure that the curvature of the brush matches curvature of commercial solvents and may create a hazard or cause product damage. &#...
...cap is required. � WARNING: To ensure safety and reliability, all repairs should be performed by their use only identical replacement parts. Remove the brush assembly. 4. length of personal injury. Make sure that should be periodically checked for wear. Brush cap Brush ...when blowing dust. Replace both brushes when either has less than 1/4 in the brush tube. 6. Reassemble using solvents when cleaning plastic parts. Make sure that the curvature of the brush matches curvature of commercial solvents and may create a hazard or cause product damage. &#...
Operation Manual
Page 34
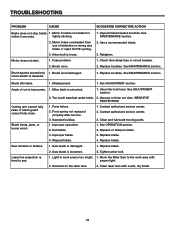
...out dust. Cutting arm cannot fully raise or blade guard cannot fully close. Improper operation. 2. Warped blade. 1. Clean and lubricate moving parts. 1. Replace blade. 4. Replace blade. Saw blade is unlocked. 1. Laser line projection is inaccurate. 1. Move the Miter Saw to...service. 3. See OPERATION section. 2. Saw vibrates or shakes. 1. Tighten arbor bolt. lightly sticking. 2. Replace brushes. See ADJUSTMENT section. Parts failure. 2. Contact authorized service center. 2. Replace or sharpen blade. 3. Saw blade is loose. Replace blade. 2. Motor brushes not seated...
...out dust. Cutting arm cannot fully raise or blade guard cannot fully close. Improper operation. 2. Warped blade. 1. Clean and lubricate moving parts. 1. Replace blade. 4. Replace blade. Saw blade is unlocked. 1. Laser line projection is inaccurate. 1. Move the Miter Saw to...service. 3. See OPERATION section. 2. Saw vibrates or shakes. 1. Tighten arbor bolt. lightly sticking. 2. Replace brushes. See ADJUSTMENT section. Parts failure. 2. Contact authorized service center. 2. Replace or sharpen blade. 3. Saw blade is loose. Replace blade. 2. Motor brushes not seated...

Operation Manual
Page 35
... This warranty gives you specific legal rights, and you . HOW TO OBTAIN SERVICE To obtain service for this RIDGID® Hand Held or Stationary Power Tool for any part covered under state law are not responsible for the balance of purchase must present the original dated sales receipt. are... limited to the RIDGID® website at (toll free) 1-866-974-3443. 90-DAY SATISFACTION GUARANTEE POLICY During the ...
... This warranty gives you specific legal rights, and you . HOW TO OBTAIN SERVICE To obtain service for this RIDGID® Hand Held or Stationary Power Tool for any part covered under state law are not responsible for the balance of purchase must present the original dated sales receipt. are... limited to the RIDGID® website at (toll free) 1-866-974-3443. 90-DAY SATISFACTION GUARANTEE POLICY During the ...

Operation Manual
Page 36
Be sure to the motor housing. Serial No. OPERATOR'S MANUAL 10 INCH SLIDING COMPOUND MITER SAW WITH DUAL LASER MS255SR CUSTOMER SERVICE INFORMATION For parts or service, call . Please record the serial number in the space provided below. When ordering repair parts, always give the following information: Model No. The model number of this tool is found on a plate attached to provide all relevant information when you call 1-866-974-3443. MS255SR 35
Be sure to the motor housing. Serial No. OPERATOR'S MANUAL 10 INCH SLIDING COMPOUND MITER SAW WITH DUAL LASER MS255SR CUSTOMER SERVICE INFORMATION For parts or service, call . Please record the serial number in the space provided below. When ordering repair parts, always give the following information: Model No. The model number of this tool is found on a plate attached to provide all relevant information when you call 1-866-974-3443. MS255SR 35


